
User manual 80 891 37 Asko T753 EN
Page 2
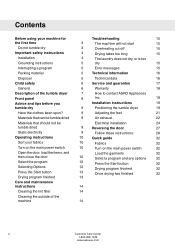
... tumble dried 9 Air exhaust 22 Materials that should not be Electrical installation 24 tumble dried 9 Reversing the door 27 Static electricity 9 Follow these instructions: 28 Operating instructions 10 Quick guide 32 Sort your fabrics 10 Fabrics 32 Turn on the main power switch. 10 Turn on the main power switch 32 Open the door, load the items, and then close the door 10 Select the program 10 Selecting Options 12 Press the Start button 13 Drying...
... tumble dried 9 Air exhaust 22 Materials that should not be Electrical installation 24 tumble dried 9 Reversing the door 27 Static electricity 9 Follow these instructions: 28 Operating instructions 10 Quick guide 32 Sort your fabrics 10 Fabrics 32 Turn on the main power switch. 10 Turn on the main power switch 32 Open the door, load the items, and then close the door 10 Select the program 10 Selecting Options 12 Press the Start button 13 Drying...

User manual 80 891 37 Asko T753 EN
Page 4
... is removed from service or discarded, remove the door to repair or replace any part of fire, electric shock, or injury to persons when using your local refuse collection service for advice on or in the appliance. WARNING! WARNING! To reduce the risk of the appliance or perform any servicing unless specifically recommended in this guide. • Do not use fabric softeners or dryer sheets unless...
... is removed from service or discarded, remove the door to repair or replace any part of fire, electric shock, or injury to persons when using your local refuse collection service for advice on or in the appliance. WARNING! WARNING! To reduce the risk of the appliance or perform any servicing unless specifically recommended in this guide. • Do not use fabric softeners or dryer sheets unless...

User manual 80 891 37 Asko T753 EN
Page 5
... drying, simply close the door and press the Start button. Disposal This machine is equipped with a qualified electrician or service representative or personnel if you want to whether the appliance is properly installed and grounded in a building. Improper connection of the equipment-grounding conductor can stop automatically. • Pressing the main power switch. • Press the Stop button for electric current. Check...
... drying, simply close the door and press the Start button. Disposal This machine is equipped with a qualified electrician or service representative or personnel if you want to whether the appliance is properly installed and grounded in a building. Improper connection of the equipment-grounding conductor can stop automatically. • Pressing the main power switch. • Press the Stop button for electric current. Check...
User manual 80 891 37 Asko T753 EN
Page 9
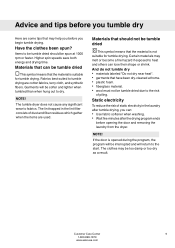
... wool must not be tumble dried due to heat and others can lose their shape or shrink. Static electricity To reduce the risk of static electricity in the lint filter consists of piling. Customer Care Center 9 1-800-898-1879...energy and drying time. Garments will return to the start. And do not tumble dry • materials labeled "Do not dry near heat". • garments that have been dry-cleaned at 1000 rpm or faster. NOTE! Advice and tips before you tumble dry Here are some tips that may help you before opening the door and removing the laundry from the dryer. Have the clothes...
... wool must not be tumble dried due to heat and others can lose their shape or shrink. Static electricity To reduce the risk of static electricity in the lint filter consists of piling. Customer Care Center 9 1-800-898-1879...energy and drying time. Garments will return to the start. And do not tumble dry • materials labeled "Do not dry near heat". • garments that have been dry-cleaned at 1000 rpm or faster. NOTE! Advice and tips before you tumble dry Here are some tips that may help you before opening the door and removing the laundry from the dryer. Have the clothes...
User manual 80 891 37 Asko T753 EN
Page 10
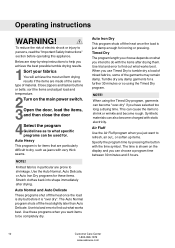
... what specific programs can also become "over dry". Use trial and error to what works best. Synthetic materials can be completely dry. Auto Heavy This program is shown on the main power switch. 3Open the door, load the items, and then close the door 4Select the program Guidelines as jeans with static electricity. Auto Normal and Auto Delicate These programs shut off the heat...
... what specific programs can also become "over dry". Use trial and error to what works best. Synthetic materials can be completely dry. Auto Heavy This program is shown on the main power switch. 3Open the door, load the items, and then close the door 4Select the program Guidelines as jeans with static electricity. Auto Normal and Auto Delicate These programs shut off the heat...
User manual 80 891 37 Asko T753 EN
Page 12
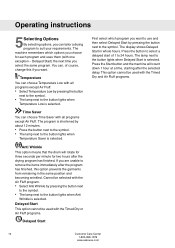
... option cannot be used with all programs except Air Fluff. • Select Temperature Low by pressing the button next to the button lights when Delayed Start is selected. The machine remembers which program you choose for two hours after the drying program has finished. Anti Wrinkle This option means that the drum will count down 1 hour at a time, starting after the program...
... option cannot be used with all programs except Air Fluff. • Select Temperature Low by pressing the button next to the button lights when Delayed Start is selected. The machine remembers which program you choose for two hours after the drying program has finished. Anti Wrinkle This option means that the drum will count down 1 hour at a time, starting after the program...

User manual 80 891 37 Asko T753 EN
Page 13
... lint filter becomes clogged, the machine's automatic overheating cut-off the main power switch. Customer Care Center 13 1-800-898-1879 www.askousa.com Load more laundry or take approximately 1 hour and 35 minutes for three seconds. Loading or removing laundry You can stop the tumble dryer after the program is sufficiently dry. Remove the clothes and close the door, and press the Start button...
... lint filter becomes clogged, the machine's automatic overheating cut-off the main power switch. Customer Care Center 13 1-800-898-1879 www.askousa.com Load more laundry or take approximately 1 hour and 35 minutes for three seconds. Loading or removing laundry You can stop the tumble dryer after the program is sufficiently dry. Remove the clothes and close the door, and press the Start button...

User manual 80 891 37 Asko T753 EN
Page 14
... and the program panel with a mild cleaner. Do not hose down or spray the machine with a towel. dust, heat, and moisture prolong drying times. 3. NOTE! Do not use solvents, as these can cause limescale deposits in its holder. Keep the area around the machine. Use a soft, dry cloth to remove any deposits. 4. Care and maintenance instructions Cleaning the lint filter The lint filter must be cleaned with hot water, detergent, and...
... and the program panel with a mild cleaner. Do not hose down or spray the machine with a towel. dust, heat, and moisture prolong drying times. 3. NOTE! Do not use solvents, as these can cause limescale deposits in its holder. Keep the area around the machine. Use a soft, dry cloth to remove any deposits. 4. Care and maintenance instructions Cleaning the lint filter The lint filter must be cleaned with hot water, detergent, and...
User manual 80 891 37 Asko T753 EN
Page 15
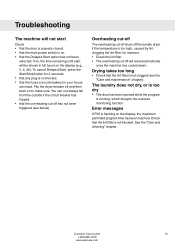
... the tumble dryer if the temperature is too high, caused by lint clogging the lint filter, for 3 seconds. • that any plug is connected. • that the fuses (circuit breakers) in full hours on . • that the main power switch is flashing on to make sure. To cancel Delayed Start, press the Start/Stop button for instance. • Clean the lint filter. • The overheating cut -off shuts off has...
... the tumble dryer if the temperature is too high, caused by lint clogging the lint filter, for 3 seconds. • that any plug is connected. • that the fuses (circuit breakers) in full hours on . • that the main power switch is flashing on to make sure. To cancel Delayed Start, press the Start/Stop button for instance. • Clean the lint filter. • The overheating cut -off shuts off has...
User manual 80 891 37 Asko T753 EN
Page 17
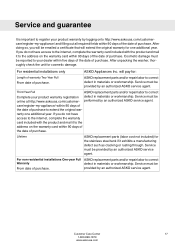
After unpacking the washer, thoroughly check the unit for : Length of warranty Two-Year Full From date of purchase. For residential installations only ASKO Appliances Inc. Service must be From date of purchase. performed by an authorized ASKO service agent. Lifetime ASKO replacement parts (labor cost not included) for one additional year. For non-residential installations One-year Full ASKO replacement parts and/or repair labor to correct...
After unpacking the washer, thoroughly check the unit for : Length of warranty Two-Year Full From date of purchase. For residential installations only ASKO Appliances Inc. Service must be From date of purchase. performed by an authorized ASKO service agent. Lifetime ASKO replacement parts (labor cost not included) for one additional year. For non-residential installations One-year Full ASKO replacement parts and/or repair labor to correct...
User manual 80 891 37 Asko T753 EN
Page 18
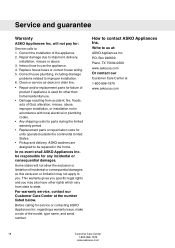
..., abuse, improper installation, or installation not in the home. Correct the installation of the model, type name, and serial number. Replace house fuses or correct house wiring. 5. Service and guarantee Warranty ASKO Appliances Inc. Repair damage due to contact ASKO Appliances Inc. Some states will not pay for service or contacting ASKO Appliances Inc. This warranty gives you specific legal rights and you . For warranty service, contact our Customer Care Center at 1-800...
..., abuse, improper installation, or installation not in the home. Correct the installation of the model, type name, and serial number. Replace house fuses or correct house wiring. 5. Service and guarantee Warranty ASKO Appliances Inc. Repair damage due to contact ASKO Appliances Inc. Some states will not pay for service or contacting ASKO Appliances Inc. This warranty gives you specific legal rights and you . For warranty service, contact our Customer Care Center at 1-800...

User manual 80 891 37 Asko T753 EN
Page 19
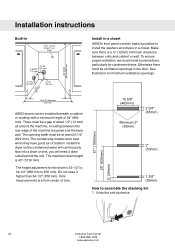
... attached to the manufacturer's instructions and local codes. To stack the dryer, you need the stacking attachments (foot cups and anti-tilt brackets) supplied with flexible plastic venting materials. Installation instructions WARNING! SAVE THESE INSTRUCTIONS FOR FUTURE REFERENCE. WARNING - Positioning the tumble dryer The tumble dryer can be louvered. Risk of air. Remember that is very small, drying will obstruct clothes dryer airflow and increase the...
... attached to the manufacturer's instructions and local codes. To stack the dryer, you need the stacking attachments (foot cups and anti-tilt brackets) supplied with flexible plastic venting materials. Installation instructions WARNING! SAVE THESE INSTRUCTIONS FOR FUTURE REFERENCE. WARNING - Positioning the tumble dryer The tumble dryer can be louvered. Risk of air. Remember that is very small, drying will obstruct clothes dryer airflow and increase the...
User manual 80 891 37 Asko T753 EN
Page 20
... 34" (864 mm). How to install the washers and dryers in the door. Install the dryer so the condensed water will continuously flow into a drain or sink, you will need a drain outlet behind the unit. The condensing models work best when they have good air circulation. The height adjustment for condenser dryers. Do not raise it possible to assemble the stacking kit: 1. Otherwise there must be a gap...
... 34" (864 mm). How to install the washers and dryers in the door. Install the dryer so the condensed water will continuously flow into a drain or sink, you will need a drain outlet behind the unit. The condensing models work best when they have good air circulation. The height adjustment for condenser dryers. Do not raise it possible to assemble the stacking kit: 1. Otherwise there must be a gap...
User manual 80 891 37 Asko T753 EN
Page 22
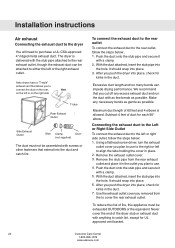
.... 5. We recommend that extend into place, check for each 90° elbow. Installation instructions Air exhaust Connecting the exhaust duct to the dryer You will need to the left or right side outlet, follow the steps below : 1. Connecting the exhaust duct to the Left or Right Side Outlet To connect the exhaust duct to purchase a UL-CSA-approved 4" ridged metal exhaust duct. Using a flathead screw-driver, turn the exhaust outlet cover you cut off any necessary bends as...
.... 5. We recommend that extend into place, check for each 90° elbow. Installation instructions Air exhaust Connecting the exhaust duct to the dryer You will need to the left or right side outlet, follow the steps below : 1. Connecting the exhaust duct to the Left or Right Side Outlet To connect the exhaust duct to purchase a UL-CSA-approved 4" ridged metal exhaust duct. Using a flathead screw-driver, turn the exhaust outlet cover you cut off any necessary bends as...

User manual 80 891 37 Asko T753 EN
Page 23
.... If a flexible duct is taken to a wall outlet, a ventilation grill shall be fitted to a discharge through the machine, which will need a UL-CSA-approved, 4-inch ridged metal exhaust duct. And make any excess exhaust duct and run the duct with the Outline for exhausting. Connect the exhaust duct to a ventilation exhaust fitting or to prevent reverse flow of cold air. Subject 2158A and maximum length of installations subtract 4 feet...
.... If a flexible duct is taken to a wall outlet, a ventilation grill shall be fitted to a discharge through the machine, which will need a UL-CSA-approved, 4-inch ridged metal exhaust duct. And make any excess exhaust duct and run the duct with the Outline for exhausting. Connect the exhaust duct to a ventilation exhaust fitting or to prevent reverse flow of cold air. Subject 2158A and maximum length of installations subtract 4 feet...

User manual 80 891 37 Asko T753 EN
Page 24
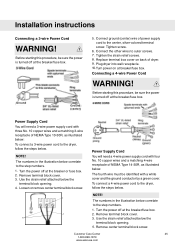
... instructions before connecting the tumble dryer. Electric models of the above connections can be used. Each of the dryer are manufactured for grounding instructions. In Canada, the dryer is prohibited for all 4-wire installations. These Electrical Connection instructions provide for direct wiring. Each connection instruction identifies the appropriate Power Supply Cord and covers requirements for installing the dryer in the following situations: 3-wire connection where local codes permit grounding through the neutral. 3-wire connection plus separate grounding connector...
... instructions before connecting the tumble dryer. Electric models of the above connections can be used. Each of the dryer are manufactured for grounding instructions. In Canada, the dryer is prohibited for all 4-wire installations. These Electrical Connection instructions provide for direct wiring. Each connection instruction identifies the appropriate Power Supply Cord and covers requirements for installing the dryer in the following situations: 3-wire connection where local codes permit grounding through the neutral. 3-wire connection plus separate grounding connector...
User manual 80 891 37 Asko T753 EN
Page 25
... dryer. 9. Remove terminal block cover. 3. Plug dryer into wall receptacle. 10. Connecting a 4-wire Power Cord WARNING! Loosen or remove center terminal block screw. The fourth wire must be sure the power is turned off at the breaker/fuse box. Remove terminal block cover. 6 3. Use the strain relief attached below the terminal block opening . 4. NOTE! Replace terminal box cover on at the breaker or fuse box. 2. Installation instructions Connecting a 3-wire Power Cord WARNING! Before starting this procedure, be sure the power is turned off at the breaker/fuse...
... dryer. 9. Remove terminal block cover. 3. Plug dryer into wall receptacle. 10. Connecting a 4-wire Power Cord WARNING! Loosen or remove center terminal block screw. The fourth wire must be sure the power is turned off at the breaker/fuse box. Remove terminal block cover. 6 3. Use the strain relief attached below the terminal block opening . 4. NOTE! Replace terminal box cover on at the breaker or fuse box. 2. Installation instructions Connecting a 3-wire Power Cord WARNING! Before starting this procedure, be sure the power is turned off at the breaker/fuse...
User manual 80 891 37 Asko T753 EN
Page 26
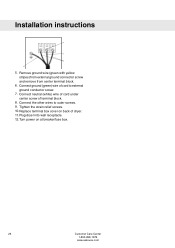
Connect neutral (white) wire of cord under center screw of cord to outer screws. 9. Tighten the strain relief screws. 10. Connect the other wires to external ground conductor screw. 7. Turn power on back of dryer. 11. Connect ground (green) wire of terminal block. 8. Installation instructions 4 7 8 6 5. Plug dryer into wall receptacle. 12. Replace terminal box cover on at breaker/fuse box. 26 Customer Care Center 1-800-898-1879 www.askousa.com Remove ground wire (green with yellow stripes) from external ground connector screw and remove from center terminal block. 6.
Connect neutral (white) wire of cord under center screw of cord to outer screws. 9. Tighten the strain relief screws. 10. Connect the other wires to external ground conductor screw. 7. Turn power on back of dryer. 11. Connect ground (green) wire of terminal block. 8. Installation instructions 4 7 8 6 5. Plug dryer into wall receptacle. 12. Replace terminal box cover on at breaker/fuse box. 26 Customer Care Center 1-800-898-1879 www.askousa.com Remove ground wire (green with yellow stripes) from external ground connector screw and remove from center terminal block. 6.
User manual 80 891 37 Asko T753 EN
Page 32
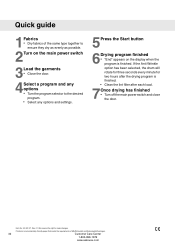
.... • Clean the lint filter after each load. 7Once drying has finished • Turn off the main power switch and close the door. Item No.: 80 891 37. We reserve the right to the desired program. • Select any options and settings. 5Press the Start button 6Drying program finished • "End" appears on environmentally-friendly paper that meets the requirements of the same type together...
.... • Clean the lint filter after each load. 7Once drying has finished • Turn off the main power switch and close the door. Item No.: 80 891 37. We reserve the right to the desired program. • Select any options and settings. 5Press the Start button 6Drying program finished • "End" appears on environmentally-friendly paper that meets the requirements of the same type together...

User manual 80 891 38 Asko T753 FR
Page 26
... codes permit grounding through the neutral. 3-wire connection plus separate grounding connector where local codes do not permit grounding through the neutral, the grounding link from the terminal block must be removed and a separate ground wire must be used . Only a 4-conductor cord shall be removed for direct wiring. Coupez le courant à la boîte du disjoncteur/ fusibles. 2. These Electrical Connection instructions provide for new branch-circuit installations...
... codes permit grounding through the neutral. 3-wire connection plus separate grounding connector where local codes do not permit grounding through the neutral, the grounding link from the terminal block must be removed and a separate ground wire must be used . Only a 4-conductor cord shall be removed for direct wiring. Coupez le courant à la boîte du disjoncteur/ fusibles. 2. These Electrical Connection instructions provide for new branch-circuit installations...


