
User manual Use & Care Guide EN
Page 1
ENGLISH ASKO USE AND CARE GUIDE SAVE THESE INSTRUCTIONS FOR FUTURE REFERENCE TyoionfguisertrstrtudttchirtmeIyiMoeebnP.res,OsbrRteeTpafAoedNrrefToaru!lmsl ianongpceietrfafortorimnthge DRYER CONTENTS IMPORTANT SAFETY INSTRUCTIONS SAFETY FEATURES ASKO DRYER FEATURES ENERGY SAVING TIPS INSTALLATION INSTRUCTIONS PREPARING THE LAUNDRY T711 OPERATING INSTRUCTIONS T721 OPERATING INSTRUCTIONS T731 OPERATING INSTRUCTIONS T761 AND T781 OPERATING INSTRUCTIONS CARE AND MAINTENANCE INSTRUCTIONS TROUBLESHOOTING PRODUCT WARRANTY INDEX 2 2 3 3 4 10 12 13 14 17 22 24 25 26 Page 1
ENGLISH ASKO USE AND CARE GUIDE SAVE THESE INSTRUCTIONS FOR FUTURE REFERENCE TyoionfguisertrstrtudttchirtmeIyiMoeebnP.res,OsbrRteeTpafAoedNrrefToaru!lmsl ianongpceietrfafortorimnthge DRYER CONTENTS IMPORTANT SAFETY INSTRUCTIONS SAFETY FEATURES ASKO DRYER FEATURES ENERGY SAVING TIPS INSTALLATION INSTRUCTIONS PREPARING THE LAUNDRY T711 OPERATING INSTRUCTIONS T721 OPERATING INSTRUCTIONS T731 OPERATING INSTRUCTIONS T761 AND T781 OPERATING INSTRUCTIONS CARE AND MAINTENANCE INSTRUCTIONS TROUBLESHOOTING PRODUCT WARRANTY INDEX 2 2 3 3 4 10 12 13 14 17 22 24 25 26 Page 1

User manual Use & Care Guide EN
Page 2
... service representative or personnel if you close the door and press the Start button. Use common sense and caution when installing, operating, and maintaining any servicing unless specifically recommended in your dryer. Children should be cleaned periodically by providing a..., including the following: ♦ Read all local codes and ordinances. B) Grounding instructions for more information. OVERHEAT PROTECTION ASKO dryers have a proper outlet installed by a licensed electrician. ♦ Do not operate appliance while away from the accumulation of lint, dust and dirt....
... service representative or personnel if you close the door and press the Start button. Use common sense and caution when installing, operating, and maintaining any servicing unless specifically recommended in your dryer. Children should be cleaned periodically by providing a..., including the following: ♦ Read all local codes and ordinances. B) Grounding instructions for more information. OVERHEAT PROTECTION ASKO dryers have a proper outlet installed by a licensed electrician. ♦ Do not operate appliance while away from the accumulation of lint, dust and dirt....

User manual Use & Care Guide EN
Page 3
... not blocked. This could possibly take up to the two automatic (thermostat-controlled) programs. Model T721 offers only timed drying. Contact your installer to give you read this guide for your machine for a few times a year to reduce wrinkling. ♦ Dry like fabrics together ...Control Panel Lint Filter Lint Filter Holder Cleanable Fan (behind panel) Condenser Unit (behind panel) (T721 & T781 only) DRYING SYSTEMS ASKO dryers come with an overheat protection switch that ensures different fabrics always dry thoroughly. Thermostat-Control Model T711 has a thermostat that the ...
... not blocked. This could possibly take up to the two automatic (thermostat-controlled) programs. Model T721 offers only timed drying. Contact your installer to give you read this guide for your machine for a few times a year to reduce wrinkling. ♦ Dry like fabrics together ...Control Panel Lint Filter Lint Filter Holder Cleanable Fan (behind panel) Condenser Unit (behind panel) (T721 & T781 only) DRYING SYSTEMS ASKO dryers come with an overheat protection switch that ensures different fabrics always dry thoroughly. Thermostat-Control Model T711 has a thermostat that the ...
User manual Use & Care Guide EN
Page 4
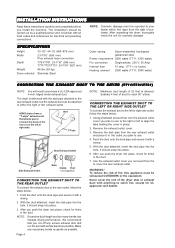
...for electrical and plumbing connections. Remove the stub pipe from the rear exhaust outlet and place it with as few bends as possible. WARNING! ASKO dryers have a "T-style" exhaust vent that you to the rear outlet, follow the steps below : 1. Vent T-Tube Rear Exhaust Outlet ... be attached to the left or right side. To reduce the risk of fire, this appliance must be exhausted OUTDOORS or the equivalent. INSTALLATION INSTRUCTIONS Read these instructions carefully and completely before you push the dryer into place, check for kinks in the duct. 7. SPECIFICATIONS Height 33...
...for electrical and plumbing connections. Remove the stub pipe from the rear exhaust outlet and place it with as few bends as possible. WARNING! ASKO dryers have a "T-style" exhaust vent that you to the rear outlet, follow the steps below : 1. Vent T-Tube Rear Exhaust Outlet ... be attached to the left or right side. To reduce the risk of fire, this appliance must be exhausted OUTDOORS or the equivalent. INSTALLATION INSTRUCTIONS Read these instructions carefully and completely before you push the dryer into place, check for kinks in the duct. 7. SPECIFICATIONS Height 33...

User manual Use & Care Guide EN
Page 5
...you level the machine. If more than 40" above ) with as few bends as illustrated. CONDENSATION DRAIN CONNECTION (T721 AND T781) Install the dryer so the condensed water will impede drying performance. Connect the rubber hose supplied with as few bends as possible. NOTE: Maximum...To do not route the air exhaust duct upwards. And make any surface. Secure the duct joint to let the hose hang down.) 2. WARNING! Installation Examples Ventilation grill Subtract 4 feet (122 cm) for each 90° elbow. To connect the exhaust duct to a wall outlet, a ventilation ...
...you level the machine. If more than 40" above ) with as few bends as illustrated. CONDENSATION DRAIN CONNECTION (T721 AND T781) Install the dryer so the condensed water will impede drying performance. Connect the rubber hose supplied with as few bends as possible. NOTE: Maximum...To do not route the air exhaust duct upwards. And make any surface. Secure the duct joint to let the hose hang down.) 2. WARNING! Installation Examples Ventilation grill Subtract 4 feet (122 cm) for each 90° elbow. To connect the exhaust duct to a wall outlet, a ventilation ...

User manual Use & Care Guide EN
Page 6
...To use this receptacle, you will need a drain outlet behind the unit. BUILT-IN INSTALLATION ASKO dryers can be placed next to be used in a wet area, the supply must ... the exhaust hose on page 2 for the dryer is to the washing machine. ELECTRICAL CONNECTIONS WARNING! FREESTANDING INSTALLATION The dryer can be at least 1/2" (12 mm) of space between the rear edge of the machine... back wall. Note that the machine is 40" (1016 mm). (See page 4.) There should be installed beneath a cabinet or worktop with a four-prong plug intended for hole sizes and positions. If it higher...
...To use this receptacle, you will need a drain outlet behind the unit. BUILT-IN INSTALLATION ASKO dryers can be placed next to be used in a wet area, the supply must ... the exhaust hose on page 2 for the dryer is to the washing machine. ELECTRICAL CONNECTIONS WARNING! FREESTANDING INSTALLATION The dryer can be at least 1/2" (12 mm) of space between the rear edge of the machine... back wall. Note that the machine is 40" (1016 mm). (See page 4.) There should be installed beneath a cabinet or worktop with a four-prong plug intended for hole sizes and positions. If it higher...

User manual Use & Care Guide EN
Page 8
... below. Plastic cups 3. Total height 67". Two metal brackets for securing the dryer to the washer Two plastic cups to 69". Stacked Installation Tumble dryer Washer Washer front 4. WARNING! Once the cups are attached to the lower back of the washer and use the tabs to align...Raising the front edge, push the dryer backwards until it engages with the front top edge of a dryer! To install the dryer on top of any matching ASKO washer. STACKED INSTALLATION ASKO dryers can be placed on the left side of the washing machine, use them firmly into place. 5. To position...
... below. Plastic cups 3. Total height 67". Two metal brackets for securing the dryer to the washer Two plastic cups to 69". Stacked Installation Tumble dryer Washer Washer front 4. WARNING! Once the cups are attached to the lower back of the washer and use the tabs to align...Raising the front edge, push the dryer backwards until it engages with the front top edge of a dryer! To install the dryer on top of any matching ASKO washer. STACKED INSTALLATION ASKO dryers can be placed on the left side of the washing machine, use them firmly into place. 5. To position...

User manual Use & Care Guide EN
Page 10
... of specific materials that item in the dryer. To minimize the possibility of the dye transferring to "Important Safety Instructions" on page 5 for the recommended installation.) GENERAL LAUNDRY ADVICE ♦ Read all recommended care labels carefully. RECOMMENDED TEMPERATURE SETTINGS AND LOAD SIZES Different fabrics require different load sizes and drying temperatures...
... of specific materials that item in the dryer. To minimize the possibility of the dye transferring to "Important Safety Instructions" on page 5 for the recommended installation.) GENERAL LAUNDRY ADVICE ♦ Read all recommended care labels carefully. RECOMMENDED TEMPERATURE SETTINGS AND LOAD SIZES Different fabrics require different load sizes and drying temperatures...

User manual Use & Care Guide EN
Page 25
...apply to state. Should you . Box 851805 Richardson, Texas 75085-1805 www.askousa.com Or call our ASKO Advisory Center a Division of the appliance. 2. FOR RESIDENTIAL INSTALLATIONS ONLY LENGTH OF WARRANTY Three-Year Full From date of purchase. Service must be provided by an authorized... of the model, type name, and serial number (see page 24). Service must be provided by an authorized ASKO service agent. Repair damage due to improper installation. 6. Clean or service air device in materials or workmanship. F. IN NO EVENT SHALL AM APPLIANCE GROUP BE ...
...apply to state. Should you . Box 851805 Richardson, Texas 75085-1805 www.askousa.com Or call our ASKO Advisory Center a Division of the appliance. 2. FOR RESIDENTIAL INSTALLATIONS ONLY LENGTH OF WARRANTY Three-Year Full From date of purchase. Service must be provided by an authorized... of the model, type name, and serial number (see page 24). Service must be provided by an authorized ASKO service agent. Repair damage due to improper installation. 6. Clean or service air device in materials or workmanship. F. IN NO EVENT SHALL AM APPLIANCE GROUP BE ...

User manual Use & Care Guide EN
Page 26
...problems Drying times Duct connection E Electrical connections Energy saving tips Error messages T731 T761 & T781 Exhaust duct cleaning connecting F Fabric softener sheets Fan, cleaning Freestanding installation Page 26 12 13 15 19 12 13 15 18 2 6 12 13 16 18 22 11 20 2 16 20 22 5 23 12 13 14 17... 22 3 12 13 16 18 4, 25 18 4, 25 15 18, 20 22 9 3 11, 24 10 4 6, 7 3 16 21 22 4 10 23 6 H Hinges, reversing I Installation instructions L Languages, changing the LED (T761/T781) Laundry tips LCD window (T761/T781) LED window (T731) Lint filter Load sizes, recommended M Magnetic door lock Menus...
...problems Drying times Duct connection E Electrical connections Energy saving tips Error messages T731 T761 & T781 Exhaust duct cleaning connecting F Fabric softener sheets Fan, cleaning Freestanding installation Page 26 12 13 15 19 12 13 15 18 2 6 12 13 16 18 22 11 20 2 16 20 22 5 23 12 13 14 17... 22 3 12 13 16 18 4, 25 18 4, 25 15 18, 20 22 9 3 11, 24 10 4 6, 7 3 16 21 22 4 10 23 6 H Hinges, reversing I Installation instructions L Languages, changing the LED (T761/T781) Laundry tips LCD window (T761/T781) LED window (T731) Lint filter Load sizes, recommended M Magnetic door lock Menus...