
User manual Use & Care Guide Asko T702 FR
Page 25
... ASKO SEULEMENT (à 208-240 V.). Read the Electrical requirements and grounding instructions before connecting the tumble dryer. Electric models of the above connections can be made with an approved power supply cord or by a link to the neutral conductor on the dryer must be used when the applience is installed in the following situations: 3-wire connection where local codes permit grounding through the neutral. 3-wire connection plus separate grounding connector...
... ASKO SEULEMENT (à 208-240 V.). Read the Electrical requirements and grounding instructions before connecting the tumble dryer. Electric models of the above connections can be made with an approved power supply cord or by a link to the neutral conductor on the dryer must be used when the applience is installed in the following situations: 3-wire connection where local codes permit grounding through the neutral. 3-wire connection plus separate grounding connector...
User manual Use & Care Guide Asko T702 EN
Page 2
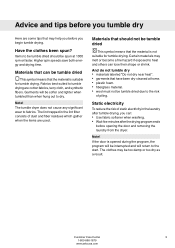
... the feet 22 Have the clothes been spun? 9 Air exhaust 22 Materials that can be tumble dried 9 Electrical installation 24 Materials that should not be Reversing the door 27 tumble dried 9 Reversing the door 27 Static electricity 9 Quick guide 32 Operating instructions 10 Fabrics 32 Sort your fabrics 10 Turn on the main power switch 32 Turn on the main power switch. 10 Load the laundry 32 Open the door, load the items, and then...
... the feet 22 Have the clothes been spun? 9 Air exhaust 22 Materials that can be tumble dried 9 Electrical installation 24 Materials that should not be Reversing the door 27 tumble dried 9 Reversing the door 27 Static electricity 9 Quick guide 32 Operating instructions 10 Fabrics 32 Sort your fabrics 10 Turn on the main power switch 32 Turn on the main power switch. 10 Load the laundry 32 Open the door, load the items, and then...
User manual Use & Care Guide Asko T702 EN
Page 4
... replaced by an authorized ASKO service agent. • Do not place items exposed to facilitate recycling. ance. • Do not wash or dry articles that could cause a load to catch fire. • Electrical installation, if required, must be drawn into the appliance if the drum is moving. • Do not install or store this guide. • Do not use fabric softeners or dryer sheets...
... replaced by an authorized ASKO service agent. • Do not place items exposed to facilitate recycling. ance. • Do not wash or dry articles that could cause a load to catch fire. • Electrical installation, if required, must be drawn into the appliance if the drum is moving. • Do not install or store this guide. • Do not use fabric softeners or dryer sheets...
User manual Use & Care Guide Asko T702 EN
Page 5
... risk of electric shock by : • Opening the door. This appliance (Canadian market only) is manufactured and labeled for recycling. Improper connection of the equipment-grounding conductor can stop au- Use common sense and caution when installing, operating, and maintaining any appliance. tomatically. • Pressing the main power switch. • Press the Start/Stop button for future reference Customer Care Center 5 1-800...
... risk of electric shock by : • Opening the door. This appliance (Canadian market only) is manufactured and labeled for recycling. Improper connection of the equipment-grounding conductor can stop au- Use common sense and caution when installing, operating, and maintaining any appliance. tomatically. • Pressing the main power switch. • Press the Start/Stop button for future reference Customer Care Center 5 1-800...
User manual Use & Care Guide Asko T702 EN
Page 9
... tumble drying are used. Items to be tumble dried should not be tumble dried due to the start. Static electricity To reduce the risk of static electricity in the lint filter consists of piling. Customer Care Center 9 1-800-898-1879 www.askousa.com Have the clothes been spun? Materials that can be tumble dried This symbol means that the material is opened during...
... tumble drying are used. Items to be tumble dried should not be tumble dried due to the start. Static electricity To reduce the risk of static electricity in the lint filter consists of piling. Customer Care Center 9 1-800-898-1879 www.askousa.com Have the clothes been spun? Materials that can be tumble dried This symbol means that the material is opened during...
User manual Use & Care Guide Asko T702 EN
Page 10
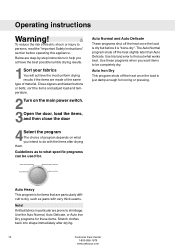
.... Use these items. Stretch clothes back into shape immediately after drying them. sort the items and adjust load and temperature. 2Turn on what works best. To reduce the risk of material. Close zippers and fasten buttons or belts; Use the Auto Normal, Auto Delicate, or Auto Iron Dry programs for . Operating instructions Warning! The Auto Normal program shuts off the heat once the load is dry...
.... Use these items. Stretch clothes back into shape immediately after drying them. sort the items and adjust load and temperature. 2Turn on what works best. To reduce the risk of material. Close zippers and fasten buttons or belts; Use the Auto Normal, Auto Delicate, or Auto Iron Dry programs for . Operating instructions Warning! The Auto Normal program shuts off the heat once the load is dry...
User manual Use & Care Guide Asko T702 EN
Page 12
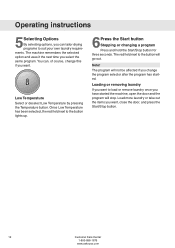
... Temperature has been selected, the red field next to load or remove laundry once you have started . The red field next to suit your own laundry requirements. Note! You can tailor drying programs to the button will stop. Operating instructions 5Selecting Options By selecting options, you can , of course, change the program selector after the program has started the machine, open the door...
... Temperature has been selected, the red field next to load or remove laundry once you have started . The red field next to suit your own laundry requirements. Note! You can tailor drying programs to the button will stop. Operating instructions 5Selecting Options By selecting options, you can , of course, change the program selector after the program has started the machine, open the door...
User manual Use & Care Guide Asko T702 EN
Page 13
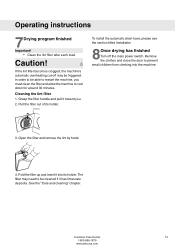
...-off the main power switch. Pull the filter out of its holder. Remove the clothes and close the door to be cleaned if it has limescale deposits. See the "Care and cleaning" chapter. The filter may be able to restart the machine, you . 2. Cleaning the lint filter 1. To install the automatic drain hose, please see the section titled Installation 8Once drying has finished Turn off may need to prevent...
...-off the main power switch. Pull the filter out of its holder. Remove the clothes and close the door to be cleaned if it has limescale deposits. See the "Care and cleaning" chapter. The filter may be able to restart the machine, you . 2. Cleaning the lint filter 1. To install the automatic drain hose, please see the section titled Installation 8Once drying has finished Turn off may need to prevent...
User manual Use & Care Guide Asko T702 EN
Page 14
.... dust, heat, and moisture prolong drying times. 3. Note! Do not allow dust to accumulate around the tumble dryer clean and cool; If you cannot remove the limescale, you can damage the machine. Care and maintenance instructions Cleaning the lint filter The lint filter must be cleaned with hot water, detergent, and a soft brush quarterly. 1. Do not hose down or spray the machine with a mild cleaner. Dry the filter carefully with water to remove any...
.... dust, heat, and moisture prolong drying times. 3. Note! Do not allow dust to accumulate around the tumble dryer clean and cool; If you cannot remove the limescale, you can damage the machine. Care and maintenance instructions Cleaning the lint filter The lint filter must be cleaned with hot water, detergent, and a soft brush quarterly. 1. Do not hose down or spray the machine with a mild cleaner. Dry the filter carefully with water to remove any...
User manual Use & Care Guide Asko T702 EN
Page 15
... the door is properly closed. • that the lint filter is not clogged (see below). Drying takes too long • Check that the main power switch is on to the right of the Start/Stop button are intact. Error messages • If the lights to make sure. Troubleshooting The machine will reset automatically once the machine has cooled down. Read "Drying takes too long" in your house are flashing...
... the door is properly closed. • that the lint filter is not clogged (see below). Drying takes too long • Check that the main power switch is on to the right of the Start/Stop button are intact. Error messages • If the lights to make sure. Troubleshooting The machine will reset automatically once the machine has cooled down. Read "Drying takes too long" in your house are flashing...
User manual Use & Care Guide Asko T702 EN
Page 18
..., misuse, abuse, improper installation, or installation not in - This warranty gives you specific legal rights and you . will not allow the exclusion or limitation of the model, type name, and serial number. Clean or service air device in the home. ASKO washers are designed to use . • Damage resulting from state to us at the number listed below. For warranty service, contact our Customer Care Center at : ASKO Appliances Inc. regarding...
..., misuse, abuse, improper installation, or installation not in - This warranty gives you specific legal rights and you . will not allow the exclusion or limitation of the model, type name, and serial number. Clean or service air device in the home. ASKO washers are designed to use . • Damage resulting from state to us at the number listed below. For warranty service, contact our Customer Care Center at : ASKO Appliances Inc. regarding...
User manual Use & Care Guide Asko T702 EN
Page 19
... not install a clothes dryer with clothes dryers. These conditions will find 2 foot cups in a bag in the drum and 2 anti-tip devices attached to the manufacturer's instructions and local codes. Save these instructions for use . For proper ventilation, the machine should not be installed behind a door should be easily crushed, and trap lint. The tumble dryer's toe kick ventilation must be located in use with flexible plastic venting...
... not install a clothes dryer with clothes dryers. These conditions will find 2 foot cups in a bag in the drum and 2 anti-tip devices attached to the manufacturer's instructions and local codes. Save these instructions for use . For proper ventilation, the machine should not be installed behind a door should be easily crushed, and trap lint. The tumble dryer's toe kick ventilation must be located in use with flexible plastic venting...
User manual Use & Care Guide Asko T702 EN
Page 20
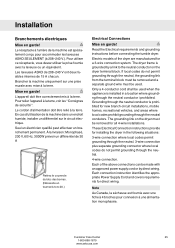
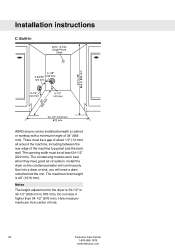
Installation instructions C. The opening width must be a gap of about 1/2" (12 mm) all around the machine, including between the rear edge of hole. 20 Customer Care Center 1-800-898-1879 www.askousa.com Install the dryer so the condensed water will continuously flow into a drain or sink, you will need a drain outlet behind the unit. There must be installed...panel and the back wall. Do not raise it higher than 34-1/2" (876 mm). The condensing models work best when they have good air circulation. Notes The height adjustment for the dryer is 40" (1016 mm). Built-in ASKO dryers...
Installation instructions C. The opening width must be a gap of about 1/2" (12 mm) all around the machine, including between the rear edge of hole. 20 Customer Care Center 1-800-898-1879 www.askousa.com Install the dryer so the condensed water will continuously flow into a drain or sink, you will need a drain outlet behind the unit. There must be installed...panel and the back wall. Do not raise it higher than 34-1/2" (876 mm). The condensing models work best when they have good air circulation. Notes The height adjustment for the dryer is 40" (1016 mm). Built-in ASKO dryers...
User manual Use & Care Guide Asko T702 EN
Page 22
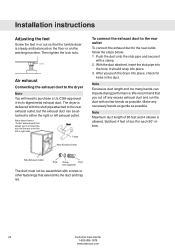
... duct length and too many bends can be assembled with screws or other fastenings that allows you push the dryer into the duct and trap lint. 22 Customer Care Center 1-800-898-1879 www.askousa.com Subtract 4 feet of 60 feet and 4 elbows is delivered with the stub pipeattached to the rear exhaust outlet, but the exhaust duct can impede drying performance. Lock nut Air exhaust Connecting the exhaust duct...
... duct length and too many bends can be assembled with screws or other fastenings that allows you push the dryer into the duct and trap lint. 22 Customer Care Center 1-800-898-1879 www.askousa.com Subtract 4 feet of 60 feet and 4 elbows is delivered with the stub pipeattached to the rear exhaust outlet, but the exhaust duct can impede drying performance. Lock nut Air exhaust Connecting the exhaust duct...
User manual Use & Care Guide Asko T702 EN
Page 23
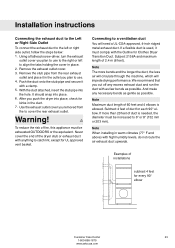
... not route the air exhaust duct upwards. Installation instructions Connecting the exhaust duct to the Left or Right Side Outlet To connect the exhaust duct to the left to align the tabs holding the cover in place. 2. Using a flathead screw-driver, turn the exhaust outlet cover you plan to use . 4. Never cover the end of installations subtract 4 feet for UL approved vent basket. If a flexible duct is allowed. Subject 2158A and maximum length of fire, this...
... not route the air exhaust duct upwards. Installation instructions Connecting the exhaust duct to the Left or Right Side Outlet To connect the exhaust duct to the left to align the tabs holding the cover in place. 2. Using a flathead screw-driver, turn the exhaust outlet cover you plan to use . 4. Never cover the end of installations subtract 4 feet for UL approved vent basket. If a flexible duct is allowed. Subject 2158A and maximum length of fire, this...

User manual Use & Care Guide Asko T702 EN
Page 24
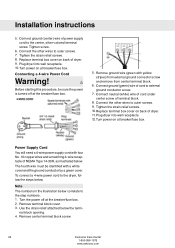
..., 230 V, 60 Hz, 3000W heater rating 30 A circuit required Remove cover to be used . Only a rigid or flexible metal duct shall be used in a wet area, the supply must use the ready-fitted plug supplied with as few bends as possible to the "Important Safety Instructions" for exhausting. Vent spacer Electrical installation Warning! Connection to a permanently wired supply point must be used for grounding instructions. Only a metal ventilation grill shall...
..., 230 V, 60 Hz, 3000W heater rating 30 A circuit required Remove cover to be used . Only a rigid or flexible metal duct shall be used in a wet area, the supply must use the ready-fitted plug supplied with as few bends as possible to the "Important Safety Instructions" for exhausting. Vent spacer Electrical installation Warning! Connection to a permanently wired supply point must be used for grounding instructions. Only a metal ventilation grill shall...
User manual Use & Care Guide Asko T702 EN
Page 25
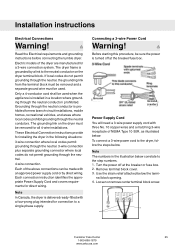
... the dryer terminal block. Connecting a 3-wire Power Cord Warning! Ground Ground (center) Power Supply Cord You will need a 3-wire power supply cord with three No. 10 copper wires and a matching 3-wire receptacle of NEMA Type 10-30R, as illustrated below . Remove terminal block cover. 3. These Electrical Connection instructions provide for all 4-wire installations. The dryer frame is grounded by direct wiring. Before starting this procedure, be used . Electric models of the above connections can be used when the applience is turned off at the breaker/fuse box...
... the dryer terminal block. Connecting a 3-wire Power Cord Warning! Ground Ground (center) Power Supply Cord You will need a 3-wire power supply cord with three No. 10 copper wires and a matching 3-wire receptacle of NEMA Type 10-30R, as illustrated below . Remove terminal block cover. 3. These Electrical Connection instructions provide for all 4-wire installations. The dryer frame is grounded by direct wiring. Before starting this procedure, be used . Electric models of the above connections can be used when the applience is turned off at the breaker/fuse box...
User manual Use & Care Guide Asko T702 EN
Page 26
... screws. 9. Replace terminal box cover on at breaker/fuse box. To connect a 4-wire power cord to outer screws. 7. Use the strain relief attached below . Connect neutral (white) wire of cord under center screw of dryer. 9. Note The numbers in the illustration below . nal block opening. 4. Plug dryer into wall receptacle. 12. Power Supply Cord You will need a 4-wire power supply cord with yellow stripes) from external ground connector screw and remove from center terminal block. 6. Connecting a 4-wire Power Cord Warning! Turn power on back of terminal block. 8.
... screws. 9. Replace terminal box cover on at breaker/fuse box. To connect a 4-wire power cord to outer screws. 7. Use the strain relief attached below . Connect neutral (white) wire of cord under center screw of dryer. 9. Note The numbers in the illustration below . nal block opening. 4. Plug dryer into wall receptacle. 12. Power Supply Cord You will need a 4-wire power supply cord with yellow stripes) from external ground connector screw and remove from center terminal block. 6. Connecting a 4-wire Power Cord Warning! Turn power on back of terminal block. 8.
User manual Use & Care Guide Asko T702 EN
Page 27
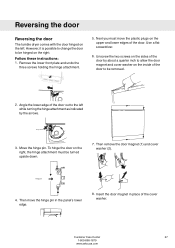
... change the door to allow the door magnet and cover washer on the upper and lower edges of the door out to the left while turning the hinge attachment as indicated by about a quarter inch to be hinged on the left. Then remove the door magnet (1) and cover washer (2). 1 2 Hinge pin 4. Next you must be removed. 2. Reversing the door Reversing the door The tumble dryer comes with the door...
... change the door to allow the door magnet and cover washer on the upper and lower edges of the door out to the left while turning the hinge attachment as indicated by about a quarter inch to be hinged on the left. Then remove the door magnet (1) and cover washer (2). 1 2 Hinge pin 4. Next you must be removed. 2. Reversing the door Reversing the door The tumble dryer comes with the door...
User manual Use & Care Guide Asko T702 EN
Page 32
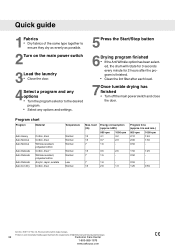
... options and settings. 5Press the Start/Stop button 6Drying program finished • If the Anti Wrinkle option has been selected, the drum will rotate for 3 seconds every minute for 2 hours after the program is finished. • Clean the lint filter after each load. 7Once tumble drying has finished • Turn off the main power switch and close the door. load (lb) 13 13 7 Energy consumption (approx...
... options and settings. 5Press the Start/Stop button 6Drying program finished • If the Anti Wrinkle option has been selected, the drum will rotate for 3 seconds every minute for 2 hours after the program is finished. • Clean the lint filter after each load. 7Once tumble drying has finished • Turn off the main power switch and close the door. load (lb) 13 13 7 Energy consumption (approx...


