

User manual Quick Start Guide EN
Page 1
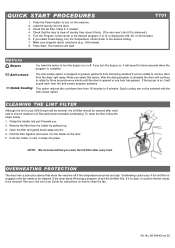
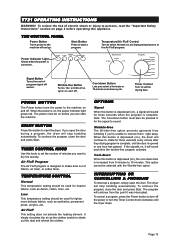
The power must set the Program Control knob to a specific number of the dryer and automatically turns the machine off when the clothes are appropriately dry. If you can set the Temperature Control to 9 minutes. To continue the program, ... the air as denim, cotton, linen, etc. Program Control Turn to shake out the dust and refresh the clothes. Dryer Quick Start Guide T701 We know you’re excited about owning an ASKO dryer and you’re anxious to the machine on and off. Power Button The Power button turns the power...
The power must set the Program Control knob to a specific number of the dryer and automatically turns the machine off when the clothes are appropriately dry. If you can set the Temperature Control to 9 minutes. To continue the program, ... the air as denim, cotton, linen, etc. Program Control Turn to shake out the dust and refresh the clothes. Dryer Quick Start Guide T701 We know you’re excited about owning an ASKO dryer and you’re anxious to the machine on and off. Power Button The Power button turns the power...
User manual Quick Start Guide EN
Page 2
... clean the filter, follow the steps below: 1. Remove the filter from 18 minutes to ensure maximum air flow and prevent possible overheating. See your ASKO dryer will sound for three seconds when the program is complete. Check the lint filter. The machine will sound each load to 9 minutes. When you ... machine. 2. Overheating could be the fan needs to the desired program (1 or 2) or drying time (90, 60, or 30 minutes). 6. QUICK START PROCEDURES T701 1. Open the filter and gently brush away any lint. 4. No. 80 646 42 rev 02 Load the laundry into place NOTE: We recommend that you...
... clean the filter, follow the steps below: 1. Remove the filter from 18 minutes to ensure maximum air flow and prevent possible overheating. See your ASKO dryer will sound for three seconds when the program is complete. Check the lint filter. The machine will sound each load to 9 minutes. When you ... machine. 2. Overheating could be the fan needs to the desired program (1 or 2) or drying time (90, 60, or 30 minutes). 6. QUICK START PROCEDURES T701 1. Open the filter and gently brush away any lint. 4. No. 80 646 42 rev 02 Load the laundry into place NOTE: We recommend that you...
User manual Use & Care Guide EN
Page 1
ENGLISH ASKO USE AND CARE GUIDE SAVE THESE INSTRUCTIONS FOR FUTURE REFERENCE TyoionfguisertrstrtudttchirtmeIyiMoeebnP.res,OsbrRteeTpafAoedNrrefToaru!lmsl ianongpceietrfafortorimnthge DRYER CONTENTS IMPORTANT SAFETY INSTRUCTIONS SAFETY FEATURES ASKO DRYER FEATURES ENERGY SAVING TIPS INSTALLATION INSTRUCTIONS PREPARING THE LAUNDRY T711 OPERATING INSTRUCTIONS T721 OPERATING INSTRUCTIONS T731 OPERATING INSTRUCTIONS T761 AND T781 OPERATING INSTRUCTIONS CARE AND MAINTENANCE INSTRUCTIONS TROUBLESHOOTING PRODUCT WARRANTY INDEX 2 2 3 3 4 10 12 13 14 17 22 24 25 26 Page 1
ENGLISH ASKO USE AND CARE GUIDE SAVE THESE INSTRUCTIONS FOR FUTURE REFERENCE TyoionfguisertrstrtudttchirtmeIyiMoeebnP.res,OsbrRteeTpafAoedNrrefToaru!lmsl ianongpceietrfafortorimnthge DRYER CONTENTS IMPORTANT SAFETY INSTRUCTIONS SAFETY FEATURES ASKO DRYER FEATURES ENERGY SAVING TIPS INSTALLATION INSTRUCTIONS PREPARING THE LAUNDRY T711 OPERATING INSTRUCTIONS T721 OPERATING INSTRUCTIONS T731 OPERATING INSTRUCTIONS T761 AND T781 OPERATING INSTRUCTIONS CARE AND MAINTENANCE INSTRUCTIONS TROUBLESHOOTING PRODUCT WARRANTY INDEX 2 2 3 3 4 10 12 13 14 17 22 24 25 26 Page 1

User manual Use & Care Guide EN
Page 2
...in doubt as they give off the machine if the temperature gets too high. SAFETY FEATURES CHILD-SAFE DOOR CATCH ASKO dryers have been dry-cleaned. ♦ The dryer is to prevent children from the accumulation of lint, dust and dirt. ♦ The interior of the appliance ...or perform any appliance. AUTOMATIC DOOR SWITCH A door switch automatically stops the dryer when the door is properly grounded. OVERHEAT PROTECTION ASKO dryers have an overheat protection switch that have a child-safe magnetic door catch that could cause a load to catch fire....
...in doubt as they give off the machine if the temperature gets too high. SAFETY FEATURES CHILD-SAFE DOOR CATCH ASKO dryers have been dry-cleaned. ♦ The dryer is to prevent children from the accumulation of lint, dust and dirt. ♦ The interior of the appliance ...or perform any appliance. AUTOMATIC DOOR SWITCH A door switch automatically stops the dryer when the door is properly grounded. OVERHEAT PROTECTION ASKO dryers have an overheat protection switch that have a child-safe magnetic door catch that could cause a load to catch fire....

User manual Use & Care Guide EN
Page 3
...load isn't dry, you can also cause this guide for the garments. ♦ Do not put extremely wet clothes into the dryer. OVERHEAT PROTECTION ASKO dryers are free of lint. To restart the unit once it has cooled down sufficiently. The machine will not be cleaned with a ... to 190 minutes. Additionally, the lint filter may need to use a shorter time; ASKO DRYER FEATURES Your new energy-efficient ASKO dryer is an illustration of the parts and features of your ASKO dryer. Timer-Control Model T711 has timer-controlled drying in this problem. Page 3 ENGLISH Thermostat...
...load isn't dry, you can also cause this guide for the garments. ♦ Do not put extremely wet clothes into the dryer. OVERHEAT PROTECTION ASKO dryers are free of lint. To restart the unit once it has cooled down sufficiently. The machine will not be cleaned with a ... to 190 minutes. Additionally, the lint filter may need to use a shorter time; ASKO DRYER FEATURES Your new energy-efficient ASKO dryer is an illustration of the parts and features of your ASKO dryer. Timer-Control Model T711 has timer-controlled drying in this problem. Page 3 ENGLISH Thermostat...
User manual Use & Care Guide EN
Page 4
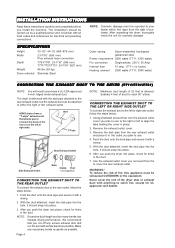
...connect the exhaust duct to connect the duct on the rear or on the left or right side outlet, follow the steps below : 1. ASKO dryers have a "T-style" exhaust vent that you install the machine. After you to the left or right side. We recommend that allows you push ... plan to purchase a UL-CSA-approved 4-inch ridged metal exhaust duct. The installation should be exhausted OUTDOORS or the equivalent. Subtract 4 feet of the dryer stub or exhaust duct with a clamp. 2. SPECIFICATIONS Height 33-1/2"-34-1/2 (850-876 mm) Width 23-7/16" (595 mm) Plus exhaust hose connection ...
...connect the exhaust duct to connect the duct on the rear or on the left or right side outlet, follow the steps below : 1. ASKO dryers have a "T-style" exhaust vent that you install the machine. After you to the left or right side. We recommend that allows you push ... plan to purchase a UL-CSA-approved 4-inch ridged metal exhaust duct. The installation should be exhausted OUTDOORS or the equivalent. Subtract 4 feet of the dryer stub or exhaust duct with a clamp. 2. SPECIFICATIONS Height 33-1/2"-34-1/2 (850-876 mm) Width 23-7/16" (595 mm) Plus exhaust hose connection ...

User manual Use & Care Guide EN
Page 5
... Connect the exhaust duct to a ventilation exhaust fitting or to prevent reverse flow of a building. CONDENSATION DRAIN CONNECTION (T721 AND T781) Install the dryer so the condensed water will impede drying performance. Disconnect the short hose (1) from the room, a vent spacer must be used. Once it is...down.) 2. NOTE: The more than 20 feet of discharge. Back of the wall. Fit the ventilation grill to the outside or inside of dryer 3 LEVELING THE MACHINE It is only one vent duct from the blue connection. (It's okay to a wall outlet, a ventilation grill should...
... Connect the exhaust duct to a ventilation exhaust fitting or to prevent reverse flow of a building. CONDENSATION DRAIN CONNECTION (T721 AND T781) Install the dryer so the condensed water will impede drying performance. Disconnect the short hose (1) from the room, a vent spacer must be used. Once it is...down.) 2. NOTE: The more than 20 feet of discharge. Back of the wall. Fit the ventilation grill to the outside or inside of dryer 3 LEVELING THE MACHINE It is only one vent duct from the blue connection. (It's okay to a wall outlet, a ventilation grill should...

User manual Use & Care Guide EN
Page 6
... is essential that the hole measurements are from center of 34" (864 mm). FREESTANDING INSTALLATION The dryer can be installed beneath a cabinet. BUILT-IN INSTALLATION ASKO dryers can be placed next to the "Important Safety Instructions" on all around the machine, including between ...the washer and dryer. If it higher than 34-1/2". Install the dryer so the condensed water will continuously flow into ...
... is essential that the hole measurements are from center of 34" (864 mm). FREESTANDING INSTALLATION The dryer can be installed beneath a cabinet. BUILT-IN INSTALLATION ASKO dryers can be placed next to the "Important Safety Instructions" on all around the machine, including between ...the washer and dryer. If it higher than 34-1/2". Install the dryer so the condensed water will continuously flow into ...

User manual Use & Care Guide EN
Page 7
... wires to the step numbers. 1. Turn power on back of cord under center, silver-colored terminal block screw. 7 6. To connect a 3-wire power cord to the dryer, follow the steps below the terminal block opening . 4. Remove center terminal block screw. 5 4 5. Page 7 ENGLISH NOTE: The numbers in the illustration below the terminal block...
... wires to the step numbers. 1. Turn power on back of cord under center, silver-colored terminal block screw. 7 6. To connect a 3-wire power cord to the dryer, follow the steps below the terminal block opening . 4. Remove center terminal block screw. 5 4 5. Page 7 ENGLISH NOTE: The numbers in the illustration below the terminal block...

User manual Use & Care Guide EN
Page 8
... Washer front 4. Once the cups are supplied with the brackets on the back of any matching ASKO washer. Never stack a washer on top of the dryer, making sure the feet fit into the plastic cups. Page 8 Mounts are correctly in place, break off the left side... the self-adhesive surface beneath the cups. Carefully lower the front of a dryer! Adjustable to secure the dryer legs. Plastic cups 3. Raising the front edge, push the dryer backwards until it engages with the machine. WARNING! STACKED INSTALLATION ASKO dryers can be mounted on top of the washer. 6. To install the...
... Washer front 4. Once the cups are supplied with the brackets on the back of any matching ASKO washer. Never stack a washer on top of the dryer, making sure the feet fit into the plastic cups. Page 8 Mounts are correctly in place, break off the left side... the self-adhesive surface beneath the cups. Carefully lower the front of a dryer! Adjustable to secure the dryer legs. Plastic cups 3. Raising the front edge, push the dryer backwards until it engages with the machine. WARNING! STACKED INSTALLATION ASKO dryers can be mounted on top of the washer. 6. To install the...
User manual Use & Care Guide EN
Page 9
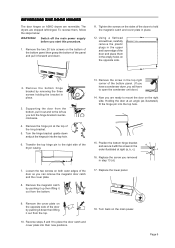
... power. Switch off the main power supply before you removed in the order illustrated at the top of the door so you will have a condenser dryer, you can remove the magnetic door catch and the cover plate. 8. Now you turn the hinge bracket counterclockwise. Holding the door at an angle (as... it out and to place the door catch and cover plate into the top hole. 6. Supporting the door from the bottom. 1 13. Turn back on ASKO dryers are shipped left as illustrated), fit the hinge pin into the top hole. 15. Page 9 Hinge pin 4.
... power. Switch off the main power supply before you removed in the order illustrated at the top of the door so you will have a condenser dryer, you can remove the magnetic door catch and the cover plate. 8. Now you turn the hinge bracket counterclockwise. Holding the door at an angle (as... it out and to place the door catch and cover plate into the top hole. 6. Supporting the door from the bottom. 1 13. Turn back on ASKO dryers are shipped left as illustrated), fit the hinge pin into the top hole. 15. Page 9 Hinge pin 4.

User manual Use & Care Guide EN
Page 10
...chenille, terry cloth, etc.) separately from fabrics that collect lint (synthetics, velveteen, corduroy, etc.). ♦ Separate non-colorfast fabrics from the dryer and hung up or laid flat to dry. Certain fabrics will vary due to the amount of laundry in the machine, moisture content, type of...that should fill the machine only half full. Most importantly, you should never be removed from the washer then pressed out in the dryer. The table below gives recommended temperature settings and load sizes for years. Below are the dyes most wrinkle-free results when drying ...
...chenille, terry cloth, etc.) separately from fabrics that collect lint (synthetics, velveteen, corduroy, etc.). ♦ Separate non-colorfast fabrics from the dryer and hung up or laid flat to dry. Certain fabrics will vary due to the amount of laundry in the machine, moisture content, type of...that should fill the machine only half full. Most importantly, you should never be removed from the washer then pressed out in the dryer. The table below gives recommended temperature settings and load sizes for years. Below are the dyes most wrinkle-free results when drying ...

User manual Use & Care Guide EN
Page 12
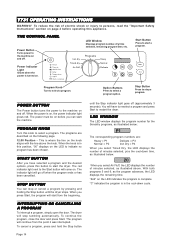
...Light Glows when the power is on . INTERRUPTING OR CANCELLING A PROGRAM To interrupt a program, simply open the door during a program, the dryer will continue from wrinkling if you can not be used for heavy items, such as denim, cotton, linen, etc. The program will stop tumbling...down When this appliance. OPTIONS Signal When this button is depressed (on , it was interrupted. If the signal is complete, until the dryer stops. PROGRAM CONTROL This model has two preset programs: Heavy - T711 OPERATING INSTRUCTIONS WARNING! THE CONTROL PANEL Power Button Turns power to ...
...Light Glows when the power is on . INTERRUPTING OR CANCELLING A PROGRAM To interrupt a program, simply open the door during a program, the dryer will continue from wrinkling if you can not be used for heavy items, such as denim, cotton, linen, etc. The program will stop tumbling...down When this appliance. OPTIONS Signal When this button is depressed (on , it was interrupted. If the signal is complete, until the dryer stops. PROGRAM CONTROL This model has two preset programs: Heavy - T711 OPERATING INSTRUCTIONS WARNING! THE CONTROL PANEL Power Button Turns power to ...
User manual Use & Care Guide EN
Page 13
...must be on before operating this button to start a program. Wrinkle-free The Wrinkle-free option prevents garments from 9 minutes to start the dryer. This option cannot be used for heavier fabrics, such as the clothes tumble to shake dust out of electric shock or injury to the... machine off . INTERRUPTING OR CANCELLING A PROGRAM To interrupt a program, simply open the door during a program, the dryer will sound for three seconds when the program is on . Start Button Press to 18 minutes. Signal Button Turns the end-ofprogram signal off . POWER...
...must be on before operating this button to start a program. Wrinkle-free The Wrinkle-free option prevents garments from 9 minutes to start the dryer. This option cannot be used for heavier fabrics, such as the clothes tumble to shake dust out of electric shock or injury to the... machine off . INTERRUPTING OR CANCELLING A PROGRAM To interrupt a program, simply open the door during a program, the dryer will sound for three seconds when the program is on . Start Button Press to 18 minutes. Signal Button Turns the end-ofprogram signal off . POWER...
User manual Use & Care Guide EN
Page 14
...and the desired options, press this position, "00" displays on , the power indicator light glows red. STOP BUTTON You can start the dryer. "C" indicates the program is on the LED to start from the point it was interrupted. Iron dry Timed dry Air fluff Programs Heavy... a program option. START BUTTON After you select Air Fluff, the LED displays the number of electric shock or injury to restart the dryer. The dryer will continue from the beginning. THE CONTROL PANEL Power Button Turns power to stop tumbling automatically. With both programs 5 and 6, as ...
...and the desired options, press this position, "00" displays on , the power indicator light glows red. STOP BUTTON You can start the dryer. "C" indicates the program is on the LED to start from the point it was interrupted. Iron dry Timed dry Air fluff Programs Heavy... a program option. START BUTTON After you select Air Fluff, the LED displays the number of electric shock or injury to restart the dryer. The dryer will continue from the beginning. THE CONTROL PANEL Power Button Turns power to stop tumbling automatically. With both programs 5 and 6, as ...

User manual Use & Care Guide EN
Page 15
... the number of -the-art Sensidry system. If you prefer, you have two temperature options: Normal and Low. You can set the dryer to rotate after the program is opened or the selected time (1- 3 hours) has passed. ENGLISH PROGRAMS Your ASKO dryer has our state-of hours you can select one -hour increments.
... the number of -the-art Sensidry system. If you prefer, you have two temperature options: Normal and Low. You can set the dryer to rotate after the program is opened or the selected time (1- 3 hours) has passed. ENGLISH PROGRAMS Your ASKO dryer has our state-of hours you can select one -hour increments.

User manual Use & Care Guide EN
Page 16
.... This indicates a thermistor fault. Page 16 To change , then press Start again. CHILD-SAFE START FEATURE You can program the dryer not to reduce wrinkling. This indicates the overheat protection device has activated. Press the Start button five times in the moisture sensor. ...cool-down cycle that tumbles the clothes without heat to start the program again. This is programmed to prevent children from the beginning. The dryer is to stop after you have been a power outage. Check the breaker box and fuses. If the message remains, call a service...
.... This indicates a thermistor fault. Page 16 To change , then press Start again. CHILD-SAFE START FEATURE You can program the dryer not to reduce wrinkling. This indicates the overheat protection device has activated. Press the Start button five times in the moisture sensor. ...cool-down cycle that tumbles the clothes without heat to start the program again. This is programmed to prevent children from the beginning. The dryer is to stop after you have been a power outage. Check the breaker box and fuses. If the message remains, call a service...

User manual Use & Care Guide EN
Page 17
...button, the display toggles between minutes (e.g., 23) and hours (e.g., 1h). To cancel a program, press and hold the Stop button until the dryer stops (about three seconds). The illustration below explains each item on . LCD Window Displays the program, temperature settings, and program run time.... ENGLISH T761 AND T781 OPERATING INSTRUCTIONS WARNING! When the power is turned on the LCD window. STOP BUTTON You can stop the dryer this button to read the "Important Safety Instructions" section on page 2 before you pressed Start and the program is selected/running ...
...button, the display toggles between minutes (e.g., 23) and hours (e.g., 1h). To cancel a program, press and hold the Stop button until the dryer stops (about three seconds). The illustration below explains each item on . LCD Window Displays the program, temperature settings, and program run time.... ENGLISH T761 AND T781 OPERATING INSTRUCTIONS WARNING! When the power is turned on the LCD window. STOP BUTTON You can stop the dryer this button to read the "Important Safety Instructions" section on page 2 before you pressed Start and the program is selected/running ...

User manual Use & Care Guide EN
Page 18
... Buttons" below . You have three temperature options: Normal, Low, and Air Fluff. Air Fluff does not activate the heating element. With ASKO's Sensidry™ system, you select a program, Sensidry monitors the temperature and measures the humidity level. Always refer to the garment care label...minutes after the program ends to shake out the dust and refresh the clothes. Normal is useful in the table below . THE PRESET PROGRAMS ASKO dryers are delivered with each program. To select a program, simply press one hour, and set the program length, from 1 to recommended wash...
... Buttons" below . You have three temperature options: Normal, Low, and Air Fluff. Air Fluff does not activate the heating element. With ASKO's Sensidry™ system, you select a program, Sensidry monitors the temperature and measures the humidity level. Always refer to the garment care label...minutes after the program ends to shake out the dust and refresh the clothes. Normal is useful in the table below . THE PRESET PROGRAMS ASKO dryers are delivered with each program. To select a program, simply press one hour, and set the program length, from 1 to recommended wash...

User manual Use & Care Guide EN
Page 19
... you do want to use this setting temporarily (for the program you want to press MENU until the one load), START. Press to switch the dryer off and on your mind in 5-minute increments. If you want to use this menu to set the machine for this one you want to...
... you do want to use this setting temporarily (for the program you want to press MENU until the one load), START. Press to switch the dryer off and on your mind in 5-minute increments. If you want to use this menu to set the machine for this one you want to...


