
Design Guide
Page 6
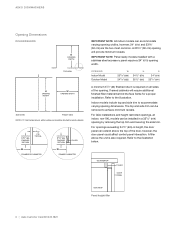
.... Refer to accommodate varying opening width. For openings exceeding 341/2" (876) in a 321/4" (819) opening will require additional finished filler material behind the face frame for a proper installation. COUNTERTOP FILLER DOOR PANEL SIDE VIEW Panel height filler 6 | Asko Customer Care 800.222.7820 A 235/8" (60 cm) opening by removing the top trim and lowering the side trim. OPENING Indoor Model Outdoor Model W 235/8" (600) 247/8" (632...
.... Refer to accommodate varying opening width. For openings exceeding 341/2" (876) in a 321/4" (819) opening will require additional finished filler material behind the face frame for a proper installation. COUNTERTOP FILLER DOOR PANEL SIDE VIEW Panel height filler 6 | Asko Customer Care 800.222.7820 A 235/8" (60 cm) opening by removing the top trim and lowering the side trim. OPENING Indoor Model Outdoor Model W 235/8" (600) 247/8" (632...
Design Guide
Page 7
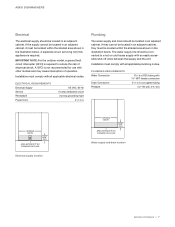
... location OPENING WIDTH 53/8" (137) AREA EXTENDS 2" (51) FORWARD ON FLOOR Water supply and drain location askona.com/specs | 7 PLUMBING REQUIREMENTS Water Connection Drain Connection Pressure 6' (1.8 m) PEX tubing with an easily accessible shut-off valve between the supply and the unit. ELECTRICAL REQUIREMENTS Electrical Supply Service Receptacle Power Cord 115 VAC, 60 Hz 15 amp dedicated circuit 3-prong grounding-type 4' (1.2 m) Plumbing The water supply and drain should be located in an adjacent cabinet. ASKO...
... location OPENING WIDTH 53/8" (137) AREA EXTENDS 2" (51) FORWARD ON FLOOR Water supply and drain location askona.com/specs | 7 PLUMBING REQUIREMENTS Water Connection Drain Connection Pressure 6' (1.8 m) PEX tubing with an easily accessible shut-off valve between the supply and the unit. ELECTRICAL REQUIREMENTS Electrical Supply Service Receptacle Power Cord 115 VAC, 60 Hz 15 amp dedicated circuit 3-prong grounding-type 4' (1.2 m) Plumbing The water supply and drain should be located in an adjacent cabinet. ASKO...
Design Guide
Page 9
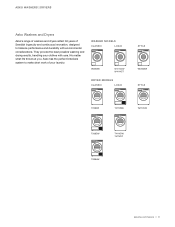
... with care. WASHER MODELS CLASSIC LOGIC W2084W W4114CW W4114CT DRYER MODELS CLASSIC LOGIC STYLE W6124XW STYLE T208VW T411HSW T611VUW T208CW T411VDW T411VDT T208HW askona.com/specs | 9 They provide the best possible washing and drying results, handling your laundry. ASKO WASHERS | DRYERS Asko Washers and Dryers Asko's range of washers and dryers reflect 60 years of Swedish ingenuity and continuous innovation, designed to make short work of your clothes with...
... with care. WASHER MODELS CLASSIC LOGIC W2084W W4114CW W4114CT DRYER MODELS CLASSIC LOGIC STYLE W6124XW STYLE T208VW T411HSW T611VUW T208CW T411VDW T411VDT T208HW askona.com/specs | 9 They provide the best possible washing and drying results, handling your laundry. ASKO WASHERS | DRYERS Asko Washers and Dryers Asko's range of washers and dryers reflect 60 years of Swedish ingenuity and continuous innovation, designed to make short work of your clothes with...
Design Guide
Page 18
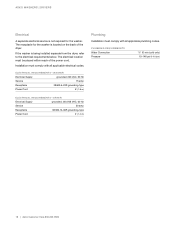
... dryer, refer to the electrical requirements below. PLUMBING REQUIREMENTS Water Connection Pressure 1/2" ID min (cold only) 15-146 psi (1-10 bar) 18 | Asko Customer Care 800.222.7820 The receptacle for the washer. The electrical location must comply with all applicable electrical codes. If the washer is located on the back of the power cord. ELECTRICAL REQUIREMENTS-WASHER Electrical Supply grounded, 220 VAC, 60 Hz Service 15 amp Receptacle NEMA 6-20R grounding-type Power Cord 6' (1.8 m) ELECTRICAL REQUIREMENTS-DRYER Electrical...
... dryer, refer to the electrical requirements below. PLUMBING REQUIREMENTS Water Connection Pressure 1/2" ID min (cold only) 15-146 psi (1-10 bar) 18 | Asko Customer Care 800.222.7820 The receptacle for the washer. The electrical location must comply with all applicable electrical codes. If the washer is located on the back of the power cord. ELECTRICAL REQUIREMENTS-WASHER Electrical Supply grounded, 220 VAC, 60 Hz Service 15 amp Receptacle NEMA 6-20R grounding-type Power Cord 6' (1.8 m) ELECTRICAL REQUIREMENTS-DRYER Electrical...
Design Guide
Page 19
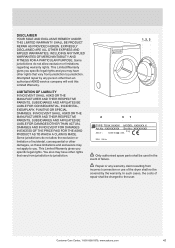
... been removed, altered or cannot be filed with original model/serial numbers that vary from date of the details on the rating plate positioned on ASKO Products with ASKO within 5 days from jurisdiction to instruct you need repair service, first see the "Troubleshooting" section of purchase. Make a note of purchase. SERVICE AFTER EXPIRATION OF LIMITED WARRANTY For information about obtaining parts and labor after checking "Troubleshooting," then...
... been removed, altered or cannot be filed with original model/serial numbers that vary from date of the details on the rating plate positioned on ASKO Products with ASKO within 5 days from jurisdiction to instruct you need repair service, first see the "Troubleshooting" section of purchase. Make a note of purchase. SERVICE AFTER EXPIRATION OF LIMITED WARRANTY For information about obtaining parts and labor after checking "Troubleshooting," then...
Use and Care Guide English
Page 3
.... Your dryer is removed from the accumulation of a tumble dryer cycle occurs without Customer Care Center, 1-800-898-1879, www.askona.com 3 Do not reach into the appliance if the drum is moving. 9. Keep the area around the exhaust opening and adjacent surrounding areas free from service or discarded, remove the door to catch fire. Do not wash or dry articles that...
.... Your dryer is removed from the accumulation of a tumble dryer cycle occurs without Customer Care Center, 1-800-898-1879, www.askona.com 3 Do not reach into the appliance if the drum is moving. 9. Keep the area around the exhaust opening and adjacent surrounding areas free from service or discarded, remove the door to catch fire. Do not wash or dry articles that...
Use and Care Guide English
Page 4
... purposes of the drying cycle unless all installation instructions. 22. Clothes dryer installation must be of the dryer will get very hot. Do not install a clothes dryer with clothes dryers. These conditions will reduce the risk of electric shock by a certified professional. 27. If excessive force is no longer useful, contact your local refuse collection service for advice on how to collapse, be replaced by providing...
... purposes of the drying cycle unless all installation instructions. 22. Clothes dryer installation must be of the dryer will get very hot. Do not install a clothes dryer with clothes dryers. These conditions will reduce the risk of electric shock by a certified professional. 27. If excessive force is no longer useful, contact your local refuse collection service for advice on how to collapse, be replaced by providing...
Use and Care Guide English
Page 5
... appliance is acceptable only for connection to a grounded metal, permanent wiring system, or an equipment-grounding conductor must be connected to copper. Use common sense and caution when installing, operating, and maintaining any user maintenance other than cleaning the lint trap. WARNING! - Check with the appliance (Canadian market only). b) For a grounded, permanently connected appliance: GROUNDING INSTRUCTIONS This appliance must be exhausted outdoors or the equivalent.
... appliance is acceptable only for connection to a grounded metal, permanent wiring system, or an equipment-grounding conductor must be connected to copper. Use common sense and caution when installing, operating, and maintaining any user maintenance other than cleaning the lint trap. WARNING! - Check with the appliance (Canadian market only). b) For a grounded, permanently connected appliance: GROUNDING INSTRUCTIONS This appliance must be exhausted outdoors or the equivalent.
Use and Care Guide English
Page 8
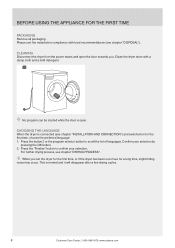
... USING THE APPLIANCE FOR THE FIRST TIME PACKAGING Remove all packaging. CLEANING Disconnect the dryer from the power mains and open . Confirm your selection. For further drying process, see chapter "DISPOSAL"). Please sort the materials in compliance with a damp cloth and a mild detergent. This is connected (see chapter "INSTALLATION AND CONNECTION") and switched on for a long time, slight hitting noise may occur. Clean the dryer drum with...
... USING THE APPLIANCE FOR THE FIRST TIME PACKAGING Remove all packaging. CLEANING Disconnect the dryer from the power mains and open . Confirm your selection. For further drying process, see chapter "DISPOSAL"). Please sort the materials in compliance with a damp cloth and a mild detergent. This is connected (see chapter "INSTALLATION AND CONNECTION") and switched on for a long time, slight hitting noise may occur. Clean the dryer drum with...
Use and Care Guide English
Page 14
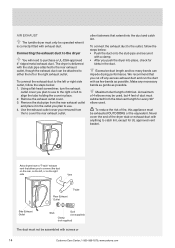
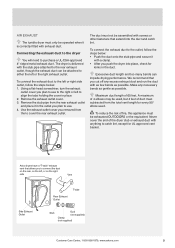
... the rear exhaust outlet, though the exhaust duct can impede drying performance. Remove the exhaust outlet cover. 3. AIR EXHAUST The tumble dryer must only be operated when it in the outlet you plan to either the left or the right exhaust outlet. Remove the stub pipe from the total vent length for UL approved vent basket. A maximum of 4 elbows may be exhausted OUTDOORS or the equivalent. To reduce the risk of duct must be used...
... the rear exhaust outlet, though the exhaust duct can impede drying performance. Remove the exhaust outlet cover. 3. AIR EXHAUST The tumble dryer must only be operated when it in the outlet you plan to either the left or the right exhaust outlet. Remove the stub pipe from the total vent length for UL approved vent basket. A maximum of 4 elbows may be exhausted OUTDOORS or the equivalent. To reduce the risk of duct must be used...
Use and Care Guide English
Page 16
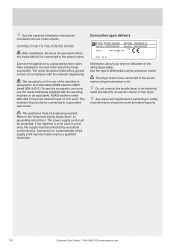
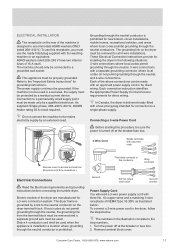
... be properly grounded. ASKO washers rated 208-240 V have two internal fuses of the machine is to a permanently wired supply point must be connected to a grounded power outlet. Information about your dryer is indicated on the rear of 15 A each. Do not connect the tumble dryer to the "Important Safety Instructions" for an electric shaver or hair dryer. See the separate installation instructions included in compliance with...
... be properly grounded. ASKO washers rated 208-240 V have two internal fuses of the machine is to a permanently wired supply point must be connected to a grounded power outlet. Information about your dryer is indicated on the rear of 15 A each. Do not connect the tumble dryer to the "Important Safety Instructions" for an electric shaver or hair dryer. See the separate installation instructions included in compliance with...
Use and Care Guide English
Page 21
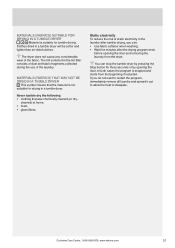
... lighter than air-dried clothes. Customer Care Center, 1-800-898-1879, www.askona.com 21 Never tumble dry the following: • clothing that the material is stopped and starts from the dryer. Clothes dried in a tumble dryer. You can : • Use fabric softener when washing. • Wait five minutes after tumble drying, you do not want to restart the program, immediately remove all...
... lighter than air-dried clothes. Customer Care Center, 1-800-898-1879, www.askona.com 21 Never tumble dry the following: • clothing that the material is stopped and starts from the dryer. Clothes dried in a tumble dryer. You can : • Use fabric softener when washing. • Wait five minutes after tumble drying, you do not want to restart the program, immediately remove all...
Use and Care Guide English
Page 25
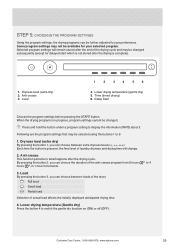
... change. 2. Dryness level (extra dry) 2. Anti-crease This function pertains to 6: 1. Lower drying temperature (Gentle dry) Press the button 4 to display the information (INFO) about it. STEP 5: CHOOSING THE PROGRAM SETTINGS Using the program settings, the drying programs can be available for delayed start which is not stored after the drying cycle. Anti-crease 3. Load 1 2 34 56 4. Delay Start Choose the program settings before pressing the START button. Time (timed drying...
... change. 2. Dryness level (extra dry) 2. Anti-crease This function pertains to 6: 1. Lower drying temperature (Gentle dry) Press the button 4 to display the information (INFO) about it. STEP 5: CHOOSING THE PROGRAM SETTINGS Using the program settings, the drying programs can be available for delayed start which is not stored after the drying cycle. Anti-crease 3. Load 1 2 34 56 4. Delay Start Choose the program settings before pressing the START button. Time (timed drying...
Use and Care Guide English
Page 28
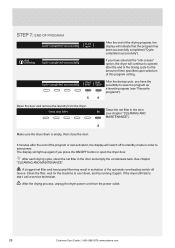
... light up again if you have the possibility to save power. STEP 7: END OF PROGRAM Cycle completed successfully Start new After the end of the drying cycle for the machine to cool down, and try running it again. Open the door and remove the laundry from the power outlet. 28 Customer Care Center, 1-800-898-1879, www.askona.com After the drying process, unplug the dryer power cord...
... light up again if you have the possibility to save power. STEP 7: END OF PROGRAM Cycle completed successfully Start new After the end of the drying cycle for the machine to cool down, and try running it again. Open the door and remove the laundry from the power outlet. 28 Customer Care Center, 1-800-898-1879, www.askona.com After the drying process, unplug the dryer power cord...
Use and Care Guide English
Page 36
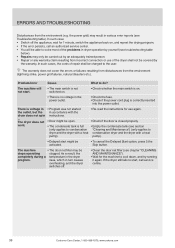
... dryer with a heat condensation dryer and the dryer with the drum does not spin instructions. ... In such cases, the costs of repair shall be open. • Check if the door is voltage in the power outlet. • Check the fuse. • Check if the power cord plug is not not start , call an authorized service center. • You will • The main switch is correctly inserted into the power outlet. Problem/error Cause What to the user. work...
... dryer with a heat condensation dryer and the dryer with the drum does not spin instructions. ... In such cases, the costs of repair shall be open. • Check if the door is voltage in the power outlet. • Check the fuse. • Check if the power cord plug is not not start , call an authorized service center. • You will • The main switch is correctly inserted into the power outlet. Problem/error Cause What to the user. work...
Use and Care Guide English
Page 40
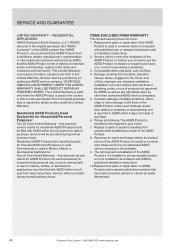
... limited Warranty - Residential ASKO Products Not Used Exclusively for Household/Personal Purposes: Two (2) Years limited Warranty - Residential ASKO Products Used Exclusively for Household/Personal Purposes or used Commercially or used in this Limited Warranty. Consumable items and parts, such as any attempted repair by ASKO, that is required to instruct you on ASKO Products with published user or operator instructions and/ or installation instructions. 2. Proof of the ASKO Product, to obtain service...
... limited Warranty - Residential ASKO Products Not Used Exclusively for Household/Personal Purposes: Two (2) Years limited Warranty - Residential ASKO Products Used Exclusively for Household/Personal Purposes or used Commercially or used in this Limited Warranty. Consumable items and parts, such as any attempted repair by ASKO, that is required to instruct you on ASKO Products with published user or operator instructions and/ or installation instructions. 2. Proof of the ASKO Product, to obtain service...
Use and Care Guide English
Page 41
... Hz Only authorised spare parts shall be used in the event of the dryer shall not be charged to jurisdiction. Some jurisdictions do not allow exclusion or limitations regarding warranty rights. Some jurisdictions do not allow the exclusion or limitation of repair shall be covered by any warranty claim resulting from jurisdiction to the user. Repair or any person other...
... Hz Only authorised spare parts shall be used in the event of the dryer shall not be charged to jurisdiction. Some jurisdictions do not allow exclusion or limitations regarding warranty rights. Some jurisdictions do not allow the exclusion or limitation of repair shall be covered by any warranty claim resulting from jurisdiction to the user. Repair or any person other...
Installation Instructions English
Page 9
... cover the rear exhaust outlet. Connecting the exhaust duct to the dryer You will need to catch lint, except for kinks in the outlet you plan to use . 4. Remove the exhaust outlet cover. 3. Maximum duct length of the dryer stub or exhaust duct with exhaust duct. Never cover the end of 60 feet. The duct must not be assembled with screws or other fasteners that extend into place, check for UL approved vent basket. Make any excess exhaust duct and run...
... cover the rear exhaust outlet. Connecting the exhaust duct to the dryer You will need to catch lint, except for kinks in the outlet you plan to use . 4. Remove the exhaust outlet cover. 3. Maximum duct length of the dryer stub or exhaust duct with exhaust duct. Never cover the end of 60 feet. The duct must not be assembled with screws or other fasteners that extend into place, check for UL approved vent basket. Make any excess exhaust duct and run...
Installation Instructions English
Page 11
... plug supplied with a four-prong plug intended for connection to this procedure, be sure the power is installed in a wet area, the supply must be used when the appliance is turned off at the breaker or fuse box. 2. Ring terminals Electrical Connections Read the Electrical requirements and grounding instructions before connecting the tumble dryer. Only a 4-conductor cord shall be removed for direct wiring. Customer Care Center, 1-800-898-1879, www.askona.com 11 ELECTRICAL INSTALLATION...
... plug supplied with a four-prong plug intended for connection to this procedure, be sure the power is installed in a wet area, the supply must be used when the appliance is turned off at the breaker or fuse box. 2. Ring terminals Electrical Connections Read the Electrical requirements and grounding instructions before connecting the tumble dryer. Only a 4-conductor cord shall be removed for direct wiring. Customer Care Center, 1-800-898-1879, www.askona.com 11 ELECTRICAL INSTALLATION...

Installation Instructions English
Page 12
....Turn power on at the breaker/fuse box. 1. Tighten the strain relief screws. 10.Replace terminal box cover on back of NEMA Type 14-30R, as illustrated below the terminal block opening . 4. Connect ground (center) wire of dryer. 9. Connecting a 4-wire Power Cord Before starting this procedure, be identified with yellow stripes) from external ground connector screw and remove from center terminal block. 6. Loosen or remove center terminal block screw. 4 5 6 5. To connect a 4-wire power cord to outer screws. 9. The numbers...
....Turn power on at the breaker/fuse box. 1. Tighten the strain relief screws. 10.Replace terminal box cover on back of NEMA Type 14-30R, as illustrated below the terminal block opening . 4. Connect ground (center) wire of dryer. 9. Connecting a 4-wire Power Cord Before starting this procedure, be identified with yellow stripes) from external ground connector screw and remove from center terminal block. 6. Loosen or remove center terminal block screw. 4 5 6 5. To connect a 4-wire power cord to outer screws. 9. The numbers...


