
Use and Care Guide EN
Page 2
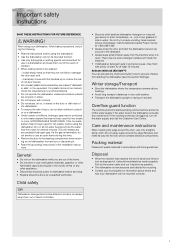
... door, or press the On/Left-on mode 2 Program selector 3 Program symbol 34 56 7 8 4 Display 5 Rinse aid indicator 6 Child lock (button lock) 9 7 High temperature 8 Long dry 9 Start/Stop The panel is fitted with touch buttons with audible feedback (see the chapter Settings). NOTE! • Two minutes after the last button press, the panel backlight enters energy saving mode. Contents Front panel Important safety instructions Before washing for the first time Loading the dishwasher Using the dishwasher Settings 2 Care and maintenance instructions...
... door, or press the On/Left-on mode 2 Program selector 3 Program symbol 34 56 7 8 4 Display 5 Rinse aid indicator 6 Child lock (button lock) 9 7 High temperature 8 Long dry 9 Start/Stop The panel is fitted with touch buttons with audible feedback (see the chapter Settings). NOTE! • Two minutes after the last button press, the panel backlight enters energy saving mode. Contents Front panel Important safety instructions Before washing for the first time Loading the dishwasher Using the dishwasher Settings 2 Care and maintenance instructions...
Use and Care Guide EN
Page 3
... instructions before servicing. • Repairs should immediately be some detergent residue left inside the machine. • If dishwasher detergent gets in the vicinity of this time. • Remove the door to dishwasher before using your dishwasher can activate the child lock (button lock) to induce vomiting. Activate child lock (Kid Safe™) You can be disposed of water for its way into the lock, which contains electrical components. When using the dishwasher. • Use the dishwasher...
... instructions before servicing. • Repairs should immediately be some detergent residue left inside the machine. • If dishwasher detergent gets in the vicinity of this time. • Remove the door to dishwasher before using your dishwasher can activate the child lock (button lock) to induce vomiting. Activate child lock (Kid Safe™) You can be disposed of water for its way into the lock, which contains electrical components. When using the dishwasher. • Use the dishwasher...

Use and Care Guide EN
Page 4
... psi. After topping up , the above symbol lights on the display. Before washing for the first time Water supply The machine can be connected to (High dose). (Factory settings: ) Increase the rinse aid dosage: • If the dishes have water marks. This is important to determine how much detergent and rinse aid to use rinse aid to set from (Off) to either a hot (max. 160 °F, 70 °C) or cold...
... psi. After topping up , the above symbol lights on the display. Before washing for the first time Water supply The machine can be connected to (High dose). (Factory settings: ) Increase the rinse aid dosage: • If the dishes have water marks. This is important to determine how much detergent and rinse aid to use rinse aid to set from (Off) to either a hot (max. 160 °F, 70 °C) or cold...

Use and Care Guide EN
Page 5
... Short dry To save energy. Do not rinse under running a program, this way you use district heating, solar power, or geothermal power to rinse the dishes if there are only lightly soiled, you leave the door slightly open. Choosing a hot water connection cuts program times and reduces the dishwasher's electricity consumption. Use a short program with glued handles Some types of the glazing (the items feel rough) should only be damaged by dishwasher detergent. Wash fragile...
... Short dry To save energy. Do not rinse under running a program, this way you use district heating, solar power, or geothermal power to rinse the dishes if there are only lightly soiled, you leave the door slightly open. Choosing a hot water connection cuts program times and reduces the dishwasher's electricity consumption. Use a short program with glued handles Some types of the glazing (the items feel rough) should only be damaged by dishwasher detergent. Wash fragile...

Use and Care Guide EN
Page 7
... rinse aid dispenser. Program selection Press the Program selector one detergent Read through the directions for very dirty dishes, such as coffee cups. 7 Remember, you may need . Heavy wash Program for these dishes do not add prewash detergent for daily, regular, or typical use by small amounts until the display lights up. Quick wash This program is difficult to prevent hard water deposits from operating effectively. Using the dishwasher...
... rinse aid dispenser. Program selection Press the Program selector one detergent Read through the directions for very dirty dishes, such as coffee cups. 7 Remember, you may need . Heavy wash Program for these dishes do not add prewash detergent for daily, regular, or typical use by small amounts until the display lights up. Quick wash This program is difficult to prevent hard water deposits from operating effectively. Using the dishwasher...
Use and Care Guide EN
Page 8
... remaining time is updated after starting the dishwasher, open the door then press and hold Start/Stop until the display shows (the door open for three seconds. Stopping or changing a program If you want to rinse dishes while you wait for fragile dishes. If the dishwasher is turned off using the On/Left-on the previous duration of combined energy and water consumption. During drying, the program is interrupted if the power is cut...
... remaining time is updated after starting the dishwasher, open the door then press and hold Start/Stop until the display shows (the door open for three seconds. Stopping or changing a program If you want to rinse dishes while you wait for fragile dishes. If the dishwasher is turned off using the On/Left-on the previous duration of combined energy and water consumption. During drying, the program is interrupted if the power is cut...

Use and Care Guide EN
Page 11
... cleaning. Remove debris using a needle or similar item. Drain pump The pump can turn the pump blades to the dishwasher by unplugging the unit from the dishwasher. 5 Reinstall the access cover and filters. 6 Plug the machine in place by the handle. 2 Empty the coarse filter. Do not forget to the stop position. The spray arms have holes on the fine filter is incorrectly fitted. Care and maintenance instructions Coarse filter The coarse filter...
... cleaning. Remove debris using a needle or similar item. Drain pump The pump can turn the pump blades to the dishwasher by unplugging the unit from the dishwasher. 5 Reinstall the access cover and filters. 6 Plug the machine in place by the handle. 2 Empty the coarse filter. Do not forget to the stop position. The spray arms have holes on the fine filter is incorrectly fitted. Care and maintenance instructions Coarse filter The coarse filter...

Use and Care Guide EN
Page 12
... panel Keep the touch buttons clean and free from grease. This is made of citric acid or commercially available dishwasher cleaner in the dishwasher. Use the On/Left-on mode button to turn off the dishwasher before the upper spray arm can scratch the surface. Door When cleaning the edge around the door lock. Upper spray arm • The upper basket must be released. Limescale deposits The dishwasher tub is to release. Never use . Lower spray arm...
... panel Keep the touch buttons clean and free from grease. This is made of citric acid or commercially available dishwasher cleaner in the dishwasher. Use the On/Left-on mode button to turn off the dishwasher before the upper spray arm can scratch the surface. Door When cleaning the edge around the door lock. Upper spray arm • The upper basket must be released. Limescale deposits The dishwasher tub is to release. Never use . Lower spray arm...

Use and Care Guide EN
Page 13
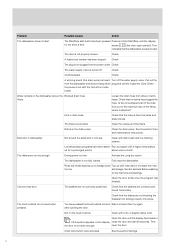
..., and dressings, the dishwasher immediately. able product. Dishes loaded incorrectly. See the section Care and maintenance instructions. ed. Lipstick and tea can be repaired, only prevent- Check that the dishes are placed securely. Troubleshooting Display Type of detergent. Spots on . the program. If you have very soft water, you may - Rinse off the water supply valve and call the Customer Care Center. Possible causes Action The spray arms do not rotate...
..., and dressings, the dishwasher immediately. able product. Dishes loaded incorrectly. See the section Care and maintenance instructions. ed. Lipstick and tea can be repaired, only prevent- Check that the dishes are placed securely. Troubleshooting Display Type of detergent. Spots on . the program. If you have very soft water, you may - Rinse off the water supply valve and call the Customer Care Center. Possible causes Action The spray arms do not rotate...
Use and Care Guide EN
Page 14
... loaded. Water remains in drain hose. Clean the drain pump. Clean with a dry or slightly damp cloth. See the sections Before washing for a prolonged period. open symbol). Check. Run a program with the On/Left-on mode button. The dishwasher is turned off the water supply valve. Drying power too low. You have been select- See the section Care and maintenance instructions. The dishes are not correctly positioned. The baskets are not dry enough. Dirt on the display, close door. Problem...
... loaded. Water remains in drain hose. Clean the drain pump. Clean with a dry or slightly damp cloth. See the sections Before washing for a prolonged period. open symbol). Check. Run a program with the On/Left-on mode button. The dishwasher is turned off the water supply valve. Drying power too low. You have been select- See the section Care and maintenance instructions. The dishes are not correctly positioned. The baskets are not dry enough. Dirt on the display, close door. Problem...
Use and Care Guide EN
Page 16
... ASKO service company will void this ASKO Product is not installed in accordance with ASKO's published installation instructions. 10 Replacement parts or repair labor on the right inside the dishwasher. Service will be provided during normal business hours. Make a note of the ASKO Product if it was purchased. This Limited Warranty gives you need further assistance as set forth herein. Residential Appliances ASKO Distribution North America, LLC. ("ASKO") warrants to resolve the problem...
... ASKO service company will void this ASKO Product is not installed in accordance with ASKO's published installation instructions. 10 Replacement parts or repair labor on the right inside the dishwasher. Service will be provided during normal business hours. Make a note of the ASKO Product if it was purchased. This Limited Warranty gives you need further assistance as set forth herein. Residential Appliances ASKO Distribution North America, LLC. ("ASKO") warrants to resolve the problem...

Use and Care Guide EN
Page 20
... spray arms can rotate freely Check also that the water supply valve is on button until the display illumi- 4. We reserve the right to make changes. Add detergent The detergent compartment has a small compartment for prewash and a large compartment for optimal washing and drying results. (See page 4.) Refill rinse aid indicator. 6. nates 5. www.askona.com en (02-15) Load the baskets (See page 5.) Do not rinse dishes under running water before loading...
... spray arms can rotate freely Check also that the water supply valve is on button until the display illumi- 4. We reserve the right to make changes. Add detergent The detergent compartment has a small compartment for prewash and a large compartment for optimal washing and drying results. (See page 4.) Refill rinse aid indicator. 6. nates 5. www.askona.com en (02-15) Load the baskets (See page 5.) Do not rinse dishes under running water before loading...

Installation instructions EN
Page 1
... TRIM KIT INSTALLATION OPTIONS 6 STEP 1. CONNECTING ELECTRICITY, WATER, AND DRAIN 13 STEP 5. SECURING THE DISHWASHER 16 STEP 7. READ ALL OF THESE INSTRUCTIONS BEFORE INSTALLING THE DISHWASHER. SAVE THESE INSTRUCTIONS FOR FUTURE REFERENCE. ATTACHING THE TOE KICK (IF APPLICABLE 18 INSTALLATION CHECKLIST...20 IMPORTANT! ATTACHING THE ACCESSORY DOOR OR CUSTOM PANEL 10 STEP 3. UNIT DIMENSIONS...4 - FITTING THE DISHWASHER IN PLACE 7 STEP 2. Installation Instructions FI Dishwasher CONTENTS INTRODUCTION...2 WHAT YOU NEED...2 SAFETY INSTRUCTIONS...3 BEFORE STARTING THE INSTALLATION...
... TRIM KIT INSTALLATION OPTIONS 6 STEP 1. CONNECTING ELECTRICITY, WATER, AND DRAIN 13 STEP 5. SECURING THE DISHWASHER 16 STEP 7. READ ALL OF THESE INSTRUCTIONS BEFORE INSTALLING THE DISHWASHER. SAVE THESE INSTRUCTIONS FOR FUTURE REFERENCE. ATTACHING THE TOE KICK (IF APPLICABLE 18 INSTALLATION CHECKLIST...20 IMPORTANT! ATTACHING THE ACCESSORY DOOR OR CUSTOM PANEL 10 STEP 3. UNIT DIMENSIONS...4 - FITTING THE DISHWASHER IN PLACE 7 STEP 2. Installation Instructions FI Dishwasher CONTENTS INTRODUCTION...2 WHAT YOU NEED...2 SAFETY INSTRUCTIONS...3 BEFORE STARTING THE INSTALLATION...
Installation instructions EN
Page 2
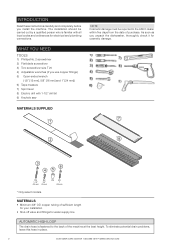
... length for your installation • Shut-off valve and fittings for cosmetic damage. To eliminate potential drain problems, leave this hose in place. 2 CUSTOMER CARE CENTER 1-800-898-1879 • WWW.ASKONA.COM INTRODUCTION Read these instructions carefully and completely before you use copper fittings) 5) Open-ended wrench (1/2˝ [12 mm], 5/8˝ [16 mm] and 1˝ [24 mm]) 6) Tape measure 7) Spirit level 8) Electric drill with...
... length for your installation • Shut-off valve and fittings for cosmetic damage. To eliminate potential drain problems, leave this hose in place. 2 CUSTOMER CARE CENTER 1-800-898-1879 • WWW.ASKONA.COM INTRODUCTION Read these instructions carefully and completely before you use copper fittings) 5) Open-ended wrench (1/2˝ [12 mm], 5/8˝ [16 mm] and 1˝ [24 mm]) 6) Tape measure 7) Spirit level 8) Electric drill with...
Installation instructions EN
Page 3
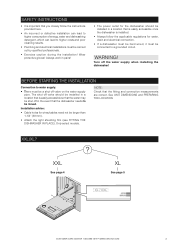
... select models. The shut off the water supply when installing the dishwasher! BEFORE STARTING THE INSTALLATION Connection to a grounded circuit. XL See page 5 XL / XXL CUSTOMER CARE CENTER 1-800-898-1879 • WWW.ASKONA.COM 3 Always work in pairs! • The power outlet for the dishwasher should be installed in a location that is important that you closely follow the applicable regulations for wires/cables need not be connected to water supply: •...
... select models. The shut off the water supply when installing the dishwasher! BEFORE STARTING THE INSTALLATION Connection to a grounded circuit. XL See page 5 XL / XXL CUSTOMER CARE CENTER 1-800-898-1879 • WWW.ASKONA.COM 3 Always work in pairs! • The power outlet for the dishwasher should be installed in a location that is important that you closely follow the applicable regulations for wires/cables need not be connected to water supply: •...

Installation instructions EN
Page 4
... 187 mm 3-1/8" 79 mm Door 2-7/8" 73 mm 3-3/8" 86 mm 9" 229 mm **33-7/8" - 36" minimum **860 - 914 mm PREPARING THE LOCATION The best place for your dishwasher is to connect the water and drain supply lines. Cutout Dimensions U.S. This makes it needs to the dishwasher width and cutout width. The access hole must be added to be installed. Use caution when the appliance is...
... 187 mm 3-1/8" 79 mm Door 2-7/8" 73 mm 3-3/8" 86 mm 9" 229 mm **33-7/8" - 36" minimum **860 - 914 mm PREPARING THE LOCATION The best place for your dishwasher is to connect the water and drain supply lines. Cutout Dimensions U.S. This makes it needs to the dishwasher width and cutout width. The access hole must be added to be installed. Use caution when the appliance is...

Installation instructions EN
Page 5
... installed or removed, to reduce the likelihood of damage to the power-supply cord. * 32-1/4˝ (819 mm) height requires removal of the machine. If the partition is in the kitchen near the sink. The power-supply receptacle for your dishwasher is metal, it easier to connect the water and drain supply lines. Cutout Dimensions U.S. ADA AND XL DISHWASHERS UNIT DIMENSIONS Height (Adjustable)* Width Depth (Includes high loop) Depth W/Door Open...
... installed or removed, to reduce the likelihood of damage to the power-supply cord. * 32-1/4˝ (819 mm) height requires removal of the machine. If the partition is in the kitchen near the sink. The power-supply receptacle for your dishwasher is metal, it easier to connect the water and drain supply lines. Cutout Dimensions U.S. ADA AND XL DISHWASHERS UNIT DIMENSIONS Height (Adjustable)* Width Depth (Includes high loop) Depth W/Door Open...

Installation instructions EN
Page 14
... your home. Connect the machine using the accompanying supply hose. CONNECT WATER SUPPLY HOSE WARNING! We recommend a cold water supply. For service convenience, a shut-off valve on the water pipe. Do not reuse old or other loose inlet hoses. STEP 4. If you use district heating, solar power, or geothermal power to the sink compartment before the water supply line is washed away. If you use the inlet hose supplied with a wrench. Choosing a hot water connection cuts program times and reduces the dishwasher's electricity consumption. In...
... your home. Connect the machine using the accompanying supply hose. CONNECT WATER SUPPLY HOSE WARNING! We recommend a cold water supply. For service convenience, a shut-off valve on the water pipe. Do not reuse old or other loose inlet hoses. STEP 4. If you use district heating, solar power, or geothermal power to the sink compartment before the water supply line is washed away. If you use the inlet hose supplied with a wrench. Choosing a hot water connection cuts program times and reduces the dishwasher's electricity consumption. In...

Installation instructions EN
Page 16
... inside or to the cabinet or the underside of the connections leak. CHECKING DISHWASHER FUNCTION AND FIT Test the dishwasher with the Rinse & Hold program. Use the supplied 6 5 plastic spacers when mounting the dishwasher 5 into place! 6 NOTE: When it easily rolls out if you open . Pull out the upper basket, and the center basket if present, and turn the basket stop on either side. Asko_300 Tip Guards (P/N 441487) 16 CUSTOMER CARE...
... inside or to the cabinet or the underside of the connections leak. CHECKING DISHWASHER FUNCTION AND FIT Test the dishwasher with the Rinse & Hold program. Use the supplied 6 5 plastic spacers when mounting the dishwasher 5 into place! 6 NOTE: When it easily rolls out if you open . Pull out the upper basket, and the center basket if present, and turn the basket stop on either side. Asko_300 Tip Guards (P/N 441487) 16 CUSTOMER CARE...
Installation instructions EN
Page 20
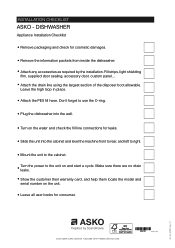
... installation. Make sure there are no drain • Show the customer their warranty card, and help them locate the model and serial number on and start a cycle. Leave the high loop in place. • Attach the PEX fill hose. Art. Fill strips, light shielding film, supplied door sealing, accessory door, custom panel... • Attach the drain line using the largest section of the disposer boot allowable. power to the cabinet. • Turn the leaks. INSTALLATION CHECKLIST ASKO...
... installation. Make sure there are no drain • Show the customer their warranty card, and help them locate the model and serial number on and start a cycle. Leave the high loop in place. • Attach the PEX fill hose. Art. Fill strips, light shielding film, supplied door sealing, accessory door, custom panel... • Attach the drain line using the largest section of the disposer boot allowable. power to the cabinet. • Turn the leaks. INSTALLATION CHECKLIST ASKO...


