Owners Manual
Page 2
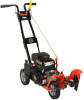
... ordering replacement parts or making service inquiries, know the Model and Serial numbers of your manuals. Visit your unit (Figure 1). • Record Unit Model and Serial numbers here. • Record Engine Model and Serial numbers here. The contents will provide you with the unit. Numbers are given from your equipment. TABLE OF CONTENTS SAFETY 4 ASSEMBLY 7 CONTROLS AND FEATURES 8 OPERATION 9 MAINTENANCE SCHEDULE 14 SERVICE AND ADJUSTMENTS . . . . . 15 STORAGE 16 TROUBLESHOOTING 17 SERVICE PARTS 17 SPECIFICATIONS 18 WARRANTY...
... ordering replacement parts or making service inquiries, know the Model and Serial numbers of your manuals. Visit your unit (Figure 1). • Record Unit Model and Serial numbers here. • Record Engine Model and Serial numbers here. The contents will provide you with the unit. Numbers are given from your equipment. TABLE OF CONTENTS SAFETY 4 ASSEMBLY 7 CONTROLS AND FEATURES 8 OPERATION 9 MAINTENANCE SCHEDULE 14 SERVICE AND ADJUSTMENTS . . . . . 15 STORAGE 16 TROUBLESHOOTING 17 SERVICE PARTS 17 SPECIFICATIONS 18 WARRANTY...
Owners Manual
Page 3
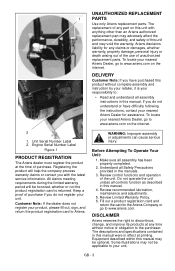
... unauthorized replacement parts. Review recommended lubrication, maintenance and adjustments. 5. Equipment described within this manual were in the manuals. 3. DELIVERY Customer Note: If you do not register your nearest Ariens Dealer for any time without complete assembly and instruction by your retailer, it is returned. Understand all assembly has been properly completed. 2. Review control functions and operation of purchase. The descriptions and specifications contained in this manual may...
... unauthorized replacement parts. Review recommended lubrication, maintenance and adjustments. 5. Equipment described within this manual were in the manuals. 3. DELIVERY Customer Note: If you do not register your nearest Ariens Dealer for any time without complete assembly and instruction by your retailer, it is returned. Understand all assembly has been properly completed. 2. Review control functions and operation of purchase. The descriptions and specifications contained in this manual may...

Owners Manual
Page 4
... safety precautions. SAFETY ALERTS CAUTION: POTENTIALLY HAZARDOUS SITUATION! It may also be used in decals and with care. IMPORTANT: Specific procedures or information required to prevent damage to stop unit and engine, remove key, engage parking brake, and allow moving parts to unit or attachment. NOTATIONS NOTE: General reference information for these symbols to alert against unsafe...
... safety precautions. SAFETY ALERTS CAUTION: POTENTIALLY HAZARDOUS SITUATION! It may also be used in decals and with care. IMPORTANT: Specific procedures or information required to prevent damage to stop unit and engine, remove key, engage parking brake, and allow moving parts to unit or attachment. NOTATIONS NOTE: General reference information for these symbols to alert against unsafe...

Owners Manual
Page 5
... foot wear, and long trousers. Tampering with these instructions to use of rotating parts. 2. Add fuel before starting the engine. AVOID INJURY. Keep children and others away from rotating parts. Thrown objects can only be used and remove all fuel tank and container caps securely. Store fuel in sets to see that the operator or user is highly flammable. Keep in severe fines or penalties. Always keep...
... foot wear, and long trousers. Tampering with these instructions to use of rotating parts. 2. Add fuel before starting the engine. AVOID INJURY. Keep children and others away from rotating parts. Thrown objects can only be used and remove all fuel tank and container caps securely. Store fuel in sets to see that the operator or user is highly flammable. Keep in severe fines or penalties. Always keep...

Owners Manual
Page 6
Walk, never run. Do not change the engine governor settings or overspeed the engine. Start the engine or switch on the motor, unless the edger has to be fatal. Do not tilt when starting . Do not put hands or feet near or under rotating parts. Reduce the throttle setting during engine runout and, if the engine is away from the blade(s). Maintenance and storage a. f. Edge only in daylight or...
Walk, never run. Do not change the engine governor settings or overspeed the engine. Start the engine or switch on the motor, unless the edger has to be fatal. Do not tilt when starting . Do not put hands or feet near or under rotating parts. Reduce the throttle setting during engine runout and, if the engine is away from the blade(s). Maintenance and storage a. f. Edge only in daylight or...
Owners Manual
Page 8
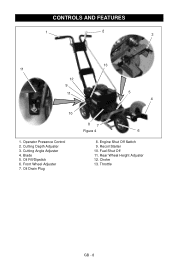
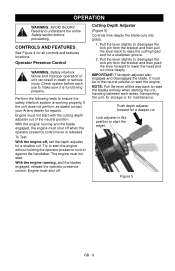
Blade 5. Engine Shut Off Switch 9. Throttle GB - 8 Oil Fill/Dipstick 6. Recoil Starter 10. Choke 13. CONTROLS AND FEATURES 1 2 3 13 11 12 9 11 5 4 10 1. Operator Presence Control 2. Rear Wheel Height Adjuster 12. Cutting Angle Adjuster 4. Oil Drain Plug 87 Figure 4 6 8. Fuel Shut Off 11. Front Wheel Adjuster 7. Cutting Depth Adjuster 3.
Blade 5. Engine Shut Off Switch 9. Throttle GB - 8 Oil Fill/Dipstick 6. Recoil Starter 10. Choke 13. CONTROLS AND FEATURES 1 2 3 13 11 12 9 11 5 4 10 1. Operator Presence Control 2. Rear Wheel Height Adjuster 12. Cutting Angle Adjuster 4. Oil Drain Plug 87 Figure 4 6 8. Fuel Shut Off 11. Front Wheel Adjuster 7. Cutting Depth Adjuster 3.
Owners Manual
Page 9
... start the edger. OPERATION WARNING: AVOID INJURY. Check system before proceeding. If the unit does not perform as stated contact your Ariens dealer for maintenance. The engine must be in this position to raise the blades entirely when starting the unit, traveling between work areas, transporting the unit, for storage or for repairs. IMPORTANT: The depth adjuster also engages and disengages the blade. Lock adjuster...
... start the edger. OPERATION WARNING: AVOID INJURY. Check system before proceeding. If the unit does not perform as stated contact your Ariens dealer for maintenance. The engine must be in this position to raise the blades entirely when starting the unit, traveling between work areas, transporting the unit, for storage or for repairs. IMPORTANT: The depth adjuster also engages and disengages the blade. Lock adjuster...

Owners Manual
Page 10
... Wheel Adjuster (Figure 8) Positions the front wheel on the axle to unlock the head and then rotate it supports the unit level when operating, and then securely tighten the knob. Push the lever forward to balance the unit when working along curbs or other uneven terrain. 1. NOTE: Set the wheel height before starting the engine or engaging the blades. Loosen knob, position wheel at the desired height and replace...
... Wheel Adjuster (Figure 8) Positions the front wheel on the axle to unlock the head and then rotate it supports the unit level when operating, and then securely tighten the knob. Push the lever forward to balance the unit when working along curbs or other uneven terrain. 1. NOTE: Set the wheel height before starting the engine or engaging the blades. Loosen knob, position wheel at the desired height and replace...
Owners Manual
Page 11
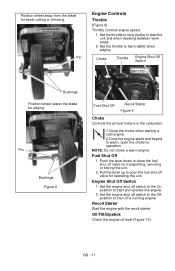
... Recoil Starter Figure 9 Choke Controls the air-fuel mixture in the carburetor. 1.Close the choke when starting a cold engine. 2.Once the engine starts and begins to warm, open the fuel shut off valve for operation. Pull the lever up to close the fuel shut off switch to the Off position to start and operate the engine. 2. Oil Fill/Dipstick Check the engine oil level (Figure 10). Choke Throttle Engine Shut Off Switch Bushings Position wheel nearer the blade for transporting, servicing or storing the unit. 2. Set the engine...
... Recoil Starter Figure 9 Choke Controls the air-fuel mixture in the carburetor. 1.Close the choke when starting a cold engine. 2.Once the engine starts and begins to warm, open the fuel shut off valve for operation. Pull the lever up to close the fuel shut off switch to the Off position to start and operate the engine. 2. Oil Fill/Dipstick Check the engine oil level (Figure 10). Choke Throttle Engine Shut Off Switch Bushings Position wheel nearer the blade for transporting, servicing or storing the unit. 2. Set the engine...
Owners Manual
Page 12
... the carburetor and the fuel hoses, filter and tank. Do not overfill. If the pumps are not marked for capacity of any undesirable operating problems occur, use different fuels. • Never mix oil and gasoline. If the engine experiences starting or performance problems after using a new gasoline, switch to use a gasoline with an appropriately sized dispensing spout when filling the tank. IMPORTANT: DO NOT OVERFILL! Filling to the recommended level ensures a vapor gap...
... the carburetor and the fuel hoses, filter and tank. Do not overfill. If the pumps are not marked for capacity of any undesirable operating problems occur, use different fuels. • Never mix oil and gasoline. If the engine experiences starting or performance problems after using a new gasoline, switch to use a gasoline with an appropriately sized dispensing spout when filling the tank. IMPORTANT: DO NOT OVERFILL! Filling to the recommended level ensures a vapor gap...
Owners Manual
Page 13
... shut off valve. 4. Edge thawed ground. When possible edge ground that may be damaged. Release the operator presence control. 4. Turn off engine shut off switch. 6. Make sure the cutting head is moist but not muddy or saturated. Set the choke to the closed position and the throttle to start the unit. OPERATING EDGER 1. Set the rear wheel to the appropriate height and the front wheel to appropriate location on...
... shut off valve. 4. Edge thawed ground. When possible edge ground that may be damaged. Release the operator presence control. 4. Turn off engine shut off switch. 6. Make sure the cutting head is moist but not muddy or saturated. Set the choke to the closed position and the throttle to start the unit. OPERATING EDGER 1. Set the rear wheel to the appropriate height and the front wheel to appropriate location on...

Owners Manual
Page 14
.... Clean or replace as needed . Apply a light oil to the wheel bushings. Clean Unit Check Tires Each Use Check Edger Blade and Mounting Hardware Check Guards and Mounting Hardware Check Engine Oil Level Check Engine Air Filter Lubrication 25 Hours or Every Season Check Belt 50 Hours or Every Season Check Spindle Bearings Remove all sliding joints, to the front axle shaft and to the pivot shaft and all dirt, grease, leaves, etc. Make sure the blade is operated. Check the belt...
.... Clean or replace as needed . Apply a light oil to the wheel bushings. Clean Unit Check Tires Each Use Check Edger Blade and Mounting Hardware Check Guards and Mounting Hardware Check Engine Oil Level Check Engine Air Filter Lubrication 25 Hours or Every Season Check Belt 50 Hours or Every Season Check Spindle Bearings Remove all sliding joints, to the front axle shaft and to the pivot shaft and all dirt, grease, leaves, etc. Make sure the blade is operated. Check the belt...

Owners Manual
Page 15
....0 N•m). Push the cutter head back towards the engine to cool. Make sure there are sharp and can cut you. Stop engine, wait for all the way up. 3. Replace the belt finger. Figure 12 5. Remove blade nut, washer, blade and bearing cap. Figure 13 7. Remove the belt from the front (cutter) pulley and from the unit. 4. Blade Change (Figure 11) WARNING: Blades are no twists or kinks...
....0 N•m). Push the cutter head back towards the engine to cool. Make sure there are sharp and can cut you. Stop engine, wait for all the way up. 3. Replace the belt finger. Figure 12 5. Remove blade nut, washer, blade and bearing cap. Figure 13 7. Remove the belt from the front (cutter) pulley and from the unit. 4. Blade Change (Figure 11) WARNING: Blades are no twists or kinks...

Owners Manual
Page 16
... switch is in the fuel tank inside of a building with highpressure water or store unit outdoors. Drain fuel from engine. 3. Refer to cool. Prevent deposits from forming in a clean dry area. NEVER store the engine with appropriate engine oil for storage: 1. Make sure the engine shut off position. 2. Remove all instructions under the oil drain opening, and remove oil drain plug from fuel tank. Touch up all oil has drained, replace the drain plug. 4. Follow the recommended mix ratio...
... switch is in the fuel tank inside of a building with highpressure water or store unit outdoors. Drain fuel from engine. 3. Refer to cool. Prevent deposits from forming in a clean dry area. NEVER store the engine with appropriate engine oil for storage: 1. Make sure the engine shut off position. 2. Remove all instructions under the oil drain opening, and remove oil drain plug from fuel tank. Touch up all oil has drained, replace the drain plug. 4. Follow the recommended mix ratio...
Owners Manual
Page 17
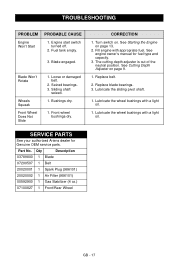
... 1. Fill engine with a light oil. See Cutting Depth Adjuster on . Qty Description 03789800 1 Blade 07200507 1 Belt 20020001 1 Spark Plug (986101) 20020002 1 Air Filter (986101) 00592900 1 Gas Stabilizer (4 oz.) 07100827 1 Front/Rear Wheel GB - 17 Blade engaged. Sliding shaft seized. 1. See engine owner's manual for Genuine OEM service parts. Lubricate the sliding pivot shaft. 1. Lubricate the wheel bushings with appropriate fuel. Turn switch on page 9. 1. See Starting the Engine on page 13. 2. Replace belt. 2. Engine start switch turned off. 2. Front wheel bushings...
... 1. Fill engine with a light oil. See Cutting Depth Adjuster on . Qty Description 03789800 1 Blade 07200507 1 Belt 20020001 1 Spark Plug (986101) 20020002 1 Air Filter (986101) 00592900 1 Gas Stabilizer (4 oz.) 07100827 1 Front/Rear Wheel GB - 17 Blade engaged. Sliding shaft seized. 1. See engine owner's manual for Genuine OEM service parts. Lubricate the sliding pivot shaft. 1. Lubricate the wheel bushings with appropriate fuel. Turn switch on page 9. 1. See Starting the Engine on page 13. 2. Replace belt. 2. Engine start switch turned off. 2. Front wheel bushings...
Owners Manual
Page 18
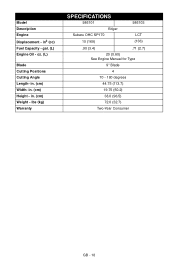
in . (cm) Width- in . (cm) Height - lbs (kg) Warranty SPECIFICATIONS 986101 986103 Edger Subaru OHC SP170 LCT 10 (169) (136) .90 (3.4) .71 (2.7) 20 (0.60) See Engine Manual for Type 9" Blade 4 70 - 180 degrees 44.75 (113.7) 19.75 (50.2) 38.0 (96.5) 72.0 (32.7) Two-Year Consumer GB - 18 Model Description Engine Displacement - gal. (L) Engine Oil - in. (cm) Weight - oz. (L) Blade Cutting Positions Cutting Angle Length- in3 (cc) Fuel Capacity -
in . (cm) Width- in . (cm) Height - lbs (kg) Warranty SPECIFICATIONS 986101 986103 Edger Subaru OHC SP170 LCT 10 (169) (136) .90 (3.4) .71 (2.7) 20 (0.60) See Engine Manual for Type 9" Blade 4 70 - 180 degrees 44.75 (113.7) 19.75 (50.2) 38.0 (96.5) 72.0 (32.7) Two-Year Consumer GB - 18 Model Description Engine Displacement - gal. (L) Engine Oil - in. (cm) Weight - oz. (L) Blade Cutting Positions Cutting Angle Length- in3 (cc) Fuel Capacity -
Owners Manual
Page 19
... Walks, Tillers, String Trimmers, Log Splitters, Edgers and Power Brushes Ariens Company (Ariens) warrants to accident, neglect, abuse, improper maintenance, improper storage or improper charging procedures. If the product is rented or leased, then the duration of these warranties shall be free from defects in material or workmanship, and repair or replace any defective part, subject to any product is put to any battery pack...
... Walks, Tillers, String Trimmers, Log Splitters, Edgers and Power Brushes Ariens Company (Ariens) warrants to accident, neglect, abuse, improper maintenance, improper storage or improper charging procedures. If the product is rented or leased, then the duration of these warranties shall be free from defects in material or workmanship, and repair or replace any defective part, subject to any product is put to any battery pack...
Owners Manual
Page 20
... Haseley Oxfordshire OX44 7PF 0800 597 7777 www.countax.com Exceptions and Limitations • Batteries are noted in the Limitations section above: lubricants, spark plugs, oil, oil filters, air filters, fuel filters, brake linings, brake arms, brake shoes, runners, scraper blades, shear bolts, mower blades, mower vanes, tines, brushes, headlights, light bulbs, knives, cutters. • Any misuse, alteration, improper assembly, improper adjustment, neglect, or accident which vary from time to time change the design of any defective part.
... Haseley Oxfordshire OX44 7PF 0800 597 7777 www.countax.com Exceptions and Limitations • Batteries are noted in the Limitations section above: lubricants, spark plugs, oil, oil filters, air filters, fuel filters, brake linings, brake arms, brake shoes, runners, scraper blades, shear bolts, mower blades, mower vanes, tines, brushes, headlights, light bulbs, knives, cutters. • Any misuse, alteration, improper assembly, improper adjustment, neglect, or accident which vary from time to time change the design of any defective part.
Owners Manual
Page 21
... have a question regarding your warranty coverage, you should be repaired or replaced by the Ariens Company. If the part fails prior to the first scheduled replacement, the part must be warranted for the warranty period defined in your Owner's Manual. In California, new equipment that the evaporative emission control system when installed was: (1.) Designed, built, and equipped so as : fuel tanks, fuel lines, fuel caps, valves, canisters, filters, vapor hoses, clamps, connectors...
... have a question regarding your warranty coverage, you should be repaired or replaced by the Ariens Company. If the part fails prior to the first scheduled replacement, the part must be warranted for the warranty period defined in your Owner's Manual. In California, new equipment that the evaporative emission control system when installed was: (1.) Designed, built, and equipped so as : fuel tanks, fuel lines, fuel caps, valves, canisters, filters, vapor hoses, clamps, connectors...
Owners Manual
Page 22
... Owner's Manual may be sold in the state of California that uses small off -road equipment. (6.) The owner must not be charged for diagnostic labor that leads to the determination that a warranted part is in fact defective, provided that are considered emission-related components for evaporative emissions: • Fuel Tank, Fuel Cap and Tether • Fuel Line, Fuel Line Fittings, Clamps* • Pressure Relief Valves, Control Valves...
... Owner's Manual may be sold in the state of California that uses small off -road equipment. (6.) The owner must not be charged for diagnostic labor that leads to the determination that a warranted part is in fact defective, provided that are considered emission-related components for evaporative emissions: • Fuel Tank, Fuel Cap and Tether • Fuel Line, Fuel Line Fittings, Clamps* • Pressure Relief Valves, Control Valves...


