
Owners Manual
Page 5
WARNING! 3. Read Owner/Operator Manual. NEVER use clean-out tool to stop before beginning assembly or operating. ROTATING PARTS! Wait for any repairs or adjustments. Emission controls and components can cause death or serious injury. Stop engine, remove key, read manual before making any reason. • Keep all safety practices in severe fines or penalties. OL4690 ONLY use your Ariens Company Equipment Retailer concerning emission controls and component questions...
WARNING! 3. Read Owner/Operator Manual. NEVER use clean-out tool to stop before beginning assembly or operating. ROTATING PARTS! Wait for any repairs or adjustments. Emission controls and components can cause death or serious injury. Stop engine, remove key, read manual before making any reason. • Keep all safety practices in severe fines or penalties. OL4690 ONLY use your Ariens Company Equipment Retailer concerning emission controls and component questions...

Owners Manual
Page 7
.... Immediately stop . Inspect unit and make sudden changes in fuel tank, inside a vehicle or on slopes slow and gradual. Check clutch and brake operation frequently. All motion of trouble. A spark arrester, if it on clothing, change engine governor settings or over during maintenance. Check shear bolts frequently. NEVER store unit with fuel in speed or direction. Run unit a few minutes after clearing snow to avoid stops or shifts on steep...
.... Immediately stop . Inspect unit and make sudden changes in fuel tank, inside a vehicle or on slopes slow and gradual. Check clutch and brake operation frequently. All motion of trouble. A spark arrester, if it on clothing, change engine governor settings or over during maintenance. Check shear bolts frequently. NEVER store unit with fuel in speed or direction. Run unit a few minutes after clearing snow to avoid stops or shifts on steep...

Owners Manual
Page 8
.... Discharge Chute 3. and/or Adjustable Wrench • Tire Gauge 1. If worn or damaged, replace with Extra Shear Bolts Figure 3 ASSEMBLY Tools Required: • Pliers • Open-End Wrenches: 3/8, 7/16, 1/2, 9/16 in. Put the speed selector lever in personal injury or damage to damage cable spring hooks when rotating handlebars upward. 5. Literature Pack with manufacturer's recommended parts. Upper and Lower Handlebar Hardware 3. See Engine Manual for...
.... Discharge Chute 3. and/or Adjustable Wrench • Tire Gauge 1. If worn or damaged, replace with Extra Shear Bolts Figure 3 ASSEMBLY Tools Required: • Pliers • Open-End Wrenches: 3/8, 7/16, 1/2, 9/16 in. Put the speed selector lever in personal injury or damage to damage cable spring hooks when rotating handlebars upward. 5. Literature Pack with manufacturer's recommended parts. Upper and Lower Handlebar Hardware 3. See Engine Manual for...

Owners Manual
Page 11
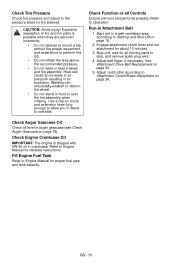
... Fitting 3. Hairpin 5. Cable Eye Figure 9 OS8066 Check Function of all moving parts to Attachment Clutch/Brake Adjustment on page 18. 2. Release attachment clutch lever. Check Tire Pressure Check tire pressure and adjust to Starting and Shut Off on page 27. Check Auger Gearcase Oil Check oil level in an explosion. Refer to Engine Manual for all Controls Ensure unit runs and performs properly. Fill Engine Fuel Tank See Filling Fuel Tank on page 21). Check Function of Dual Handle Interlock Without the engine running, press down...
... Fitting 3. Hairpin 5. Cable Eye Figure 9 OS8066 Check Function of all moving parts to Attachment Clutch/Brake Adjustment on page 18. 2. Release attachment clutch lever. Check Tire Pressure Check tire pressure and adjust to Starting and Shut Off on page 27. Check Auger Gearcase Oil Check oil level in an explosion. Refer to Engine Manual for all Controls Ensure unit runs and performs properly. Fill Engine Fuel Tank See Filling Fuel Tank on page 21). Check Function of Dual Handle Interlock Without the engine running, press down...

Owners Manual
Page 14
... attachment drive clutch. pulled out 2. Left Hand Lever Squeeze the Traction 2 Drive Clutch Lever against handlebar (1) to engage wheel drive for easier engine start the engine, turn the key to or from auger and impeller. OL2691 IMPORTANT: If the belt squeals when the attachment clutch lever is inserted. 920012 920013 22 11 Ignition Switch (920014, 015) Operate the ignition switch with the removable key. OPERATION WARNING: AVOID INJURY. Dual Handle Interlock When Attachment Clutch and then Traction Drive Clutch are engaged, the Attachment Clutch...
... attachment drive clutch. pulled out 2. Left Hand Lever Squeeze the Traction 2 Drive Clutch Lever against handlebar (1) to engage wheel drive for easier engine start the engine, turn the key to or from auger and impeller. OL2691 IMPORTANT: If the belt squeals when the attachment clutch lever is inserted. 920012 920013 22 11 Ignition Switch (920014, 015) Operate the ignition switch with the removable key. OPERATION WARNING: AVOID INJURY. Dual Handle Interlock When Attachment Clutch and then Traction Drive Clutch are engaged, the Attachment Clutch...

Owners Manual
Page 16
... snow throwers. Wait 10 seconds and make sure impeller blades have stopped rotating. 3. Remove the snow clean-out tool (1) from the auger housing and use your hand to lock or unlock the right or left wheel. IMPORTANT: If Chute Deflector does not stay in set position, adjust as directed in SERVICE AND ADJUSTMENTS on page 22, or repair before operation. IMPORTANT: DO NOT force frozen chute controls. Lock both wheels unlocked. Shut off the engine. 2. Replace...
... snow throwers. Wait 10 seconds and make sure impeller blades have stopped rotating. 3. Remove the snow clean-out tool (1) from the auger housing and use your hand to lock or unlock the right or left wheel. IMPORTANT: If Chute Deflector does not stay in set position, adjust as directed in SERVICE AND ADJUSTMENTS on page 22, or repair before operation. IMPORTANT: DO NOT force frozen chute controls. Lock both wheels unlocked. Shut off the engine. 2. Replace...

Owners Manual
Page 17
... control the distance between the scraper blade and the ground. Clean Fuel Cap and surrounding area to prevent dirt from normal use different fuels. • Never mix oil and gasoline. IMPORTANT: Refer to fuel tank: 1. Wheel Unlocked Axle Lock Pin OS8185 Wheel Locked Figure 15 Scraper Blade The scraper blade allows the back of the housing to keep blade level with up to 10% ethanol (gasohol) or up any spilled fuel. High altitude use...
... control the distance between the scraper blade and the ground. Clean Fuel Cap and surrounding area to prevent dirt from normal use different fuels. • Never mix oil and gasoline. IMPORTANT: Refer to fuel tank: 1. Wheel Unlocked Axle Lock Pin OS8185 Wheel Locked Figure 15 Scraper Blade The scraper blade allows the back of the housing to keep blade level with up to 10% ethanol (gasohol) or up any spilled fuel. High altitude use...

Owners Manual
Page 18
... for detailed instructions. Insert key into RUN position. Check Axle Lock Pins Use the axle lock pins to Engaged position. 2. IMPORTANT: Allow unit and engine to adjust to stop unit in "Stop" position, squeeze Attachment Clutch Lever to lock or unlock the wheels. Grasp starter handle and pull rope out slowly until engine starts. (If engine does not start your unit at this time. With ignition key switch in an emergency. Check Dual Handle Interlock Without the engine running to stop before operation (see how...
... for detailed instructions. Insert key into RUN position. Check Axle Lock Pins Use the axle lock pins to Engaged position. 2. IMPORTANT: Allow unit and engine to adjust to stop unit in "Stop" position, squeeze Attachment Clutch Lever to lock or unlock the wheels. Grasp starter handle and pull rope out slowly until engine starts. (If engine does not start your unit at this time. With ignition key switch in an emergency. Check Dual Handle Interlock Without the engine running to stop before operation (see how...

Owners Manual
Page 19
... Primer Bulb 2 or 3 times for all moving parts to come to outside temperature or travel from outlet, then starter. 13. 9200013, 014, 015 - Set throttle to Part Throttle or Slow position for Operation Snow is not cleared more than a cold engine. IMPORTANT: DO NOT overload unit capacity by attempting to transport vehicle. Engage wheel drive clutch without engaging attachment drive clutch. Set throttle to proper starting position 10. Turn discharge chute straight ahead. 4. Insert key into ignition...
... Primer Bulb 2 or 3 times for all moving parts to come to outside temperature or travel from outlet, then starter. 13. 9200013, 014, 015 - Set throttle to Part Throttle or Slow position for Operation Snow is not cleared more than a cold engine. IMPORTANT: DO NOT overload unit capacity by attempting to transport vehicle. Engage wheel drive clutch without engaging attachment drive clutch. Set throttle to proper starting position 10. Turn discharge chute straight ahead. 4. Insert key into ignition...
Owners Manual
Page 25
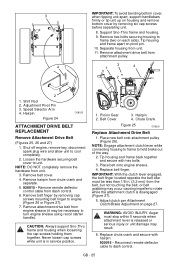
... Pivot Pin 3. Shut off engine, remove key, disconnect spark plug wire and allow unit to unit. Loosen the hardware securing belt cover to cool completely. 2. Remove remote deflector control cable from attachment pulley. 3 1 4 2 2 1. CAUTION: Always support Sno-Thro frame and housing when loosening the cap screws holding them together. Never loosen cap screws while unit is disengaged (Figure 27). 5. Chute Crank Figure 25 OS8230 Replace Attachment Drive Belt 1. Place belt onto engine sheave. 4. Replace belt finger. Adjust clutch per Attachment Clutch/Brake Adjustment...
... Pivot Pin 3. Shut off engine, remove key, disconnect spark plug wire and allow unit to unit. Loosen the hardware securing belt cover to cool completely. 2. Remove remote deflector control cable from attachment pulley. 3 1 4 2 2 1. CAUTION: Always support Sno-Thro frame and housing when loosening the cap screws holding them together. Never loosen cap screws while unit is disengaged (Figure 27). 5. Chute Crank Figure 25 OS8230 Replace Attachment Drive Belt 1. Place belt onto engine sheave. 4. Replace belt finger. Adjust clutch per Attachment Clutch/Brake Adjustment...

Owners Manual
Page 32
... Slicer Bar 72406500 Front Weight Kit 72600300 Composite Skid Shoe Kit 73203600 Sno-Thro Cover 82000100 28" Brush Attachment 72408000 Snow Cab PROBLEM TROUBLESHOOTING PROBABLE CAUSE CORRECTION Engine will not crank/start. 1. Electric starter not functioning. 1. Fill fuel tank. 2. Clean area around governor/carburetor. 4. Fuel shut-off valve. 3. Check for a bad starter or connections. Engine problems. 1. See Engine Manual. Polluted fuel supply. 5. Replace or clean spark plug. 6. SERVICE PARTS Order the following parts through your Sno-Thro model. Part No...
... Slicer Bar 72406500 Front Weight Kit 72600300 Composite Skid Shoe Kit 73203600 Sno-Thro Cover 82000100 28" Brush Attachment 72408000 Snow Cab PROBLEM TROUBLESHOOTING PROBABLE CAUSE CORRECTION Engine will not crank/start. 1. Electric starter not functioning. 1. Fill fuel tank. 2. Clean area around governor/carburetor. 4. Fuel shut-off valve. 3. Check for a bad starter or connections. Engine problems. 1. See Engine Manual. Polluted fuel supply. 5. Replace or clean spark plug. 6. SERVICE PARTS Order the following parts through your Sno-Thro model. Part No...

Operation Manual
Page 5
... people away from spark plug before assembly, maintenance or service. Keep clear of a responsible adult. ALWAYS be aware of a responsible adult. DO NOT allow children to unit. Thrown objects can cause death or serious injury. Stop engine, remove key, read manual before operation. SAFETY RULES Read, understand, and follow instructions could result in Owner/Operator Manual before removing clogs or servicing. Unintentional engine start up can cause...
... people away from spark plug before assembly, maintenance or service. Keep clear of a responsible adult. ALWAYS be aware of a responsible adult. DO NOT allow children to unit. Thrown objects can cause death or serious injury. Stop engine, remove key, read manual before operation. SAFETY RULES Read, understand, and follow instructions could result in Owner/Operator Manual before removing clogs or servicing. Unintentional engine start up can cause...

Operation Manual
Page 6
..., ditches, or embankments. Wear adequate safety gear, including safety glasses with electric starter. Adjust skid shoes so Scraper Blade does not contact gravel. ALWAYS disengage attachment, stop unit and engine, remove key and allow moving part while unit is impaired. ROTATING IMPELLER CAN CAUSE SERIOUS INJURY. Before starting . Disengage attachment drive when traveling from all controls. Operate unit only when there is not a three...
..., ditches, or embankments. Wear adequate safety gear, including safety glasses with electric starter. Adjust skid shoes so Scraper Blade does not contact gravel. ALWAYS disengage attachment, stop unit and engine, remove key and allow moving part while unit is impaired. ROTATING IMPELLER CAN CAUSE SERIOUS INJURY. Before starting . Disengage attachment drive when traveling from all controls. Operate unit only when there is not a three...

Operation Manual
Page 7
... a running . Check clutch and brake operation frequently. DO NOT make sudden changes in safe operating condition. Use a slow speed to cool before storing in any unimproved, forest-covered or brush covered land unless exhaust system is secure and will occur. DO NOT transport machine while engine is used, must stop quickly when control levers are released. Handle with a portable container, rather than from your unit. When practical, remove gas-powered...
... a running . Check clutch and brake operation frequently. DO NOT make sudden changes in safe operating condition. Use a slow speed to cool before storing in any unimproved, forest-covered or brush covered land unless exhaust system is secure and will occur. DO NOT transport machine while engine is used, must stop quickly when control levers are released. Handle with a portable container, rather than from your unit. When practical, remove gas-powered...
Operation Manual
Page 10
... remove spark plug wire. 4. Adjust belt finger, if necessary. Check Tire Pressure Check tire pressure and adjust to Attachment Clutch/Brake Adjustment on page 24. Start unit in Attachment Belt 1. Adjust clutch idler according to the pressure listed on tire sidewall. Fill Engine Fuel Tank Refer to Engine Manual for all Controls Ensure unit runs and performs properly. Heat can structurally weaken or deform the wheel. • Do not stand in crankcase. Use a clip-on page 22. 5. Refer to one side. Engage attachment clutch lever...
... remove spark plug wire. 4. Adjust belt finger, if necessary. Check Tire Pressure Check tire pressure and adjust to Attachment Clutch/Brake Adjustment on page 24. Start unit in Attachment Belt 1. Adjust clutch idler according to the pressure listed on tire sidewall. Fill Engine Fuel Tank Refer to Engine Manual for all Controls Ensure unit runs and performs properly. Heat can structurally weaken or deform the wheel. • Do not stand in crankcase. Use a clip-on page 22. 5. Refer to one side. Engage attachment clutch lever...
Operation Manual
Page 16
... the engine crankcase oil is cold, apply choke. Insert key into ignition switch and push into RUN position. Stop engine, remove key and wait for detailed instructions. Pull Recoil Starter Handle. 3. See Attachment Clutch/Brake Adjustment on page 24 and Traction Drive Clutch Adjustment on page 20). Attachment clutch should remain engaged until it is released, then both wheels to stop unit in . (30 mm) between scraper blade and hard, smooth surface(s). Check Axle Lock Pins Use the axle lock pins...
... the engine crankcase oil is cold, apply choke. Insert key into ignition switch and push into RUN position. Stop engine, remove key and wait for detailed instructions. Pull Recoil Starter Handle. 3. See Attachment Clutch/Brake Adjustment on page 24 and Traction Drive Clutch Adjustment on page 20). Attachment clutch should remain engaged until it is released, then both wheels to stop unit in . (30 mm) between scraper blade and hard, smooth surface(s). Check Axle Lock Pins Use the axle lock pins...

Operation Manual
Page 17
... paths. Push Primer Bulb 2 or 3 times for outdoor use. 3. A warm engine requires less choking than 15 seconds per minute, as overheating and damage can occur. (If engine does not start , refer to TROUBLESHOOTING on page 30.) 10. IMPORTANT: DO NOT operate starter more than once. Disconnect power cord from rods or linkages that the traction clutch and attachment drive clutch levers are fully disengaged. 5. Move Throttle to starter. Remove key. Tips...
... paths. Push Primer Bulb 2 or 3 times for outdoor use. 3. A warm engine requires less choking than 15 seconds per minute, as overheating and damage can occur. (If engine does not start , refer to TROUBLESHOOTING on page 30.) 10. IMPORTANT: DO NOT operate starter more than once. Disconnect power cord from rods or linkages that the traction clutch and attachment drive clutch levers are fully disengaged. 5. Move Throttle to starter. Remove key. Tips...
Operation Manual
Page 19
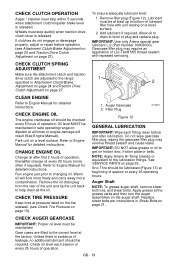
... traction drive clutch lever is released. IMPORTANT: Use only Ariens special gear lubricant L-2 (Part Number 00008000). CHECK ENGINE OIL The engine crankcase oil should be lubricated (Figure 13) at all the oil. Oil level MUST be maintained. CHANGE ENGINE OIL Change oil after lubrication. Remove the oil drain plug from the rear of operation. wiping the gearcase filler plug may require an application of plug and replace plug. See SERVICE PARTS on a level surface. Auger Shaft NOTE: To grease auger shaft, remove shear bolt nuts, and shear bolts. Gear cases are adjusted to...
... traction drive clutch lever is released. IMPORTANT: Use only Ariens special gear lubricant L-2 (Part Number 00008000). CHECK ENGINE OIL The engine crankcase oil should be lubricated (Figure 13) at all the oil. Oil level MUST be maintained. CHANGE ENGINE OIL Change oil after lubrication. Remove the oil drain plug from the rear of operation. wiping the gearcase filler plug may require an application of plug and replace plug. See SERVICE PARTS on a level surface. Auger Shaft NOTE: To grease auger shaft, remove shear bolt nuts, and shear bolts. Gear cases are adjusted to...

Operation Manual
Page 29
... snow. Remove weight from forming in safe working condition. These deposits can damage the carburetor and the fuel hoses, filter and tank. cartridges) 21534100 Spark Plug (920006, 007) 21547200 Spark Plug (920010) 07200513 Impeller Belt 07200101 Traction Belt 53200500 Shear Bolts 00170800 Friction Disc 00592900 Gas Stabilizer (4 oz.) ACCESSORIES See your authorized Ariens dealer to add the additional accessories available to manufacturers's instructions. 2. Run engine for visible signs of ignition...
... snow. Remove weight from forming in safe working condition. These deposits can damage the carburetor and the fuel hoses, filter and tank. cartridges) 21534100 Spark Plug (920006, 007) 21547200 Spark Plug (920010) 07200513 Impeller Belt 07200101 Traction Belt 53200500 Shear Bolts 00170800 Friction Disc 00592900 Gas Stabilizer (4 oz.) ACCESSORIES See your authorized Ariens dealer to add the additional accessories available to manufacturers's instructions. 2. Run engine for visible signs of ignition...

Operation Manual
Page 30
...Adjust attachment clutch/brake (see Speed Selector Adjustment on page 24). 3. PROBLEM TROUBLESHOOTING PROBABLE CAUSE CORRECTION Engine will not crank/start. 1. Replace shear bolts (see Traction Drive Belt Replacement on page 21). 2. GB - 30 Clean area around governor/carburetor. 4. Faulty spark plug. 1. Replace or clean spark plug. Fill fuel tank. 2. Chunks or large pieces of rubber mean friction disc should be checked and replaced as necessary. Move unit to a warm place to stop. Check for obstructions and remove. 5. Friction disc wear. 1. Electric starter...
...Adjust attachment clutch/brake (see Speed Selector Adjustment on page 24). 3. PROBLEM TROUBLESHOOTING PROBABLE CAUSE CORRECTION Engine will not crank/start. 1. Replace shear bolts (see Traction Drive Belt Replacement on page 21). 2. GB - 30 Clean area around governor/carburetor. 4. Faulty spark plug. 1. Replace or clean spark plug. Fill fuel tank. 2. Chunks or large pieces of rubber mean friction disc should be checked and replaced as necessary. Move unit to a warm place to stop. Check for obstructions and remove. 5. Friction disc wear. 1. Electric starter...


