User Guide
Page 1
... a few minutes to register it will allow you to get access to come. This will give you satisfaction for many years to ARNOVA technical support (http://arnovatech.com/support). ? P/N: 109563 As we recommend that it (http://arnovatech.com/register). NEED HELP? UserGuide_Arnova_10_PN109563_book.... for e-mail support. Once you unpack your Product). Please register your product before contacting Technical Support (see Register your ARNOVA product, we are often updating and improving our products, your device's software may have a slightly different appearance or modified functionality...
... a few minutes to register it will allow you to get access to come. This will give you satisfaction for many years to ARNOVA technical support (http://arnovatech.com/support). ? P/N: 109563 As we recommend that it (http://arnovatech.com/register). NEED HELP? UserGuide_Arnova_10_PN109563_book.... for e-mail support. Once you unpack your Product). Please register your product before contacting Technical Support (see Register your ARNOVA product, we are often updating and improving our products, your device's software may have a slightly different appearance or modified functionality...

User Guide
Page 2
...: enables to turn on or turn off the Host port after use. 6 Micro-USB port: to connect your ARNOVA to your computer, using downloaded applications. 10 Microphone Hardware Reset: In the event that your ARNOVA freezes operation, you can press the "pinhole reset" button. 2 UserGuide_Arnova_10_PN109563_book.indd 2 1 23 4 5 76 8 15/02/2011 17...
...: enables to turn on or turn off the Host port after use. 6 Micro-USB port: to connect your ARNOVA to your computer, using downloaded applications. 10 Microphone Hardware Reset: In the event that your ARNOVA freezes operation, you can press the "pinhole reset" button. 2 UserGuide_Arnova_10_PN109563_book.indd 2 1 23 4 5 76 8 15/02/2011 17...

User Guide
Page 3
Charging the Battery 1 Connect the supplied power cable to the ARNOVA Power connector and to help you set up ▲! English Starting up the principal settings: Language, country, time, etc. 3 UserGuide_Arnova_10_PN109563_book.indd 3 15/02/2011 17:46:56 Before using your ARNOVA, the installation wizard will bring you through a few screens to a wall outlet. 2 The ARNOVA device will turn on and start charging. 1 UK EUR US Installation Wizard The first time you start up your ARNOVA for the first time, completely charge the battery!
Charging the Battery 1 Connect the supplied power cable to the ARNOVA Power connector and to help you set up ▲! English Starting up the principal settings: Language, country, time, etc. 3 UserGuide_Arnova_10_PN109563_book.indd 3 15/02/2011 17:46:56 Before using your ARNOVA, the installation wizard will bring you through a few screens to a wall outlet. 2 The ARNOVA device will turn on and start charging. 1 UK EUR US Installation Wizard The first time you start up your ARNOVA for the first time, completely charge the battery!
User Guide
Page 4
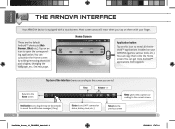
.... Top bar of the Interface (varies according to the screen you tap on your finger. See next page. English ▼ The ARNOVA INTERFACE Your ARNOVA device is equipped with your ARNOVA (games, various tools, etc.). Tap on an icon to reveal all the Android™ applications installed on them onto the Home screen...
.... Top bar of the Interface (varies according to the screen you tap on your finger. See next page. English ▼ The ARNOVA INTERFACE Your ARNOVA device is equipped with your ARNOVA (games, various tools, etc.). Tap on an icon to reveal all the Android™ applications installed on them onto the Home screen...
User Guide
Page 5
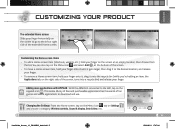
... your finger on the Menu icon and select Add , at an empty location, then choose from the list. Adding more applications with APPSLIB : With the ARNOVA connected to the Wifi, tap on the screen to go to download and use. English Customizing your product The extended Home screen Slide your finger...
... your finger on the Menu icon and select Add , at an empty location, then choose from the list. Adding more applications with APPSLIB : With the ARNOVA connected to the Wifi, tap on the screen to go to download and use. English Customizing your product The extended Home screen Slide your finger...

User Guide
Page 6
..., or WPA2.To obtain the exact connection parameters required, contact the Internet service provider . 6 UserGuide_Arnova_10_PN109563_book.indd 6 15/02/2011 17:47:06 Every time the ARNOVA is in a WiFi zone that WiFi hot spot with the network parameters you entered. * For free access WiFi points, there is off, tap on the... Wi-Fi line to turn it . Your ARNOVA will at the bottom of the screen. 4 Tap on the network you want to connect to, enter the required network information* and then tap on...
..., or WPA2.To obtain the exact connection parameters required, contact the Internet service provider . 6 UserGuide_Arnova_10_PN109563_book.indd 6 15/02/2011 17:47:06 Every time the ARNOVA is in a WiFi zone that WiFi hot spot with the network parameters you entered. * For free access WiFi points, there is off, tap on the... Wi-Fi line to turn it . Your ARNOVA will at the bottom of the screen. 4 Tap on the network you want to connect to, enter the required network information* and then tap on...

User Guide
Page 7
... on-screen controls, tap anywhere on the screen. English Playing multimedia files 1 From the Home screen, tap on the video, audio or photo application. 2 The ARNOVA will display a list of screen). To go to any particular point in the video, Music To play the next or previous song, tap on the...
... on-screen controls, tap anywhere on the screen. English Playing multimedia files 1 From the Home screen, tap on the video, audio or photo application. 2 The ARNOVA will display a list of screen). To go to any particular point in the video, Music To play the next or previous song, tap on the...
User Guide
Page 8
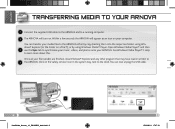
...Windows Media Player® and then 3 use the Sync tab to synchronize your music, videos, and photos onto your ARNOVA 1 Connect the supplied USB cable to the ARNOVA and to a running computer. 2 The ARNOVA will appear as an icon on USB 1 8 UserGuide_Arnova_10_PN109563_book.indd 8 32 15/02/2011 17:47:13 Click on ...clock.You can transfer your file transfers are finished, close Windows® Explorer and any other program that may have read or written to the ARNOVA either by using Win-� dows® Explorer (or the Finder on the 'safely remove' icon in the system tray, next to ...
...Windows Media Player® and then 3 use the Sync tab to synchronize your music, videos, and photos onto your ARNOVA 1 Connect the supplied USB cable to the ARNOVA and to a running computer. 2 The ARNOVA will appear as an icon on USB 1 8 UserGuide_Arnova_10_PN109563_book.indd 8 32 15/02/2011 17:47:13 Click on ...clock.You can transfer your file transfers are finished, close Windows® Explorer and any other program that may have read or written to the ARNOVA either by using Win-� dows® Explorer (or the Finder on the 'safely remove' icon in the system tray, next to ...
