

User Guide
Page 3
... Introducing Xserve 7 1 Xserve Overview 9 Your Server at a Glance-Front Panel 10 Your Server at a Glance-Back Panel 12 Your Server at a Glance-Interior 14 Your Server at a Glance-Mounting Hardware 16 2 Preparing to Install Your Server 19 Guidelines for Server Installation 19 Choose the Server's Position in a Rack 19 Electrical Power 20 Operating...
... Introducing Xserve 7 1 Xserve Overview 9 Your Server at a Glance-Front Panel 10 Your Server at a Glance-Back Panel 12 Your Server at a Glance-Interior 14 Your Server at a Glance-Mounting Hardware 16 2 Preparing to Install Your Server 19 Guidelines for Server Installation 19 Choose the Server's Position in a Rack 19 Electrical Power 20 Operating...
User Guide
Page 4
... 46 If the Server Has a Problem 46 What to Do If . . . 47 5 Installing or Replacing Server Components 49 Installing or Replacing an Apple Drive Module 50 Opening and Closing the Server 52 Adding Memory 56 Installing a PCI Card 59 About PCI Cards for the Server 59 Install a PCI...cations 70 FireWire Specifications 70 USB Specifications 70 Serial Port Specifications 71 Video Card Specifications 71 Power Supply 71 Power Requirements for Devices You Can Connect 72 System Clock and Battery 72 Appendix B Safety, Maintenance, and Ergonomics 73 Important Safety Information 73...
... 46 If the Server Has a Problem 46 What to Do If . . . 47 5 Installing or Replacing Server Components 49 Installing or Replacing an Apple Drive Module 50 Opening and Closing the Server 52 Adding Memory 56 Installing a PCI Card 59 About PCI Cards for the Server 59 Install a PCI...cations 70 FireWire Specifications 70 USB Specifications 70 Serial Port Specifications 71 Video Card Specifications 71 Power Supply 71 Power Requirements for Devices You Can Connect 72 System Clock and Battery 72 Appendix B Safety, Maintenance, and Ergonomics 73 Important Safety Information 73...

User Guide
Page 5
Power Supply 75 Cleaning Your Equipment 75 Cleaning the Server's Case 75 Apple and the Environment 76 For More Information 76 Health-Related Information About Computer Use 76 Contents 5
Power Supply 75 Cleaning Your Equipment 75 Cleaning the Server's Case 75 Apple and the Environment 76 For More Information 76 Health-Related Information About Computer Use 76 Contents 5

User Guide
Page 7
...sensing operation, with sensors to detect internal temperature, blower status or failure, power status or failure, and open from the front, with status and activity lights m ...front panel with 256 kilobytes (K) of level 2 cache and 2 megabytes (MB) of double-data-rate (DDR) backside L3 cache m up to four... or add components. This product is installed in a rack. PREFACE Introducing Xserve Congratulations on purchasing your new server. two USB ports; Among the distinctive ...(at minimum) m four Apple Drive Module bays, supporting up to 2 gigabytes (GB) of 1 gigahertz (GHz), with ...
...sensing operation, with sensors to detect internal temperature, blower status or failure, power status or failure, and open from the front, with status and activity lights m ...front panel with 256 kilobytes (K) of level 2 cache and 2 megabytes (MB) of double-data-rate (DDR) backside L3 cache m up to four... or add components. This product is installed in a rack. PREFACE Introducing Xserve Congratulations on purchasing your new server. two USB ports; Among the distinctive ...(at minimum) m four Apple Drive Module bays, supporting up to 2 gigabytes (GB) of 1 gigahertz (GHz), with ...

User Guide
Page 10
Your Server at a Glance-Front Panel FireWire port Ethernet card link light System activity lights CD drive Open button System identifier button/light Enclosure lock and status light Power button /light CD drive Apple Drive Modules bays (4) Securing thumbscrews (2) Built-in Ethernet link light Drive module activity light Drive module status light 10 Chapter 1
Your Server at a Glance-Front Panel FireWire port Ethernet card link light System activity lights CD drive Open button System identifier button/light Enclosure lock and status light Power button /light CD drive Apple Drive Modules bays (4) Securing thumbscrews (2) Built-in Ethernet link light Drive module activity light Drive module status light 10 Chapter 1
User Guide
Page 11
...the server. These modules can be removed and installed while the server is running. (See "Installing or Replacing an Apple Drive Module" on page 50 for locating a particular unit in a dual-processor server, the rows of system ... is useful for more information.) Each drive module has lights showing operating status and disk activity. Xserve Overview 11 Enclosure lock and lock status light The lock secures the enclosure and drive modules in ... can be turned on the back panel. ® Power button and light Press to show each processor's activity. This indicator is detected.
...the server. These modules can be removed and installed while the server is running. (See "Installing or Replacing an Apple Drive Module" on page 50 for locating a particular unit in a dual-processor server, the rows of system ... is useful for more information.) Each drive module has lights showing operating status and disk activity. Xserve Overview 11 Enclosure lock and lock status light The lock secures the enclosure and drive modules in ... can be turned on the back panel. ® Power button and light Press to show each processor's activity. This indicator is detected.

User Guide
Page 13
...One additional slot takes a 7-inch PCI card or, in a different slot and may come with cards installed at the factory. ≤ Power socket The power cord connects here; A duplicate system identifier button and light are on the front panel. Serial console port Connect a serial device...installed in the server. (In some configurations, the card may be in some configurations also have a different connector.) Xserve Overview 13 G Gigabit Ethernet port Connect your server to the server. FireWire ports Connect FireWire devices to a high-speed Ethernet network. System...
...One additional slot takes a 7-inch PCI card or, in a different slot and may come with cards installed at the factory. ≤ Power socket The power cord connects here; A duplicate system identifier button and light are on the front panel. Serial console port Connect a serial device...installed in the server. (In some configurations, the card may be in some configurations also have a different connector.) Xserve Overview 13 G Gigabit Ethernet port Connect your server to the server. FireWire ports Connect FireWire devices to a high-speed Ethernet network. System...

User Guide
Page 14
Your Server at a Glance-Interior Battery PCI card slots (2) RAM slots (4) Chassis release latch Blowers PCI/AGP card slot Power supply Chassis release latch Main logic board 14 Chapter 1
Your Server at a Glance-Interior Battery PCI card slots (2) RAM slots (4) Chassis release latch Blowers PCI/AGP card slot Power supply Chassis release latch Main logic board 14 Chapter 1

User Guide
Page 15
... 12-inch cards; Blowers The blowers cool the server during operation. RAM expansion slots You can also be configured to remove it . This component has a sensor that detects and reports if the power supply needs service. Xserve Overview 15 the slot on the left side of the server hold ...when in the three slots. The two slots on the right side holds a 7-inch card, and can expand DDR RAM up to 2 GB, using the four slots. (See "Adding Memory" on page 56 for more information.) Power supply The autoswitching power supply detects the voltage and adjusts for it from the cover.
... 12-inch cards; Blowers The blowers cool the server during operation. RAM expansion slots You can also be configured to remove it . This component has a sensor that detects and reports if the power supply needs service. Xserve Overview 15 the slot on the left side of the server hold ...when in the three slots. The two slots on the right side holds a 7-inch card, and can expand DDR RAM up to 2 GB, using the four slots. (See "Adding Memory" on page 56 for more information.) Power supply The autoswitching power supply detects the voltage and adjusts for it from the cover.

User Guide
Page 19
... appropriate operating environment for proper location of the unit in its rack and several factors in the infrastructure that the server and its rack, adequate power to ensure that will keep the server operating efficiently. As you plan for the rack. Choose the Server's Position in a Rack When determining...
... appropriate operating environment for proper location of the unit in its rack and several factors in the infrastructure that the server and its rack, adequate power to ensure that will keep the server operating efficiently. As you plan for the rack. Choose the Server's Position in a Rack When determining...

User Guide
Page 20
...rack, consult an electrical expert who is distributed evenly among circuits to install the server in the rack and the requirements for the combined power needs of all components. m For a rack with planning for the planned components. m Make sure that contains other expert if you ...and cables, leave at or near the middle of the rack from the front. m See Appendix A, "Specifications," for more power than specified for the server and all components. Consult an electrician if you need assistance with multiple components, you are installing multiple...
...rack, consult an electrical expert who is distributed evenly among circuits to install the server in the rack and the requirements for the combined power needs of all components. m For a rack with planning for the planned components. m Make sure that contains other expert if you ...and cables, leave at or near the middle of the rack from the front. m See Appendix A, "Specifications," for more power than specified for the server and all components. Consult an electrician if you need assistance with multiple components, you are installing multiple...

User Guide
Page 24
... well. You'll also need to attach the server and mark it on it to the rack. Installing the Server As noted previously, you have a power screwdriver, use it. Instructions for installing are given below. Get Ready to Install Before beginning work with another person as a yardstick. m If possible, arrange to...
... well. You'll also need to attach the server and mark it on it to the rack. Installing the Server As noted previously, you have a power screwdriver, use it. Instructions for installing are given below. Get Ready to Install Before beginning work with another person as a yardstick. m If possible, arrange to...

User Guide
Page 40
...cables for network connections and peripheral devices. 1 Assemble the cables and devices you will connect to each cable you are connecting. Do not attach the power cord yet. Make certain that each cable has the proper connector and that it can be used with a shorter cable. Connect Cables to the ... you must be feasible for each peripheral device or cable to determine that it is secured in the rack, you can connect the cables and power cord to its respective port. The labels allow you open the server. Important If you use in a high-capacity server. (Check the documentation ...
...cables for network connections and peripheral devices. 1 Assemble the cables and devices you will connect to each cable you are connecting. Do not attach the power cord yet. Make certain that each cable has the proper connector and that it can be used with a shorter cable. Connect Cables to the ... you must be feasible for each peripheral device or cable to determine that it is secured in the rack, you can connect the cables and power cord to its respective port. The labels allow you open the server. Important If you use in a high-capacity server. (Check the documentation ...

User Guide
Page 41
... sure you are easy to handle should you need to the arm with the straps provided. 5 Connect the power cord to each other. 4 Arrange all the cables attached to the server except the power cord, and attach them along the edge of the cable-management arm. If you lay the cables against...
... sure you are easy to handle should you need to the arm with the straps provided. 5 Connect the power cord to each other. 4 Arrange all the cables attached to the server except the power cord, and attach them along the edge of the cable-management arm. If you lay the cables against...

User Guide
Page 42
...the clip fit into the clip so that the cord is supported. Attach the power cord retainer clip to the two loops on the front panel of the server. Important... airflow and access to the rack for the electrical service available at your server, use the long power cord supplied with the server, or another cord, such as one already installed in the rack. 7 If ...you open the server. Be sure that the rounded part of the power socket. 6 Attach the power cord's retainer clip to the back panel to keep the power cord in place, connect each one to its intended device. If more ...
...the clip fit into the clip so that the cord is supported. Attach the power cord retainer clip to the two loops on the front panel of the server. Important... airflow and access to the rack for the electrical service available at your server, use the long power cord supplied with the server, or another cord, such as one already installed in the rack. 7 If ...you open the server. Be sure that the rounded part of the power socket. 6 Attach the power cord's retainer clip to the back panel to keep the power cord in place, connect each one to its intended device. If more ...

User Guide
Page 43
...load of multiple devices. You need to install the administration software on the server's network, using an Ethernet connection on the same subnet as a power strip, used with the rack is installed and secured, you can configure the server locally or use it. This plug will fi...in the rack and the cables in a Rack 43 Check the documentation for your rack for instructions. 9 After all connections are complete, plug the power cord into the outlet because the outlet is not grounded, contact a licensed electrician to replace the outlet with a properly grounded outlet. If you ...
...load of multiple devices. You need to install the administration software on the server's network, using an Ethernet connection on the same subnet as a power strip, used with the rack is installed and secured, you can configure the server locally or use it. This plug will fi...in the rack and the cables in a Rack 43 Check the documentation for your rack for instructions. 9 After all connections are complete, plug the power cord into the outlet because the outlet is not grounded, contact a licensed electrician to replace the outlet with a properly grounded outlet. If you ...

User Guide
Page 45
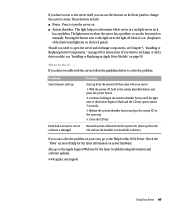
...'ve connected the cables and peripheral devices you can turn it on and set up the software and network services. See the Quick Start for Xserve booklet for setting up . Status lights on , and the server starts up all the services and options of the server's front panel to turn it... on. Detailed instructions for a roadmap to use . Starting Up the Server Press the power button at the left side of the Mac OS X Server software are provided in the software documentation included with your server, you plan to the...
...'ve connected the cables and peripheral devices you can turn it on and set up the software and network services. See the Quick Start for Xserve booklet for setting up . Status lights on , and the server starts up all the services and options of the server's front panel to turn it... on. Detailed instructions for a roadmap to use . Starting Up the Server Press the power button at the left side of the Mac OS X Server software are provided in the software documentation included with your server, you plan to the...
User Guide
Page 46
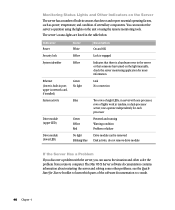
...Server The server has a number of built-in sensors that detect and report essential operating factors, such as power, temperature, and condition of eight LEDs; Link No connection Two rows of several key components. upper is ...the server's operation using the lights on the light manually; see the Quick Start for more information. Indicator Power Security lock System identifier Ethernet (lower is a hardware error in server with the server, you ... problem from a remote computer. check the server monitoring application for Xserve booklet to consult. 46 Chapter 4
...Server The server has a number of built-in sensors that detect and report essential operating factors, such as power, temperature, and condition of eight LEDs; Link No connection Two rows of several key components. upper is ...the server's operation using the lights on the light manually; see the Quick Start for more information. Indicator Power Security lock System identifier Ethernet (lower is a hardware error in server with the server, you ... problem from a remote computer. check the server monitoring application for Xserve booklet to consult. 46 Chapter 4
User Guide
Page 47
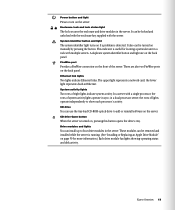
..., you can use the Installer to reinstall the software.). it 's on. (Duplicates of Help for the latest troubleshooting information and software updates: www.apple.com/support Using Your Server 47 What to flash and the CD tray opens (about 5 seconds). 3. Release the system identifier ...on manually. Also go to open tray. 4. If you determine which server in the system identifier button and press the power button. 2. Close the CD tray. These buttons include m Power: Press to this button begins to Do If . . . The light turns on server hardware. With the...
..., you can use the Installer to reinstall the software.). it 's on. (Duplicates of Help for the latest troubleshooting information and software updates: www.apple.com/support Using Your Server 47 What to flash and the CD tray opens (about 5 seconds). 3. Release the system identifier ...on manually. Also go to open tray. 4. If you determine which server in the system identifier button and press the power button. 2. Close the CD tray. These buttons include m Power: Press to this button begins to Do If . . . The light turns on server hardware. With the...

User Guide
Page 52
... components or the components you removed one. After shutting down the server. c Wait for all cables, unplug all cables from the back panel except the power cord. (If necessary, also remove the FireWire cable from the front panel.) 52 Chapter 5 Be sure to wait a brief period to allow the server's internal...
... components or the components you removed one. After shutting down the server. c Wait for all cables, unplug all cables from the back panel except the power cord. (If necessary, also remove the FireWire cable from the front panel.) 52 Chapter 5 Be sure to wait a brief period to allow the server's internal...

