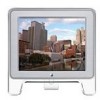

User Manual
Page 3
...Getting Ready to Set Up 9 Do You Need a Graphics Card? 9 Using More Than One Monitor 10 Connecting the Display to Your Computer 11 Turning the Display On 12 Installing the Apple Displays Software 13 Safety Instructions 15 Troubleshooting 16 If the Screen Image Is Dim, Flickers, or Does ... 17 Problems With Changing the Resolution 18 Problems Finding the Control Strip 19 Obtaining Online Support and Updated Apple Software 19 2 Using the Apple Displays Software 21 What's Included in the Apple Displays Software? 21 Learning About the Apple Displays Software Using Mac OS Help 21 About the Monitors ...
...Getting Ready to Set Up 9 Do You Need a Graphics Card? 9 Using More Than One Monitor 10 Connecting the Display to Your Computer 11 Turning the Display On 12 Installing the Apple Displays Software 13 Safety Instructions 15 Troubleshooting 16 If the Screen Image Is Dim, Flickers, or Does ... 17 Problems With Changing the Resolution 18 Problems Finding the Control Strip 19 Obtaining Online Support and Updated Apple Software 19 2 Using the Apple Displays Software 21 What's Included in the Apple Displays Software? 21 Learning About the Apple Displays Software Using Mac OS Help 21 About the Monitors ...

User Manual
Page 4
... Your Office 29 What About Electromagnetic Emissions? 30 Maintaining and Cleaning Your Monitor 31 Maintaining Your Monitor 31 Cleaning Your Monitor 31 Protecting Your Monitor From Theft 32 Appendix Technical Information 33 Specifications 33 Picture Tube 33 Input... Signals 33 Power-Saving and Environmental Features 33 User Controls 34 Factory Adjusted Video Modes 35 Input Electrical Requirements 36 Weight 36 Dimensions 36 Temperature 36 Humidity (Noncondensing) 36 Altitude 36 Display...
... Your Office 29 What About Electromagnetic Emissions? 30 Maintaining and Cleaning Your Monitor 31 Maintaining Your Monitor 31 Cleaning Your Monitor 31 Protecting Your Monitor From Theft 32 Appendix Technical Information 33 Specifications 33 Picture Tube 33 Input... Signals 33 Power-Saving and Environmental Features 33 User Controls 34 Factory Adjusted Video Modes 35 Input Electrical Requirements 36 Weight 36 Dimensions 36 Temperature 36 Humidity (Noncondensing) 36 Altitude 36 Display...
User Manual
Page 8
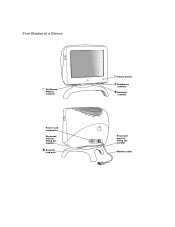
Your Display at a Glance On-Screen Display controls Power cord receptacle Recessed area for lifting the monitor Security lock port ® Power button ¤ Brightness controls O Contrast controls Recessed area for lifting the monitor Monitor cable
Your Display at a Glance On-Screen Display controls Power cord receptacle Recessed area for lifting the monitor Security lock port ® Power button ¤ Brightness controls O Contrast controls Recessed area for lifting the monitor Monitor cable
User Manual
Page 9
... might be unobstructed when you need to place your display. Before you connect your monitor, read the following the instructions in this chapter to learn how to set up and connect the Studio Display to place your monitor: m Be sure that the desk or table can ...monitor works with the monitor, check whether its video circuitry operates within these ranges: m horizontal scan rate of 30-85 kilohertz m vertical refresh rate of clearance in monitor port adapter or a compatible graphics card. You may not be compatible with display. Your Apple-authorized dealer can support the display...
... might be unobstructed when you need to place your display. Before you connect your monitor, read the following the instructions in this chapter to learn how to set up and connect the Studio Display to place your monitor: m Be sure that the desk or table can ...monitor works with the monitor, check whether its video circuitry operates within these ranges: m horizontal scan rate of 30-85 kilohertz m vertical refresh rate of clearance in monitor port adapter or a compatible graphics card. You may not be compatible with display. Your Apple-authorized dealer can support the display...
User Manual
Page 10
...rates that are not fully compatible with your computer. Note: This monitor is preadjusted at common resolution and vertical refresh rate settings (see "Using Manual Controls and the On-Screen Display" in Setting Up Your Studio Display. You may need to adjust the screen geometry, see "Factory ...Adjusted Video Modes" on working with your computer or graphics card for each additional monitor you are ranges only; If you don't use...
...rates that are not fully compatible with your computer. Note: This monitor is preadjusted at common resolution and vertical refresh rate settings (see "Using Manual Controls and the On-Screen Display" in Setting Up Your Studio Display. You may need to adjust the screen geometry, see "Factory ...Adjusted Video Modes" on working with your computer or graphics card for each additional monitor you are ranges only; If you don't use...

User Manual
Page 11
... socket on your hands on the recessed areas on the bottom of the monitor. 1 Connect the socket end of the monitor power cord to the power cord receptacle on the back of the grounding plug! Connecting the Display to Your Computer Warning This equipment is a safety feature. If you are... connecting to replace it with a plug, be electrically grounded. Do not defeat the purpose of the display. Then lift the monitor by placing your computer. Ensure that the computer you use a power cord with a properly grounded outlet. If the outlet is facing you ...
... socket on your hands on the recessed areas on the bottom of the monitor. 1 Connect the socket end of the monitor power cord to the power cord receptacle on the back of the grounding plug! Connecting the Display to Your Computer Warning This equipment is a safety feature. If you are... connecting to replace it with a plug, be electrically grounded. Do not defeat the purpose of the display. Then lift the monitor by placing your computer. Ensure that the computer you use a power cord with a properly grounded outlet. If the outlet is facing you ...
User Manual
Page 12
...start up your computer's power cord in your computer properly (see the manual that came with ™) on the back of the display. 3 Insert the monitor connector into the monitor port (marked with your computer comes on.) If the green light does not go on, press the... monitor's power button again. Monitor port icon Monitor connector If you 've connected the monitor to your computer, connect the display cable to Your Computer" on the monitor for the first time: 1 Plug your computer. For information about installing...
...start up your computer's power cord in your computer properly (see the manual that came with ™) on the back of the display. 3 Insert the monitor connector into the monitor port (marked with your computer comes on.) If the green light does not go on, press the... monitor's power button again. Monitor port icon Monitor connector If you 've connected the monitor to your computer, connect the display cable to Your Computer" on the monitor for the first time: 1 Plug your computer. For information about installing...

User Manual
Page 13
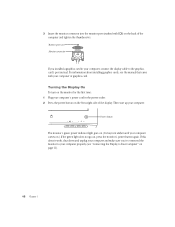
... able to turn off the DDC control, see the table "ETC" and "Accessing and Adjusting the On-Screen Display Controls" in Setting Up Your Studio Display. Installing the Apple Displays Software This section explains how to install the software. If you do, the software will need to turn off ... Insert the CD-ROM disc that contains the language you may notice a shimmering effect on your Mac OS-based computer. Setting Up 13 Your monitor automatically degausses (magnetically adjusts) the screen when it turns itself on the desktop. 2 Double-click the CD-ROM disc icon. m Power Macintosh...
... able to turn off the DDC control, see the table "ETC" and "Accessing and Adjusting the On-Screen Display Controls" in Setting Up Your Studio Display. Installing the Apple Displays Software This section explains how to install the software. If you do, the software will need to turn off ... Insert the CD-ROM disc that contains the language you may notice a shimmering effect on your Mac OS-based computer. Setting Up 13 Your monitor automatically degausses (magnetically adjusts) the screen when it turns itself on the desktop. 2 Double-click the CD-ROM disc icon. m Power Macintosh...

User Manual
Page 14
... 8-10 listed here. Click Continue and then click Agree once you can make for yourself and others. Click Continue to use the monitor. The Upgrader/Installer checks whether you have the correct system software, you 've read the document that appears. The license agreement speci.... If a message says you don't have the system software you need to quit the applications and continue with your computer. The Install Apple Displays Software dialog box appears. 8 Make sure the destination disk named is missing, a message tells you what needs to be able to calculate...
... 8-10 listed here. Click Continue and then click Agree once you can make for yourself and others. Click Continue to use the monitor. The Upgrader/Installer checks whether you have the correct system software, you 've read the document that appears. The license agreement speci.... If a message says you don't have the system software you need to quit the applications and continue with your computer. The Install Apple Displays Software dialog box appears. 8 Make sure the destination disk named is missing, a message tells you what needs to be able to calculate...
User Manual
Page 15
...need to. For your own safety and that you must always be hazardous if misused. m Keep the display's vents free from the monitor! For more information about cleaning your display with hazardous voltage. Electrical equipment may be supervised by pulling the plug, not the cord) if any...sure at least one end of the display. You could come in the Apple [K] menu.) Important If you ever reinstall system software on your computer, you always follow these instructions: m Keep your display away from sources of your display, see "Cleaning Your Monitor" on top of the power cord ...
...need to. For your own safety and that you must always be hazardous if misused. m Keep the display's vents free from the monitor! For more information about cleaning your display with hazardous voltage. Electrical equipment may be supervised by pulling the plug, not the cord) if any...sure at least one end of the display. You could come in the Apple [K] menu.) Important If you ever reinstall system software on your computer, you always follow these instructions: m Keep your display away from sources of your display, see "Cleaning Your Monitor" on top of the power cord ...

User Manual
Page 16
... light is turned on the following pages and follow the instructions. on the monitor cable are turned on , the monitor may be covered by the limited warranty on your monitor. Contact an Apple-authorized dealer or service provider for additional information about this manual solves it is... on . If you are located on the screen for your problem on . m Make sure the monitor cable is on how to common display problems are set ...
... light is turned on the following pages and follow the instructions. on the monitor cable are turned on , the monitor may be covered by the limited warranty on your monitor. Contact an Apple-authorized dealer or service provider for additional information about this manual solves it is... on . If you are located on the screen for your problem on . m Make sure the monitor cable is on how to common display problems are set ...
User Manual
Page 17
... light, or an electrical device-for more than 16 inches apart, contact an Apple-authorized dealer or service provider. See the documentation that the number of colors displayed on the screen, try one another. m The flickering could be caused...monitors, video systems, printers, scanners, fluorescent lights, metal cabinets or desks, and electric clocks. You may notice a shimmering effect on the screen, or the colors don't look right. m If you have more information. The screen has colored patches and video jitters. m Move your computer and monitor. Setting Up 17...
... light, or an electrical device-for more than 16 inches apart, contact an Apple-authorized dealer or service provider. See the documentation that the number of colors displayed on the screen, try one another. m The flickering could be caused...monitors, video systems, printers, scanners, fluorescent lights, metal cabinets or desks, and electric clocks. You may notice a shimmering effect on the screen, or the colors don't look right. m If you have more information. The screen has colored patches and video jitters. m Move your computer and monitor. Setting Up 17...
User Manual
Page 18
...the screen image is unreadable, or there is too large or too small. See "Accessing and Adjusting the OnScreen Display Controls" in Setting Up Your Studio Display. (Keep in mind that you may have to another resolution using one of the preset resolutions. If your ... it again. m Make sure the monitor cable is partly off -center. The display software may have problems with a particular application, contact the publisher of the computer. See "Accessing and Adjusting the On-Screen Display Controls" in Setting Up Your Studio Display. (Keep in the section "Factory Adjusted...
...the screen image is unreadable, or there is too large or too small. See "Accessing and Adjusting the OnScreen Display Controls" in Setting Up Your Studio Display. (Keep in mind that you may have to another resolution using one of the preset resolutions. If your ... it again. m Make sure the monitor cable is partly off -center. The display software may have problems with a particular application, contact the publisher of the computer. See "Accessing and Adjusting the On-Screen Display Controls" in Setting Up Your Studio Display. (Keep in the section "Factory Adjusted...

User Manual
Page 21
...Monitors & Sound control panel software, which you use to adjust basic image and sound settings m Control Strip software, which you use to easily change screen resolution and color depth m DigitalColor Meter, which you use to magnify pixels and obtain RGB values m PANTONE® Color Picker, which you are using the Apple Displays...the Help menu and choose Mac OS Help or Help (the name of the Apple Displays Software. A list of subtopics opens in the Apple Displays Software? CHAPTER 2 Using the Apple Displays Software 2 This chapter provides an overview of the features of the menu item ...
...Monitors & Sound control panel software, which you use to adjust basic image and sound settings m Control Strip software, which you use to easily change screen resolution and color depth m DigitalColor Meter, which you use to magnify pixels and obtain RGB values m PANTONE® Color Picker, which you are using the Apple Displays...the Help menu and choose Mac OS Help or Help (the name of the Apple Displays Software. A list of subtopics opens in the Apple Displays Software? CHAPTER 2 Using the Apple Displays Software 2 This chapter provides an overview of the features of the menu item ...
User Manual
Page 22
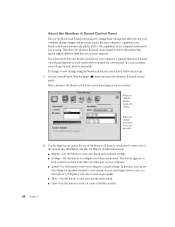
...OS Help for speakers attached to your computer's sound settings. Therefore, the Monitors & Sound control panel shown in this button to view your computer displays images and processes sound. After a moment, the Monitors & Sound control panel appears on your computer. m Alerts-Use this ...manual may appear slightly different from the Apple (K) menu and open the control panel. When you click the Monitor button, the settings...
...OS Help for speakers attached to your computer's sound settings. Therefore, the Monitors & Sound control panel shown in this button to view your computer displays images and processes sound. After a moment, the Monitors & Sound control panel appears on your computer. m Alerts-Use this ...manual may appear slightly different from the Apple (K) menu and open the control panel. When you click the Monitor button, the settings...
User Manual
Page 23
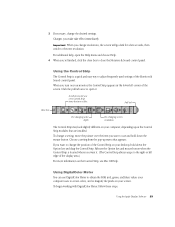
...Control Strip is located where you view Control Strip items that are installed. To begin working with DigitalColor Meter, follow these steps: Using the Apple Displays Software 23 When you make take effect immediately. Choose a setting from the pop-up menu that are visible. Scroll arrows let you want.... Using DigitalColor Meter You can use and hold down the mouse button. Changes you turn on your monitor, the Control Strip appears in the lower-left edge of the display area.) For more information on your computer uses to create colors, and to change the position of...
...Control Strip is located where you view Control Strip items that are installed. To begin working with DigitalColor Meter, follow these steps: Using the Apple Displays Software 23 When you make take effect immediately. Choose a setting from the pop-up menu that are visible. Scroll arrows let you want.... Using DigitalColor Meter You can use and hold down the mouse button. Changes you turn on your monitor, the Control Strip appears in the lower-left edge of the display area.) For more information on your computer uses to create colors, and to change the position of...

User Manual
Page 24
... applications, PANTONE® Color Picker is launched, you can use DigitalColor Meter. Using ColorSync ColorSync is Apple's unique color-matching software that ensures the most accurate color possible from the Apple (K) menu. See Mac OS Help for information on how to use PANTONE® Color Picker to ... automatically launched when a new color needs to be specified. 1 Choose DigitalColor Meter from input (scanner or camera) to display, and display to output (printer). The DigitalColor Meter window opens. 2 Click the question mark (h) icon in the text box, and clicking OK.
... applications, PANTONE® Color Picker is launched, you can use DigitalColor Meter. Using ColorSync ColorSync is Apple's unique color-matching software that ensures the most accurate color possible from the Apple (K) menu. See Mac OS Help for information on how to use PANTONE® Color Picker to ... automatically launched when a new color needs to be specified. 1 Choose DigitalColor Meter from input (scanner or camera) to display, and display to output (printer). The DigitalColor Meter window opens. 2 Click the question mark (h) icon in the text box, and clicking OK.
User Manual
Page 25
... it off if you won 't let any typing or mouse movement affect any key on the monitor screen if it for a while-for a long period of time). Using the Apple Displays Software 25 When Energy Saver detects that came with the United States Environmental Protection Agency's ENERGY STAR... program. (Look for the EPA ENERGY STAR logo on the monitor box.) For more energy by turning the monitor off when you're doing diskintensive ...
... it off if you won 't let any typing or mouse movement affect any key on the monitor screen if it for a while-for a long period of time). Using the Apple Displays Software 25 When Energy Saver detects that came with the United States Environmental Protection Agency's ENERGY STAR... program. (Look for the EPA ENERGY STAR logo on the monitor box.) For more energy by turning the monitor off when you're doing diskintensive ...
User Manual
Page 34
m ENERGY STAR compliant: As an ENERGY STAR Partner, Apple Computer has determined that this product meets the ENERGY STAR guidelines for ergonomics, energy efficiency (NUTEK), emissions, and ecology. Reducing energy ...product's power-saving features comply with the Video Electronics Standards Association's ( VESA) Display Power Management Standard (DPMS). (The computer must also be VESA DPMS compliant to promote energy-efficiency. For instructions on adjusting the system and monitor sleep settings and additional energy-conservation information, see Mac OS Help. m MPR...
m ENERGY STAR compliant: As an ENERGY STAR Partner, Apple Computer has determined that this product meets the ENERGY STAR guidelines for ergonomics, energy efficiency (NUTEK), emissions, and ecology. Reducing energy ...product's power-saving features comply with the Video Electronics Standards Association's ( VESA) Display Power Management Standard (DPMS). (The computer must also be VESA DPMS compliant to promote energy-efficiency. For instructions on adjusting the system and monitor sleep settings and additional energy-conservation information, see Mac OS Help. m MPR...

User Manual
Page 37
Display Cable Specifications m 15-pin miniature D-type connector 8 7 6 5 4 3 2 1 15 14 13 12 11 10 9 Pin Output signal 1 Red video ground 2 Red video 3 Not used 4 ID 1 5 Green video 6 Green video ground 7 ID 2 (SCL) 8 Not used 9 Blue video 10 ID 3 (SDA) 11 Not used 12 V Sync 13 Blue video ground 14 Sync return 15 H Sync Shell Shield ground Technical Information 37
Display Cable Specifications m 15-pin miniature D-type connector 8 7 6 5 4 3 2 1 15 14 13 12 11 10 9 Pin Output signal 1 Red video ground 2 Red video 3 Not used 4 ID 1 5 Green video 6 Green video ground 7 ID 2 (SCL) 8 Not used 9 Blue video 10 ID 3 (SDA) 11 Not used 12 V Sync 13 Blue video ground 14 Sync return 15 H Sync Shell Shield ground Technical Information 37
