User Guide
Page 2
... trademarks of Adobe Systems Incorporated or its subsidiaries and may be copied, in whole or in part, without the written consent of Apple Computer, Inc., registered in the U.S. Mac is a trademark of Tektronix, Inc. Energy Star is a registered trademark of Texas Instruments.... Helvetica and Times are trademarks of the U.S. K Apple Computer, Inc. © 1996 Apple Computer, Inc. Tektronix is a trademark of Apple Computer, Inc., registered in the United States and Canada. Your rights to the performance or use of ...
... trademarks of Adobe Systems Incorporated or its subsidiaries and may be copied, in whole or in part, without the written consent of Apple Computer, Inc., registered in the U.S. Mac is a trademark of Tektronix, Inc. Energy Star is a registered trademark of Texas Instruments.... Helvetica and Times are trademarks of the U.S. K Apple Computer, Inc. © 1996 Apple Computer, Inc. Tektronix is a trademark of Apple Computer, Inc., registered in the United States and Canada. Your rights to the performance or use of ...
User Guide
Page 3
Contents Communications regulation information v 1 Setting Up 1 Important safety instructions 1 What about electromagnetic emissions? 2 Getting ready to set up 3 Your Apple Multiple Scan 15 Display at a glance 4 Choosing a good location for your monitor 5 Installing the monitor base 5 Positioning the monitor 6 Do you need a video card? 7 Using more than one monitor 8 Connecting the monitor to your computer 8 Connecting headphones to your monitor 10 Turning the monitor on 10 Installing the display software 11 iii
Contents Communications regulation information v 1 Setting Up 1 Important safety instructions 1 What about electromagnetic emissions? 2 Getting ready to set up 3 Your Apple Multiple Scan 15 Display at a glance 4 Choosing a good location for your monitor 5 Installing the monitor base 5 Positioning the monitor 6 Do you need a video card? 7 Using more than one monitor 8 Connecting the monitor to your computer 8 Connecting headphones to your monitor 10 Turning the monitor on 10 Installing the display software 11 iii

User Guide
Page 4
2 Using the Display Software 13 About the Control Strip 13 Working with the Control Strip 14 Changing screen resolution 15 Other things you can do with the Monitors control panel 16 Conserving energy 17 What happens after you turn on the energy saving feature 17 ...
2 Using the Display Software 13 About the Control Strip 13 Working with the Control Strip 14 Changing screen resolution 15 Other things you can do with the Monitors control panel 16 Conserving energy 17 What happens after you turn on the energy saving feature 17 ...

User Guide
Page 5
...with the limits for a Class B digital device in accordance with the specifications in Part 15 of FCC rules. Radio and television interference The equipment described in this product not authorized by Apple Computer, Inc., could void the FCC Certification and negate your computer system does cause ... However, there is suspected. If your authority to one or more of the television or radio. You can determine whether your Apple product. Communications Regulation Information v If it is not installed and used properly-that is important that interference will not occur in strict ...
...with the limits for a Class B digital device in accordance with the specifications in Part 15 of FCC rules. Radio and television interference The equipment described in this product not authorized by Apple Computer, Inc., could void the FCC Certification and negate your computer system does cause ... However, there is suspected. If your authority to one or more of the television or radio. You can determine whether your Apple product. Communications Regulation Information v If it is not installed and used properly-that is important that interference will not occur in strict ...
User Guide
Page 7
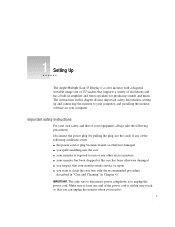
... frayed or otherwise damaged m you spill something into the case m your monitor is exposed to rain or any of the following precautions. 1 Setting Up The Apple Multiple Scan 15 Display is within easy reach so that you can unplug the monitor when you need to. 1 Disconnect the power plug (by pulling the plug, not...
... frayed or otherwise damaged m you spill something into the case m your monitor is exposed to rain or any of the following precautions. 1 Setting Up The Apple Multiple Scan 15 Display is within easy reach so that you can unplug the monitor when you need to. 1 Disconnect the power plug (by pulling the plug, not...
User Guide
Page 8
... low frequency (VLF) electromagnetic fields. Such fields are also actively encouraging further scientific research so we can continue to electromagnetic fields, Apple has lowered the emission levels of government regulatory agencies and respected health organizations. We are associated with your monitor into a power source...permit them to the interior of the monitor (such as rain, snow, and so on the prevailing evidence and opinions, Apple believes that you and others. Do not allow children access to handle any cables. What about electromagnetic emissions? Be sure ...
... low frequency (VLF) electromagnetic fields. Such fields are also actively encouraging further scientific research so we can continue to electromagnetic fields, Apple has lowered the emission levels of government regulatory agencies and respected health organizations. We are associated with your monitor into a power source...permit them to the interior of the monitor (such as rain, snow, and so on the prevailing evidence and opinions, Apple believes that you and others. Do not allow children access to handle any cables. What about electromagnetic emissions? Be sure ...
User Guide
Page 9
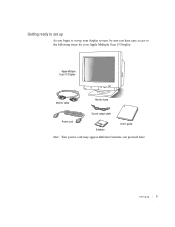
Getting ready to set up As you begin to set up your display system, be sure you have easy access to the following items for your Apple Multiple Scan 15 Display: Apple Multiple Scan 15 Display Monitor cable Monitor base Sound output cable Power cord Software User's guide Note: Your power cord may appear different from the one pictured here. Setting Up 3
Getting ready to set up As you begin to set up your display system, be sure you have easy access to the following items for your Apple Multiple Scan 15 Display: Apple Multiple Scan 15 Display Monitor cable Monitor base Sound output cable Power cord Software User's guide Note: Your power cord may appear different from the one pictured here. Setting Up 3

User Guide
Page 10
Your Apple Multiple Scan 15 Display at a glance f Headphone jack Control panel I Power button O Contrast control ¤ Brightness control Stereo speakers ≤ Power cord receptacle Monitor cable (attached) Security slot ™ Video port - Sound ouput port 4 Chapter 1
Your Apple Multiple Scan 15 Display at a glance f Headphone jack Control panel I Power button O Contrast control ¤ Brightness control Stereo speakers ≤ Power cord receptacle Monitor cable (attached) Security slot ™ Video port - Sound ouput port 4 Chapter 1
User Guide
Page 11
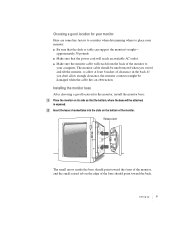
Setting Up 5 The monitor cable should point toward the front of the monitor, and the small raised tab on the edge of the base should be attached, is exposed. 2 Insert the base's hooked tabs into the slots on its side so that the bottom, where the base will be unobstructed when you don't allow at least 6 inches of clearance in the back. Installing the monitor base After choosing a good location for your monitor Here are some key factors to consider when determining where to your monitor: m Be sure that the desk or table can support the monitor's weight- Choosing a good ...
Setting Up 5 The monitor cable should point toward the front of the monitor, and the small raised tab on the edge of the base should be attached, is exposed. 2 Insert the base's hooked tabs into the slots on its side so that the bottom, where the base will be unobstructed when you don't allow at least 6 inches of clearance in the back. Installing the monitor base After choosing a good location for your monitor Here are some key factors to consider when determining where to your monitor: m Be sure that the desk or table can support the monitor's weight- Choosing a good ...

User Guide
Page 12
With the base now attached, turn the monitor upright so that when you use it, no bright light is in place, either on top of the monitor by tilting it up or down and turning it . Position the monitor so that it sits upon the base. Take occasional breaks when using your computer, to focus your monitor is behind the monitor or reflected on a desk or table, follow these steps: 1 Place the monitor so that the screen faces the user. 2 To slide the monitor, lift the front up slightly and push or pull in the direction you can withdraw the tabs from the monitor. 3 Slide the base forward to ...
With the base now attached, turn the monitor upright so that when you use it, no bright light is in place, either on top of the monitor by tilting it up or down and turning it . Position the monitor so that it sits upon the base. Take occasional breaks when using your computer, to focus your monitor is behind the monitor or reflected on a desk or table, follow these steps: 1 Place the monitor so that the screen faces the user. 2 To slide the monitor, lift the front up slightly and push or pull in the direction you can withdraw the tabs from the monitor. 3 Slide the base forward to ...
User Guide
Page 13
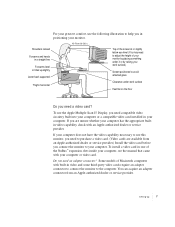
... dealer or service provider.) Install the video card before you need an adapter connector? Setting Up 7 To use the Apple Multiple Scan 15 Display, you need compatible video circuitry built into your computer or a compatible video card installed in your computer. To install a video card in ...one of the NuBus™ expansion slots inside your computer, see the manual that came with an Apple-authorized dealer or service provider. For your greatest comfort, use the following illustration to help you in positioning your monitor. 45-70 cm (18-...
... dealer or service provider.) Install the video card before you need an adapter connector? Setting Up 7 To use the Apple Multiple Scan 15 Display, you need compatible video circuitry built into your computer or a compatible video card installed in your computer. To install a video card in ...one of the NuBus™ expansion slots inside your computer, see the manual that came with an Apple-authorized dealer or service provider. For your greatest comfort, use the following illustration to help you in positioning your monitor. 45-70 cm (18-...

User Guide
Page 14
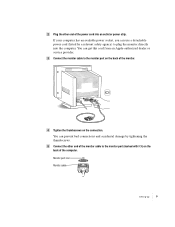
Connecting the monitor to your computer Follow these steps to connect the Apple Multiple Scan 15 Display to your computer. Do not defeat the purpose of the grounding plug! 1 Connect the socket end of the monitor. ≤ 8 Chapter 1 You may need a ...) pin-this plug will fit only a grounded AC outlet. Using more than one monitor If your computer has NuBus expansion slots, you can use the Apple Multiple Scan 15 Display with one or more additional monitors connected to your computer: IMPORTANT Before you connect any cords or cables, make sure that came with your...
Connecting the monitor to your computer Follow these steps to connect the Apple Multiple Scan 15 Display to your computer. Do not defeat the purpose of the grounding plug! 1 Connect the socket end of the monitor. ≤ 8 Chapter 1 You may need a ...) pin-this plug will fit only a grounded AC outlet. Using more than one monitor If your computer has NuBus expansion slots, you can use the Apple Multiple Scan 15 Display with one or more additional monitors connected to your computer: IMPORTANT Before you connect any cords or cables, make sure that came with your...
User Guide
Page 15
... and accidental damage by a relevant safety agency) to plug the monitor directly into an outlet or power strip. You can get this cord from an Apple-authorized dealer or service provider. 3 Connect the monitor cable to the monitor port on the back of the monitor. ™ 4 Tighten the thumbscrews on the...
... and accidental damage by a relevant safety agency) to plug the monitor directly into an outlet or power strip. You can get this cord from an Apple-authorized dealer or service provider. 3 Connect the monitor cable to the monitor port on the back of the monitor. ™ 4 Tighten the thumbscrews on the...

User Guide
Page 16
When headphones are plugged in your computer. 2 Press the Power button on the back of the computer. 8 Attach the other sound output device) into the Apple Multiple Scan 15 Display. Connecting headphones to your monitor If you wish, you installed a video card in , the stereo speakers are attached to the sound output port (marked ...
When headphones are plugged in your computer. 2 Press the Power button on the back of the computer. 8 Attach the other sound output device) into the Apple Multiple Scan 15 Display. Connecting headphones to your monitor If you wish, you installed a video card in , the stereo speakers are attached to the sound output port (marked ...

User Guide
Page 17
... Monitor to you with this chapter. Also, make for Macintosh disk into a floppy disk drive. To install the display software, follow these steps: 1 Insert the Apple Multiple Scan Software for yourself and others. See "Do You Need a Video Card?"
... Monitor to you with this chapter. Also, make for Macintosh disk into a floppy disk drive. To install the display software, follow these steps: 1 Insert the Apple Multiple Scan Software for yourself and others. See "Do You Need a Video Card?"

User Guide
Page 18
After the installation, the Installer tells you to restart your computer (if you installed the software onto your startup disk) or to quit (if you see "Changing Screen Resolution" in the box is the one on the screen. The software is now installed and the monitor is complete, follow the instructions on which you want to start the Installer program. The Installer takes a few moments to calculate what needs to be done and then begins to copy files. 7 When the installation is ready for use. If not, click Switch Disk until the correct disk name appears. 6 Click the Install ...
After the installation, the Installer tells you to restart your computer (if you installed the software onto your startup disk) or to quit (if you see "Changing Screen Resolution" in the box is the one on the screen. The software is now installed and the monitor is complete, follow the instructions on which you want to start the Installer program. The Installer takes a few moments to calculate what needs to be done and then begins to copy files. 7 When the installation is ready for use. If not, click Switch Disk until the correct disk name appears. 6 Click the Install ...

User Guide
Page 19
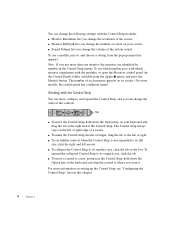
Your software includes a new feature called the Control Strip, which you can use to change the volume of color. The Control Strip is a new way of system software will notice the Control Strip at the lower-left edge of your new display software, you have installed. About the Control Strip When you start up your Macintosh after installing your screen. Note: Some versions of changing certain settings from your computer or system software upgrade kit. 2 Using the Display Software This chapter explains how to use the new display software you will show different modules in the ...
Your software includes a new feature called the Control Strip, which you can use to change the volume of color. The Control Strip is a new way of system software will notice the Control Strip at the lower-left edge of your new display software, you have installed. About the Control Strip When you start up your Macintosh after installing your screen. Note: Some versions of changing certain settings from your computer or system software upgrade kit. 2 Using the Display Software This chapter explains how to use the new display software you will show different modules in the ...
User Guide
Page 20
... resolution of the system sound. m Monitor BitDepth lets you change the volume of the screen. Note: If you want it and choose a setting from the Apple K menu) and press the Identify button. m To collapse the Control Strip to its screen. (On some models, the control panel has a different name.) Working with...
... resolution of the system sound. m Monitor BitDepth lets you change the volume of the screen. Note: If you want it and choose a setting from the Apple K menu) and press the Identify button. m To collapse the Control Strip to its screen. (On some models, the control panel has a different name.) Working with...

User Guide
Page 21
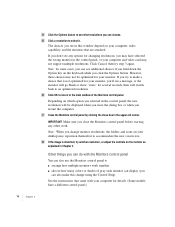
... want the change screen resolution with the Control Strip, press the Resolution control and choose the resolution you close this window may differ from the Apple (K) menu. Second, click the icon of your computer. First, if you have one monitor, you will only see one monitor, click here to see a whole... menu. Changing screen resolution You can 't find it , click the scroll bar arrows. m To change to open the Monitors control panel. Using the Display Software 15
... want the change screen resolution with the Control Strip, press the Resolution control and choose the resolution you close this window may differ from the Apple (K) menu. Second, click the icon of your computer. First, if you have one monitor, you will only see one monitor, click here to see a whole... menu. Changing screen resolution You can 't find it , click the scroll bar arrows. m To change to open the Monitors control panel. Using the Display Software 15
User Guide
Page 22
...to an optimized resolution. 6 Click OK to return to the main window of gray each monitor can display (you try to m arrange how multiple monitors work . Click Cancel, then try another resolution, or adjust the controls on your monitor. Other things you can also make a choice that... you see any other work together m choose how many colors or shades of the Monitors control panel. However, these choices may not support multiple resolutions. If you may reposition themselves to select it. The choices you restart the computer. 7 Close the Monitors control panel by clicking the...
...to an optimized resolution. 6 Click OK to return to the main window of gray each monitor can display (you try to m arrange how multiple monitors work . Click Cancel, then try another resolution, or adjust the controls on your monitor. Other things you can also make a choice that... you see any other work together m choose how many colors or shades of the Monitors control panel. However, these choices may not support multiple resolutions. If you may reposition themselves to select it. The choices you restart the computer. 7 Close the Monitors control panel by clicking the...