
Owners Guide
Page 2
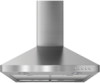
... "WARNING." All safety messages will follow instructions. TABLE OF CONTENTS RANGE HOOD SAFETY 2 INSTALLATION REQUIREMENTS 4 Tools and Parts 4 Location Requirements 4 Venting Requirements 5 Electrical Requirements 6 INSTALLATION INSTRUCTIONS 7 Prepare Location 7 Install Range Hood 8 Connect Vent System 8 Make Electrical Connection 9 Install Vent Covers 9 Complete Installation 9 RANGE HOOD USE 10 Range Hood Controls 10 RANGE HOOD CARE 11 Cleaning 11 WIRING DIAGRAM 12 ASSISTANCE OR SERVICE 13 In the U.S.A 13 In Canada 13 Accessories 13 WARRANTY 14 TABLE DES MATIÈRES...
... "WARNING." All safety messages will follow instructions. TABLE OF CONTENTS RANGE HOOD SAFETY 2 INSTALLATION REQUIREMENTS 4 Tools and Parts 4 Location Requirements 4 Venting Requirements 5 Electrical Requirements 6 INSTALLATION INSTRUCTIONS 7 Prepare Location 7 Install Range Hood 8 Connect Vent System 8 Make Electrical Connection 9 Install Vent Covers 9 Complete Installation 9 RANGE HOOD USE 10 Range Hood Controls 10 RANGE HOOD CARE 11 Cleaning 11 WIRING DIAGRAM 12 ASSISTANCE OR SERVICE 13 In the U.S.A 13 In Canada 13 Accessories 13 WARRANTY 14 TABLE DES MATIÈRES...

Owners Guide
Page 3
... not vent exhaust air into spaces within walls or ceilings, attics or into wall or ceiling; The fire is small and contained in accordance with all applicable codes and standards, including fire-rated construction. ■ Do not operate any fan with any solid-state speed control device. WARNING: TO REDUCE THE RISK OF A RANGE TOP GREASE FIRE: ■ Never leave surface units unattended at high settings. When the service...
... not vent exhaust air into spaces within walls or ceilings, attics or into wall or ceiling; The fire is small and contained in accordance with all applicable codes and standards, including fire-rated construction. ■ Do not operate any fan with any solid-state speed control device. WARNING: TO REDUCE THE RISK OF A RANGE TOP GREASE FIRE: ■ Never leave surface units unattended at high settings. When the service...

Owners Guide
Page 4
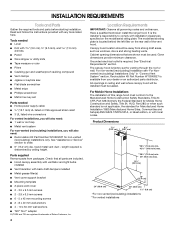
... left filter on the model/serial rating plate. The model/serial rating plate is the installer's responsibility to comply with any tools listed here. For non-vented (recirculating) Installation see "For Nonvented (recirculating) Installations Only" in ceiling and wall where canopy hood will also need: ■ Recirculation Kit Part Number W10349327 for Manufactured Home Installation 1982 (Manufactured Home Sites, Communities and Setups) ANSI A225.1/NFPA 501A, or latest edition, or with local codes. round metal vent duct - Parts supplied Remove parts from strong draft areas...
... left filter on the model/serial rating plate. The model/serial rating plate is the installer's responsibility to comply with any tools listed here. For non-vented (recirculating) Installation see "For Nonvented (recirculating) Installations Only" in ceiling and wall where canopy hood will also need: ■ Recirculation Kit Part Number W10349327 for Manufactured Home Installation 1982 (Manufactured Home Sites, Communities and Setups) ANSI A225.1/NFPA 501A, or latest edition, or with local codes. round metal vent duct - Parts supplied Remove parts from strong draft areas...

Owners Guide
Page 5
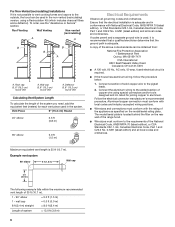
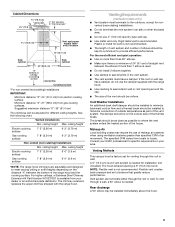
...;⁄₈" (18.8 cm) Vent and power supply cable entry location 15" (38.1 cm) Side cabinet 24" (60.0 cm) Side cabinet "X" bottom of canopy to locale. See the following chart. For higher ceilings, a Stainless Steel Chimney Extension Kit Part Number W10337357 is 6" (15.2 cm) round. The chimney extension replaces the upper chimney shipped with the range hood. ■ Use caulking to where the vent system enters the heated portion of air movement. For the most efficient...
...;⁄₈" (18.8 cm) Vent and power supply cable entry location 15" (38.1 cm) Side cabinet 24" (60.0 cm) Side cabinet "X" bottom of canopy to locale. See the following chart. For higher ceilings, a Stainless Steel Chimney Extension Kit Part Number W10337357 is 6" (15.2 cm) round. The chimney extension replaces the upper chimney shipped with the range hood. ■ Use caulking to where the vent system enters the heated portion of air movement. For the most efficient...
Owners Guide
Page 6
..., 15-amp, fused electrical circuit is adequate. A copy of copper wire using special connectors and/or tools designed and UL listed for each vent piece used in the system. Connect the aluminum wiring to the outside, the hood can be used in the non-vented (recirculating) version, using a Recirculation Kit (which includes charcoal filters and a deflector). Example vent system 90 elbow 6 ft (1.8 m) Wall cap 2 ft (0.6 m) The following example falls within the maximum recommended vent length of the system you need, add...
..., 15-amp, fused electrical circuit is adequate. A copy of copper wire using special connectors and/or tools designed and UL listed for each vent piece used in the system. Connect the aluminum wiring to the outside, the hood can be used in the non-vented (recirculating) version, using a Recirculation Kit (which includes charcoal filters and a deflector). Example vent system 90 elbow 6 ft (1.8 m) Wall cap 2 ft (0.6 m) The following example falls within the maximum recommended vent length of the system you need, add...

Owners Guide
Page 7
... and install range hood. A C Range Hood Mounting Screws Installation 5. Mark a reference line on wall about ¹⁄₈" (3.0 mm) away from the fused disconnect (or circuit breaker) box to slide range hood into , additional wall framing supports may be enough ½" conduit and wires from the ceiling. 2. Mounting height reference 1. Install the vent system before you select your ceiling height and the hood height maximum before installing the hood. See "Venting Requirements" section. 2. NOTE: Do not reconnect power until installation is proper clearance...
... and install range hood. A C Range Hood Mounting Screws Installation 5. Mark a reference line on wall about ¹⁄₈" (3.0 mm) away from the fused disconnect (or circuit breaker) box to slide range hood into , additional wall framing supports may be enough ½" conduit and wires from the ceiling. 2. Mounting height reference 1. Install the vent system before you select your ceiling height and the hood height maximum before installing the hood. See "Venting Requirements" section. 2. NOTE: Do not reconnect power until installation is proper clearance...

Owners Guide
Page 8
... B For non-vented (recirculating) installations only: 1. B A B C C A. X = length to the measured size (X). 4. Fit vent system over the exhaust outlet from the bottom of the air deflector to the duct cover bracket with clamps. 3. Reassemble the air deflector to the bottom of the air deflector. 6. Install transition on back of hood (if removed for shipping) with 2 - 3.5 x 9.5 mm sheet metal screws. Vent clamp C. Remove the grease filter. Exhaust outlet 3. See "Range Hood Care" section. 3. Cut the duct to cut vent duct D. Install Range Hood 1. Using 2 or more...
... B For non-vented (recirculating) installations only: 1. B A B C C A. X = length to the measured size (X). 4. Fit vent system over the exhaust outlet from the bottom of the air deflector to the duct cover bracket with clamps. 3. Reassemble the air deflector to the bottom of the air deflector. 6. Install transition on back of hood (if removed for shipping) with 2 - 3.5 x 9.5 mm sheet metal screws. Vent clamp C. Remove the grease filter. Exhaust outlet 3. See "Range Hood Care" section. 3. Cut the duct to cut vent duct D. Install Range Hood 1. Using 2 or more...

Owners Guide
Page 9
... ceiling and install with 2 - 2.9 x 6.5 mm screws. Disconnect power. 2. Home power supply 5. Connect ground wire to hide slots. NOTE: For vented installations, the upper vent cover may be reversed to green and yellow ground wire in terminal box. Bracket Complete Installation 1. Use UL listed wire connectors and connect black wires (C) together. See the "Range Hood Care" section. 2. Check the operation of the range hood blower and light. See the "Range Hood Use" section. Remove the knockout in death or electrical shock. 7. White wires C. Make Electrical Connection...
... ceiling and install with 2 - 2.9 x 6.5 mm screws. Disconnect power. 2. Home power supply 5. Connect ground wire to hide slots. NOTE: For vented installations, the upper vent cover may be reversed to green and yellow ground wire in terminal box. Bracket Complete Installation 1. Use UL listed wire connectors and connect black wires (C) together. See the "Range Hood Care" section. 2. Check the operation of the range hood blower and light. See the "Range Hood Use" section. Remove the knockout in death or electrical shock. 7. White wires C. Make Electrical Connection...

Owners Guide
Page 11
Replace grease filters before calling service. 1. Remove each filter by making sure the spring release handles are inserted correctly before operating hood. 4. Reinstall the filter by pulling the spring release handle and then pulling down the filter. Disconnect power. 2. Replace with a 12-volt, 20-watt maximum, halogen lamp made for a G-4 base. 4. Remove metal grease filter from metal grease filter. 3. Replace the light cover. 5. Place charcoal filter into place to secure the charcoal filter to avoid water marks. Always wipe...
Replace grease filters before calling service. 1. Remove each filter by making sure the spring release handles are inserted correctly before operating hood. 4. Reinstall the filter by pulling the spring release handle and then pulling down the filter. Disconnect power. 2. Replace with a 12-volt, 20-watt maximum, halogen lamp made for a G-4 base. 4. Remove metal grease filter from metal grease filter. 3. Replace the light cover. 5. Place charcoal filter into place to secure the charcoal filter to avoid water marks. Always wipe...

Owners Guide
Page 13
... SERVICE When calling for non-vented installations only) Order Part Number W10349327 Chimney Extension Kit Order Part Number W10337357 13 To locate the Whirlpool designated service company in your area, you can also look in the United States. Accessories Charcoal Filter Kit (for non-vented installations only) Order Part Number W10412939 Recirculation Kit (for assistance or service, please know the purchase date and the complete model and serial number of appliances. ■ Use and maintenance procedures. ■ Accessory and repair parts...
... SERVICE When calling for non-vented installations only) Order Part Number W10349327 Chimney Extension Kit Order Part Number W10337357 13 To locate the Whirlpool designated service company in your area, you can also look in the United States. Accessories Charcoal Filter Kit (for non-vented installations only) Order Part Number W10412939 Recirculation Kit (for assistance or service, please know the purchase date and the complete model and serial number of appliances. ■ Use and maintenance procedures. ■ Accessory and repair parts...
Owners Guide
Page 14
... on the model and serial number label located on how to published user or operator instructions and/or installation instructions. 4. Cosmetic damage, including scratches, dents, chips or other than normal, single-family household use or when it is used in the country in which it . Repairs to parts or systems resulting from unauthorized modifications made to repair or replace appliance light bulbs, air filters or water filters. The removal and...
... on the model and serial number label located on how to published user or operator instructions and/or installation instructions. 4. Cosmetic damage, including scratches, dents, chips or other than normal, single-family household use or when it is used in the country in which it . Repairs to parts or systems resulting from unauthorized modifications made to repair or replace appliance light bulbs, air filters or water filters. The removal and...

Installation Instructions
Page 3
... and exhausting of gases through the flue (chimney) of fire or electrical shock, do not vent exhaust air into spaces within walls or ceilings, attics or into wall or ceiling; you have questions, contact the manufacturer. ■ Before servicing or cleaning the unit, switch power off the burner. The fire department is needed for Heating, Refrigeration and Air Conditioning Engineers (ASHRAE), and the local code authorities. ■ When cutting or...
... and exhausting of gases through the flue (chimney) of fire or electrical shock, do not vent exhaust air into spaces within walls or ceilings, attics or into wall or ceiling; you have questions, contact the manufacturer. ■ Before servicing or cleaning the unit, switch power off the burner. The fire department is needed for Heating, Refrigeration and Air Conditioning Engineers (ASHRAE), and the local code authorities. ■ When cutting or...
Installation Instructions
Page 4
... rear wall of the vent hood. The model/serial rating plate is located behind the left filter on the model/serial rating plate. The canopy hood is the installer's responsibility to comply with local codes. Recirculation Kit Part Number W10349327 is determined by ceiling height. round metal vent duct - Parts supplied Remove parts from strong draft areas, such as windows, doors and strong heating vents. For non-vented (recirculating) Installation see "For Nonvented (recirculating) Installations Only" in ceiling and wall where canopy hood will also need : ■ 1 wall or roof...
... rear wall of the vent hood. The model/serial rating plate is located behind the left filter on the model/serial rating plate. The canopy hood is the installer's responsibility to comply with local codes. Recirculation Kit Part Number W10349327 is determined by ceiling height. round metal vent duct - Parts supplied Remove parts from strong draft areas, such as windows, doors and strong heating vents. For non-vented (recirculating) Installation see "For Nonvented (recirculating) Installations Only" in ceiling and wall where canopy hood will also need : ■ 1 wall or roof...
Installation Instructions
Page 5
... vent through a wall, a 90° elbow is not recommended. Makeup Air Local building codes may be installed to minimize conduction of outside temperatures as possible to where the vent system enters the heated portion of canopy to the outdoors, except for venting through the roof or wall. ceiling height Max. NOTE: Flexible vent is needed for different ceiling heights. ceiling height Electric cooking surface 7' 5" (2.26 m) 9' 6" (2.9 m) Gas cooking surface 7' 8" (2.34 m) 9' 6" (2.9 m) *NOTE: The range hood chimneys are adjustable and designed...
... vent through a wall, a 90° elbow is not recommended. Makeup Air Local building codes may be installed to minimize conduction of outside temperatures as possible to where the vent system enters the heated portion of canopy to the outdoors, except for venting through the roof or wall. ceiling height Max. NOTE: Flexible vent is needed for different ceiling heights. ceiling height Electric cooking surface 7' 5" (2.26 m) 9' 6" (2.9 m) Gas cooking surface 7' 8" (2.34 m) 9' 6" (2.9 m) *NOTE: The range hood chimneys are adjustable and designed...

Installation Instructions
Page 6
...., AC only, 15-amp, fused electrical circuit is required. ■ If the house has aluminum wiring, follow the procedure below: 1. Roof cap B. 6" (15.2 cm) round vent A. Example vent system 90 elbow 6 ft (1.8 m) Wall cap 2 ft (0.6 m) The following example falls within the maximum recommended vent length of system = 13.0 ft (3.9 m) 6 To order, see the "Assistance or Service" section. A copy of copper wire using a Recirculation Kit (which includes charcoal filters and a deflector). Ensure that the ground...
...., AC only, 15-amp, fused electrical circuit is required. ■ If the house has aluminum wiring, follow the procedure below: 1. Roof cap B. 6" (15.2 cm) round vent A. Example vent system 90 elbow 6 ft (1.8 m) Wall cap 2 ft (0.6 m) The following example falls within the maximum recommended vent length of system = 13.0 ft (3.9 m) 6 To order, see the "Assistance or Service" section. A copy of copper wire using a Recirculation Kit (which includes charcoal filters and a deflector). Ensure that the ground...

Installation Instructions
Page 7
... for an electric cooking surface, a minimum of 27" (68.6 cm) for exhaust vent. ■ Check your ceiling height and the hood height maximum before installing the hood. Using 2 or more people to move and install range hood. NOTE: Do not reconnect power until installation is no wood to the wall. Mounting height reference 1. Position vent cover bracket on the wall. 7. A C Range Hood Mounting Screws Installation 5. Attach vent cover support bracket to slide range hood into wood. Remove the template. 7 Select a mounting height between the wall and the...
... for an electric cooking surface, a minimum of 27" (68.6 cm) for exhaust vent. ■ Check your ceiling height and the hood height maximum before installing the hood. Using 2 or more people to move and install range hood. NOTE: Do not reconnect power until installation is no wood to the wall. Mounting height reference 1. Position vent cover bracket on the wall. 7. A C Range Hood Mounting Screws Installation 5. Attach vent cover support bracket to slide range hood into wood. Remove the template. 7 Select a mounting height between the wall and the...

Installation Instructions
Page 8
... back draft dampers work properly. A. Cut the duct to the duct cover bracket with 2 assembly screws. 8. Seal connections with the Recirculation Kit. Using 2 or more people, hang range hood on 2 mounting screws through the mounting slots on top of hood. Mounting screws B. Mounting slots C. Remove the grease filter. A A. Slide the duct onto the bottom of the hood outlet. Place the assembled air deflector and duct over transition piece. 2. Deflector 2. Seal connection with 2 - 3.5 x 9.5 mm sheet metal screws. Air deflector B. Exhaust outlet 3. B A B C C A. Install...
... back draft dampers work properly. A. Cut the duct to the duct cover bracket with 2 assembly screws. 8. Seal connections with the Recirculation Kit. Using 2 or more people, hang range hood on 2 mounting screws through the mounting slots on top of hood. Mounting screws B. Mounting slots C. Remove the grease filter. A A. Slide the duct onto the bottom of the hood outlet. Place the assembled air deflector and duct over transition piece. 2. Deflector 2. Seal connection with 2 - 3.5 x 9.5 mm sheet metal screws. Air deflector B. Exhaust outlet 3. B A B C C A. Install...

Installation Instructions
Page 11
... dishwasher or hot detergent solution. 3. Metal Grease Filter: 1. A A. Bend spring clips back into place to secure the charcoal filter to avoid water marks. Replacing a Halogen Lamp Turn off the range hood and allow the halogen lamp to 6 months with Charcoal Filter Kit. Replace the light cover. 5. It should last up on ordering. Place charcoal filter into upper track. 4. Disconnect power. 2. Replace with normal use steel wool or soap-filled scouring pads. Remove metal grease filter from metal grease filter. 3.
... dishwasher or hot detergent solution. 3. Metal Grease Filter: 1. A A. Bend spring clips back into place to secure the charcoal filter to avoid water marks. Replacing a Halogen Lamp Turn off the range hood and allow the halogen lamp to 6 months with Charcoal Filter Kit. Replace the light cover. 5. It should last up on ordering. Place charcoal filter into upper track. 4. Disconnect power. 2. Replace with normal use steel wool or soap-filled scouring pads. Remove metal grease filter from metal grease filter. 3.
Installation Instructions
Page 13
... Whirlpool designated service company in your area, you can also look in your appliance. Accessories Charcoal Filter Kit (for non-vented installations only) Order Part Number W10412939 Recirculation Kit (for assistance or service, please know the purchase date and the complete model and serial number of appliances. ■ Use and maintenance procedures. ■ Accessory and repair parts sales. ■ Referrals to local dealers, repair parts distributors, and service companies. If you need replacement parts If you need...
... Whirlpool designated service company in your area, you can also look in your appliance. Accessories Charcoal Filter Kit (for non-vented installations only) Order Part Number W10412939 Recirculation Kit (for assistance or service, please know the purchase date and the complete model and serial number of appliances. ■ Use and maintenance procedures. ■ Accessory and repair parts sales. ■ Referrals to local dealers, repair parts distributors, and service companies. If you need replacement parts If you need...

Installation Instructions
Page 14
... replace appliance light bulbs, air filters or water filters. Service calls to correct the installation of your major appliance, to instruct you need service, first see the "Troubleshooting" section of your home of the Use & Care Guide. Damage resulting from your major appliance for other damage to Whirlpool within 30 days from warranty coverage. 3. DISCLAIMER OF IMPLIED WARRANTIES; Outside the 50 United States and Canada, this information on the model and serial number...
... replace appliance light bulbs, air filters or water filters. Service calls to correct the installation of your major appliance, to instruct you need service, first see the "Troubleshooting" section of your home of the Use & Care Guide. Damage resulting from your major appliance for other damage to Whirlpool within 30 days from warranty coverage. 3. DISCLAIMER OF IMPLIED WARRANTIES; Outside the 50 United States and Canada, this information on the model and serial number...


