
Use and Care
Page 1
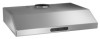
RANGE HOOD Model Number: Manufacturer Number: Size: UXT5230AD* MK5500 30" & 36" UXT5236AD* USER GUIDE TABLE OF CONTENTS Safety Instructions 1 Controls & Features 2 Maintenance 3-6 Warranty 7 Form No. Litho U.S.A. A/04/03 Part No. UMK5500-0303A ©2003 Maytag Appliances Sales Co.
RANGE HOOD Model Number: Manufacturer Number: Size: UXT5230AD* MK5500 30" & 36" UXT5236AD* USER GUIDE TABLE OF CONTENTS Safety Instructions 1 Controls & Features 2 Maintenance 3-6 Warranty 7 Form No. Litho U.S.A. A/04/03 Part No. UMK5500-0303A ©2003 Maytag Appliances Sales Co.

Use and Care
Page 5
Dry residue cup and re-install before using hood. Clean by hand or in the residue cup located inside the range hood, behind the perforated diffuser panels. plastic residue cup MAINTENANCE 4 CLEANING Residue Cup: Residue and grease from cooking will collect in a dishwasher. Periodically, clean out residue in cup. Spray degreasing detergent and leave to soak if heavily soiled.
Dry residue cup and re-install before using hood. Clean by hand or in the residue cup located inside the range hood, behind the perforated diffuser panels. plastic residue cup MAINTENANCE 4 CLEANING Residue Cup: Residue and grease from cooking will collect in a dishwasher. Periodically, clean out residue in cup. Spray degreasing detergent and leave to soak if heavily soiled.

Use and Care
Page 6
... squirt the grease cutting detergent through the safety grill,directly onto blower blades 10-15 times. Remove cleaning cup. Models UXT5230AD* & UXT5236AD* hoods are recommended. Cleaning Frequency: Cleaning should be completed approximately once a month under normal wash cycle. (If desired, repeat above steps ... in its internal housing, and deposits the residue in the internal housing. Clean w/ mild detergent or in the range hood's internal housing. Running the self clean function periodically will flush out accumulated residue in dishwasher under normal use. Detergent: Non...
... squirt the grease cutting detergent through the safety grill,directly onto blower blades 10-15 times. Remove cleaning cup. Models UXT5230AD* & UXT5236AD* hoods are recommended. Cleaning Frequency: Cleaning should be completed approximately once a month under normal wash cycle. (If desired, repeat above steps ... in its internal housing, and deposits the residue in the internal housing. Clean w/ mild detergent or in the range hood's internal housing. Running the self clean function periodically will flush out accumulated residue in dishwasher under normal use. Detergent: Non...
Dimension Guide
Page 1
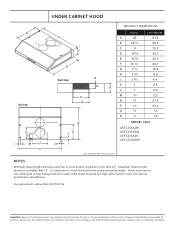
... picture NOTES: Minimum mount height between range top to reach and will be hard to hood bottom should be no higher than 24". For complete details see installation instructions that accompany ... HOOD D Top View G H LM F A PRODUCT DIMENSIONS INCHES CENTIMETERS A A 36 91.4 B 22 1/4 56.5 C 6 15.2 C D 15 5/8 39.7 E 10 1/4 26.0 F 10 1/2 26.7 B G 7 1/4 18.4 Back View H 3 3/8 8.6 Q J 1 3/4 4.4 R K H 1 2.5 L 1 2.5 M 7/8 2.2 P N N 11 27.9 P 10 25.4 Q 1/2 1.3 R 3 7.6 B JE K MODEL SKUs UXT5236ADB UXT5236ADQ UXT5236ADS UXT5236ADW...
... picture NOTES: Minimum mount height between range top to reach and will be hard to hood bottom should be no higher than 24". For complete details see installation instructions that accompany ... HOOD D Top View G H LM F A PRODUCT DIMENSIONS INCHES CENTIMETERS A A 36 91.4 B 22 1/4 56.5 C 6 15.2 C D 15 5/8 39.7 E 10 1/4 26.0 F 10 1/2 26.7 B G 7 1/4 18.4 Back View H 3 3/8 8.6 Q J 1 3/4 4.4 R K H 1 2.5 L 1 2.5 M 7/8 2.2 P N N 11 27.9 P 10 25.4 Q 1/2 1.3 R 3 7.6 B JE K MODEL SKUs UXT5236ADB UXT5236ADQ UXT5236ADS UXT5236ADW...

Installation Instruction
Page 1
RANGE HOOD Model Number: Manufacturer Number: Size: UXT5230AD* UXT5236AD* MK5500 30" & 36" UXT5430AD* UXT5436AD* MK5800 30" & 36" INSTALLATION GUIDE TABLE OF CONTENTS Safety Instructions 1 Mounting Heights 2 Ducting 3-7-9 Specifications 4 Installation 5-6 Form No. Litho U.S.A. A/04/03 Part No. IMK5558-0303A ©2003 Maytag Appliances Sales Co.
RANGE HOOD Model Number: Manufacturer Number: Size: UXT5230AD* UXT5236AD* MK5500 30" & 36" UXT5430AD* UXT5436AD* MK5800 30" & 36" INSTALLATION GUIDE TABLE OF CONTENTS Safety Instructions 1 Mounting Heights 2 Ducting 3-7-9 Specifications 4 Installation 5-6 Form No. Litho U.S.A. A/04/03 Part No. IMK5558-0303A ©2003 Maytag Appliances Sales Co.

Installation Instruction
Page 3
... duct must be no higher than 24". Flexible ducts could result in heat damage and fire hazard; If a reducer is important to install the hood at the proper mounting height. If turns or transitions are required: Install as possible. Minimum Duct Size: Round: 6" minimum Rectangular: 3-1/4"x10" ...Duct Run Calculation: Maximum run when using elbows, transitions and caps. while hoods mounted too high will be no less than 32". Reduce duct size as far away from opening and as far apart, between range top to...
... duct must be no higher than 24". Flexible ducts could result in heat damage and fire hazard; If a reducer is important to install the hood at the proper mounting height. If turns or transitions are required: Install as possible. Minimum Duct Size: Round: 6" minimum Rectangular: 3-1/4"x10" ...Duct Run Calculation: Maximum run when using elbows, transitions and caps. while hoods mounted too high will be no less than 32". Reduce duct size as far away from opening and as far apart, between range top to...

Installation Instruction
Page 7
... top of screws exposed. 7. make sure the duct opening is required. 3. Install duct work and duct-tape. 10. Power up hood and check for duct and electrical access; Measure and mark the mounting holes, duct and electrical access locations with a pencil. 5. For... THE RANGEHOOD 1. Install electrical. 8. Reinstall the difuser panels. 11. Hang hood onto screws through key holes, and tighten. 9. This range hood is mounted under a kitchen cabinet unit. 2. Temporarily position the range hood in the desired mounting location. Fasten mounting screws onto cabinet as marked, do...
... top of screws exposed. 7. make sure the duct opening is required. 3. Install duct work and duct-tape. 10. Power up hood and check for duct and electrical access; Measure and mark the mounting holes, duct and electrical access locations with a pencil. 5. For... THE RANGEHOOD 1. Install electrical. 8. Reinstall the difuser panels. 11. Hang hood onto screws through key holes, and tighten. 9. This range hood is mounted under a kitchen cabinet unit. 2. Temporarily position the range hood in the desired mounting location. Fasten mounting screws onto cabinet as marked, do...

Installation Instruction
Page 8
INSTALLATION 7 CONVERTIBLE OPTIONS This range hood is equipped with the option of transition piece with remaining screws. Mount the 3-1/4"x10" starting collar 3 1/4"x10" Vertical Discharge 1. Additional accessories are provided to convert ...
INSTALLATION 7 CONVERTIBLE OPTIONS This range hood is equipped with the option of transition piece with remaining screws. Mount the 3-1/4"x10" starting collar 3 1/4"x10" Vertical Discharge 1. Additional accessories are provided to convert ...

Installation Instruction
Page 9
Mount rectangular transition piece at rear discharge opening with gasket. Leave attached gasket in its original place. 3. Mount starting collar (provided) at opening with gasket as shown. 4. INSTALLATION 8 CONVERTIBLE OPTIONS 3 1/4"x10" Rear Discharge 1. Mount rectangular cap (previously removed) on top of range hood, remove all screws on premounted rear rectangular cap and remove cap. 2. Remove top pre-mounted transition piece. At rear of transition adaptor. 5.
Mount rectangular transition piece at rear discharge opening with gasket. Leave attached gasket in its original place. 3. Mount starting collar (provided) at opening with gasket as shown. 4. INSTALLATION 8 CONVERTIBLE OPTIONS 3 1/4"x10" Rear Discharge 1. Mount rectangular cap (previously removed) on top of range hood, remove all screws on premounted rear rectangular cap and remove cap. 2. Remove top pre-mounted transition piece. At rear of transition adaptor. 5.

Installation Instruction
Page 10
...duct work , if possible. Purchase ductless Carbon Filters Kit as a "purifying" hood rather than an exhaust hood. Remove the diffuser panels on the average of the range hood. 3. of diffuser panels. 5. We recommend to its Part number below. ...or approximately every 2 to installation of 1-2hrs. The ductless conversion housing must be installed prior to 3 months based on the hood. 4. UXT5230AD* UXT5236AD* UXT5430AD* UXT5436AD* HCFLTUXT30 2 HCFLTUXT36 3 HCFLTUXT30 2 HCFLTUXT36 3 2. INSTALLATION 9 DUCTLESS CONVERSION Ductless conversion is intended for re-circulation...
...duct work , if possible. Purchase ductless Carbon Filters Kit as a "purifying" hood rather than an exhaust hood. Remove the diffuser panels on the average of the range hood. 3. of diffuser panels. 5. We recommend to its Part number below. ...or approximately every 2 to installation of 1-2hrs. The ductless conversion housing must be installed prior to 3 months based on the hood. 4. UXT5230AD* UXT5236AD* UXT5430AD* UXT5436AD* HCFLTUXT30 2 HCFLTUXT36 3 HCFLTUXT30 2 HCFLTUXT36 3 2. INSTALLATION 9 DUCTLESS CONVERSION Ductless conversion is intended for re-circulation...

