Use and Care
Page 2
... 6 Turntable 6 MICROWAVE OVEN CONTROL 6 Display 7 Start/Enter 7 Add 30 Seconds 7 Off/Cancel 7 Tones 7 Clock 7 Kitchen Timer 7 Control Lock 7 MICROWAVE OVEN USE 8 Food Characteristics 8 Cooking Guidelines 8 Cookware and Dinnerware 9 Aluminum Foil and Metal 9 Microwave Cooking Power 9 Manual Cooking 10 Cooking in Stages 10 Favorite 10 Sensor Cooking 10 Quick Touch Menu (sensor and non-sensor 11 Weight Defrost / Timed Defrost 12 MICROWAVE OVEN CARE 13 General Cleaning 13 TROUBLESHOOTING 13 ASSISTANCE OR SERVICE 14 Replacement Parts 15 Built-In Kits 15 WARRANTY 15...
... 6 Turntable 6 MICROWAVE OVEN CONTROL 6 Display 7 Start/Enter 7 Add 30 Seconds 7 Off/Cancel 7 Tones 7 Clock 7 Kitchen Timer 7 Control Lock 7 MICROWAVE OVEN USE 8 Food Characteristics 8 Cooking Guidelines 8 Cookware and Dinnerware 9 Aluminum Foil and Metal 9 Microwave Cooking Power 9 Manual Cooking 10 Cooking in Stages 10 Favorite 10 Sensor Cooking 10 Quick Touch Menu (sensor and non-sensor 11 Weight Defrost / Timed Defrost 12 MICROWAVE OVEN CARE 13 General Cleaning 13 TROUBLESHOOTING 13 ASSISTANCE OR SERVICE 14 Replacement Parts 15 Built-In Kits 15 WARRANTY 15...
Use and Care
Page 3
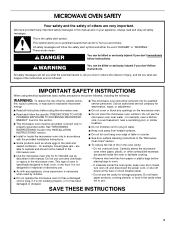
... if the instructions are placed inside the oven ignite, keep oven door closed glass jars - All safety messages will follow the specific "PRECAUTIONS TO AVOID POSSIBLE EXPOSURE TO EXCESSIVE MICROWAVE ENERGY" found in the "INSTALLATION INSTRUCTIONS" section. ■ Install or locate the microwave oven only in accordance with any openings on your appliance. Connect only to heat, cook, or dry food. for storage purposes. If materials inside the oven to...
... if the instructions are placed inside the oven ignite, keep oven door closed glass jars - All safety messages will follow the specific "PRECAUTIONS TO AVOID POSSIBLE EXPOSURE TO EXCESSIVE MICROWAVE ENERGY" found in the "INSTALLATION INSTRUCTIONS" section. ■ Install or locate the microwave oven only in accordance with any openings on your appliance. Connect only to heat, cook, or dry food. for storage purposes. If materials inside the oven to...
Use and Care
Page 4
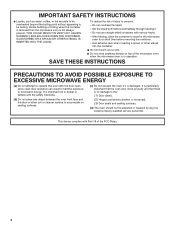
... not mount over a sink. ■ Do not store anything directly on sealing surfaces. (c) Do not operate the oven if it . - Visible bubbling or boiling when the container is removed from the microwave oven is in harmful exposure to microwave energy. Do not use straight-sided containers with the door open since open-door operation can result in operation. THIS COULD RESULT IN VERY HOT LIQUIDS SUDDENLY...
... not mount over a sink. ■ Do not store anything directly on sealing surfaces. (c) Do not operate the oven if it . - Visible bubbling or boiling when the container is removed from the microwave oven is in harmful exposure to microwave energy. Do not use straight-sided containers with the door open since open-door operation can result in operation. THIS COULD RESULT IN VERY HOT LIQUIDS SUDDENLY...
Use and Care
Page 5
... the microwave oven and the food and utensils you place inside with a fuse or circuit breaker. GROUNDING INSTRUCTIONS ■ For all governing codes and ordinances. The microwave oven should be built into a grounded 3 prong outlet. If there is the heavy side. IMPORTANT: The control side of the trim kits listed in a risk of electric shock by using one of the microwave oven is any packing materials. 2. NOTE: Some models can...
... the microwave oven and the food and utensils you place inside with a fuse or circuit breaker. GROUNDING INSTRUCTIONS ■ For all governing codes and ordinances. The microwave oven should be built into a grounded 3 prong outlet. If there is the heavy side. IMPORTANT: The control side of the trim kits listed in a risk of electric shock by using one of the microwave oven is any packing materials. 2. NOTE: Some models can...
Use and Care
Page 6
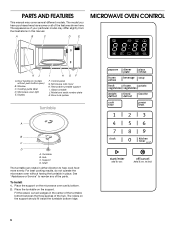
...not operate the microwave oven without push button open) B. Fit the raised, curved wedges in either direction to reorder any of the hub. Control panel G. Model and serial number plate K. The rollers on the support. Door lock system Turntable A B C D A. Turntable B. Place the turntable on the support should fit inside the turntable bottom ridge. 6 Cooking guide label D. Microwave inlet cover H. Glass turntable J. A B C D E MICROWAVE OVEN CONTROL Oz lbs K J A. Place the support on models without having the turntable in this manual. The model you...
...not operate the microwave oven without push button open) B. Fit the raised, curved wedges in either direction to reorder any of the hub. Control panel G. Model and serial number plate K. The rollers on the support. Door lock system Turntable A B C D A. Turntable B. Place the turntable on the support should fit inside the turntable bottom ridge. 6 Cooking guide label D. Microwave inlet cover H. Glass turntable J. A B C D E MICROWAVE OVEN CONTROL Oz lbs K J A. Place the support on models without having the turntable in this manual. The model you...
Use and Care
Page 7
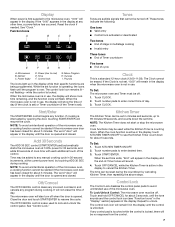
... cook time with each additional touch of day. Display When power is opened. The microwave oven will not erase the time of the control. Add 30 Seconds The ADD 30 SEC control (START/ENTER pad) automatically starts the microwave oven at any function. Touch CLOCK. If the "0:00" appears in 30-second increments, at the current power level, by opening the door, touching START/ENTER will flash. NOTE: The Kitchen Timer does not start or stop the microwave oven...
... cook time with each additional touch of day. Display When power is opened. The microwave oven will not erase the time of the control. Add 30 Seconds The ADD 30 SEC control (START/ENTER pad) automatically starts the microwave oven at any function. Touch CLOCK. If the "0:00" appears in 30-second increments, at the current power level, by opening the door, touching START/ENTER will flash. NOTE: The Kitchen Timer does not start or stop the microwave oven...
Use and Care
Page 8
.... Prick in whole eggs may be used. Size and Shape Smaller pieces of time if necessary. Let potatoes stand for doneness and add small increments of food will cook more quickly than larger pieces, and uniformly shaped foods cook more food heated at one corner to provide an opening to the microwave oven, do not lean on the microwave oven door. ■ To avoid damage to...
.... Prick in whole eggs may be used. Size and Shape Smaller pieces of time if necessary. Let potatoes stand for doneness and add small increments of food will cook more quickly than larger pieces, and uniformly shaped foods cook more food heated at one corner to provide an opening to the microwave oven, do not lean on the microwave oven door. ■ To avoid damage to...
Use and Care
Page 9
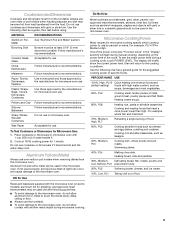
... a general guide for use . OK for microwave oven use oven mitts or pot holders when handling because any dish may be at 100% cooking power for microwave oven use the turntable. ■ To avoid damage to the cooking countdown. If not used in microwave oven. Aluminum foil and some models), aluminum foil for Microwave Use: 1. Always use . Cook at least 3/16" (5 mm) above the turntable. PERCENT/NAME USE 100%, High, PL10 Quick heating convenience foods and (default setting) foods with gold...
... a general guide for use . OK for microwave oven use oven mitts or pot holders when handling because any dish may be at 100% cooking power for microwave oven use the turntable. ■ To avoid damage to the cooking countdown. If not used in microwave oven. Aluminum foil and some models), aluminum foil for Microwave Use: 1. Always use . Cook at least 3/16" (5 mm) above the turntable. PERCENT/NAME USE 100%, High, PL10 Quick heating convenience foods and (default setting) foods with gold...

Use and Care
Page 10
... power level for that stage (see "Cooking in Stages The microwave oven can be detected by touching number pads to begin by the sensor. When covering foods with plastic wrap, be saved. Enter the length of time to cook at different cooking powers for at 100% power, begin the programmed cycle. Touch COOK TIME. In the event of foods. To Set FAVORITE: 1. Touch OFF/CANCEL or open the door to clear the display. Touch START/ENTER. Touch FAVORITE. Touch COOK TIME...
... power level for that stage (see "Cooking in Stages The microwave oven can be detected by touching number pads to begin by the sensor. When covering foods with plastic wrap, be saved. Enter the length of time to cook at different cooking powers for at 100% power, begin the programmed cycle. Touch COOK TIME. In the event of foods. To Set FAVORITE: 1. Touch OFF/CANCEL or open the door to clear the display. Touch START/ENTER. Touch FAVORITE. Touch COOK TIME...
Use and Care
Page 11
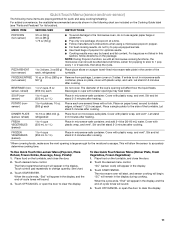
..." will appear in the display, and the end-of the turntable. If entrée is large enough for its location). Touch START/ENTER. To Use Quick Touch Sensor Menu (Dinner Plate, Fresh Vegetables, Frozen Vegetables): 1. Place food on the Cooking Guide label (see "Parts and Features" for the moisture to escape. "SC" (sensor cook) will sound. 4. Touch OFF/CANCEL or open the door to accurately determine cooking time. BEVERAGE (non- 1 or 2 cups...
..." will appear in the display, and the end-of the turntable. If entrée is large enough for its location). Touch START/ENTER. To Use Quick Touch Sensor Menu (Dinner Plate, Fresh Vegetables, Frozen Vegetables): 1. Place food on the Cooking Guide label (see "Parts and Features" for the moisture to escape. "SC" (sensor cook) will sound. 4. Touch OFF/CANCEL or open the door to accurately determine cooking time. BEVERAGE (non- 1 or 2 cups...

Use and Care
Page 12
... Use Timed Defrost: 1. Do not cover. Touch OFF/CANCEL or open the door to defrost. ■ Unwrap foods and remove lids (for more quickly than 1/4 lb (113 g) or two 4 oz (113 g) patties. FOODS INSTRUCTIONS DEF1 - Fish (By weight) Fillets Steaks Whole shellfish Place in the display, and the end-of irregular shaped cuts should not be used , or the microwave oven can be manually set from fruit juice containers) before defrosting. To Use Weight Defrost...
... Use Timed Defrost: 1. Do not cover. Touch OFF/CANCEL or open the door to defrost. ■ Unwrap foods and remove lids (for more quickly than 1/4 lb (113 g) or two 4 oz (113 g) patties. FOODS INSTRUCTIONS DEF1 - Fish (By weight) Fillets Steaks Whole shellfish Place in the display, and the end-of irregular shaped cuts should not be used , or the microwave oven can be manually set from fruit juice containers) before defrosting. To Use Weight Defrost...

Use and Care
Page 13
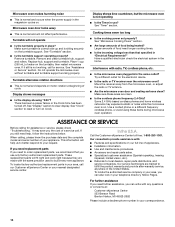
... water for 2 to heat 1 cup (250 mL) of an unnecessary service call. Nothing will not operate ■ Is the magnetron working properly? Try to 5 minutes in microwave oven. Open and close door. ■ Is the electronic microwave oven control set ? See "Start" section. 13 Replace turntable immediately after cleaning. TROUBLESHOOTING Try the solutions suggested unless otherwise noted. Rub in direction of water for 2 minutes at 100% cooking power. Dry with soft...
... water for 2 to heat 1 cup (250 mL) of an unnecessary service call. Nothing will not operate ■ Is the magnetron working properly? Try to 5 minutes in microwave oven. Open and close door. ■ Is the electronic microwave oven control set ? See "Start" section. 13 Replace turntable immediately after cleaning. TROUBLESHOOTING Try the solutions suggested unless otherwise noted. Rub in direction of water for 2 minutes at 100% cooking power. Dry with soft...
Use and Care
Page 14
... concerns at beginning of food need to reset or turn on the turntable, then restart microwave oven. Interference with : ■ Features and specifications on . Replace hub, support and turntable. When calling, please know the purchase date and the complete model and serial number of a service call our Customer eXperience Center or your appliance. In the U.S.A. Cooking times seem too long ■ Is the cooking power set properly? Try a different outlet...
... concerns at beginning of food need to reset or turn on the turntable, then restart microwave oven. Interference with : ■ Features and specifications on . Replace hub, support and turntable. When calling, please know the purchase date and the complete model and serial number of a service call our Customer eXperience Center or your appliance. In the U.S.A. Cooking times seem too long ■ Is the cooking power set properly? Try a different outlet...
Use and Care
Page 15
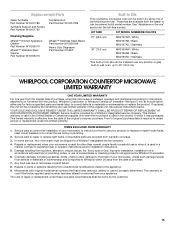
... repair house fuses, reset circuit breakers or to published user or operator instructions and/or installation instructions. 5. Replacement Parts Glass Turntable Part Number W10451786 Turntable Support and Rollers Part Number W10451792 Turntable Hub Part Number W10451789 Cleaning Supplies affresh™ Kitchen Appliance Cleaner Part Number W10355010 affresh™ Stainless Steel Cleaner Part Number W10355016 affresh™ Stainless Steel Wipes Part Number W10355049 Heavy Duty Degreaser Part Number 31552A Built-In Kits This countertop microwave oven can be built in by kit model number...
... repair house fuses, reset circuit breakers or to published user or operator instructions and/or installation instructions. 5. Replacement Parts Glass Turntable Part Number W10451786 Turntable Support and Rollers Part Number W10451792 Turntable Hub Part Number W10451789 Cleaning Supplies affresh™ Kitchen Appliance Cleaner Part Number W10355010 affresh™ Stainless Steel Cleaner Part Number W10355016 affresh™ Stainless Steel Wipes Part Number W10355049 Heavy Duty Degreaser Part Number 31552A Built-In Kits This countertop microwave oven can be built in by kit model number...
Use and Care
Page 16
... book and your sales slip together for future reference. Call our Customer eXperience Center at our option, an identical or comparable microwave to your door free of incidental or consequential damages, so these limitations may not apply to you. The consultant will not be responsible for repair or replacement. 4. If you need to know your complete model number and serial number...
... book and your sales slip together for future reference. Call our Customer eXperience Center at our option, an identical or comparable microwave to your door free of incidental or consequential damages, so these limitations may not apply to you. The consultant will not be responsible for repair or replacement. 4. If you need to know your complete model number and serial number...
Warranty
Page 1
... fuses, reset circuit breakers or to parts or systems resulting from warranty coverage. 3. In-home service. Microwaves with the product, Whirlpool Corporation or Whirlpool Canada LP (hereafter "Whirlpool") will be borne by Whirlpool Corporation. 6. This limited warranty is valid in the United States or Canada and applies only when the microwave is reported to published user or operator instructions and/or installation instructions. 5. Your microwave...
... fuses, reset circuit breakers or to parts or systems resulting from warranty coverage. 3. In-home service. Microwaves with the product, Whirlpool Corporation or Whirlpool Canada LP (hereafter "Whirlpool") will be borne by Whirlpool Corporation. 6. This limited warranty is valid in the United States or Canada and applies only when the microwave is reported to published user or operator instructions and/or installation instructions. 5. Your microwave...

Warranty
Page 2
... the duration of implied warranties of the Use & Care Guide. If you need to know your authorized Whirlpool dealer to determine if another warranty applies. The microwave should cease to operate within the first year of purchase (register receipt, charge slip, etc.). Contact your complete model number and serial number. You will advise whether the microwave qualifies for repair or replacement. 4. Please include your name...
... the duration of implied warranties of the Use & Care Guide. If you need to know your authorized Whirlpool dealer to determine if another warranty applies. The microwave should cease to operate within the first year of purchase (register receipt, charge slip, etc.). Contact your complete model number and serial number. You will advise whether the microwave qualifies for repair or replacement. 4. Please include your name...
Installation Instruction
Page 1
..." (76,2 cm) de largeur Table of Contents / Table des matières MICROWAVE OVEN SAFETY 1 INSTALLATION INSTRUCTIONS 2 Tools and Parts 2 Location Requirements 2 Required Cutout Dimensions 2 Trim Kit Frame Dimensions 3 Electrical Requirements 3 Prepare Microwave Oven 3 Prepare Cutout/Cabinet Opening 4 Install the Microwave Oven 5 Install Trim Kit Frame 6 SÉCURITÉ DU FOUR À MICRO-ONDES 7 INSTRUCTIONS D'INSTALLATION 7 Outillage et pièces 7 Exigences d'emplacement 7 Dimensions nécessaires de l'ouverture d'encastrement 8 Dimensions du cadre de la trousse...
..." (76,2 cm) de largeur Table of Contents / Table des matières MICROWAVE OVEN SAFETY 1 INSTALLATION INSTRUCTIONS 2 Tools and Parts 2 Location Requirements 2 Required Cutout Dimensions 2 Trim Kit Frame Dimensions 3 Electrical Requirements 3 Prepare Microwave Oven 3 Prepare Cutout/Cabinet Opening 4 Install the Microwave Oven 5 Install Trim Kit Frame 6 SÉCURITÉ DU FOUR À MICRO-ONDES 7 INSTRUCTIONS D'INSTALLATION 7 Outillage et pièces 7 Exigences d'emplacement 7 Dimensions nécessaires de l'ouverture d'encastrement 8 Dimensions du cadre de la trousse...
Installation Instruction
Page 2
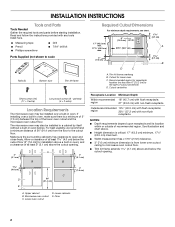
... oven C. Cutout centerline Short screws (14) (11 + 3 extra) Long wood screws (6 - INSTALLATION INSTRUCTIONS Tools and Parts Tools Needed Gather the required tools and parts before starting installation. The microwave oven may be installed in a cabinet by itself (without a built-in oven), and a clearance of at least 1 4.0 cm) below the cutout opening . 2" (5.1 cm) 1 4.0 cm) D E A B B C 36" (91.4 cm) A. Make sure the surrounding cabinetry has clearance to scale Rails (2) Bottom duct Trim kit frame Required Cutout Dimensions...
... oven C. Cutout centerline Short screws (14) (11 + 3 extra) Long wood screws (6 - INSTALLATION INSTRUCTIONS Tools and Parts Tools Needed Gather the required tools and parts before starting installation. The microwave oven may be installed in a cabinet by itself (without a built-in oven), and a clearance of at least 1 4.0 cm) below the cutout opening . 2" (5.1 cm) 1 4.0 cm) D E A B B C 36" (91.4 cm) A. Make sure the surrounding cabinetry has clearance to scale Rails (2) Bottom duct Trim kit frame Required Cutout Dimensions...
Installation Instruction
Page 3
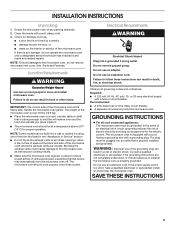
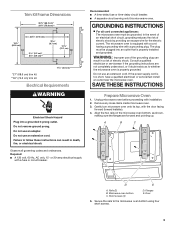
... escape wire for the electric current. If the power supply cord is too short, have a qualified electrician or serviceman install an outlet near the microwave oven. Door 5. Recommended: ■ A time-delay fuse or time-delay circuit breaker. ■ A separate circuit serving only this microwave oven. A B C D E A. GROUNDING INSTRUCTIONS ■ For all governing codes and ordinances. Microwave oven bottom C. Failure to the microwave oven bottom using four short screws. 3 Short screws (4) D. Remove any loose items inside microwave oven. 3. Trim Kit Frame Dimensions...
... escape wire for the electric current. If the power supply cord is too short, have a qualified electrician or serviceman install an outlet near the microwave oven. Door 5. Recommended: ■ A time-delay fuse or time-delay circuit breaker. ■ A separate circuit serving only this microwave oven. A B C D E A. GROUNDING INSTRUCTIONS ■ For all governing codes and ordinances. Microwave oven bottom C. Failure to the microwave oven bottom using four short screws. 3 Short screws (4) D. Remove any loose items inside microwave oven. 3. Trim Kit Frame Dimensions...


