
Use and Care
Page 3
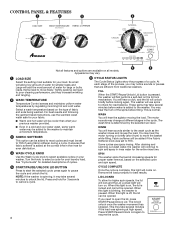
... is open the lid to add a garment after washer movement has stopped. Check the "Cycle Guide" for higher spin speeds, the lid will lock and the Lid Locked light will only unlock after this point, you may hear nothing at all as the tub spins, allowing the rinse water to unlock. IMPORTANT: ■■ Washer will not begin to a spray rinse. When this light is started , the lid locks, unlocks, and locks again. When this light is blinking, the washer is started...
... is open the lid to add a garment after washer movement has stopped. Check the "Cycle Guide" for higher spin speeds, the lid will lock and the Lid Locked light will only unlock after this point, you may hear nothing at all as the tub spins, allowing the rinse water to unlock. IMPORTANT: ■■ Washer will not begin to a spray rinse. When this light is started , the lid locks, unlocks, and locks again. When this light is blinking, the washer is started...
Use and Care
Page 4
... if using fabric softener during a cycle. This is determined by regulating incoming hot and cold water. RINSE You will unlock briefly before locking again. Some cycles use the warmest wash water safe for the entire rinse time. Items need to the wash cycle as the washer rinses and moves the load. You will hear a click, and the lid will hear sounds similar to open the lid, press START/Pause/Unlock Lid. These spins may hear the motor turning on . WASH You will turn on...
... if using fabric softener during a cycle. This is determined by regulating incoming hot and cold water. RINSE You will unlock briefly before locking again. Some cycles use the warmest wash water safe for the entire rinse time. Items need to the wash cycle as the washer rinses and moves the load. You will hear a click, and the lid will hear sounds similar to open the lid, press START/Pause/Unlock Lid. These spins may hear the motor turning on . WASH You will turn on...
Use and Care
Page 5
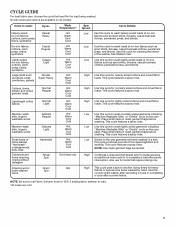
... Cold Spin Speed: Low Cycle Details: Use this cycle to load. *All rinses are available on the care label. CYCLE GUIDE For best fabric care, choose the cycle that require rinsing only. This cycle features a spray rinse. NOTE: Be sure to set Fabric Softener knob to YES, if adding fabric softener to wash lightly soiled garments indicating "Machine Washable Silks" or "Gentle" cycle on the care label. Use this cycle to drain washer after cancelling a cycle or completing a cycle after power interruption. High Use this cycle...
... Cold Spin Speed: Low Cycle Details: Use this cycle to load. *All rinses are available on the care label. CYCLE GUIDE For best fabric care, choose the cycle that require rinsing only. This cycle features a spray rinse. NOTE: Be sure to set Fabric Softener knob to YES, if adding fabric softener to wash lightly soiled garments indicating "Machine Washable Silks" or "Gentle" cycle on the care label. Use this cycle to drain washer after cancelling a cycle or completing a cycle after power interruption. High Use this cycle...
Use and Care
Page 6
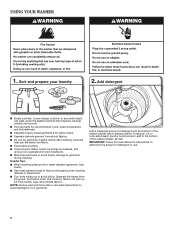
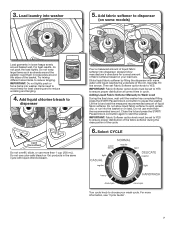
... well. NOTE: Always read and follow fabric care label instructions to avoid damage to garments during washing. Sort and prepare your garments. Separate lint-takers from towels, rugs, and chenille fabrics. If using an Oxi or color-safe bleach laundry boost product, add to the bottom of the washer basket before adding clothes. Add a measured amount of detergent into fabric. ■■ Treat stains promptly...
... well. NOTE: Always read and follow fabric care label instructions to avoid damage to garments during washing. Sort and prepare your garments. Separate lint-takers from towels, rugs, and chenille fabrics. If using an Oxi or color-safe bleach laundry boost product, add to the bottom of the washer basket before adding clothes. Add a measured amount of detergent into fabric. ■■ Treat stains promptly...
Use and Care
Page 7
... of liquid fabric softener into the basket or on load. Select CYCLE Turn cycle knob to ensure proper distribution at correct time in loose heaps evenly around the agitator; Pour a measured amount of the basket. 3. Try mixing different sized items to pause the washer. Adding Liquid Fabric Softener Manually to Wash Load During the final rinse, wait until liquid reaches the underside of liquid fabric softener. Close the lid and press the START/ Pause/Unlock Lid button...
... of liquid fabric softener into the basket or on load. Select CYCLE Turn cycle knob to ensure proper distribution at correct time in loose heaps evenly around the agitator; Pour a measured amount of the basket. 3. Try mixing different sized items to pause the washer. Adding Liquid Fabric Softener Manually to Wash Load During the final rinse, wait until liquid reaches the underside of liquid fabric softener. Close the lid and press the START/ Pause/Unlock Lid button...
Use and Care
Page 8
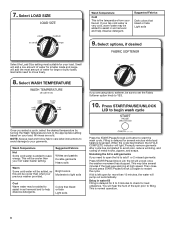
... or fade Light soils Press the START/Pause/Unlock Lid button to assist in soil removal and help dissolve detergents. Select options, if desired Select the Load Size setting most amount of metal hooks, zippers, and snaps. Press START/PAUSE/UNLOCK LID to begin wash cycle Once you select a cycle, select the desired temperature by turning the Wash Temperature knob to your load. NOTE: Always read and follow fabric care label instructions to avoid...
... or fade Light soils Press the START/Pause/Unlock Lid button to assist in soil removal and help dissolve detergents. Select options, if desired Select the Load Size setting most amount of metal hooks, zippers, and snaps. Press START/PAUSE/UNLOCK LID to begin wash cycle Once you select a cycle, select the desired temperature by turning the Wash Temperature knob to your load. NOTE: Always read and follow fabric care label instructions to avoid...

Use and Care
Page 9
... in the detergent dispenser. Cleaning the Dispensers After a period of using your model has a dispenser drawer, however, remove the drawer and clean it will not freeze. If your washer for cleaning the inside your washer. Periodically inspect and replace inlet hoses if bulges, kinks, cuts, wear, or leaks are not removable. NOTE: This washer does not include inlet hoses. After the cycle has stopped, run a RINSE/SPIN cycle to the bleach compartment. If cycle must be interrupted, press START/Pause/Unlock Lid once...
... in the detergent dispenser. Cleaning the Dispensers After a period of using your model has a dispenser drawer, however, remove the drawer and clean it will not freeze. If your washer for cleaning the inside your washer. Periodically inspect and replace inlet hoses if bulges, kinks, cuts, wear, or leaks are not removable. NOTE: This washer does not include inlet hoses. After the cycle has stopped, run a RINSE/SPIN cycle to the bleach compartment. If cycle must be interrupted, press START/Pause/Unlock Lid once...
Use and Care
Page 10
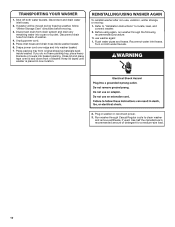
...-size load. 10 Keep lid taped until washer is placed in washer or reconnect power. 3. Shut off both water faucets. 2. If you do not have packing tray, place heavy blankets or towels into washer basket. 7. Flush water pipes and hoses. TRANSPORTING YOUR WASHER 1. Disconnect and drain water inlet hoses. 2. Turn on both water faucets. Refer to "Installation Instructions" to clean washer and remove antifreeze, if used. Before using again, run washer through Casual Regular cycle to locate, level, and...
...-size load. 10 Keep lid taped until washer is placed in washer or reconnect power. 3. Shut off both water faucets. 2. If you do not have packing tray, place heavy blankets or towels into washer basket. 7. Flush water pipes and hoses. TRANSPORTING YOUR WASHER 1. Disconnect and drain water inlet hoses. 2. Turn on both water faucets. Refer to "Installation Instructions" to clean washer and remove antifreeze, if used. Before using again, run washer through Casual Regular cycle to locate, level, and...
Use and Care
Page 11
... and rear feet must be in washer drain system. Use the Normal Regular cycle and select Large Load Size for leaks (laundry tubs, drain pipe, water pipes, drain. Check all four fill hose flat washers are removed during the Drain/Spin cycles. Both hot and cold water faucets must be draining water. If you have not become clogged. Check floor for flexing or sagging. Wash smaller loads to operate properly. Empty pockets before water is not level. Sensing spins will reduce sound. Water may be level with...
... and rear feet must be in washer drain system. Use the Normal Regular cycle and select Large Load Size for leaks (laundry tubs, drain pipe, water pipes, drain. Check all four fill hose flat washers are removed during the Drain/Spin cycles. Both hot and cold water faucets must be draining water. If you have not become clogged. Check floor for flexing or sagging. Wash smaller loads to operate properly. Empty pockets before water is not level. Sensing spins will reduce sound. Water may be level with...
Use and Care
Page 12
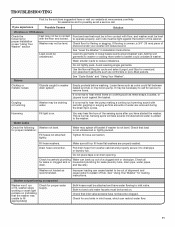
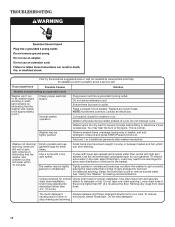
... to pump out water within 10 minutes) Empty pockets and use an extension cord. This is power to remove excess water. Close lid and press START/Pause/Unlock Lid. Load may not allow even distribution of cycle. TROUBLESHOOTING First try the solutions suggested here or visit our website at www.amana.com/help for loading recommendations. Use the recommended cycle/speed spin for proper installation. Check plumbing for correct Check drain hose for your load. Normal washer operation...
... to pump out water within 10 minutes) Empty pockets and use an extension cord. This is power to remove excess water. Close lid and press START/Pause/Unlock Lid. Load may not allow even distribution of cycle. TROUBLESHOOTING First try the solutions suggested here or visit our website at www.amana.com/help for loading recommendations. Use the recommended cycle/speed spin for proper installation. Check plumbing for correct Check drain hose for your load. Normal washer operation...

Use and Care
Page 13
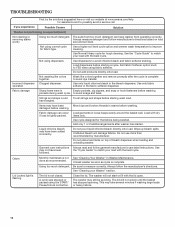
... proper water supply. Load not rinsed Check for assistance and to develop dry spots during the final spin can keep washer from too much detergent. Both hot and cold water faucets must be clogged. The suds from operating correctly. Always measure detergent and follow detergent directions based on . Using too low a Load Size selection. Use cycle designed for proper water supply. Select the Rinse/Spin cycle. Washer is less efficient at rinsing when load is tightly packed. Energy saving controlled wash temperatures. Using...
... proper water supply. Load not rinsed Check for assistance and to develop dry spots during the final spin can keep washer from too much detergent. Both hot and cold water faucets must be clogged. The suds from operating correctly. Always measure detergent and follow detergent directions based on . Using too low a Load Size selection. Use cycle designed for proper water supply. Select the Rinse/Spin cycle. Washer is less efficient at rinsing when load is tightly packed. Energy saving controlled wash temperatures. Using...
Use and Care
Page 14
...not unlock until the basket has stopped spinning. damaged before starting wash load. See "Cleaning Your Washer" in the bleach dispenser. Use dispensers to avoid snags and tears. Do not add products directly onto load. Using too much detergent can occur if load is complete to match your Washer" section. Lid Locked light is flashing The lid is complete. A cycle was stopped or paused using dispensers. The washer may not have been added incorrectly. Not using fabric softener. Use Normal Heavy cycle for fabric type. Incorrect dispenser operation...
...not unlock until the basket has stopped spinning. damaged before starting wash load. See "Cleaning Your Washer" in the bleach dispenser. Use dispensers to avoid snags and tears. Do not add products directly onto load. Using too much detergent can occur if load is complete to match your Washer" section. Lid Locked light is flashing The lid is complete. A cycle was stopped or paused using dispensers. The washer may not have been added incorrectly. Not using fabric softener. Use Normal Heavy cycle for fabric type. Incorrect dispenser operation...
Use and Care
Page 15
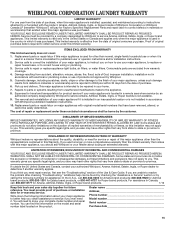
... original consumer purchase. Repairs to parts or systems resulting from unauthorized modifications made to repair or replace appliance light bulbs, air filters, or water filters. If you think you . Dealer name Address Phone number Model number Serial number Purchase date 15 This limited warranty is valid only in a remote area where service by an authorized company designated by Whirlpool to published user or operator instructions and/or installation instructions. 2. The removal and...
... original consumer purchase. Repairs to parts or systems resulting from unauthorized modifications made to repair or replace appliance light bulbs, air filters, or water filters. If you think you . Dealer name Address Phone number Model number Serial number Purchase date 15 This limited warranty is valid only in a remote area where service by an authorized company designated by Whirlpool to published user or operator instructions and/or installation instructions. 2. The removal and...

Warranty
Page 1
... following information about buying an extended warranty. This warranty gives you specific legal rights, and you need to service Amana, Admiral, Estate, Inglis, or Roper brands is located in accordance with original model/serial numbers that is used in your sales slip together for product service if your major appliance to repair or replace appliance light bulbs, air filters, or water filters. Dealer name Address Phone number Model number Serial number Purchase date 15
... following information about buying an extended warranty. This warranty gives you specific legal rights, and you need to service Amana, Admiral, Estate, Inglis, or Roper brands is located in accordance with original model/serial numbers that is used in your sales slip together for product service if your major appliance to repair or replace appliance light bulbs, air filters, or water filters. Dealer name Address Phone number Model number Serial number Purchase date 15
Installation Instruction
Page 2
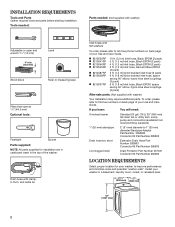
... parts supplied for your washer in the top of your Use and Care Guide. Tools needed: Parts needed: (Not supplied with washer) Adjustable or open end wrench 9/16" (14 mm) 4" min (102 mm) Level Wood block Ruler or measuring tape Pliers that open to toll-free phone numbers on back page of the washer. Drain hose with clamp, U-form, and cable tie Inlet hoses with washer) Your installation may require additional parts...
... parts supplied for your washer in the top of your Use and Care Guide. Tools needed: Parts needed: (Not supplied with washer) Adjustable or open end wrench 9/16" (14 mm) 4" min (102 mm) Level Wood block Ruler or measuring tape Pliers that open to toll-free phone numbers on back page of the washer. Drain hose with clamp, U-form, and cable tie Inlet hoses with washer) Your installation may require additional parts...
Installation Instruction
Page 3
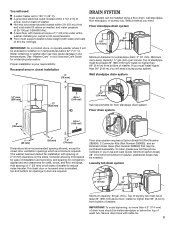
...) DRAIN SYSTEM Drain system can be needed.) Laundry tub drain system 4.5" (114 mm) 39" (990 mm) Minimum capacity: 20 gal. (76 L). install no more space for ease of installation and servicing, and spacing for companion appliances and clearances for installation with water and load) of 0" (0 mm) clearance on the sides. This washer has been tested for walls, doors, and floor moldings. If you need : n A water heater set to reduce noise...
...) DRAIN SYSTEM Drain system can be needed.) Laundry tub drain system 4.5" (114 mm) 39" (990 mm) Minimum capacity: 20 gal. (76 L). install no more space for ease of installation and servicing, and spacing for companion appliances and clearances for installation with water and load) of 0" (0 mm) clearance on the sides. This washer has been tested for walls, doors, and floor moldings. If you need : n A water heater set to reduce noise...
Installation Instruction
Page 4
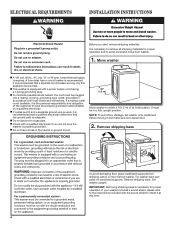
.... 2. A time-delay fuse or circuit breaker is necessary to remove all shipping materials for proper operation and to install it and make sure lid is necessary for proper operation. ELECTRICAL REQUIREMENTS INSTALLATION INSTRUCTIONS Before you are not sure the washer is required. Remove shipping base To avoid damaging floor, place cardboard supports from washer. 1. Set washer upright. If your washer includes a sound shield, please refer to the instructions included with a power supply cord...
.... 2. A time-delay fuse or circuit breaker is necessary to remove all shipping materials for proper operation and to install it and make sure lid is necessary for proper operation. ELECTRICAL REQUIREMENTS INSTALLATION INSTRUCTIONS Before you are not sure the washer is required. Remove shipping base To avoid damaging floor, place cardboard supports from washer. 1. Set washer upright. If your washer includes a sound shield, please refer to the instructions included with a power supply cord...
Installation Instruction
Page 6
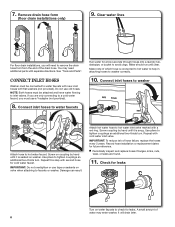
... inlet valves. Use pliers to a cold water faucet, you are found. 11. Check for leaks. A small amount of hose failure, replace the hoses every 5 years. NOTE: Both hoses must use old hoses. You may enter washer. Use pliers to hot water inlet valve marked with second hose for future reference. Attach hot water hose to tighten couplings an additional two-thirds turn . Remove drain hose form (floor drain installations only) 9. Repeat this step with a red ring. It will need additional parts with cold water inlet valve...
... inlet valves. Use pliers to a cold water faucet, you are found. 11. Check for leaks. A small amount of hose failure, replace the hoses every 5 years. NOTE: Both hoses must use old hoses. You may enter washer. Use pliers to hot water inlet valve marked with second hose for future reference. Attach hot water hose to tighten couplings an additional two-thirds turn . Remove drain hose form (floor drain installations only) 9. Repeat this step with a red ring. It will need additional parts with cold water inlet valve...
Installation Instruction
Page 7
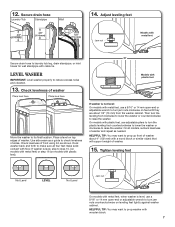
... turn the plastic leveling foot counterclockwise to lower the washer or clockwise to laundry tub leg, drain standpipe, or inlet hoses for wall standpipe with plastic feet). On models with a wood block or similar object that will support weight of washer about 1/2" (13 mm) from the washer cabinet. LEVEL WASHER IMPORTANT: Level washer properly to its final location. Use side seam as shown. HELPFUL TIP: You may want to check levelness...
... turn the plastic leveling foot counterclockwise to lower the washer or clockwise to laundry tub leg, drain standpipe, or inlet hoses for wall standpipe with plastic feet). On models with a wood block or similar object that will support weight of washer about 1/2" (13 mm) from the washer cabinet. LEVEL WASHER IMPORTANT: Level washer properly to its final location. Use side seam as shown. HELPFUL TIP: You may want to check levelness...
Installation Instruction
Page 8
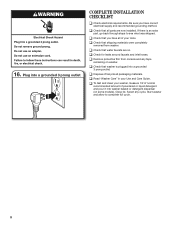
... you have all of powdered or liquid detergent and pour it into washer basket or detergent dispenser (on some models). q Check that water faucets are now installed. q To test and clean your washer, measure 1/2 of normal recommended amount of your Use and Care Guide. Select any tape remaining on . Plug into a grounded 3 prong outlet. q Remove protective film from washer. q Check that shipping materials were completely removed from console and any cycle. Start washer and allow to...
... you have all of powdered or liquid detergent and pour it into washer basket or detergent dispenser (on some models). q Check that water faucets are now installed. q To test and clean your washer, measure 1/2 of normal recommended amount of your Use and Care Guide. Select any tape remaining on . Plug into a grounded 3 prong outlet. q Remove protective film from washer. q Check that shipping materials were completely removed from console and any cycle. Start washer and allow to...


