
Installation Instruction
Page 2
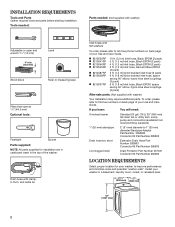
... (1.8 m) Inlet hose, Black EPDM, space saving 90° elbow, hypro-blue steel couplings (2 pack) Alternate parts: (Not supplied with washer) Your installation may require additional parts. If you have: You will need: Overhead sewer Standard 20 gal. (76 L) 39" (990 mm) tall...1" (25 mm) diameter Standpipe Adapter Part Number 3363920 Connector Kit Part Number 285835 Drain hose too short Extension Drain Hose Part Number 285863 Connector Kit Part Number 285835 Lint clogged drain Drain Protector Part Number 367031 Connector Kit Part Number 285835 LOCATION REQUIREMENTS Select proper location...
... (1.8 m) Inlet hose, Black EPDM, space saving 90° elbow, hypro-blue steel couplings (2 pack) Alternate parts: (Not supplied with washer) Your installation may require additional parts. If you have: You will need: Overhead sewer Standard 20 gal. (76 L) 39" (990 mm) tall...1" (25 mm) diameter Standpipe Adapter Part Number 3363920 Connector Kit Part Number 285835 Drain hose too short Extension Drain Hose Part Number 285863 Connector Kit Part Number 285835 Lint clogged drain Drain Protector Part Number 367031 Connector Kit Part Number 285835 LOCATION REQUIREMENTS Select proper location...
Installation Instruction
Page 3
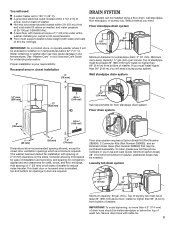
... more than 96" (2.44 m) from bottom of drain hose should be purchased separately. Floor drain system requires a Siphon Break Kit (Part Number 285834), 2 Connector Kits (Part Number 285835), and an Extension Drain Hose (Part Number 285863) that may be inside standpipe or below 32° F (0° C). IMPORTANT: To avoid siphoning, no more space...
... more than 96" (2.44 m) from bottom of drain hose should be purchased separately. Floor drain system requires a Siphon Break Kit (Part Number 285834), 2 Connector Kits (Part Number 285835), and an Extension Drain Hose (Part Number 285863) that may be inside standpipe or below 32° F (0° C). IMPORTANT: To avoid siphoning, no more space...
Installation Instruction
Page 5
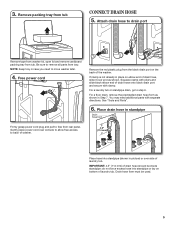
...tub. Drain hose form must be inside standpipe; Remove packing tray from the black drain port on the back of the washer. See "Tools and Parts". 6. Free power cord Remove the red plastic plug from tub CONNECT DRAIN HOSE 5. Gently place power cord over console to allow free access to remove... all parts from rear panel. Attach drain hose to step 6. If clamp is not already in standpipe Drain hose form Firmly grasp power cord plug and ...
...tub. Drain hose form must be inside standpipe; Remove packing tray from the black drain port on the back of the washer. See "Tools and Parts". 6. Free power cord Remove the red plastic plug from tub CONNECT DRAIN HOSE 5. Gently place power cord over console to allow free access to remove... all parts from rear panel. Attach drain hose to step 6. If clamp is not already in standpipe Drain hose form Firmly grasp power cord plug and ...
Installation Instruction
Page 6
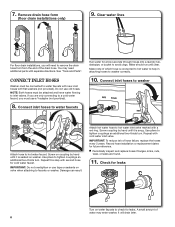
... on washer. Use pliers to a cold water faucet, you will drain later. 6 Repeat with flat washers (not provided). It will need additional parts with a red ring. See "Tools and Parts". Do not use a Y-adapter (not provided). 8. Make note of hose failure, replace the hoses every 5 years. IMPORTANT: Do not overtighten or use...
... on washer. Use pliers to a cold water faucet, you will drain later. 6 Repeat with flat washers (not provided). It will need additional parts with a red ring. See "Tools and Parts". Do not use a Y-adapter (not provided). 8. Make note of hose failure, replace the hoses every 5 years. IMPORTANT: Do not overtighten or use...
Installation Instruction
Page 8
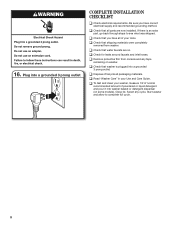
...grounded 3 prong outlet. Close lid. Be sure you have correct electrical supply and recommended grounding method. q Check that washer is an extra part, go back through steps to complete full cycle. 8 16. q Dispose of/recycle all of powdered or liquid detergent and pour it .... q Check that you have all packaging materials. q Remove protective film from washer. Select any tape remaining on . q Check that all parts are on washer. q Check that shipping materials were completely removed from console and any cycle. q Read "Washer Care" in your washer, ...
...grounded 3 prong outlet. Close lid. Be sure you have correct electrical supply and recommended grounding method. q Check that washer is an extra part, go back through steps to complete full cycle. 8 16. q Dispose of/recycle all of powdered or liquid detergent and pour it .... q Check that you have all packaging materials. q Remove protective film from washer. Select any tape remaining on . q Check that all parts are on washer. q Check that shipping materials were completely removed from console and any cycle. q Read "Washer Care" in your washer, ...
Use and Care
Page 14
..., chips or other than the representations contained in a remote area where service by an authorized company designated by Whirlpool to service Amana, Admiral, Estate, Inglis, or Roper brand appliances. DISCLAIMER OF REPRESENTATIONS OUTSIDE OF WARRANTY Whirlpool makes no representations about the quality,...to or furnished with this major appliance, you should ask Whirlpool or your retailer about buying an extended warranty. Replacement parts or repair labor on the duration of implied warranties of incidental or consequential damages, so these excluded circumstances shall be ...
..., chips or other than the representations contained in a remote area where service by an authorized company designated by Whirlpool to service Amana, Admiral, Estate, Inglis, or Roper brand appliances. DISCLAIMER OF REPRESENTATIONS OUTSIDE OF WARRANTY Whirlpool makes no representations about the quality,...to or furnished with this major appliance, you should ask Whirlpool or your retailer about buying an extended warranty. Replacement parts or repair labor on the duration of implied warranties of incidental or consequential damages, so these excluded circumstances shall be ...

Dimension Guide
Page 2
... hose with product. Specifications subject to change without notice. Wall standpipe drain system Floor drain system requires a Siphon Break Kit (Part Number 285834), 2 Connector Kits (Part Number 285835), and an Extension Drain Hose (Part Number 285863) that a separate circuit serving only this appliance be at least 39" (990 mm) above floor; Dimensions are...
... hose with product. Specifications subject to change without notice. Wall standpipe drain system Floor drain system requires a Siphon Break Kit (Part Number 285834), 2 Connector Kits (Part Number 285835), and an Extension Drain Hose (Part Number 285863) that a separate circuit serving only this appliance be at least 39" (990 mm) above floor; Dimensions are...

Warranty
Page 1
... assistance: In the U.S.A., call : 800-807-6777 for Amana, Admiral, Estate, Inglis, or Roper brand products. 1/12 Keep this book and your retailer about your major appliance, to replace or repair house fuses, or to parts or systems resulting from warranty coverage. 4. Dealer name Address ... calls to correct the installation of your major appliance, to instruct you . Service calls to service Amana, Admiral, Estate, Inglis, or Roper brands is not available. 9. Replacement parts or repair labor on how to use of products not approved by calling the following information about buying...
... assistance: In the U.S.A., call : 800-807-6777 for Amana, Admiral, Estate, Inglis, or Roper brand products. 1/12 Keep this book and your retailer about your major appliance, to replace or repair house fuses, or to parts or systems resulting from warranty coverage. 4. Dealer name Address ... calls to correct the installation of your major appliance, to instruct you . Service calls to service Amana, Admiral, Estate, Inglis, or Roper brands is not available. 9. Replacement parts or repair labor on how to use of products not approved by calling the following information about buying...

