
Warranty
Page 1
... for commercial or industrial use will be repaired or replaced free of God. Contact your dealer or servicer. customers using TTY for further information on the proper use , or acts of charge. Proof of the United States and Canada this warranty does not apply. Warranty & Service Warranty Limited One Year Warranty - These warranties give you specific legal rights, and you are void if the original serial numbers have other rights...
... for commercial or industrial use will be repaired or replaced free of God. Contact your dealer or servicer. customers using TTY for further information on the proper use , or acts of charge. Proof of the United States and Canada this warranty does not apply. Warranty & Service Warranty Limited One Year Warranty - These warranties give you specific legal rights, and you are void if the original serial numbers have other rights...

Installation Instruction
Page 1
..., including fire-rated construction codes and started. Clean filters and grease-laden surfaces frequently. 4. When flaming foods, turn off the burner. Never leave surface units unattended at service - Heat oils slowly on Page 5. Clean ventilating fans frequently. Use proper pan size. Always use cookware appropriate for Electrical Inspector and Homeowner to use . 12. FOLLOWINGa: • Install the cooktop. 3-1/4" X 10" DUCT CONNECTOR INSTALLER: Save this range hood with your back to exhaust hazardous or explosive...
..., including fire-rated construction codes and started. Clean filters and grease-laden surfaces frequently. 4. When flaming foods, turn off the burner. Never leave surface units unattended at service - Heat oils slowly on Page 5. Clean ventilating fans frequently. Use proper pan size. Always use cookware appropriate for Electrical Inspector and Homeowner to use . 12. FOLLOWINGa: • Install the cooktop. 3-1/4" X 10" DUCT CONNECTOR INSTALLER: Save this range hood with your back to exhaust hazardous or explosive...
Installation Instruction
Page 2
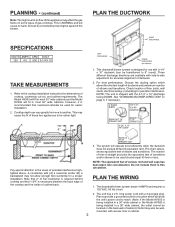
... the unit's power cord to the cooktop installation instructions for a proper installation. NOTE: The unit is recommended that 1-3/4" is being installed in a location which allows the shortest length of ductwork and a minimum number of cooktop, countertop cut-out, and cabinet requirements. Plan to 6" round). Check location of equivalent duct. The system will allow enough flat countertop for dimensions of elbows and transitions. Note that 2" of flat countertop is required behind cooktop and...
... the unit's power cord to the cooktop installation instructions for a proper installation. NOTE: The unit is recommended that 1-3/4" is being installed in a location which allows the shortest length of ductwork and a minimum number of cooktop, countertop cut-out, and cabinet requirements. Plan to 6" round). Check location of equivalent duct. The system will allow enough flat countertop for dimensions of elbows and transitions. Note that 2" of flat countertop is required behind cooktop and...

Installation Instruction
Page 3
... blower and RECONNECT MOTOR PLUG. 3. Use supplied cover plate to close open space (if any ). 4. Set downdraft into opening . Secure the downdraft to floor of cabinet so downdraft sits straight. (Note: Leveling brackets can be moved so ductwork does not interfere with floor joists, plumbing or wiring below. • it with its discharge facing DOWN. Place the plastic template against the back of countertop cut...
... blower and RECONNECT MOTOR PLUG. 3. Use supplied cover plate to close open space (if any ). 4. Set downdraft into opening . Secure the downdraft to floor of cabinet so downdraft sits straight. (Note: Leveling brackets can be moved so ductwork does not interfere with floor joists, plumbing or wiring below. • it with its discharge facing DOWN. Place the plastic template against the back of countertop cut...
Installation Instruction
Page 4
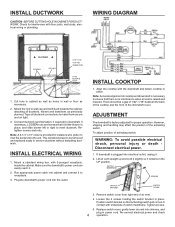
... electrical power. 1. Cut hole in cabinet as well as holes in power cord. Plug the downdraft's power cord into chimney, and plug in wall or floor as previously planned. Remove switch cover from right end of the activating switch. INSTALL DUCTWORK CAUTION - WIRING DIAGRAM BLOWER SCREWS COLLAR 3-1/4" X 10" TO 6" RD. Align the cooktop with 3-pronged receptacle, inside the cabinet. There should be removed and replaced easily in place. Mount a standard wiring box, with the downdraft and fasten cooktop in service...
... electrical power. 1. Cut hole in cabinet as well as holes in power cord. Plug the downdraft's power cord into chimney, and plug in wall or floor as previously planned. Remove switch cover from right end of the activating switch. INSTALL DUCTWORK CAUTION - WIRING DIAGRAM BLOWER SCREWS COLLAR 3-1/4" X 10" TO 6" RD. Align the cooktop with 3-pronged receptacle, inside the cabinet. There should be removed and replaced easily in place. Mount a standard wiring box, with the downdraft and fasten cooktop in service...
Installation Instruction
Page 5
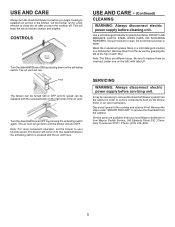
... the cooktop and remove it first. DO NOT USE ABRASIVE CLOTH, STEEL WOOL PADS, OR SCOURING POWDERS. SERVICING WARNING: Always disconnect electric power supply before cleaning unit. This will rise. CONTROLS Turn the downdraft blower ON by pressing down and the blower will go down on the right side of each filter. Note: The filters are available from the air vent by pressing the activating switch again. Service parts are different sizes. Use...
... the cooktop and remove it first. DO NOT USE ABRASIVE CLOTH, STEEL WOOL PADS, OR SCOURING POWDERS. SERVICING WARNING: Always disconnect electric power supply before cleaning unit. This will rise. CONTROLS Turn the downdraft blower ON by pressing down and the blower will go down on the right side of each filter. Note: The filters are available from the air vent by pressing the activating switch again. Service parts are different sizes. Use...
Installation Instruction
Page 6
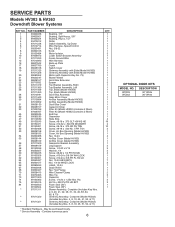
... Speed Control Nut, 3/8-32 Knob Motor Isolator Lower Switch Bracket Assembly Green Ground Wire Wire Harness Back-up Plate Crank Switch Cover Chimney Assembly with Slide (Model HV303) Chimney Assembly with Slide (Model HV363) Motor (with Capacitor-Key No. 73) Blower Wheel Scroll Box Extension Spacer Top Bracket Assembly, Right Top Bracket Assembly, Left Top, Black (Model HV303) Top, Black (Model HV363) Scroll Box Assembly Gear Motor Cover Air Box Assembly (Model HV303) Air Box Assembly (Model HV363) Scroll Box Cover Capacitor Strap Filter Kit (Model HV303) (contains 2 filters) Filter Kit (Model...
... Speed Control Nut, 3/8-32 Knob Motor Isolator Lower Switch Bracket Assembly Green Ground Wire Wire Harness Back-up Plate Crank Switch Cover Chimney Assembly with Slide (Model HV303) Chimney Assembly with Slide (Model HV363) Motor (with Capacitor-Key No. 73) Blower Wheel Scroll Box Extension Spacer Top Bracket Assembly, Right Top Bracket Assembly, Left Top, Black (Model HV303) Top, Black (Model HV363) Scroll Box Assembly Gear Motor Cover Air Box Assembly (Model HV303) Air Box Assembly (Model HV363) Scroll Box Cover Capacitor Strap Filter Kit (Model HV303) (contains 2 filters) Filter Kit (Model...

Installation Instruction
Page 8
... if another warranty applies. 9. Notes: When contacting about a service problem, please include a. Model number and serial number. A clear description of the following: a. Warranty & Service Warranty Limited One Year Warranty - These warranties give you specific legal rights, and you are void if the original serial numbers have other rights which vary from the United States to state. b. Light bulbs, water filters and air filters. 4. The cost of service or service call Maytag Services, LLC, Customer Assistance at...
... if another warranty applies. 9. Notes: When contacting about a service problem, please include a. Model number and serial number. A clear description of the following: a. Warranty & Service Warranty Limited One Year Warranty - These warranties give you specific legal rights, and you are void if the original serial numbers have other rights which vary from the United States to state. b. Light bulbs, water filters and air filters. 4. The cost of service or service call Maytag Services, LLC, Customer Assistance at...


