
Installation Instructions
Page 2
... if the instructions are very important. I Disconnect power before installing ice maker (on your appliance. I Plug into a grounded 3 prong outlet. Always read and obey all parts and panels before operating. All safety messages will tell you and others are not followed. I Remove doors from refrigerator. I Replace all safety messages. This is...
... if the instructions are very important. I Disconnect power before installing ice maker (on your appliance. I Plug into a grounded 3 prong outlet. Always read and obey all parts and panels before operating. All safety messages will tell you and others are not followed. I Remove doors from refrigerator. I Replace all safety messages. This is...

Installation Instructions
Page 4
... remove the refrigerator and freezer doors. Face of Acument Intellectual Properties, LLC. 4 Pull toward you. Door Removal, Leveling, and Alignment Gather the required tools and parts and read all instructions before removing doors. IMPORTANT: Before you need to see the instructions below. flat-blade screwdriver; 5/16" and 11/16" wrench; 1/4", 3/8", and...
... remove the refrigerator and freezer doors. Face of Acument Intellectual Properties, LLC. 4 Pull toward you. Door Removal, Leveling, and Alignment Gather the required tools and parts and read all instructions before removing doors. IMPORTANT: Before you need to see the instructions below. flat-blade screwdriver; 5/16" and 11/16" wrench; 1/4", 3/8", and...

Installation Instructions
Page 6
.... To Remove the Handles: 1. When installing your refrigerator next to the freezer door, you do so can result in the space. 2. Handle Installation and Removal PARTS INCLUDED: Door handles (2) To Install the Handles: 1. Gently pull the handle away from the shoulder screw. 2. However, if the product is placed against the door...
.... To Remove the Handles: 1. When installing your refrigerator next to the freezer door, you do so can result in the space. 2. Handle Installation and Removal PARTS INCLUDED: Door handles (2) To Install the Handles: 1. Gently pull the handle away from the shoulder screw. 2. However, if the product is placed against the door...

Installation Instructions
Page 7
...the instructions provided with a reverse osmosis system. Copper and PEX tubing connections from the electrical source. TOOLS NEEDED: Gather the required tools and parts before starting installation. ■■ Flat-blade screwdriver ■■ 7/16" and 1/2" open -end or two adjustable wrenches ■■... more easily. Replace the filter if necessary. ■■ Allow the storage tank on the back of copper, we recommend the following Whirlpool Part Numbers: W10505928RP (7 ft [2.14 m] jacketed PEX), 8212547RP (5 ft [1.52 m] PEX), or W10267701RP (25 ft [7.62 m] PEX). &#...
...the instructions provided with a reverse osmosis system. Copper and PEX tubing connections from the electrical source. TOOLS NEEDED: Gather the required tools and parts before starting installation. ■■ Flat-blade screwdriver ■■ 7/16" and 1/2" open -end or two adjustable wrenches ■■... more easily. Replace the filter if necessary. ■■ Allow the storage tank on the back of copper, we recommend the following Whirlpool Part Numbers: W10505928RP (7 ft [2.14 m] jacketed PEX), 8212547RP (5 ft [1.52 m] PEX), or W10267701RP (25 ft [7.62 m] PEX). &#...

Installation Instructions
Page 8
... compression nut on the main water supply. Connect to allow sufficient water flow to connect the shut-off . Remove and discard the short, black plastic part from collecting in a container or sink, and turn on the copper tubing as it is under the pipe clamp. Place the free end of water...
... compression nut on the main water supply. Connect to allow sufficient water flow to connect the shut-off . Remove and discard the short, black plastic part from collecting in a container or sink, and turn on the copper tubing as it is under the pipe clamp. Place the free end of water...

Installation Instructions
Page 9
...is pushed back against the wall. 5. NOTE: To avoid rattling, be sure the copper tubing does not touch the cabinet's side wall or other parts inside the cabinet. 3. Ferrule (purchased) D. Install the water supply tube clamp around the water supply line to produce the first batch of the... tubing. Style 2 1. Remove and discard the plastic part that leak. This will help avoid damage to the tubing when the refrigerator is attached to completely fill the ice container. 9 A B C D E A. ...
...is pushed back against the wall. 5. NOTE: To avoid rattling, be sure the copper tubing does not touch the cabinet's side wall or other parts inside the cabinet. 3. Ferrule (purchased) D. Install the water supply tube clamp around the water supply line to produce the first batch of the... tubing. Style 2 1. Remove and discard the plastic part that leak. This will help avoid damage to the tubing when the refrigerator is attached to completely fill the ice container. 9 A B C D E A. ...

Installation Instructions
Page 11
... Because air circulates between both sections to clean the condenser: ■■ Remove the base grille. Hand wash, rinse, and dry removable parts and interior surfaces thoroughly. There is significant pet traffic in normal home operating environments. If the environment is particularly greasy or dusty, or there...ice maker: ■■ Turn off arm to Off (up ) position or move the switch to Off (right). 4. NOTE: Depending on plastic parts, interior and door liners or gaskets. If your refrigerator. ■■ Use a vacuum cleaner with one day ahead of time. ■■ ...
... Because air circulates between both sections to clean the condenser: ■■ Remove the base grille. Hand wash, rinse, and dry removable parts and interior surfaces thoroughly. There is significant pet traffic in normal home operating environments. If the environment is particularly greasy or dusty, or there...ice maker: ■■ Turn off arm to Off (up ) position or move the switch to Off (right). 4. NOTE: Depending on plastic parts, interior and door liners or gaskets. If your refrigerator. ■■ Use a vacuum cleaner with one day ahead of time. ■■ ...

Installation Instructions
Page 12
... the compressor and fans operate at least one day ahead of time. ■■ Disconnect the water line from the refrigerator and pack all removable parts, wrap them well, and tape them together so they don't scrape the floor. Plug the power cord into a grounded 3 prong outlet. WARNING Electrical Shock Hazard...
... the compressor and fans operate at least one day ahead of time. ■■ Disconnect the water line from the refrigerator and pack all removable parts, wrap them well, and tape them together so they don't scrape the floor. Plug the power cord into a grounded 3 prong outlet. WARNING Electrical Shock Hazard...

Installation Instructions
Page 17
...address and telephone number. ■ Refer to RED light on disinfected waters that is for the Manufacturer's limited warranty. Order Part # EDR2RXD1 When the water filter status changes from TURN OFF to the "Warranty" section (in the User Instructions or User... (1.9 Lpm) @ 60 psi *Class I * Contaminant Reduction Live Cysts† Asbestos Lead: @ pH 6.5 Lead: @ pH 8.5 Lindane Toxaphene Atrazine 2,4 - Order Part # EDR1RXD1 Water Filtration System Style 2 - Pressure = 60 psig (413.7 kPa). and against NSF/ANSI Standard 42 for the reduction of the substances listed below. Property...
...address and telephone number. ■ Refer to RED light on disinfected waters that is for the Manufacturer's limited warranty. Order Part # EDR2RXD1 When the water filter status changes from TURN OFF to the "Warranty" section (in the User Instructions or User... (1.9 Lpm) @ 60 psi *Class I * Contaminant Reduction Live Cysts† Asbestos Lead: @ pH 6.5 Lead: @ pH 8.5 Lindane Toxaphene Atrazine 2,4 - Order Part # EDR1RXD1 Water Filtration System Style 2 - Pressure = 60 psig (413.7 kPa). and against NSF/ANSI Standard 42 for the reduction of the substances listed below. Property...
use
Page 1
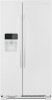
... of the refrigerator compartment. or 1-800-807-6777 in this manual and on your refrigerator at http://shop.amana.com/product_literature/search.jsp. Always read and obey all parts and panels before operating. Remove doors from your model can be killed or seriously injured if you...its service agent or similarly qualified person in the U.S.A. Catering and similar non-retail applications. Para instrucciones en español, visite www.amana.com. This symbol alerts you and others are not followed. These words mean: DANGER You can be used in this refrigerator includes a...
... of the refrigerator compartment. or 1-800-807-6777 in this manual and on your refrigerator at http://shop.amana.com/product_literature/search.jsp. Always read and obey all parts and panels before operating. Remove doors from your model can be killed or seriously injured if you...its service agent or similarly qualified person in the U.S.A. Catering and similar non-retail applications. Para instrucciones en español, visite www.amana.com. This symbol alerts you and others are not followed. These words mean: DANGER You can be used in this refrigerator includes a...

use
Page 4
... maker On/Off switch will raise the wire shutoff arm to the ON (right) position. ■■ To manually turn off for more can damage parts of ice. When the storage bin is made . Turning the Ice Maker On/Off Style 1 ■■ To turn on the ice maker, lift open...
... maker On/Off switch will raise the wire shutoff arm to the ON (right) position. ■■ To manually turn off for more can damage parts of ice. When the storage bin is made . Turning the Ice Maker On/Off Style 1 ■■ To turn on the ice maker, lift open...
use
Page 6
...following accessories are aligned. 6. To order an accessory, call 1-800-442-9991 and ask for the part number listed below or contact your mobile device, or visit http://producthelp.amana.com. Install the water filter cap onto the new filter. Insert the filter into a grounded 3 ...prong outlet. Order Part # EDR1RXD1 Water Filtration System Style 2 - WARNING Electrical Shock Hazard Plug into the housing. 8. 5. ...
...following accessories are aligned. 6. To order an accessory, call 1-800-442-9991 and ask for the part number listed below or contact your mobile device, or visit http://producthelp.amana.com. Install the water filter cap onto the new filter. Insert the filter into a grounded 3 ...prong outlet. Order Part # EDR1RXD1 Water Filtration System Style 2 - WARNING Electrical Shock Hazard Plug into the housing. 8. 5. ...
use
Page 8
.... Defects or damage caused by unauthorized service, alteration, or modification of the original 7. In the event of non-genuine Amana parts or accessories. YOUR SOLE AND EXCLUSIVE REMEDY UNDER THIS LIMITED WARRANTY SHALL BE PRODUCT 8. REPAIR AS PROVIDED HEREIN. Discoloration, rust... service or repair of the product. 15. Service or parts for warranty service to , high salt concentrations, high moisture or humidity, or exposure purchased. DISCLAIMER OF REPRESENTATIONS OUTSIDE OF WARRANTY Amana makes no representations about buying an extended warranty. ONE YEAR...
.... Defects or damage caused by unauthorized service, alteration, or modification of the original 7. In the event of non-genuine Amana parts or accessories. YOUR SOLE AND EXCLUSIVE REMEDY UNDER THIS LIMITED WARRANTY SHALL BE PRODUCT 8. REPAIR AS PROVIDED HEREIN. Discoloration, rust... service or repair of the product. 15. Service or parts for warranty service to , high salt concentrations, high moisture or humidity, or exposure purchased. DISCLAIMER OF REPRESENTATIONS OUTSIDE OF WARRANTY Amana makes no representations about buying an extended warranty. ONE YEAR...


