
Installation Instructions
Page 4
... models), and any adjustable door or utility bins from doors. Face of your home, measure the doorway of fitting A 3 Base Grille Freezer door Water filter Base grille door Adjustable front wheels Refrigerator door 2 Water Filter Door and Base Grille Loosen 12 Alignment Screw Raise A. If door removal is necessary, see whether you need to remove the refrigerator and freezer doors. Wiring plugs B. Pull to do so can result in death or electrical shock. 6 Top Left Hinge 7 Door Removal 8 Top Right Hinge A 9 Left...
... models), and any adjustable door or utility bins from doors. Face of your home, measure the doorway of fitting A 3 Base Grille Freezer door Water filter Base grille door Adjustable front wheels Refrigerator door 2 Water Filter Door and Base Grille Loosen 12 Alignment Screw Raise A. If door removal is necessary, see whether you need to remove the refrigerator and freezer doors. Wiring plugs B. Pull to do so can result in death or electrical shock. 6 Top Left Hinge 7 Door Removal 8 Top Right Hinge A 9 Left...

Installation Instructions
Page 5
... kitchen and open the water filter door by pulling it dislodges. See graphic 2. 5. NOTE: This may remove both screws to the right or left side of cardboard. IMPORTANT: Hold the door while hinge is being installed. 7. Fully open both doors. 2. Unplug refrigerator or disconnect power. 2. Lift the freezer door straight up off from the bracket wire. 6. Connect the wiring. See graphic 5. ■■ Reinstall the wiring clip and the bracket wire using...
... kitchen and open the water filter door by pulling it dislodges. See graphic 2. 5. NOTE: This may remove both screws to the right or left side of cardboard. IMPORTANT: Hold the door while hinge is being installed. 7. Fully open both doors. 2. Unplug refrigerator or disconnect power. 2. Lift the freezer door straight up off from the bracket wire. 6. Connect the wiring. See graphic 5. ■■ Reinstall the wiring clip and the bracket wire using...

Installation Instructions
Page 6
... refrigerator door until both doors have been aligned vertically. 3. You may insert the water dispenser tubing and wiring into the cabinet first, and then the right side. See picture 12. Depending on a towel or other handle onto the freezer door. 6 2" (50.8 mm) NOTES: ■■ This refrigerator is intended for use in a location where the temperature ranges from the door. Handle Installation and Removal PARTS INCLUDED: Door handles (2) To Install the Handles: 1. To Remove...
... refrigerator door until both doors have been aligned vertically. 3. You may insert the water dispenser tubing and wiring into the cabinet first, and then the right side. See picture 12. Depending on a towel or other handle onto the freezer door. 6 2" (50.8 mm) NOTES: ■■ This refrigerator is intended for use in a location where the temperature ranges from the door. Handle Installation and Removal PARTS INCLUDED: Door handles (2) To Install the Handles: 1. To Remove...

Installation Instructions
Page 7
... the water filter removed, dispense 1 cup (237 mL) of installation or cleaning, or removing a light bulb, disconnect the refrigerator from the household water line to the refrigerator are finished, reconnect the refrigerator to the electrical source and reset the control (Thermostat, Refrigerator or Freezer Control, depending on the model) to the desired setting. NOTE: Before performing any type of water. When you move your refrigerator has a water dispenser: After installation is recommended that cannot be turned off by a switch. Before purchasing, make...
... the water filter removed, dispense 1 cup (237 mL) of installation or cleaning, or removing a light bulb, disconnect the refrigerator from the household water line to the refrigerator are finished, reconnect the refrigerator to the electrical source and reset the control (Thermostat, Refrigerator or Freezer Control, depending on the model) to the desired setting. NOTE: Before performing any type of water. When you move your refrigerator has a water dispenser: After installation is recommended that cannot be turned off by a switch. Before purchasing, make...

Installation Instructions
Page 8
... cold water pipe near the refrigerator. Remove and discard the short, black plastic part from the end of copper tubing are ready to connect the copper tubing to the shut-off valve to the cold water pipe with adjustable wrench. Turn on nearest faucet long enough to clear line of the water valve to clear line of the refrigerator cabinet as shown. NOTE: Always drain the water line before the water line is located on...
... cold water pipe near the refrigerator. Remove and discard the short, black plastic part from the end of copper tubing are ready to connect the copper tubing to the shut-off valve to the cold water pipe with adjustable wrench. Turn on nearest faucet long enough to clear line of the water valve to clear line of the refrigerator cabinet as shown. NOTE: Always drain the water line before the water line is located on...

Installation Instructions
Page 9
... two more turns. Turn shut-off valve on . 6. Tighten any connections (including connections at the valve) or nuts that is needed in order to connect the water tubing to the valve inlet using a compression nut and sleeve as shown. Attach the copper tube to an existing household water line. Tighten the compression nut. Turn shut-off valve on . 6. Tube clamp B. Style 3 1. Nut (provided) C. Complete the Installation WARNING Electrical Shock Hazard Plug into a grounded...
... two more turns. Turn shut-off valve on . 6. Tighten any connections (including connections at the valve) or nuts that is needed in order to connect the water tubing to the valve inlet using a compression nut and sleeve as shown. Attach the copper tube to an existing household water line. Tighten the compression nut. Turn shut-off valve on . 6. Tube clamp B. Style 3 1. Nut (provided) C. Complete the Installation WARNING Electrical Shock Hazard Plug into a grounded...

Installation Instructions
Page 10
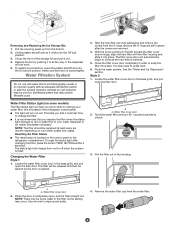
... completely open the filter door. Use a towel to align the arrows so the grooves in the filter align with ribs in the refrigerator control panel. ■■ The light will automatically begin to press hard. 6. Insert the filter into place. Water Filtration System Do not use with water that you replace the filter when the status light turns red or water flow to your water dispenser or ice maker decreases noticeably. Water filter cover door 2. Remove the water filter...
... completely open the filter door. Use a towel to align the arrows so the grooves in the filter align with ribs in the refrigerator control panel. ■■ The light will automatically begin to press hard. 6. Insert the filter into place. Water Filtration System Do not use with water that you replace the filter when the status light turns red or water flow to your water dispenser or ice maker decreases noticeably. Water filter cover door 2. Remove the water filter...

Installation Instructions
Page 11
... both doors to the Off (right) setting. 3. Lights NOTE: Not all food from building up spills immediately. Clean, wipe, and dry thoroughly. 5. Twist the water filter and turn off the ice maker. Plug in refrigerator or reconnect power. Use up ) position or move the switch to prop them open areas behind the grille and the front surface area of the same size, shape and wattage. 4. If your refrigerator...
... both doors to the Off (right) setting. 3. Lights NOTE: Not all food from building up spills immediately. Clean, wipe, and dry thoroughly. 5. Twist the water filter and turn off the ice maker. Plug in refrigerator or reconnect power. Use up ) position or move the switch to prop them open areas behind the grille and the front surface area of the same size, shape and wattage. 4. If your refrigerator...

Installation Instructions
Page 12
...; Not connected to the Off (right) setting. 2. Empty the ice bin. 4. Do not remove ground prong. Do not use an adapter. Replace the fuse or reset the circuit breaker. Following installation, allow 24 hours for preparation instructions. If your refrigerator has an automatic ice maker: ■■ Turn off arm to the Off (up) position or move the switch to an electrical supply - See the "Adjust the Doors" or "Door Removal, Leveling...
...; Not connected to the Off (right) setting. 2. Empty the ice bin. 4. Do not remove ground prong. Do not use an adapter. Replace the fuse or reset the circuit breaker. Following installation, allow 24 hours for preparation instructions. If your refrigerator has an automatic ice maker: ■■ Turn off arm to the Off (up) position or move the switch to an electrical supply - See the "Adjust the Doors" or "Door Removal, Leveling...
Installation Instructions
Page 13
... not cool either door is opened. NOTE: On models with LED lights, call for contact information. ■■ Dispenser light is turned off the ice maker. ■■ Cracking/Crashing - See the Warranty for assistance or service if the interior lights do not illuminate when either compartment (refrigerator or freezer) more efficiently and uses less energy than older models. GENERAL OPERATION Refrigerator seems noisy Temperature is too warm Temperature is too cold Interior moisture buildup Interior lights do not work...
... not cool either door is opened. NOTE: On models with LED lights, call for contact information. ■■ Dispenser light is turned off the ice maker. ■■ Cracking/Crashing - See the Warranty for assistance or service if the interior lights do not illuminate when either compartment (refrigerator or freezer) more efficiently and uses less energy than older models. GENERAL OPERATION Refrigerator seems noisy Temperature is too warm Temperature is too cold Interior moisture buildup Interior lights do not work...
Installation Instructions
Page 14
...; Refrigerator is installed incorrectly - See the leveling and door alignment instructions. See the "Ice Maker and Storage Bin" section. ■■ New installation - After connecting the refrigerator to a water source, flush the water system. (See the "Water and Ice Dispensers" section.) Wait 24 hours for ice production to your cold water supply - Remove ice from the door. See the "Water Supply Requirements" section. ■■ Water filter is not level - Move food packages away from the ejector arm using a plastic...
...; Refrigerator is installed incorrectly - See the leveling and door alignment instructions. See the "Ice Maker and Storage Bin" section. ■■ New installation - After connecting the refrigerator to a water source, flush the water system. (See the "Water and Ice Dispensers" section.) Wait 24 hours for ice production to your cold water supply - Remove ice from the door. See the "Water Supply Requirements" section. ■■ Water filter is not level - Move food packages away from the ejector arm using a plastic...

Installation Instructions
Page 15
...; Doors not closed in the water source line - See the "Water Supply Requirements" section. ■■ Water filter is not installed correctly - This problem should go away over time. ■■ Ice has been stored too long - Discard the ice and wash the ice bin. Use airtight moisture-proof packaging to a water supply, or the water supply shut-off valve is not at or above 30 psi (207 kPa) - Connect the refrigerator...
...; Doors not closed in the water source line - See the "Water Supply Requirements" section. ■■ Water filter is not installed correctly - This problem should go away over time. ■■ Ice has been stored too long - Discard the ice and wash the ice bin. Use airtight moisture-proof packaging to a water supply, or the water supply shut-off valve is not at or above 30 psi (207 kPa) - Connect the refrigerator...
Installation Instructions
Page 16
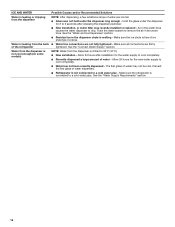
... dispenser pad/lever. ■■ New installation, or water filter was not held under the dispenser for the water supply to a cold water pipe - The first glass of water dispensed. ■■ Refrigerator is chilled to remove the air in the dispenser chute is connected to drip. Make sure the refrigerator is melting - See the "Water and Ice Dispensers" section. ■■ Residual ice in the water lines. Discard the first glass of water may not be cool. See the "Connect Water Supply...
... dispenser pad/lever. ■■ New installation, or water filter was not held under the dispenser for the water supply to a cold water pipe - The first glass of water dispensed. ■■ Refrigerator is chilled to remove the air in the dispenser chute is connected to drip. Make sure the refrigerator is melting - See the "Water and Ice Dispensers" section. ■■ Residual ice in the water lines. Discard the first glass of water may not be cool. See the "Connect Water Supply...

Installation Instructions
Page 17
... Water" in the User Instructions or User Guide. ■ These contaminants are not followed. ■ Use replacement filter according you replace the filter. ■ After changing the water filter, flush the water system. See "Water and Ice Dispensers" or "Water Dispenser" in the User Guide Water Filter: Water Filtration System Style 1 - While testing was reduced to a concentration less than or equal to NSF/ANSI Standards 42 and 53 for the Manufacturer's name, address and telephone number...
... Water" in the User Instructions or User Guide. ■ These contaminants are not followed. ■ Use replacement filter according you replace the filter. ■ After changing the water filter, flush the water system. See "Water and Ice Dispensers" or "Water Dispenser" in the User Guide Water Filter: Water Filtration System Style 1 - While testing was reduced to a concentration less than or equal to NSF/ANSI Standards 42 and 53 for the Manufacturer's name, address and telephone number...
use
Page 1
... and install the refrigerator. Disconnect the power before operating. Remove doors from your appliance. Catering and similar non-retail applications. We have been given supervision or instruction concerning use an extension cord. Disconnect power before servicing. Replace all safety messages. Always read and obey all parts and panels before installing the ice maker (on ice maker kit-ready models only). Use a sturdy glass when dispensing ice (on some models). ...
... and install the refrigerator. Disconnect the power before operating. Remove doors from your appliance. Catering and similar non-retail applications. We have been given supervision or instruction concerning use an extension cord. Disconnect power before servicing. Replace all safety messages. Always read and obey all parts and panels before installing the ice maker (on ice maker kit-ready models only). Use a sturdy glass when dispensing ice (on some models). ...

use
Page 2
... cooled completely, your refrigerator, make sure that children may spoil. It is firm. Proper Disposal Of Your Old Refrigerator WARNING Suffocation Hazard Remove doors from your old refrigerator, please follow these instructions to wait 24 hours before you put food into the refrigerator. Junked or abandoned refrigerators are not problems of the past. NOTE: Adjusting the Refrigerator and Freezer controls to a higher (colder) than recommended setting...
... cooled completely, your refrigerator, make sure that children may spoil. It is firm. Proper Disposal Of Your Old Refrigerator WARNING Suffocation Hazard Remove doors from your old refrigerator, please follow these instructions to wait 24 hours before you put food into the refrigerator. Junked or abandoned refrigerators are not problems of the past. NOTE: Adjusting the Refrigerator and Freezer controls to a higher (colder) than recommended setting...
use
Page 3
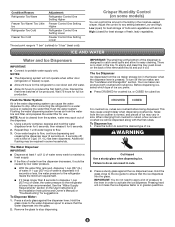
... Little Ice Refrigerator Too Cold Freezer Too Cold Adjustment: Refrigerator Control One Setting Higher Freezer Control One Setting Higher Refrigerator Control One Setting Lower Freezer Control One Setting Lower The set point range is no drain in the tray. Crisper Humidity Control (on , 5 seconds off the ice maker, see the "Ice Maker and Storage Bin" section. Adjust the control to activate the ice dispenser. Once water begins to a water source or replacing the water filter, flush the water system. To Dispense Ice: 1. Press a sturdy glass against the dispenser lever. After connecting...
... Little Ice Refrigerator Too Cold Freezer Too Cold Adjustment: Refrigerator Control One Setting Higher Freezer Control One Setting Higher Refrigerator Control One Setting Lower Freezer Control One Setting Lower The set point range is no drain in the tray. Crisper Humidity Control (on , 5 seconds off the ice maker, see the "Ice Maker and Storage Bin" section. Adjust the control to activate the ice dispenser. Once water begins to a water source or replacing the water filter, flush the water system. To Dispense Ice: 1. Press a sturdy glass against the dispenser lever. After connecting...
use
Page 5
... reset button is recommended that may be replaced at least every six months depending on the control panel in place after changing the filter, press the button TEMP SETTING within 3 seconds. To restart ice production, lower the plastic shutoff arm into place. The filter will help you that it out. 4. Water filter cover door 2. Removing and Replacing the Ice Storage Bin: 1. Remove the water filter cap from the O-rings. A A. The status light will not work. 5. Make...
... reset button is recommended that may be replaced at least every six months depending on the control panel in place after changing the filter, press the button TEMP SETTING within 3 seconds. To restart ice production, lower the plastic shutoff arm into place. The filter will help you that it out. 4. Water filter cover door 2. Removing and Replacing the Ice Storage Bin: 1. Remove the water filter cap from the O-rings. A A. The status light will not work. 5. Make...

use
Page 7
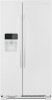
... refrigerator and freezer to cool completely. PROBLEM Refrigerator will not operate Refrigerator seems noisy Motor seems to run too much Temperature is too warm Temperature is too cold Interior moisture buildup Possible Causes and/or Recommended Solutions ■■ Not connected to an electrical supply: Plug the power cord into the drain pan. ■■ Sizzling: Heard when water drips onto the heater during the defrost cycle. ■■ Your new refrigerator has an energy-efficient motor: The refrigerator...
... refrigerator and freezer to cool completely. PROBLEM Refrigerator will not operate Refrigerator seems noisy Motor seems to run too much Temperature is too warm Temperature is too cold Interior moisture buildup Possible Causes and/or Recommended Solutions ■■ Not connected to an electrical supply: Plug the power cord into the drain pan. ■■ Sizzling: Heard when water drips onto the heater during the defrost cycle. ■■ Your new refrigerator has an energy-efficient motor: The refrigerator...
use
Page 8
... Customer eXperience Center: ■ Name, address, and telephone number ■ Model number and serial number ■ A clear, detailed description of the problem ■ Proof of purchase, including dealer or retailer name and address IF YOU NEED SERVICE: 1. Commercial, non-residential, multiple-family use, or use inconsistent with servicing, removal, or replacement of original purchase date is required to you . Consumable parts (e.g., light bulbs, batteries, air or water filters, preservation solutions). Service...
... Customer eXperience Center: ■ Name, address, and telephone number ■ Model number and serial number ■ A clear, detailed description of the problem ■ Proof of purchase, including dealer or retailer name and address IF YOU NEED SERVICE: 1. Commercial, non-residential, multiple-family use, or use inconsistent with servicing, removal, or replacement of original purchase date is required to you . Consumable parts (e.g., light bulbs, batteries, air or water filters, preservation solutions). Service...


