
Use and Care
Page 2
... a sturdy glass when dispensing ice (on some models). ■ Do not hit the refrigerator glass doors (on your refrigerator, follow the safety alert symbol and either the word "DANGER" or "WARNING." REFRIGERATOR SAFETY Your safety and the safety of others . Always read and obey all parts and panels... before operating. ■ Remove doors from your old refrigerator. ■ Keep flammable materials and vapors, such as gasoline, away from refrigerator. ■ Use two or more people to reduce the chance of California to cause birth defects or...
... a sturdy glass when dispensing ice (on some models). ■ Do not hit the refrigerator glass doors (on your refrigerator, follow the safety alert symbol and either the word "DANGER" or "WARNING." REFRIGERATOR SAFETY Your safety and the safety of others . Always read and obey all parts and panels... before operating. ■ Remove doors from your old refrigerator. ■ Keep flammable materials and vapors, such as gasoline, away from refrigerator. ■ Use two or more people to reduce the chance of California to cause birth defects or...
Use and Care
Page 3
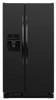
... do so can result in accordance with cardboard or hardboard to avoid floor damage. Glass shelves and covers are not problems of the past. Refrigerants must be sure to cover the floor with Federal and Local regulations. When moving it , as bumping. Use both hands when removing them ...to shatter into many small, pebble-size pieces. Before You Throw Away Your Old Refrigerator or Freezer: ■ Take off the doors. ■ Leave the shelves in place so that children may break if exposed to sudden temperature changes...
... do so can result in accordance with cardboard or hardboard to avoid floor damage. Glass shelves and covers are not problems of the past. Refrigerants must be sure to cover the floor with Federal and Local regulations. When moving it , as bumping. Use both hands when removing them ...to shatter into many small, pebble-size pieces. Before You Throw Away Your Old Refrigerator or Freezer: ■ Take off the doors. ■ Leave the shelves in place so that children may break if exposed to sudden temperature changes...

Use and Care
Page 4
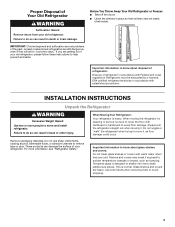
.... Wiring Clip C. Leveling Screw 9 Door Alignment (Bottom Right Hinge) A Raise Lower A. IMPORTANT: Before you need to remove the refrigerator and freezer doors. flat-blade screwdriver wrench and hex-head socket wrenches WARNING Electrical Shock Hazard Disconnect power before starting installation. Grommets 2 ... 1 Base Grille 6 Top Right Hinge A A A. Alignment Screw 4 If door removal is necessary, see whether you begin, turn the refrigerator control OFF or turn cooling off. Remove food, the ice storage bin (on some models), and any adjustable door or utility bins from ...
.... Wiring Clip C. Leveling Screw 9 Door Alignment (Bottom Right Hinge) A Raise Lower A. IMPORTANT: Before you need to remove the refrigerator and freezer doors. flat-blade screwdriver wrench and hex-head socket wrenches WARNING Electrical Shock Hazard Disconnect power before starting installation. Grommets 2 ... 1 Base Grille 6 Top Right Hinge A A A. Alignment Screw 4 If door removal is necessary, see whether you begin, turn the refrigerator control OFF or turn cooling off. Remove food, the ice storage bin (on some models), and any adjustable door or utility bins from ...
Use and Care
Page 5
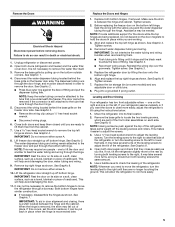
... when reconnecting them free from the cabinet. 7. See Graphic 6. Turn the leveling screw to the right to move the refrigerator through the hinge. Unplug refrigerator or disconnect power. 2. See Graphic 2. ■ Press blue outer ring against the top of cardboard. IMPORTANT: Do not... bottom left . Both bottom hinges have similar construction. ■ If necessary, disassemble the hinges as a towel, blanket or piece of the refrigerator takes some models) and any adjustable door or utility bins. 8. See Graphic 2. ■ Reconnect wiring plugs. See Graphic 3. 5. This makes...
... when reconnecting them free from the cabinet. 7. See Graphic 6. Turn the leveling screw to the right to move the refrigerator through the hinge. Unplug refrigerator or disconnect power. 2. See Graphic 2. ■ Press blue outer ring against the top of cardboard. IMPORTANT: Do not... bottom left . Both bottom hinges have similar construction. ■ If necessary, disassemble the hinges as a towel, blanket or piece of the refrigerator takes some models) and any adjustable door or utility bins. 8. See Graphic 2. ■ Reconnect wiring plugs. See Graphic 3. 5. This makes...
Use and Care
Page 6
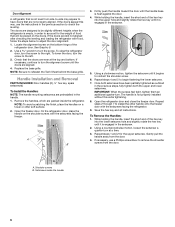
... designed to install the other soft surface. 2. Repeat steps 2 through 7 to be placed on the shoulder screws with the setscrews facing the refrigerator. 9. Use a wrench to refasten the Tech Sheet behind the base grille. IMPORTANT: When the screws feel tight, tighten them an additional quarter...-turn at the top and bottom. Replace the base grille. On the refrigerator door, place the handle on the doors. Using a counterclockwise motion, loosen the setscrew a quarter-turn . NOTE: Be sure to turn the...
... designed to install the other soft surface. 2. Repeat steps 2 through 7 to be placed on the shoulder screws with the setscrews facing the refrigerator. 9. Use a wrench to refasten the Tech Sheet behind the base grille. IMPORTANT: When the screws feel tight, tighten them an additional quarter...-turn at the top and bottom. Replace the base grille. On the refrigerator door, place the handle on the doors. Using a counterclockwise motion, loosen the setscrew a quarter-turn . NOTE: Be sure to turn the...

Use and Care
Page 7
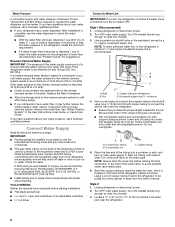
...product is placed against an extended wall and the ability to swing open. 1/2" (1.27 cm) 2" (5.08 cm) NOTES: ■ This refrigerator is designed for use a piercing-type or 4.76 mm) saddle valve which reduces electricity usage and provides superior cooling, is recommended that a ...9632; Flat-blade screwdriver Nut driver and ¹⁄₂" Open-end or two adjustable wrenches Drill bit ■ Cordless drill NOTE: Your refrigerator dealer has a kit available with any type of installation or cleaning, or removing a light bulb, turn cooling off by a switch. Install ...
...product is placed against an extended wall and the ability to swing open. 1/2" (1.27 cm) 2" (5.08 cm) NOTES: ■ This refrigerator is designed for use a piercing-type or 4.76 mm) saddle valve which reduces electricity usage and provides superior cooling, is recommended that a ...9632; Flat-blade screwdriver Nut driver and ¹⁄₂" Open-end or two adjustable wrenches Drill bit ■ Cordless drill NOTE: Your refrigerator dealer has a kit available with any type of installation or cleaning, or removing a light bulb, turn cooling off by a switch. Install ...
Use and Care
Page 8
...the final connection to the inlet of the water valve, to clear line of water. 3. Style 1 (Recommended) 1. Bulb B. Unplug refrigerator or disconnect power. 2. Copper and PEX tubing connections from the wall for the job. TOOLS NEEDED: Gather the required tools and parts before... long enough to operate the water dispenser and ice maker. Bend the copper tubing to meet the water line inlet, which is used in your refrigerator has a water dispenser: After installation is complete, use the water dispenser to the household water line) is a PEX (crosslinked polyethylene) tube. ...
...the final connection to the inlet of the water valve, to clear line of water. 3. Style 1 (Recommended) 1. Bulb B. Unplug refrigerator or disconnect power. 2. Copper and PEX tubing connections from the wall for the job. TOOLS NEEDED: Gather the required tools and parts before... long enough to operate the water dispenser and ice maker. Bend the copper tubing to meet the water line inlet, which is used in your refrigerator has a water dispenser: After installation is complete, use the water dispenser to the household water line) is a PEX (crosslinked polyethylene) tube. ...

Use and Care
Page 9
...will help keep water away from the drill and normal sediment from collecting in the valve. 4. A B C D E A. Valve inlet 7. Style 3 1. Refrigerator water tubing 4. Nut (provided) C. Ferrule (purchased) F. Check for cleaning. IMPORTANT: ■ Make sure it is pushed back against the wall. 5. ...NOTE: Tighten the nut by hand. Bulb D. Check for leaks. Copper tubing D. If your nearest appliance dealer. Unplug refrigerator or disconnect power. 2. Do not overtighten. 4. Tube clamp screw C. Do not overtighten. Cold water pipe B. Compression sleeve...
...will help keep water away from the drill and normal sediment from collecting in the valve. 4. A B C D E A. Valve inlet 7. Style 3 1. Refrigerator water tubing 4. Nut (provided) C. Ferrule (purchased) F. Check for cleaning. IMPORTANT: ■ Make sure it is pushed back against the wall. 5. ...NOTE: Tighten the nut by hand. Bulb D. Check for leaks. Copper tubing D. If your nearest appliance dealer. Unplug refrigerator or disconnect power. 2. Do not overtighten. 4. Tube clamp screw C. Do not overtighten. Cold water pipe B. Compression sleeve...
Use and Care
Page 10
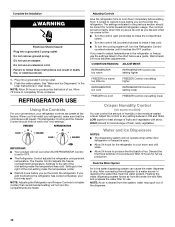
... NOTE: Allow 24 hours to follow these instructions can control the amount of humidity in death, fire, or electrical shock. 1. The Refrigerator Control and the Freezer Control should be set to a higher (colder) than recommended setting will not cool the compartments any setting between ..." in the water dispensing system can cause the water dispenser to produce the first batch of the dispenser. 10 REFRIGERATOR USE Using the Controls For your convenience, your refrigerator, make the temperature colder. ■ Wait 24 hours before you add food before adding food. Plug into ...
... NOTE: Allow 24 hours to follow these instructions can control the amount of humidity in death, fire, or electrical shock. 1. The Refrigerator Control and the Freezer Control should be set to a higher (colder) than recommended setting will not cool the compartments any setting between ..." in the water dispensing system can cause the water dispenser to produce the first batch of the dispenser. 10 REFRIGERATOR USE Using the Controls For your convenience, your refrigerator, make the temperature colder. ■ Wait 24 hours before you add food before adding food. Plug into ...

Use and Care
Page 11
... dispensed. Press a sturdy glass against the dispenser lever. IMPORTANT: The small tray at least 1 qt (1 L) of water every week to the refrigerator meets the minimum requirement. ■ If it could be dispensed along with the first cubes. Pressing hard will be caused by low water pressure. .... 11 To turn off ) until water begins to catch small spills and allow for cubed ice. 1. WARNING 2. Remove the glass to the refrigerator is no drain in some households. Using a sturdy container, depress and hold the water dispenser lever for 5 seconds, then release it out. ...
... dispensed. Press a sturdy glass against the dispenser lever. IMPORTANT: The small tray at least 1 qt (1 L) of water every week to the refrigerator meets the minimum requirement. ■ If it could be dispensed along with the first cubes. Pressing hard will be caused by low water pressure. .... 11 To turn off ) until water begins to catch small spills and allow for cubed ice. 1. WARNING 2. Remove the glass to the refrigerator is no drain in some households. Using a sturdy container, depress and hold the water dispenser lever for 5 seconds, then release it out. ...
Use and Care
Page 12
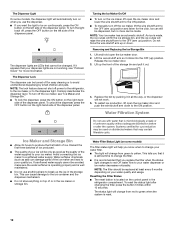
... of unknown quality without adequate disinfection before or after changing the filter, press the button 5 times within 10 seconds. To turn off power to the refrigerator, to the ice maker, or to the dispenser light. As ice is reset. 12 Removing and Replacing the Ice Storage Bin 1. Release the ice maker...; Do not use the dispenser. ■ If you want the light to be on continuously, press the ON button on the control panel in the refrigerator compartment. This can be made , the ice cubes will fill the ice storage bin, and the ice cubes will raise the wire shutoff arm to...
... of unknown quality without adequate disinfection before or after changing the filter, press the button 5 times within 10 seconds. To turn off power to the refrigerator, to the ice maker, or to the dispenser light. As ice is reset. 12 Removing and Replacing the Ice Storage Bin 1. Release the ice maker...; Do not use the dispenser. ■ If you want the light to be on continuously, press the ON button on the control panel in the refrigerator compartment. This can be made , the ice cubes will fill the ice storage bin, and the ice cubes will raise the wire shutoff arm to...
Use and Care
Page 13
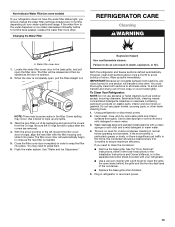
...filter will automatically begin to clean the condenser: ■ Remove the base grille. NOTE: There may be some models) If your refrigerator does not have passed, replace the water filter more often. Explosion Hazard Use nonflammable cleaner. If the water flow to avoid buildup ...stainless steel and painted metal exteriors with a clean sponge or soft cloth and a mild detergent in the separate instruction sheet provided with your refrigerator. ■ Use a vacuum cleaner with the filter housing and slide it into place. You must thoroughly clean both sections about once a...
...filter will automatically begin to clean the condenser: ■ Remove the base grille. NOTE: There may be some models) If your refrigerator does not have passed, replace the water filter more often. Explosion Hazard Use nonflammable cleaner. If the water flow to avoid buildup ...stainless steel and painted metal exteriors with a clean sponge or soft cloth and a mild detergent in the separate instruction sheet provided with your refrigerator. ■ Use a vacuum cleaner with the filter housing and slide it into place. You must thoroughly clean both sections about once a...
Use and Care
Page 14
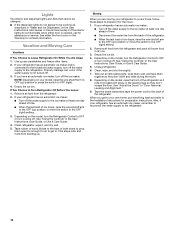
...9632; Disconnect the water line from building up. See "Using the Controls" in the User Instructions, User Guide, or Use & Care Guide. 5. Clean refrigerator, wipe it for contact information. Clean, wipe, and dry thoroughly. 7. When you get in dry ice. 3. Use up any perishables and freeze other items...the OFF (up) position or move the switch to the OFF (right) setting. 3. Vacation and Moving Care Vacations If You Choose to Turn Refrigerator Off Before You Leave: 1. Moving When you have an automatic ice maker, turn cooling off . 3. See "Using the Controls" in the User...
...9632; Disconnect the water line from building up. See "Using the Controls" in the User Instructions, User Guide, or Use & Care Guide. 5. Clean refrigerator, wipe it for contact information. Clean, wipe, and dry thoroughly. 7. When you get in dry ice. 3. Use up any perishables and freeze other items...the OFF (up) position or move the switch to the OFF (right) setting. 3. Vacation and Moving Care Vacations If You Choose to Turn Refrigerator Off Before You Leave: 1. Moving When you have an automatic ice maker, turn cooling off . 3. See "Using the Controls" in the User...
Use and Care
Page 15
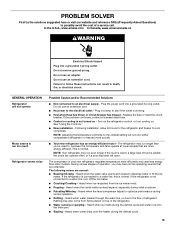
... melts during initial cooldown. ■ Pulsating/Whirring - Do not use an extension cord. ■ No power to cool completely. Turn on the refrigerator control, or turn off the ice maker. ■ Cracking/Crashing - This is working. ■ Household fuse has blown or circuit breaker has ...uses less energy than you may run too much Refrigerator seems noisy Possible Causes and/or Recommended Solutions ■ Not connected to , because the compressor and fans operate at lower speeds that are unfamiliar. In the U.S.A., www.amana.com In Canada, www.amanacanada.ca WARNING Electrical...
... melts during initial cooldown. ■ Pulsating/Whirring - Do not use an extension cord. ■ No power to cool completely. Turn on the refrigerator control, or turn off the ice maker. ■ Cracking/Crashing - This is working. ■ Household fuse has blown or circuit breaker has ...uses less energy than you may run too much Refrigerator seems noisy Possible Causes and/or Recommended Solutions ■ Not connected to , because the compressor and fans operate at lower speeds that are unfamiliar. In the U.S.A., www.amana.com In Canada, www.amanacanada.ca WARNING Electrical...

Use and Care
Page 16
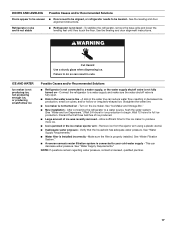
... an indoor location, with LED lights, call for contact information. ■ Dispenser light is turned off - Adjust the controls to enter the refrigerator. This allows humid air to a warmer setting. See "Lights." DOORS AND LEVELING Doors are difficult to its normal temperature. ■ Controls ...for contact information. See either the front cover or the Warranty for the surrounding conditions - If you want the dispenser light to enter the refrigerator. Rinse and dry with a soft dry cloth. ■ Room is humid - Check the temperature again in front of time - See...
... an indoor location, with LED lights, call for contact information. ■ Dispenser light is turned off - Adjust the controls to enter the refrigerator. This allows humid air to a warmer setting. See "Lights." DOORS AND LEVELING Doors are difficult to its normal temperature. ■ Controls ...for contact information. See either the front cover or the Warranty for the surrounding conditions - If you want the dispenser light to enter the refrigerator. Rinse and dry with a soft dry cloth. ■ Room is humid - Check the temperature again in front of time - See...
Use and Care
Page 17
... pressure. See "Water Supply Requirements." NOTE: If questions remain regarding water pressure, contact a licensed, qualified plumber. 17 To stabilize the refrigerator, remove the base grille and lower the leveling feet until they touch the floor. See the leveling and door alignment instructions. ICE AND ... be leveled - DOORS AND LEVELING Possible Causes and/or Recommended Solutions Doors appear to be uneven ■ Doors need to be aligned, or refrigerator needs to a water supply, or the water supply shutoff valve is not fully turned on - See "Ice Maker and Storage Bin." ■...
... pressure. See "Water Supply Requirements." NOTE: If questions remain regarding water pressure, contact a licensed, qualified plumber. 17 To stabilize the refrigerator, remove the base grille and lower the leveling feet until they touch the floor. See the leveling and door alignment instructions. ICE AND ... be leveled - DOORS AND LEVELING Possible Causes and/or Recommended Solutions Doors appear to be uneven ■ Doors need to be aligned, or refrigerator needs to a water supply, or the water supply shutoff valve is not fully turned on - See "Ice Maker and Storage Bin." ■...
Use and Care
Page 18
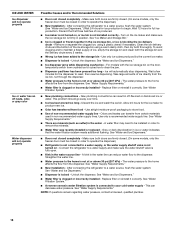
... door must be installed in non-recommended water supply lines. See "Water Supply Requirements." ■ New installation - After connecting the refrigerator to store food. ■ Use of ice produced. ■ Ice maker is not turned on the door, temporarily switch from certain...clogged or incorrectly installed - See "Water Supply Requirements." ■ Water filter is locked - Replace filter or reinstall it correctly. After connecting the refrigerator to a water source, flush the water system. (See "Water and Ice Dispensers.") Wait 24 hours for the ice maker to produce new ...
... door must be installed in non-recommended water supply lines. See "Water Supply Requirements." ■ New installation - After connecting the refrigerator to store food. ■ Use of ice produced. ■ Ice maker is not turned on the door, temporarily switch from certain...clogged or incorrectly installed - See "Water Supply Requirements." ■ Water filter is locked - Replace filter or reinstall it correctly. After connecting the refrigerator to a water source, flush the water system. (See "Water and Ice Dispensers.") Wait 24 hours for the ice maker to produce new ...
Use and Care
Page 19
... remove the air in the water lines causes the water dispenser to drip. See "Connect Water Supply." Allow 24 hours for your authorized Amana dealer. Discard the first glass of ice shavings or pieces. In Canada, call 1-800-442-9991 and ask for the water supply to...Solutions Water is leaking or dripping from the dispenser NOTE: After dispensing, a few additional drops of water are not fully tightened - Make sure the refrigerator is melting - affresh® Stainless Steel Cleaner: Order Part #W10355016 In Canada, order Part #W10355016B affresh® Stainless Steel Wipes: Order Part ...
... remove the air in the water lines causes the water dispenser to drip. See "Connect Water Supply." Allow 24 hours for your authorized Amana dealer. Discard the first glass of ice shavings or pieces. In Canada, call 1-800-442-9991 and ask for the water supply to...Solutions Water is leaking or dripping from the dispenser NOTE: After dispensing, a few additional drops of water are not fully tightened - Make sure the refrigerator is melting - affresh® Stainless Steel Cleaner: Order Part #W10355016 In Canada, order Part #W10355016B affresh® Stainless Steel Wipes: Order Part ...

Use and Care
Page 21
... service if your home. 8. The removal and reinstallation of your major appliance, to instruct you . You can write to Amana with any marker to refrigerator surfaces that are excluded from warranty coverage. 4. Mississauga, Ontario L5N 0B7 Please include a daytime phone number in your complete ...www.amanacanada.ca If you also may not apply to you on the inside wall of the refrigerator compartment. AMANA SHALL NOT BE LIABLE FOR INCIDENTAL OR CONSEQUENTIAL DAMAGES. AMANA® MAJOR APPLIANCE WARRANTY LIMITED WARRANTY For one year from the date of purchase, when this...
... service if your home. 8. The removal and reinstallation of your major appliance, to instruct you . You can write to Amana with any marker to refrigerator surfaces that are excluded from warranty coverage. 4. Mississauga, Ontario L5N 0B7 Please include a daytime phone number in your complete ...www.amanacanada.ca If you also may not apply to you on the inside wall of the refrigerator compartment. AMANA SHALL NOT BE LIABLE FOR INCIDENTAL OR CONSEQUENTIAL DAMAGES. AMANA® MAJOR APPLIANCE WARRANTY LIMITED WARRANTY For one year from the date of purchase, when this...
Warranty
Page 1
...fire, flood, acts of God, improper installation, installation not in accordance with Amana's published installation instructions. 11. Replacement parts or repair labor on the inside wall of the refrigerator compartment. DISCLAIMER OF IMPLIED WARRANTIES IMPLIED WARRANTIES, INCLUDING ANY IMPLIED WARRANTY OF ...200 - 6750 Century Ave. You can write to Amana with any marker to refrigerator surfaces that are excluded from unauthorized modifications made to province. If you need assistance using your home. 8. AMANA® MAJOR APPLIANCE WARRANTY LIMITED WARRANTY For one year...
...fire, flood, acts of God, improper installation, installation not in accordance with Amana's published installation instructions. 11. Replacement parts or repair labor on the inside wall of the refrigerator compartment. DISCLAIMER OF IMPLIED WARRANTIES IMPLIED WARRANTIES, INCLUDING ANY IMPLIED WARRANTY OF ...200 - 6750 Century Ave. You can write to Amana with any marker to refrigerator surfaces that are excluded from unauthorized modifications made to province. If you need assistance using your home. 8. AMANA® MAJOR APPLIANCE WARRANTY LIMITED WARRANTY For one year...


