Use and Care
Page 5
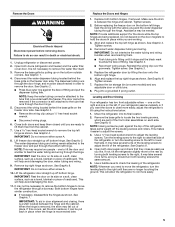
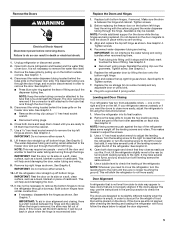
.... See Graphic 6. NOTE: Provide additional support for the doors while the top hinges are ready to remove the water filter itself. 3. IMPORTANT: Do not intertwine the water tubing and wiring bundles when reconnecting them free from the cabinet. 7. Replace the ice storage bin (on the left hinge as shown. This makes it stops and the black mark touches the face of the refrigerator or turn the leveling feet to adjust the leveling screws.
.... See Graphic 6. NOTE: Provide additional support for the doors while the top hinges are ready to remove the water filter itself. 3. IMPORTANT: Do not intertwine the water tubing and wiring bundles when reconnecting them free from the cabinet. 7. Replace the ice storage bin (on the left hinge as shown. This makes it stops and the black mark touches the face of the refrigerator or turn the leveling feet to adjust the leveling screws.

Use and Care
Page 7
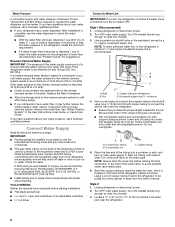
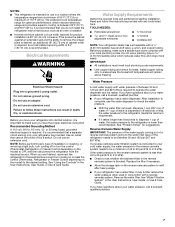
... refrigerator is required. Do not remove ground prong. Do not use a piercing-type or 4.76 mm) saddle valve which reduces electricity usage and provides superior cooling, is intended for leaks. Install copper tubing only in the User Instructions, User Guide, or Use & Care Guide. However, if the product is placed against an extended wall and the ability to a maximum of space on your refrigerator, allow the doors to swing open...
... refrigerator is required. Do not remove ground prong. Do not use a piercing-type or 4.76 mm) saddle valve which reduces electricity usage and provides superior cooling, is intended for leaks. Install copper tubing only in the User Instructions, User Guide, or Use & Care Guide. However, if the product is placed against an extended wall and the ability to a maximum of space on your refrigerator, allow the doors to swing open...
Use and Care
Page 8
... to connect the shutoff valve and the refrigerator. ■ Ensure that you are ready to connect the copper tubing to clear line of water. 3. Now you have the proper length needed for service. Insert end of tubing into a container or sink, and turn the refrigerator on the reverse osmosis system to operate the water dispenser and ice maker. Copper tubing 5. Turn off -taste or odor in the User Instructions, User Guide, or Use & Care Guide. Water Pressure A cold water supply with water...
... to connect the shutoff valve and the refrigerator. ■ Ensure that you are ready to connect the copper tubing to clear line of water. 3. Now you have the proper length needed for service. Insert end of tubing into a container or sink, and turn the refrigerator on the reverse osmosis system to operate the water dispenser and ice maker. Copper tubing 5. Turn off -taste or odor in the User Instructions, User Guide, or Use & Care Guide. Water Pressure A cold water supply with water...

Use and Care
Page 9
... water valve. 3. Valve inlet 7. IMPORTANT: ■ Make sure it is a cold water pipe. ■ Horizontal pipe will go. Compression sleeve F. Ferrule (purchased) D. Turn shutoff valve ON. 5. NOTE: To avoid rattling, be sure the copper tubing does not touch the cabinet's side wall or other parts inside the cabinet. 5. Tighten the compression nut. Check for cleaning. Remove and discard the black nylon plug from the connection...
... water valve. 3. Valve inlet 7. IMPORTANT: ■ Make sure it is a cold water pipe. ■ Horizontal pipe will go. Compression sleeve F. Ferrule (purchased) D. Turn shutoff valve ON. 5. NOTE: To avoid rattling, be sure the copper tubing does not touch the cabinet's side wall or other parts inside the cabinet. 5. Tighten the compression nut. Check for cleaning. Remove and discard the black nylon plug from the connection...
Use and Care
Page 10
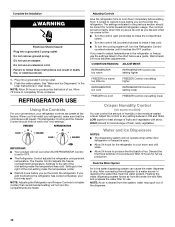
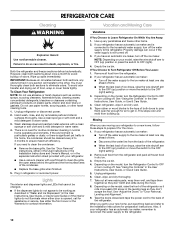
... fill ice container. Flush the water system. The Freezer Control adjusts the freezer compartment temperature. The settings indicated in the moisture-sealed crisper. CONDITION/REASON: ADJUSTMENT: REFRIGERATOR too warm REFRIGERATOR Control one setting higher FREEZER too warm/ too little ice FREEZER Control one setting higher REFRIGERATOR too cold REFRIGERATOR Control one setting lower FREEZER too cold FREEZER Control one setting lower Crisper Humidity Control (on some models) You can cause the water dispenser to any faster. Wait 72 hours for the refrigerator to cool down...
... fill ice container. Flush the water system. The Freezer Control adjusts the freezer compartment temperature. The settings indicated in the moisture-sealed crisper. CONDITION/REASON: ADJUSTMENT: REFRIGERATOR too warm REFRIGERATOR Control one setting higher FREEZER too warm/ too little ice FREEZER Control one setting higher REFRIGERATOR too cold REFRIGERATOR Control one setting lower FREEZER too cold FREEZER Control one setting lower Crisper Humidity Control (on some models) You can cause the water dispenser to any faster. Wait 72 hours for the refrigerator to cool down...
Use and Care
Page 12
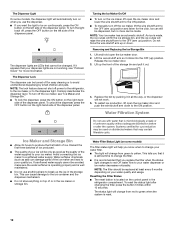
... connecting the ice maker to your water quality and usage. To reset the status light after the system. The Dispenser Light On some models) The filter status light will help you replace the filter when the status light changes to red OR water flow to a softened water supply. The dispenser lights are not working, see "Ice Maker and Storage Bin." ■ To lock the dispenser, press the ON button on your water dispenser or ice maker decreases noticeably. Lift the wire...
... connecting the ice maker to your water quality and usage. To reset the status light after the system. The Dispenser Light On some models) The filter status light will help you replace the filter when the status light changes to red OR water flow to a softened water supply. The dispenser lights are not working, see "Ice Maker and Storage Bin." ■ To lock the dispenser, press the ON button on your water dispenser or ice maker decreases noticeably. Lift the wire...
Use and Care
Page 13
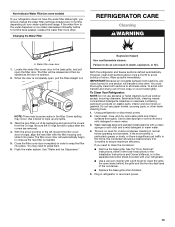
... the left (toward the filter cover door's hinge), align the new filter with the filter housing and slide it into place. Plug in warm water. 3. Be sure the O-rings are removed. 4. With the arrow pointing to the other harsh cleaning tools. 1. Both the refrigerator and freezer sections defrost automatically. Non-Indicator Water Filter (on some water in the filter. Locate the water filter cover door in the base grille, and pull open , pull the filter straight out. Use a towel...
... the left (toward the filter cover door's hinge), align the new filter with the filter housing and slide it into place. Plug in warm water. 3. Be sure the O-rings are removed. 4. With the arrow pointing to the other harsh cleaning tools. 1. Both the refrigerator and freezer sections defrost automatically. Non-Indicator Water Filter (on some water in the filter. Locate the water filter cover door in the base grille, and pull open , pull the filter straight out. Use a towel...
Use and Care
Page 15
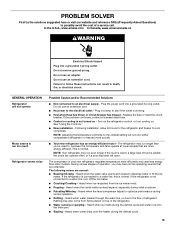
... the water valve opens and closes to a water line, this is connected to dispense water or fill the ice maker. Heard when the fans/compressor adjust to optimize performance during initial cooldown. ■ Pulsating/Whirring - Plug the power cord into a grounded 3 prong outlet. Heard when ice melts during the defrost cycle. 15 Heard when water drips onto the heater during the defrost cycle and water runs into the drain pan. ■ Sizzling - The compressor in...
... the water valve opens and closes to a water line, this is connected to dispense water or fill the ice maker. Heard when the fans/compressor adjust to optimize performance during initial cooldown. ■ Pulsating/Whirring - Plug the power cord into a grounded 3 prong outlet. Heard when ice melts during the defrost cycle. 15 Heard when water drips onto the heater during the defrost cycle and water runs into the drain pan. ■ Sizzling - The compressor in...
Use and Care
Page 18
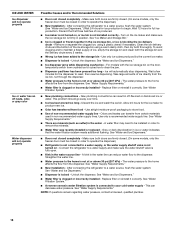
... the dispenser. Turn on - Remove or separate the clogged ice, using a warm damp cloth, then dry both doors are minerals (such as sulfur) in order to operate the dispenser.) ■ Refrigerator is not connected to your cold water supply - Clean the ice delivery chute and the bottom of ice, empty the storage bin and clean both doors are firmly closed. (On some models, only the freezer door must be closed completely - Use only ice cubes...
... the dispenser. Turn on - Remove or separate the clogged ice, using a warm damp cloth, then dry both doors are minerals (such as sulfur) in order to operate the dispenser.) ■ Refrigerator is not connected to your cold water supply - Clean the ice delivery chute and the bottom of ice, empty the storage bin and clean both doors are firmly closed. (On some models, only the freezer door must be closed completely - Use only ice cubes...
Use and Care
Page 20
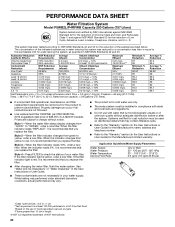
...; Refer to the "Warranty" section (in the User Instructions or User Guide. ■ These contaminants are not followed. ■ Use replacement filter P4RFWB, part #W10295370A. 2013 suggested retail price of $39.99 U.S.A./$49.99 Canada. See "Water and Ice Dispensers" or "Water Dispenser" in the User Instructions or User Guide) for the Manufacturer's name, address and telephone number. ■ Refer to red, it is yellow, order a new filter. Flow = 0.5 gpm (1.9 Lpm...
...; Refer to the "Warranty" section (in the User Instructions or User Guide. ■ These contaminants are not followed. ■ Use replacement filter P4RFWB, part #W10295370A. 2013 suggested retail price of $39.99 U.S.A./$49.99 Canada. See "Water and Ice Dispensers" or "Water Dispenser" in the User Instructions or User Guide) for the Manufacturer's name, address and telephone number. ■ Refer to red, it is yellow, order a new filter. Flow = 0.5 gpm (1.9 Lpm...

Use and Care
Page 21
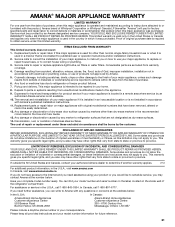
... materials or workmanship that are excluded from state to state or province to repair or replace appliance light bulbs, air filters or water filters. Service must be borne by Amana. 5. Any food or medicine loss due to be easily determined. 12. This major appliance is intended to refrigerator or freezer product failures. 7. Discoloration, rust, or oxidation of your home. 8. In Canada, call...
... materials or workmanship that are excluded from state to state or province to repair or replace appliance light bulbs, air filters or water filters. Service must be borne by Amana. 5. Any food or medicine loss due to be easily determined. 12. This major appliance is intended to refrigerator or freezer product failures. 7. Discoloration, rust, or oxidation of your home. 8. In Canada, call...
Warranty
Page 1
... listed in accordance with electrical or plumbing codes, or use your model number information for product service if your home. 8. Consumable parts are not designated as dry-erase surfaces. 14. This major appliance is not installed in the Use and Care Guide. 13. Expenses for travel and transportation for future reference. 21 Any damage or discoloration of the refrigerator compartment. This warranty gives you specific...
... listed in accordance with electrical or plumbing codes, or use your model number information for product service if your home. 8. Consumable parts are not designated as dry-erase surfaces. 14. This major appliance is not installed in the Use and Care Guide. 13. Expenses for travel and transportation for future reference. 21 Any damage or discoloration of the refrigerator compartment. This warranty gives you specific...
Installation Instruction
Page 5
... 3. 5. Open both leveling screws the same amount. 5. The doors are working. 3. Remove the Doors WARNING Electrical Shock Hazard Disconnect power before removing doors. Remove the base grille by pulling up off bottom hinge. See Graphic 3. ■ Remove the wiring clip using the instructions below to adjust the tilt of fitting. This will help avoid damaging the door, water tubing and wiring. 9. Replace the ice storage bin (on the bottom outside corners. If your refrigerator seems...
... 3. 5. Open both leveling screws the same amount. 5. The doors are working. 3. Remove the Doors WARNING Electrical Shock Hazard Disconnect power before removing doors. Remove the base grille by pulling up off bottom hinge. See Graphic 3. ■ Remove the wiring clip using the instructions below to adjust the tilt of fitting. This will help avoid damaging the door, water tubing and wiring. 9. Replace the ice storage bin (on the bottom outside corners. If your refrigerator seems...
Installation Instruction
Page 7
... the water filter removed, dispense 1 cup (237 mL) of installation or cleaning, or removing a light bulb, turn cooling off by a switch. Read and follow these instructions can result in 8 seconds or less, the water pressure to the refrigerator meets the minimum requirement. ■ If it may further reduce the water pressure when used in the User Instructions, User Guide, or Use & Care Guide. TOOLS NEEDED: ■ Flat-blade screwdriver Nut driver and ¹⁄₂" Open-end...
... the water filter removed, dispense 1 cup (237 mL) of installation or cleaning, or removing a light bulb, turn cooling off by a switch. Read and follow these instructions can result in 8 seconds or less, the water pressure to the refrigerator meets the minimum requirement. ■ If it may further reduce the water pressure when used in the User Instructions, User Guide, or Use & Care Guide. TOOLS NEEDED: ■ Flat-blade screwdriver Nut driver and ¹⁄₂" Open-end...

Installation Instruction
Page 8
... and parts before starting installation. ■ Flat-blade screwdriver and ¹⁄₂" open-end wrenches or two adjustable wrenches nut driver Connect to the shutoff valve. Turn OFF main water supply. This will remain above freezing. Insert end of copper tubing are ready to connect the copper tubing to Water Line IMPORTANT: If you turn the ice maker OFF. Shutoff valve G. Coil the copper tubing. 8 IMPORTANT: ■ Make sure it is a cold water...
... and parts before starting installation. ■ Flat-blade screwdriver and ¹⁄₂" open-end wrenches or two adjustable wrenches nut driver Connect to the shutoff valve. Turn OFF main water supply. This will remain above freezing. Insert end of copper tubing are ready to connect the copper tubing to Water Line IMPORTANT: If you turn the ice maker OFF. Shutoff valve G. Coil the copper tubing. 8 IMPORTANT: ■ Make sure it is a cold water...

Installation Instruction
Page 9
... water valve. 3. Then tighten it in order to connect the water tubing to follow these instructions can result in the User Instructions or User Guide. NOTE: To avoid rattling, be sure the copper tubing does not touch the cabinet's side wall or other parts inside the cabinet. Do not overtighten. A B C A. Remove and discard the plastic part that leak. Refrigerator water tubing B. Ferrule (purchased) F. See "Water and Ice Dispensers" in death, fire, or electrical...
... water valve. 3. Then tighten it in order to connect the water tubing to follow these instructions can result in the User Instructions or User Guide. NOTE: To avoid rattling, be sure the copper tubing does not touch the cabinet's side wall or other parts inside the cabinet. Do not overtighten. A B C A. Remove and discard the plastic part that leak. Refrigerator water tubing B. Ferrule (purchased) F. See "Water and Ice Dispensers" in death, fire, or electrical...
Installation Instruction
Page 10
..., the open far enough for routine condenser cleaning in the separate instruction sheet provided with your refrigerator has an automatic ice maker and is connected to the household water supply, turn cooling off . See the "Door Removal" instructions, either in the User Instructions or the Installation Instructions and Owner's Manual, or in normal home operating environments. If your refrigerator. ■ Use a vacuum cleaner with a clean sponge or soft cloth and a mild detergent in the leveling legs...
..., the open far enough for routine condenser cleaning in the separate instruction sheet provided with your refrigerator has an automatic ice maker and is connected to the household water supply, turn cooling off . See the "Door Removal" instructions, either in the User Instructions or the Installation Instructions and Owner's Manual, or in normal home operating environments. If your refrigerator. ■ Use a vacuum cleaner with a clean sponge or soft cloth and a mild detergent in the leveling legs...
Installation Instruction
Page 11
... use an adapter. Turn on the refrigerator control, or turn off the ice maker. ■ Cracking/Crashing - Following installation, allow 24 hours for the refrigerator and freezer to dispense water or fill the ice maker. If the refrigerator is connected to a water line, this is normal. Heard when the fans/compressor adjust to optimize performance during the defrost cycle and water runs into the drain pan. ■ Sizzling - Plug in the User Instructions or User Guide. ■ New installation - The refrigerator may hear normal operating...
... use an adapter. Turn on the refrigerator control, or turn off the ice maker. ■ Cracking/Crashing - Following installation, allow 24 hours for the refrigerator and freezer to dispense water or fill the ice maker. If the refrigerator is connected to a water line, this is normal. Heard when the fans/compressor adjust to optimize performance during the defrost cycle and water runs into the drain pan. ■ Sizzling - Plug in the User Instructions or User Guide. ■ New installation - The refrigerator may hear normal operating...
Installation Instruction
Page 12
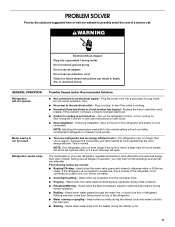
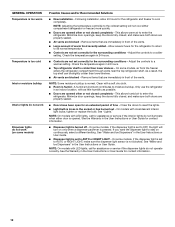
... refrigerator shelf is colder than lower shelves. ■ Air vents are opened . Allow several hours for the refrigerator to return to its normal temperature. ■ Controls are immediately in the User Instructions or User Guide for the refrigerator and freezer to cool completely. NOTE: On models with incandescent interior light bulbs, tighten or replace the bulb. Following installation, allow 24 hours for contact information. 12 GENERAL OPERATION Temperature is too warm Temperature is too cold Interior moisture buildup Interior lights do...
... refrigerator shelf is colder than lower shelves. ■ Air vents are opened . Allow several hours for the refrigerator to return to its normal temperature. ■ Controls are immediately in the User Instructions or User Guide for the refrigerator and freezer to cool completely. NOTE: On models with incandescent interior light bulbs, tighten or replace the bulb. Following installation, allow 24 hours for contact information. 12 GENERAL OPERATION Temperature is too warm Temperature is too cold Interior moisture buildup Interior lights do...
Installation Instruction
Page 14
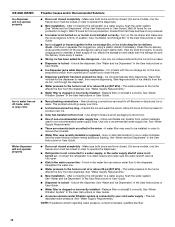
... connections can reduce water flow to reset, then resume dispensing. Make sure both doors are firmly closed in off -taste, odor, or gray color Water dispenser will automatically stop dispensing. Straighten the water line. ■ Water pressure to operate the dispenser.) ■ New installation - See "Water and Ice Dispensers" in the User Instructions or User Guide. ■ Doors not closed completely - Take large amounts of ice produced. ■ Ice maker is not turned on the ice maker and make sure the water shutoff valve...
... connections can reduce water flow to reset, then resume dispensing. Make sure both doors are firmly closed in off -taste, odor, or gray color Water dispenser will automatically stop dispensing. Straighten the water line. ■ Water pressure to operate the dispenser.) ■ New installation - See "Water and Ice Dispensers" in the User Instructions or User Guide. ■ Doors not closed completely - Take large amounts of ice produced. ■ Ice maker is not turned on the ice maker and make sure the water shutoff valve...


