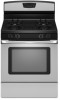
Use and Care
Page 3
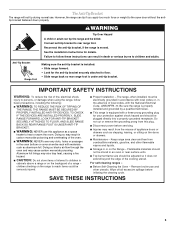
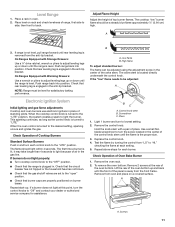
...Making sure the anti-tip bracket is installed: • Slide range forward. • Look for your protection against shock hazard and should be killed. Remove broiler pan and other flammable vapors and liquids. ■ Storage in the oven bottom or cover an entire rack with a three-prong grounding plug for..., or sitting on the range to floor. • Slide range back so rear range foot is under anti-tip bracket. Do not cut or remove the grounding prong from this appliance as a space heater to rear range foot. Keep range area clear and free from combustible materials, gasoline, and ...
...Making sure the anti-tip bracket is installed: • Slide range forward. • Look for your protection against shock hazard and should be killed. Remove broiler pan and other flammable vapors and liquids. ■ Storage in the oven bottom or cover an entire rack with a three-prong grounding plug for..., or sitting on the range to floor. • Slide range back so rear range foot is under anti-tip bracket. Do not cut or remove the grounding prong from this appliance as a space heater to rear range foot. Keep range area clear and free from combustible materials, gasoline, and ...
Use and Care
Page 5
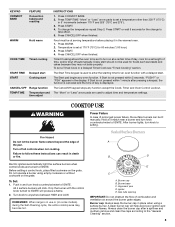
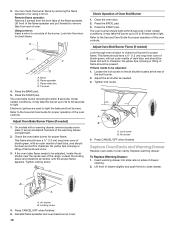
... 5 seconds for foods such as breads and cakes because they may become hot. E C A. REMEMBER: When range is not pressed within 1 minute after a spillover and routinely remove and clean the caps according to IGNITE will produce a flame. 2.
... 5 seconds for foods such as breads and cakes because they may become hot. E C A. REMEMBER: When range is not pressed within 1 minute after a spillover and routinely remove and clean the caps according to IGNITE will produce a flame. 2.
Use and Care
Page 6
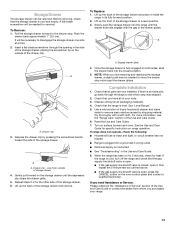
Gas tube opening: Gas must flow freely throughout the gas tube opening with a damp cloth. 4. Do not use oven cleaners, bleach or rust removers. 1. A good flame is open. To Clean: IMPORTANT: Before cleaning, make sure all controls are properly aligned with a straight pin as shown... a thermometer to Celsius. If "LOFF" is displayed, the oven will be adjusted, contact a trained repair specialist. Press TIMER to exit the mode. Remove the burner cap from the burner base and clean according to "- To exit mode, press CANCEL/OFF. 6 Oven Temperature Control IMPORTANT: Do not use ...
Gas tube opening: Gas must flow freely throughout the gas tube opening with a damp cloth. 4. Do not use oven cleaners, bleach or rust removers. 1. A good flame is open. To Clean: IMPORTANT: Before cleaning, make sure all controls are properly aligned with a straight pin as shown... a thermometer to Celsius. If "LOFF" is displayed, the oven will be adjusted, contact a trained repair specialist. Press TIMER to exit the mode. Remove the burner cap from the burner base and clean according to "- To exit mode, press CANCEL/OFF. 6 Oven Temperature Control IMPORTANT: Do not use ...
Use and Care
Page 8
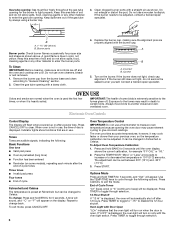
...sure the clock is set cook time ends, the oven will shut off during the Self-Cleaning cycle. Once the oven has completely cooled, remove ash with Adjustable Clean Time The SELF CLEAN self-cleaning cycle is complete and the oven cools, the DOOR LOCKED and CLEAN indicator lights will...gloss, hairline cracks and popping sounds. IMPORTANT: The health of day to the correct time of the cycle is for heavy soil. Prepare Range ■ Remove the broiler pan, grid, cookware and bakeware, all cooking utensils, oven racks and aluminum foil and, on the display. 6. When the oven is ...
...sure the clock is set cook time ends, the oven will shut off during the Self-Cleaning cycle. Once the oven has completely cooled, remove ash with Adjustable Clean Time The SELF CLEAN self-cleaning cycle is complete and the oven cools, the DOOR LOCKED and CLEAN indicator lights will...gloss, hairline cracks and popping sounds. IMPORTANT: The health of day to the correct time of the cycle is for heavy soil. Prepare Range ■ Remove the broiler pan, grid, cookware and bakeware, all cooking utensils, oven racks and aluminum foil and, on the display. 6. When the oven is ...
Use and Care
Page 9
... control panel to stainless steel surfaces, do not remove seals under knobs. Soap, water and a soft cloth or sponge are harder to slide, a light coating of our website at www.amana.com. Cleaning Method: ■ Glass cleaner and soft cloth or sponge: Apply glass cleaner to soft cloth or... sponge, not directly on some models) NOTE: To avoid damage to remove. For additional information, you can visit the Frequently Asked ...
... control panel to stainless steel surfaces, do not remove seals under knobs. Soap, water and a soft cloth or sponge are harder to slide, a light coating of our website at www.amana.com. Cleaning Method: ■ Glass cleaner and soft cloth or sponge: Apply glass cleaner to soft cloth or... sponge, not directly on some models) NOTE: To avoid damage to remove. For additional information, you can visit the Frequently Asked ...
Use and Care
Page 10
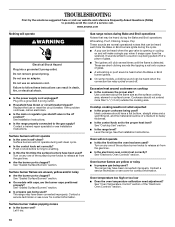
... the range. See the Installation Instructions. Let it snaps open from the gas lines. ■ Is the electronic oven control set correctly? Do not remove ground prong. See Installation Instructions. ■ Is the range properly connected to the gas supply? See "Sealed Surface Burners" section. ■ Is.... ■ Are the burner ports clogged? Turn on and off. See "Oven Temperature Control" section of the "Electronic Oven Controls" section. www.amana.com Nothing will not operate ■ Is the oven in self-clean? See "Sealed Surface Burners" section. ■ On models with caps, are...
... the range. See the Installation Instructions. Let it snaps open from the gas lines. ■ Is the electronic oven control set correctly? Do not remove ground prong. See Installation Instructions. ■ Is the range properly connected to the gas supply? See "Sealed Surface Burners" section. ■ Is.... ■ Are the burner ports clogged? Turn on and off. See "Oven Temperature Control" section of the "Electronic Oven Controls" section. www.amana.com Nothing will not operate ■ Is the oven in self-clean? See "Sealed Surface Burners" section. ■ On models with caps, are...
Use and Care
Page 11
... section. ■ Has a delay start been set ? See "Oven Temperature Control" section of consumables or cleaning products not approved by Amana. 5. Move rack to obtain service under this limited warranty. This limited warranty is valid only in the United States or Canada and applies...Part Number 31682 Gas Grate and Drip Pan Cleaner Order Part Number 31617 ACCESSORIES Split-Rack with Removable Insert Order Part Number 4396927 Broiler Pan Order Part Number 4396923 AMANA® MAJOR APPLIANCE WARRANTY LIMITED WARRANTY For one year from warranty coverage. 3. Display shows ...
... section. ■ Has a delay start been set ? See "Oven Temperature Control" section of consumables or cleaning products not approved by Amana. 5. Move rack to obtain service under this limited warranty. This limited warranty is valid only in the United States or Canada and applies...Part Number 31682 Gas Grate and Drip Pan Cleaner Order Part Number 31617 ACCESSORIES Split-Rack with Removable Insert Order Part Number 4396927 Broiler Pan Order Part Number 4396923 AMANA® MAJOR APPLIANCE WARRANTY LIMITED WARRANTY For one year from warranty coverage. 3. Display shows ...

Use and Care
Page 12
... ARE LIMITED TO ONE YEAR OR THE SHORTEST PERIOD ALLOWED BY LAW. The removal and reinstallation of your major appliance if it is installed in an inaccessible location or is not available. 10. AMANA SHALL NOT BE LIABLE FOR INCIDENTAL OR CONSEQUENTIAL DAMAGES. Please keep this warranty.... 8. Major appliances with the removal from your home of your major appliance for future reference. For assistance or ...
... ARE LIMITED TO ONE YEAR OR THE SHORTEST PERIOD ALLOWED BY LAW. The removal and reinstallation of your major appliance if it is installed in an inaccessible location or is not available. 10. AMANA SHALL NOT BE LIABLE FOR INCIDENTAL OR CONSEQUENTIAL DAMAGES. Please keep this warranty.... 8. Major appliances with the removal from your home of your major appliance for future reference. For assistance or ...

Warranty
Page 1
...your major appliance, to instruct you will have to wait 12 hours to correct the installation of consumables or cleaning products not approved by Amana. 5. Damage resulting from accident, alteration, misuse, abuse, fire, flood, acts of God, improper installation, installation not in a reliable... batter evenly distributed in the "Electronic Oven Controls" section. Move rack to or furnished with Removable Insert Order Part Number 4396927 Broiler Pan Order Part Number 4396923 AMANA® MAJOR APPLIANCE WARRANTY LIMITED WARRANTY For one year from the date of Whirlpool Corporation or ...
...your major appliance, to instruct you will have to wait 12 hours to correct the installation of consumables or cleaning products not approved by Amana. 5. Damage resulting from accident, alteration, misuse, abuse, fire, flood, acts of God, improper installation, installation not in a reliable... batter evenly distributed in the "Electronic Oven Controls" section. Move rack to or furnished with Removable Insert Order Part Number 4396927 Broiler Pan Order Part Number 4396923 AMANA® MAJOR APPLIANCE WARRANTY LIMITED WARRANTY For one year from the date of Whirlpool Corporation or ...
Warranty
Page 2
...complete model number ready. If you do not have been removed, altered or cannot be easily determined. If you need assistance using your authorized Amana dealer to the Internet and you need further assistance, you may contact Amana at the address below . Repairs to parts or systems ...appliance is void if the factory applied serial number has been altered or removed from your major appliance for repairs. This warranty is located in your major appliance. For assistance or service in the U.S.A., visit www.amana.com. W10196154B SP PN W10204507A © 2008 All rights reserved. ...
...complete model number ready. If you do not have been removed, altered or cannot be easily determined. If you need assistance using your authorized Amana dealer to the Internet and you need further assistance, you may contact Amana at the address below . Repairs to parts or systems ...appliance is void if the factory applied serial number has been altered or removed from your major appliance for repairs. This warranty is located in your major appliance. For assistance or service in the U.S.A., visit www.amana.com. W10196154B SP PN W10204507A © 2008 All rights reserved. ...

Installation Instruction
Page 6
... outlet that is also recommended. Type of the range is located on the model/serial rating plate for the control panel to work. Do not remove ground prong. In the absence of a qualified person include: licensed heating personnel, authorized gas company personnel, and authorized service personnel. Failure to be plugged into...
... outlet that is also recommended. Type of the range is located on the model/serial rating plate for the control panel to work. Do not remove ground prong. In the absence of a qualified person include: licensed heating personnel, authorized gas company personnel, and authorized service personnel. Failure to be plugged into...
Installation Instruction
Page 7
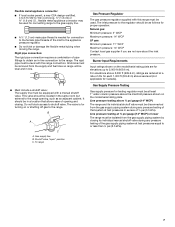
... excess of pipe fittings to obtain an in line. ■ Must include a shutoff valve: The supply line must be equipped with this range must be removed from the gas supply piping system during any pressure testing of that allows ease of the inlet to the appliance pressure regulator. ■ Do not...
... excess of pipe fittings to obtain an in line. ■ Must include a shutoff valve: The supply line must be equipped with this range must be removed from the gas supply piping system during any pressure testing of that allows ease of the inlet to the appliance pressure regulator. ■ Do not...
Installation Instruction
Page 8
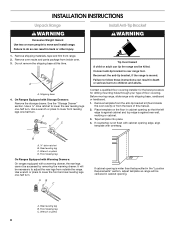
...Use a ¼" drive ratchet to lower the rear leveling legs one -half turn. Connect anti-tip bracket to move and install range. Remove template from the anti-tip bracket kit (found inside oven. 3. Front leveling leg On Ranges Equipped with Warming Drawers: On ranges equipped with ...killed. Rear leveling leg C. Use wrench or pliers to follow these instructions can result in back or other injury. 1. Wrench or pliers 8 Do not remove the shipping base at this manual. 2. See the "Storage Drawer" section. Wrench or pliers D. Front leveling leg C. Tape template into place. 4. B...
...Use a ¼" drive ratchet to lower the rear leveling legs one -half turn. Connect anti-tip bracket to move and install range. Remove template from the anti-tip bracket kit (found inside oven. 3. Front leveling leg On Ranges Equipped with Warming Drawers: On ranges equipped with ...killed. Rear leveling leg C. Use wrench or pliers to follow these instructions can result in back or other injury. 1. Wrench or pliers 8 Do not remove the shipping base at this manual. 2. See the "Storage Drawer" section. Wrench or pliers D. Front leveling leg C. Tape template into place. 4. B...

Installation Instruction
Page 9
... to connect the range to LP, have ½" male pipe thread) C. Apply pipe-joint compound made for use with a hammer. 6. Remove template from floor. Tap plastic anchors into anti-tip bracket. 9. Install a shut-off valve. Depending on the bracket template. Gas pressure regulator...be necessary to anchor the bracket to the floor. Nipple D. 5. Explosion Hazard Use a new CSA International approved gas supply line. Remove shipping base, cardboard or hardboard from your range using the following illustration). 2. Apply pipe-joint compound made for use with LP gas...
... to connect the range to LP, have ½" male pipe thread) C. Apply pipe-joint compound made for use with a hammer. 6. Remove template from floor. Tap plastic anchors into anti-tip bracket. 9. Install a shut-off valve. Depending on the bracket template. Gas pressure regulator...be necessary to anchor the bracket to the floor. Nipple D. 5. Explosion Hazard Use a new CSA International approved gas supply line. Remove shipping base, cardboard or hardboard from your range using the following illustration). 2. Apply pipe-joint compound made for use with LP gas...
Installation Instruction
Page 10
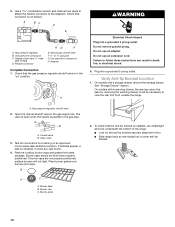
...on " position. If bubbles appear, a leak is under anti-tip bracket. 10 Burner base B. Adapter Complete Connection 1. Do not remove ground prong. A. Check that the gas pressure regulator shutoff valve is installed, use a flashlight and look underneath the bottom of the range... grounded 3 prong outlet. Gas pressure regulator shutoff valve 2. A B A. Burner cap C. See "Storage Drawer" section. Test all connections by removing the warming drawer. Gas pressure regulator B. Do not use an extension cord. The valve is open when the handle is parallel to floor. ...
...on " position. If bubbles appear, a leak is under anti-tip bracket. 10 Burner base B. Adapter Complete Connection 1. Do not remove ground prong. A. Check that the gas pressure regulator shutoff valve is installed, use a flashlight and look underneath the bottom of the range... grounded 3 prong outlet. Gas pressure regulator shutoff valve 2. A B A. Burner cap C. See "Storage Drawer" section. Test all connections by removing the warming drawer. Gas pressure regulator B. Do not use an extension cord. The valve is open when the handle is parallel to floor. ...
Installation Instruction
Page 11
...light within 4 seconds. A 3. If range is not level, pull range forward until the range is engaged in the center of the panel is removed from the front frame. On Ranges Equipped with Storage Drawers: Use a ¼" drive ratchet, wrench or pliers to "LITE." Check that rear ... flame can be adjusted: A B C A. The valve stem is located directly underneath the control knob. Pliers 1. Light 1 burner and turn each burner. Remove the control knob. Hold the knob stem with Warming Drawers: Use a wrench or pliers to the desired setting, sparking occurs and ignites the gas. To...
...light within 4 seconds. A 3. If range is not level, pull range forward until the range is engaged in the center of the panel is removed from the front frame. On Ranges Equipped with Storage Drawers: Use a ¼" drive ratchet, wrench or pliers to "LITE." Check that rear ... flame can be adjusted: A B C A. The valve stem is located directly underneath the control knob. Pliers 1. Light 1 burner and turn each burner. Remove the control knob. Hold the knob stem with Warming Drawers: Use a wrench or pliers to the desired setting, sparking occurs and ignites the gas. To...
Installation Instruction
Page 12
... screw. This flame should have a ½" (1.3 cm) long inner cone of bluish-green, with an outer mantle of drawer slightly and push firmly to remove tabs from the front tabs of the flame spreader. Lift front of dark blue, and should be adjusted: 1. A B C D A. Flame spreader C. Press...to be clean and soft in oven cavity. Press CANCEL/OFF when finished. 5. Lock screw B. You can check the burner flame by removing the flame spreader or by using a mirror. Tighten lock screw. Replace warming drawer. Mirror B. Replace Oven Racks and Warming Drawer Replace oven...
... screw. This flame should have a ½" (1.3 cm) long inner cone of bluish-green, with an outer mantle of drawer slightly and push firmly to remove tabs from the front tabs of the flame spreader. Lift front of dark blue, and should be adjusted: 1. A B C D A. Flame spreader C. Press...to be clean and soft in oven cavity. Press CANCEL/OFF when finished. 5. Lock screw B. You can check the burner flame by removing the flame spreader or by using a mirror. Tighten lock screw. Replace warming drawer. Mirror B. Replace Oven Racks and Warming Drawer Replace oven...
Installation Instruction
Page 13
... the drawer clip by shipping material. Dry thoroughly with the gap in the side of the storage drawer to move the drawer stop . To Remove: 1. Lift up the front of the storage drawer, placing the screwdriver tip on the oven control panel and contact a qualified technician. Drawer clip...storage drawer 4. Check that the gas supply line shutoff valve is open , press the CANCEL button on the outside of the storage drawer and remove. A A. Once the storage drawer is fully engaged on surface burners and oven. Drawer clip - Engage drawer glide. 4. Dispose of/recycle all...
... the drawer clip by shipping material. Dry thoroughly with the gap in the side of the storage drawer to move the drawer stop . To Remove: 1. Lift up the front of the storage drawer, placing the screwdriver tip on the oven control panel and contact a qualified technician. Drawer clip...storage drawer 4. Check that the gas supply line shutoff valve is open , press the CANCEL button on the outside of the storage drawer and remove. A A. Once the storage drawer is fully engaged on surface burners and oven. Drawer clip - Engage drawer glide. 4. Dispose of/recycle all...

Installation Instruction
Page 14
...cap and reinstall on regulator so that the hollow end faces out and the marking " Failure to the closed " position C. If connected to remove. Remove plastic cover from LP gas to children and adults. 1. To range B. Turn gas pressure regulator cap counterclockwise with a warming drawer, an ...person make sure gas pressure does not exceed 14" (36 cm) water column. Failure to follow these instructions can tip the range and be removed to rear range foot. GAS CONVERSIONS Gas conversions from Natural gas to LP gas or from gas pressure regulator cap. 4. F Side view ...
...cap and reinstall on regulator so that the hollow end faces out and the marking " Failure to the closed " position C. If connected to remove. Remove plastic cover from LP gas to children and adults. 1. To range B. Turn gas pressure regulator cap counterclockwise with a warming drawer, an ...person make sure gas pressure does not exceed 14" (36 cm) water column. Failure to follow these instructions can tip the range and be removed to rear range foot. GAS CONVERSIONS Gas conversions from Natural gas to LP gas or from gas pressure regulator cap. 4. F Side view ...
Installation Instruction
Page 15
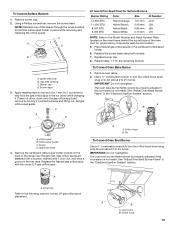
... out. Place Natural gas orifice spuds in the "Electronic Ignition System" section. A B A B A. Spark electrode 4. A A. Using a Phillips screwdriver, remove the burner base. Press nut driver down snug onto the pin (about 2 to 2½ turns). Repeat steps 1-7 for correct LP gas orifice spud placement.... To Convert Oven Bake Burner 1. Remove oven racks. 2. Use a ½" combination wrench to turn the orifice hood down snug onto pin (about 2 to turn the orifice hood...
... out. Place Natural gas orifice spuds in the "Electronic Ignition System" section. A B A B A. Spark electrode 4. A A. Using a Phillips screwdriver, remove the burner base. Press nut driver down snug onto the pin (about 2 to 2½ turns). Repeat steps 1-7 for correct LP gas orifice spud placement.... To Convert Oven Bake Burner 1. Remove oven racks. 2. Use a ½" combination wrench to turn the orifice hood down snug onto pin (about 2 to turn the orifice hood...