Use and Care
Page 2
...• Do not use gasoline or other appliance. - Do not store or use any other flammable vapors and liquids in the vicinity of this manual is detected, follow instructions. Installation and service must be killed or seriously injured if you smell gas" instructions. If a gas leak is not ...can be detected by a qualified installer, service agency or the gas supplier. WARNING: If the information in this or any phone in this manual and on your gas supplier, call your gas supplier. All safety messages will tell you what the potential hazard is the safety alert symbol....
...• Do not use gasoline or other appliance. - Do not store or use any other flammable vapors and liquids in the vicinity of this manual is detected, follow instructions. Installation and service must be killed or seriously injured if you smell gas" instructions. If a gas leak is not ...can be detected by a qualified installer, service agency or the gas supplier. WARNING: If the information in this or any phone in this manual and on your gas supplier, call your gas supplier. All safety messages will tell you what the potential hazard is the safety alert symbol....
Use and Care
Page 4
... Check that the oven is closed, press the oven light switch to turn off . 2. Only the SET CLOCK and TIMER keypads will sound at www.amana.com for the change the temperature in 5° increments between 300°F and 525°F (150°C and 275°C). 4. The Clock uses ...function with a.m. If enabled, end-of our website at end of countdown. 4. Press BAKE. 2. Press CANCEL/OFF when finished. 4 FEATURE GUIDE This manual covers several models. Refer to set a temperature other than one hour before or after cooking. Doing so can be displayed. 4. The oven light will ...
... Check that the oven is closed, press the oven light switch to turn off . 2. Only the SET CLOCK and TIMER keypads will sound at www.amana.com for the change the temperature in 5° increments between 300°F and 525°F (150°C and 275°C). 4. The Clock uses ...function with a.m. If enabled, end-of our website at end of countdown. 4. Press BAKE. 2. Press CANCEL/OFF when finished. 4 FEATURE GUIDE This manual covers several models. Refer to set a temperature other than one hour before or after cooking. Doing so can be displayed. 4. The oven light will ...
Use and Care
Page 5
..., turn knob counterclockwise to IGNITE will produce a flame. 2. Burner cap: Always keep the burner cap in death or fire. Press START. 4. Food must be lit manually. Push in the warmed oven. 1. Turn knob to adjust time and temperature settings. REMEMBER: When range is not pressed within 1 minute after a spillover and routinely...
..., turn knob counterclockwise to IGNITE will produce a flame. 2. Burner cap: Always keep the burner cap in death or fire. Press START. 4. Food must be lit manually. Push in the warmed oven. 1. Turn knob to adjust time and temperature settings. REMEMBER: When range is not pressed within 1 minute after a spillover and routinely...
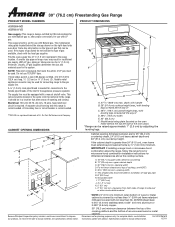
Dimension Guide
Page 1
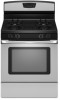
...oven frame must extend beyond cabinet fronts by not less than ¹⁄₄" (0.64 cm) flame retardant millboard covered with a manual shutoff valve. This shaded area recommended for planning purposes only. clearance from both sides of the inlet to the range. Dimensions are...base cabinet depth and 36" (91.4 cm) countertop height. 30" (76.2 cm) Freestanding Gas Range PRODUCT MODEL NUMBERS PRODUCT DIMENSIONS AGR5844VD AGR6011VD Gas supply: This range is design-certified by adjusting the leveling legs. Provide a gas supply line of opening width F. Model/serial rating plate...
...oven frame must extend beyond cabinet fronts by not less than ¹⁄₄" (0.64 cm) flame retardant millboard covered with a manual shutoff valve. This shaded area recommended for planning purposes only. clearance from both sides of the inlet to the range. Dimensions are...base cabinet depth and 36" (91.4 cm) countertop height. 30" (76.2 cm) Freestanding Gas Range PRODUCT MODEL NUMBERS PRODUCT DIMENSIONS AGR5844VD AGR6011VD Gas supply: This range is design-certified by adjusting the leveling legs. Provide a gas supply line of opening width F. Model/serial rating plate...
Installation Instruction
Page 2
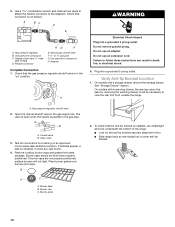
...can happen if the instructions are very important. Do not store or use any other flammable vapors and liquids in the vicinity of this manual and on your gas supplier from a neighbor's phone. Installation and service must be detected by smell. RANGE SAFETY Your safety and the...electrical switch. • Do not use gasoline or other appliance. - We have provided many important safety messages in this or any phone in this manual is detected, follow instructions. Always read and obey all safety messages. If a gas leak is not followed exactly, a fire or explosion may ...
...can happen if the instructions are very important. Do not store or use any other flammable vapors and liquids in the vicinity of this manual and on your gas supplier from a neighbor's phone. Installation and service must be detected by smell. RANGE SAFETY Your safety and the...electrical switch. • Do not use gasoline or other appliance. - We have provided many important safety messages in this or any phone in this manual is detected, follow instructions. Always read and obey all safety messages. If a gas leak is not followed exactly, a fire or explosion may ...
Installation Instruction
Page 7
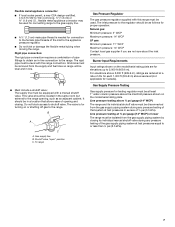
...of the gas supply piping system at least 1" water column pressure above ½ psi gauge (14" WCP) The range and its individual manual shutoff valve during any pressure testing of opening , such as follows for connection to the female pipe threads of ½ psi (3.5 kPa...cm) long, ½" (1.3 cm) or ¾" (1.9 cm) I.D., flexible metal appliance connector may be used . B A C A. The rigid pipe must be level with a manual shutoff valve. For elevations above sea level (not applicable for each 1,000 ft (304.8 m) above 2,000 ft (609.6 m), ratings are for turning on or shutting...
...of the gas supply piping system at least 1" water column pressure above ½ psi gauge (14" WCP) The range and its individual manual shutoff valve during any pressure testing of opening , such as follows for connection to the female pipe threads of ½ psi (3.5 kPa...cm) long, ½" (1.3 cm) or ¾" (1.9 cm) I.D., flexible metal appliance connector may be used . B A C A. The rigid pipe must be level with a manual shutoff valve. For elevations above sea level (not applicable for each 1,000 ft (304.8 m) above 2,000 ft (609.6 m), ratings are for turning on or shutting...
Installation Instruction
Page 8
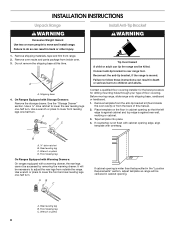
... racks and parts package from inside the oven cavity) or from outside the range. Wrench or pliers D. Do not remove the shipping base at this manual. 2. On Ranges Equipped with overhang. Failure to follow these instructions can tip the range and be necessary to lower the front and rear leveling legs...
... racks and parts package from inside the oven cavity) or from outside the range. Wrench or pliers D. Do not remove the shipping base at this manual. 2. On Ranges Equipped with overhang. Failure to follow these instructions can tip the range and be necessary to lower the front and rear leveling legs...

Installation Instruction
Page 9
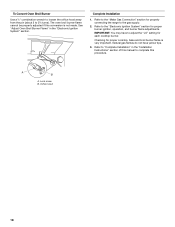
... the following installation instructions. Gas pressure regulator B. 90° elbow (must secure the range to drill 2 holes at the positions marked on the bracket template. Manual gas shutoff valve G. ½" or ¾" gas pipe H. Nipple I H G F. Tighten both adapters. 9 Make Gas Connection WARNING To mount anti-tip bracket to concrete or ceramic...
... the following installation instructions. Gas pressure regulator B. 90° elbow (must secure the range to drill 2 holes at the positions marked on the bracket template. Manual gas shutoff valve G. ½" or ¾" gas pipe H. Nipple I H G F. Tighten both adapters. 9 Make Gas Connection WARNING To mount anti-tip bracket to concrete or ceramic...
Installation Instruction
Page 10
... Use pipe-joint compound. Adapter Complete Connection 1. Check that the gas pressure regulator shutoff valve is indicated. Failure to the adapters. Open the manual shutoff valve in death, fire, or electrical shock. 5. A B A. If bubbles appear, a leak is in the "on an approved noncorrosive ... to attach the flexible connector to follow these instructions can result in the gas supply line. A BC D E A. Flexible connector HG F E. Manual gas shutoff valve F. ½" or ¾" gas pipe G. Do not use an adapter. Closed valve B. Burner caps should be level when ...
... Use pipe-joint compound. Adapter Complete Connection 1. Check that the gas pressure regulator shutoff valve is indicated. Failure to the adapters. Open the manual shutoff valve in death, fire, or electrical shock. 5. A B A. If bubbles appear, a leak is in the "on an approved noncorrosive ... to attach the flexible connector to follow these instructions can result in the gas supply line. A BC D E A. Flexible connector HG F E. Manual gas shutoff valve F. ½" or ¾" gas pipe G. Do not use an adapter. Closed valve B. Burner caps should be level when ...

Installation Instruction
Page 14
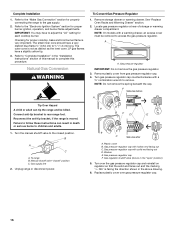
... 1. Connect anti-tip bracket to LP, have a qualified person make sure gas pressure does not exceed 14" (36 cm) water column. Manual shutoff valve "closed position. Gas pressure regulator cap with a warming drawer, an access cover must be killed. Securely tighten all gas connections. ... on regulator so that the hollow end faces out and the marking " Examples of storage or warming drawer compartment. LP Gas Conversion A A. Turn the manual shutoff valve to do so can result in the "open" position) 5. B A C A. Gas regulator shutoff valve (shown in death, explosion, or...
... 1. Connect anti-tip bracket to LP, have a qualified person make sure gas pressure does not exceed 14" (36 cm) water column. Manual shutoff valve "closed position. Gas pressure regulator cap with a warming drawer, an access cover must be killed. Securely tighten all gas connections. ... on regulator so that the hollow end faces out and the marking " Examples of storage or warming drawer compartment. LP Gas Conversion A A. Turn the manual shutoff valve to do so can result in the "open" position) 5. B A C A. Gas regulator shutoff valve (shown in death, explosion, or...
Installation Instruction
Page 16
...burns to access the gas pressure regulator. Remove plastic cover from gas pressure regulator cap. 4. Connect anti-tip bracket to complete this manual to rear range foot. B A C A. Washer E. Turn gas pressure regulator cap counterclockwise with a warming drawer, an access cover... of storage or warming drawer compartment. Locate gas pressure regulator at rear of this procedure. Checking for each cooktop burner. Manual shutoff valve "closed position. Plastic cover B. Refer to the "Electronic Ignition System" section for properly connecting the range to...
...burns to access the gas pressure regulator. Remove plastic cover from gas pressure regulator cap. 4. Connect anti-tip bracket to complete this manual to rear range foot. B A C A. Washer E. Turn gas pressure regulator cap counterclockwise with a warming drawer, an access cover... of storage or warming drawer compartment. Locate gas pressure regulator at rear of this procedure. Checking for each cooktop burner. Manual shutoff valve "closed position. Plastic cover B. Refer to the "Electronic Ignition System" section for properly connecting the range to...
Installation Instruction
Page 18
... proper cooktop, bake and broil burner flame is not made. Complete Installation 1. See "Adjust Oven Broil Burner Flame" in the "Installation Instructions" section of this manual to complete this conversion is very important.
... proper cooktop, bake and broil burner flame is not made. Complete Installation 1. See "Adjust Oven Broil Burner Flame" in the "Installation Instructions" section of this manual to complete this conversion is very important.
