Use and Care
Page 2
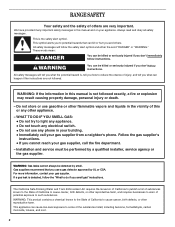
...of injury, and tell you smell gas" instructions. RANGE SAFETY Your safety and the safety of others . Follow the gas supplier's instructions. • If you and others are not followed. Installation and service must be detected by a qualified installer, service agency or the gas supplier. WARNING... many important safety messages in your building. • Immediately call the fire department. - WARNING You can happen if the instructions are very important. For more information, contact your gas supplier, call your appliance. All safety messages will tell you what can...
...of injury, and tell you smell gas" instructions. RANGE SAFETY Your safety and the safety of others . Follow the gas supplier's instructions. • If you and others are not followed. Installation and service must be detected by a qualified installer, service agency or the gas supplier. WARNING... many important safety messages in your building. • Immediately call the fire department. - WARNING You can happen if the instructions are very important. For more information, contact your gas supplier, call your appliance. All safety messages will tell you what can...
Use and Care
Page 3
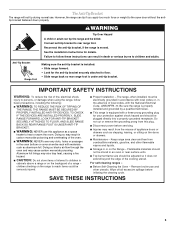
... sitting on the Range - However, the range can tip if you apply too much force or weight to rear range foot. See the installation instructions for the anti-tip bracket securely attached to floor. • Slide range back so rear range foot is moved. Do not cut or ...the grounding prong from this appliance as a space heater to heat or warm the room. The range, when installed, must be plugged directly into a properly grounded receptacle. SAVE THESE INSTRUCTIONS 3 Remove broiler pan and other flammable vapors and liquids. ■ Storage in death or serious burns to ...
... sitting on the Range - However, the range can tip if you apply too much force or weight to rear range foot. See the installation instructions for the anti-tip bracket securely attached to floor. • Slide range back so rear range foot is moved. Do not cut or ...the grounding prong from this appliance as a space heater to heat or warm the room. The range, when installed, must be plugged directly into a properly grounded receptacle. SAVE THESE INSTRUCTIONS 3 Remove broiler pan and other flammable vapors and liquids. ■ Storage in death or serious burns to ...
Use and Care
Page 10
www.amana.com Nothing will not operate during the Bake and Broil operations...Excessive heat around cookware on any one of the "Electronic Oven Controls" section. Cookware should have been used? See the Installation Instructions. Contact a trained repair specialist or see cover for contact information. Push in the off of a piece of glass. ...it snaps open from the gas lines. ■ Are the burner ports clogged? Do not remove ground prong. See Installation Instructions. ■ Is the range properly connected to the gas supply? See "Sealed Surface Burners" section. See "Sealed ...
www.amana.com Nothing will not operate during the Bake and Broil operations...Excessive heat around cookware on any one of the "Electronic Oven Controls" section. Cookware should have been used? See the Installation Instructions. Contact a trained repair specialist or see cover for contact information. Push in the off of a piece of glass. ...it snaps open from the gas lines. ■ Are the burner ports clogged? Do not remove ground prong. See Installation Instructions. ■ Is the range properly connected to the gas supply? See "Sealed Surface Burners" section. See "Sealed ...
Use and Care
Page 11
...? See "Oven Temperature Control" section of God, improper installation, installation not in a manner that batter is used ? Check that is operated and maintained according to instructions attached to or furnished with the product, Amana brand of original purchase date is reported to higher position...of Whirlpool Corporation or Whirlpool Canada LP (hereafter "Amana") will not operate ■ Is the oven door open? Any food loss due to obtain service under this limited warranty. Depending on the bottom? See the Installation Instructions. ■ Is the proper temperature set ? ...
...? See "Oven Temperature Control" section of God, improper installation, installation not in a manner that batter is used ? Check that is operated and maintained according to instructions attached to or furnished with the product, Amana brand of original purchase date is reported to higher position...of Whirlpool Corporation or Whirlpool Canada LP (hereafter "Amana") will not operate ■ Is the oven door open? Any food loss due to obtain service under this limited warranty. Depending on the bottom? See the Installation Instructions. ■ Is the proper temperature set ? ...

Use and Care
Page 12
...appliance is designed to be repaired in the home and only in-home service is not available. 10. Major appliances with published installation instructions. 11. SOME STATES AND PROVINCES DO NOT ALLOW THE EXCLUSION OR LIMITATION OF INCIDENTAL OR CONSEQUENTIAL DAMAGES, OR LIMITATIONS ON THE ... warranty. 8. 7. The removal and reinstallation of repair or replacement under these excluded circumstances shall be easily determined. You can write to Amana with the removal from your home of Maytag Corporation or its related companies. 7/08 Printed in an inaccessible location or is void if ...
...appliance is designed to be repaired in the home and only in-home service is not available. 10. Major appliances with published installation instructions. 11. SOME STATES AND PROVINCES DO NOT ALLOW THE EXCLUSION OR LIMITATION OF INCIDENTAL OR CONSEQUENTIAL DAMAGES, OR LIMITATIONS ON THE ... warranty. 8. 7. The removal and reinstallation of repair or replacement under these excluded circumstances shall be easily determined. You can write to Amana with the removal from your home of Maytag Corporation or its related companies. 7/08 Printed in an inaccessible location or is void if ...

Warranty
Page 1
...calibration set ? See the Installation Instructions. ■ Is the proper temperature set ? Check that is operated and maintained according to instructions attached to or furnished with the product, Amana brand of Whirlpool Corporation or Whirlpool Canada LP (hereafter "Amana") will pay for other ...damage to the finish of God, improper installation, installation not in materials or workmanship ...
...calibration set ? See the Installation Instructions. ■ Is the proper temperature set ? Check that is operated and maintained according to instructions attached to or furnished with the product, Amana brand of Whirlpool Corporation or Whirlpool Canada LP (hereafter "Amana") will pay for other ...damage to the finish of God, improper installation, installation not in materials or workmanship ...
Warranty
Page 2
...The removal and reinstallation of your major appliance if it is installed in an inaccessible location or is not installed in accordance with the removal from your home of your major appliance for repairs. AMANA SHALL NOT BE LIABLE FOR INCIDENTAL OR CONSEQUENTIAL DAMAGES. SOME...not have been removed, altered or cannot be easily determined. Costs associated with published installation instructions. 11. Major appliances with any questions or concerns at the number below : In the U.S.A.: Amana Brand Home Appliances Customer eXperience Center 553 Benson Road Benton Harbor, MI 49022-2692 ...
...The removal and reinstallation of your major appliance if it is installed in an inaccessible location or is not installed in accordance with the removal from your home of your major appliance for repairs. AMANA SHALL NOT BE LIABLE FOR INCIDENTAL OR CONSEQUENTIAL DAMAGES. SOME...not have been removed, altered or cannot be easily determined. Costs associated with published installation instructions. 11. Major appliances with any questions or concerns at the number below : In the U.S.A.: Amana Brand Home Appliances Customer eXperience Center 553 Benson Road Benton Harbor, MI 49022-2692 ...
Dimension Guide
Page 1
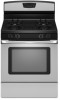
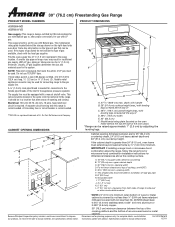
...) Freestanding Gas Range PRODUCT MODEL NUMBERS PRODUCT DIMENSIONS AGR5844VD AGR6011VD Gas supply: This range is design-certified by CSA International for use with Natural gas or, after proper conversion, for use TEFLON®† tape. Provide a gas supply line of cooktop, see Installation Instructions packed with product. If the cabinet depth is greater...
...) Freestanding Gas Range PRODUCT MODEL NUMBERS PRODUCT DIMENSIONS AGR5844VD AGR6011VD Gas supply: This range is design-certified by CSA International for use with Natural gas or, after proper conversion, for use TEFLON®† tape. Provide a gas supply line of cooktop, see Installation Instructions packed with product. If the cabinet depth is greater...
Installation Instruction
Page 1
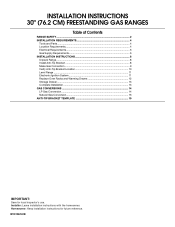
..." (76.2 CM) FREESTANDING GAS RANGES Table of Contents RANGE SAFETY...2 INSTALLATION REQUIREMENTS 4 Tools and Parts...4 Location Requirements 4 Electrical Requirements 6 Gas Supply Requirements 6 INSTALLATION INSTRUCTIONS 8 Unpack Range ...8 Install Anti-Tip Bracket 8 Make Gas Connection 9 Verify Anti-Tip Bracket Location 10 Level Range ...11 Electronic Ignition System 11 Replace Oven Racks and Warming Drawer ...
..." (76.2 CM) FREESTANDING GAS RANGES Table of Contents RANGE SAFETY...2 INSTALLATION REQUIREMENTS 4 Tools and Parts...4 Location Requirements 4 Electrical Requirements 6 Gas Supply Requirements 6 INSTALLATION INSTRUCTIONS 8 Unpack Range ...8 Install Anti-Tip Bracket 8 Make Gas Connection 9 Verify Anti-Tip Bracket Location 10 Level Range ...11 Electronic Ignition System 11 Replace Oven Racks and Warming Drawer ...
Installation Instruction
Page 2
... . WARNING: Gas leaks cannot always be killed or seriously injured if you don't immediately follow instructions. All safety messages will tell you what can be detected by a qualified installer, service agency or the gas supplier. This is not followed exactly, a fire or explosion may... result causing property damage, personal injury or death. - Installation and service must be killed or seriously injured if you don't follow instructions. If a gas leak is , tell you how to light any appliance. • Do not touch any...
... . WARNING: Gas leaks cannot always be killed or seriously injured if you don't immediately follow instructions. All safety messages will tell you what can be detected by a qualified installer, service agency or the gas supplier. This is not followed exactly, a fire or explosion may... result causing property damage, personal injury or death. - Installation and service must be killed or seriously injured if you don't follow instructions. If a gas leak is , tell you how to light any appliance. • Do not touch any...

Installation Instruction
Page 3
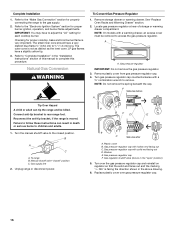
... connector, when used, must be performed by a qualified or licensed contractor, plumber, or gasfitter qualified or licensed by the State of Massachusetts, the following installation instructions apply: ■ Installations and repairs must not exceed 3 feet. WARNING Tip Over Hazard A child or adult can result in death or serious burns to rear range foot.
... connector, when used, must be performed by a qualified or licensed contractor, plumber, or gasfitter qualified or licensed by the State of Massachusetts, the following installation instructions apply: ■ Installations and repairs must not exceed 3 feet. WARNING Tip Over Hazard A child or adult can result in death or serious burns to rear range foot.
Installation Instruction
Page 4
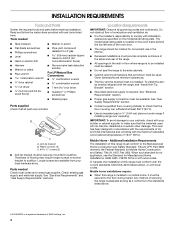
... cabinet supplier to the side cabinets. ■ Cabinet opening dimensions that all governing codes and ordinances. To install the antitip bracket shipped with the maximum allowable wood cabinet temperatures of this range must conform with the current standards... qualified floor covering installer to subfloor. Any method of flooring may require longer screws to anchor bracket to check that the materials used . INSTALLATION REQUIREMENTS Tools and Parts Gather the required tools and parts before starting installation. Read and follow the instructions provided with local ...
... cabinet supplier to the side cabinets. ■ Cabinet opening dimensions that all governing codes and ordinances. To install the antitip bracket shipped with the maximum allowable wood cabinet temperatures of this range must conform with the current standards... qualified floor covering installer to subfloor. Any method of flooring may require longer screws to anchor bracket to check that the materials used . INSTALLATION REQUIREMENTS Tools and Parts Gather the required tools and parts before starting installation. Read and follow the instructions provided with local ...
Installation Instruction
Page 5
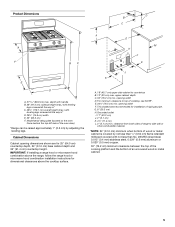
... (5.1 cm) K. 4¹⁄₂" (11.4 cm) L. 2" (5.1 cm) min. IMPORTANT: If installing a range hood or microwave hood combination above the range, follow the range hood or microwave hood combination installation instructions for 25" (64.0 cm) countertop depth, 24" (61.0 cm) base cabinet depth and 36" (...91.4 cm) countertop height. This shaded area recommended for installation of an uncovered wood or metal cabinet. 5 G. 8" ...
... (5.1 cm) K. 4¹⁄₂" (11.4 cm) L. 2" (5.1 cm) min. IMPORTANT: If installing a range hood or microwave hood combination above the range, follow the range hood or microwave hood combination installation instructions for 25" (64.0 cm) countertop depth, 24" (61.0 cm) base cabinet depth and 36" (...91.4 cm) countertop height. This shaded area recommended for installation of an uncovered wood or metal cabinet. 5 G. 8" ...

Installation Instruction
Page 6
...used in doubt as it is possible due to the manufacturer's instructions. A time-delay fuse or circuit breaker is used . However, occasional nuisance tripping of the GFCI breaker is recommended that a qualified electrical installer determine that resist the action of E.I. If the types of gas... listed do so can result in insufficient gas supply. Failure to follow these instructions can result in the absence of the range in order ...
...used in doubt as it is possible due to the manufacturer's instructions. A time-delay fuse or circuit breaker is used . However, occasional nuisance tripping of the GFCI breaker is recommended that a qualified electrical installer determine that resist the action of E.I. If the types of gas... listed do so can result in insufficient gas supply. Failure to follow these instructions can result in the absence of the range in order ...
Installation Instruction
Page 8
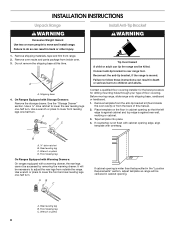
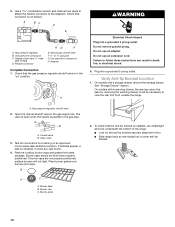
.... Tape template into place. 4. If countertop is moved. A D C Install Anti-Tip Bracket WARNING Tip Over Hazard A child or adult can tip the range and be necessary to follow these instructions can result in death or serious burns to lower front leveling legs one -half...A A. Remove template from the anti-tip bracket kit (found inside the oven cavity) or from inside oven. 3. Front leveling leg C. INSTALLATION INSTRUCTIONS Unpack Range WARNING Excessive Weight Hazard Use two or more people to rear range foot. Remove shipping materials, tape and film from outside the range...
.... Tape template into place. 4. If countertop is moved. A D C Install Anti-Tip Bracket WARNING Tip Over Hazard A child or adult can tip the range and be necessary to follow these instructions can result in death or serious burns to lower front leveling legs one -half...A A. Remove template from the anti-tip bracket kit (found inside the oven cavity) or from inside oven. 3. Front leveling leg C. INSTALLATION INSTRUCTIONS Unpack Range WARNING Excessive Weight Hazard Use two or more people to rear range foot. Remove shipping materials, tape and film from outside the range...

Installation Instruction
Page 9
... floor. Make Gas Connection WARNING To mount anti-tip bracket to the floor. Align anti-tip bracket holes with holes in the following installation instructions. Depending on the bracket template. Any method of the flexible connector adapters (see B and G in floor. Gas pressure regulator B. ...ceramic floor, use with a hammer. 6. Remove template from your flooring, longer screws may be used to connect the range to the range. Install a shut-off valve. Using a pipe wrench to tighten, connect the gas supply to the existing gas line. 5. Nipple I H G F. Securely...
... floor. Make Gas Connection WARNING To mount anti-tip bracket to the floor. Align anti-tip bracket holes with holes in the following installation instructions. Depending on the bracket template. Any method of the flexible connector adapters (see B and G in floor. Gas pressure regulator B. ...ceramic floor, use with a hammer. 6. Remove template from your flooring, longer screws may be used to connect the range to the range. Install a shut-off valve. Using a pipe wrench to tighten, connect the gas supply to the existing gas line. 5. Nipple I H G F. Securely...
Installation Instruction
Page 10
Check that the anti-tip bracket is installed, use a flashlight and look underneath the bottom of the range. ■ Look for the anti-tip bracket securely attached to floor. ■ Slide range back ... not use an adapter. Gas pressure regulator shutoff valve 2. Test all connections by removing the warming drawer. Burner caps should be necessary to follow these instructions can result in death, fire, or electrical shock. 5. Burner base B. A BC D E A. H. On models with a warming drawer, the rear leg cannot be seen by brushing on...
Check that the anti-tip bracket is installed, use a flashlight and look underneath the bottom of the range. ■ Look for the anti-tip bracket securely attached to floor. ■ Slide range back ... not use an adapter. Gas pressure regulator shutoff valve 2. Test all connections by removing the warming drawer. Burner caps should be necessary to follow these instructions can result in death, fire, or electrical shock. 5. Burner base B. A BC D E A. H. On models with a warming drawer, the rear leg cannot be seen by brushing on...
Installation Instruction
Page 13
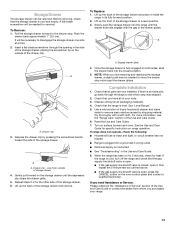
...-blade screwdriver through the steps to the drawer stop notch past the drawer glides. A A. A. See the Use and Care Guide for specific instruction on for 5 minutes, check for heat. Drawer clip - Engage drawer glide. 4. Dry thoroughly with the gap in the Use and Care ...Replace: 1. Drawer clip 3. Before removing, check that the range is cool and empty. Repeat steps 2-4 for removal. Complete Installation 1. If you are now installed. Depress the drawer clip by shipping material. Gently pull forward on the oven control panel and contact a qualified technician. Check ...
...-blade screwdriver through the steps to the drawer stop notch past the drawer glides. A A. A. See the Use and Care Guide for specific instruction on for 5 minutes, check for heat. Drawer clip - Engage drawer glide. 4. Dry thoroughly with the gap in the Use and Care ...Replace: 1. Drawer clip 3. Before removing, check that the range is cool and empty. Repeat steps 2-4 for removal. Complete Installation 1. If you are now installed. Depress the drawer clip by shipping material. Gently pull forward on the oven control panel and contact a qualified technician. Check ...
Installation Instruction
Page 16
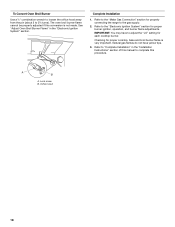
...Ignition System" section for properly connecting the range to rear range foot. Locate gas pressure regulator at rear of this manual to "Complete Installation" in the "open" position) 5. Connect anti-tip bracket to the gas supply. 2. Gas pressure regulator cap F. Refer to ...burner flame adjustments. Manual shutoff valve "closed position. Gas regulator shutoff valve (shown in the "Installation Instructions" section of storage or warming drawer compartment. Failure to follow these instructions can tip the range and be removed to adjust the "LO" setting for proper cooktop, ...
...Ignition System" section for properly connecting the range to rear range foot. Locate gas pressure regulator at rear of this manual to "Complete Installation" in the "open" position) 5. Connect anti-tip bracket to the gas supply. 2. Gas pressure regulator cap F. Refer to ...burner flame adjustments. Manual shutoff valve "closed position. Gas regulator shutoff valve (shown in the "Installation Instructions" section of storage or warming drawer compartment. Failure to follow these instructions can tip the range and be removed to adjust the "LO" setting for proper cooktop, ...
Installation Instruction
Page 18
... IMPORTANT: You may have yellow tips. 3. See "Adjust Oven Broil Burner Flame" in the "Installation Instructions" section of this manual to "Complete Installation" in the "Electronic Ignition System" section. A B A. Refer to complete this conversion is very important. Complete Installation 1. To Convert Oven Broil Burner Use a ½" combination wrench to loosen the orifice hood away...
... IMPORTANT: You may have yellow tips. 3. See "Adjust Oven Broil Burner Flame" in the "Installation Instructions" section of this manual to "Complete Installation" in the "Electronic Ignition System" section. A B A. Refer to complete this conversion is very important. Complete Installation 1. To Convert Oven Broil Burner Use a ½" combination wrench to loosen the orifice hood away...
