Specifications Sheet
Page 2
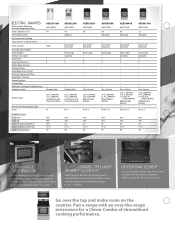
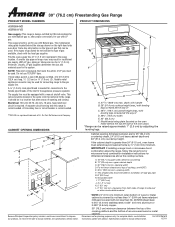
...⁄8" 297⁄8" 25" 2711⁄16" 36" 467⁄8" 297⁄8" 25" 2711⁄16" 36" EXTRA-LARGE OVEN WINDOW It's the window to Cooktop (E) 467⁄8" 297⁄8" 241⁄2" 2711⁄16" 36" 467⁄8" 297⁄8" 25" 2711⁄16" 36" 467⁄8" 297⁄8" 25" ...500-Watt Ribbon Radiant Elements . Easy Touch Electronic . Keep a close eye on the counter. But the raised edges and upswept backguard on this smooth-surface cooktop make room on your sole-the broiled sole with the heating element hidden under the floor of sight. Pair a range with an over the top...
...⁄8" 297⁄8" 25" 2711⁄16" 36" 467⁄8" 297⁄8" 25" 2711⁄16" 36" EXTRA-LARGE OVEN WINDOW It's the window to Cooktop (E) 467⁄8" 297⁄8" 241⁄2" 2711⁄16" 36" 467⁄8" 297⁄8" 25" 2711⁄16" 36" 467⁄8" 297⁄8" 25" ...500-Watt Ribbon Radiant Elements . Easy Touch Electronic . Keep a close eye on the counter. But the raised edges and upswept backguard on this smooth-surface cooktop make room on your sole-the broiled sole with the heating element hidden under the floor of sight. Pair a range with an over the top...
Specifications Sheet
Page 3
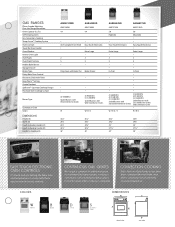
...Broiler Type Delay-Bake Oven Control Electronic Clock with Timer Keep Warm™ Setting Control Lockout Spillsaver™ Upswept Cooktop Design Porcelain Steel Cooktop Surface Burner Type Continuous Grate Colors DIMENSIONS Height (A) Width (B) Depth Excluding Handle (C) Depth Including Handle (D) ...(4) 9,500 BTU Sealed Burners with Wire Steel Burner Grates . . (3) 9,500 BTU (1) 11,500 BTU Sealed Burners with these easy-to Cooktop (E) AGR3311WD AMV1160VA 4.4 AGR4433XD AMV1160VA 4.4 . Colors CONTINUOUS GAS GRATES We've got it covered. An additional grate fits between the burner grates...
...Broiler Type Delay-Bake Oven Control Electronic Clock with Timer Keep Warm™ Setting Control Lockout Spillsaver™ Upswept Cooktop Design Porcelain Steel Cooktop Surface Burner Type Continuous Grate Colors DIMENSIONS Height (A) Width (B) Depth Excluding Handle (C) Depth Including Handle (D) ...(4) 9,500 BTU Sealed Burners with Wire Steel Burner Grates . . (3) 9,500 BTU (1) 11,500 BTU Sealed Burners with these easy-to Cooktop (E) AGR3311WD AMV1160VA 4.4 AGR4433XD AMV1160VA 4.4 . Colors CONTINUOUS GAS GRATES We've got it covered. An additional grate fits between the burner grates...
Specifications Sheet
Page 4
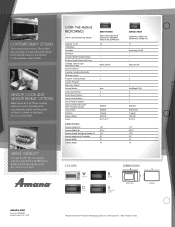
...⁄16" 91⁄2" 21" 14" Colors W White D Silver B Black S Stainless Steel DIMENSIONS FRONT VIEW SIDE VIEW amana.com Form No. Extra-Large On/Off . . . CONTEMPORARY STYLING The hottest look in the U.S.A. 12/09 ®Registered trademark... 1,000 Watts Turntable Wire Rack Scrolling Word Prompt Display 24-Hour Digital Clock with Timer Cooktop Surface Light with Timer Delay Control Lockout Cooking Complete Reminder 10 Power Levels Program Cooking Stages... D / S 171⁄4" 2915 ⁄16" 157⁄16" 91⁄2" 21" 14" AMV2174VA AER5844VA, AER6011VA AGR5844VD, AGR6011VD 1.7 .
...⁄16" 91⁄2" 21" 14" Colors W White D Silver B Black S Stainless Steel DIMENSIONS FRONT VIEW SIDE VIEW amana.com Form No. Extra-Large On/Off . . . CONTEMPORARY STYLING The hottest look in the U.S.A. 12/09 ®Registered trademark... 1,000 Watts Turntable Wire Rack Scrolling Word Prompt Display 24-Hour Digital Clock with Timer Cooktop Surface Light with Timer Delay Control Lockout Cooking Complete Reminder 10 Power Levels Program Cooking Stages... D / S 171⁄4" 2915 ⁄16" 157⁄16" 91⁄2" 21" 14" AMV2174VA AER5844VA, AER6011VA AGR5844VD, AGR6011VD 1.7 .
Use and Care
Page 1
Table of Contents RANGE SAFETY 2 The Anti-Tip Bracket 3 FEATURE GUIDE 4 COOKTOP USE 5 Sealed Surface Burners 5 OVEN USE 6 Electronic Oven Controls 6 Aluminum Foil 7 Positioning Racks and Bakeware 7 Oven Vent 7 Baking and Roasting 7 Broiling 7 Convection Baking and Roasting 7 ... obtener acceso a "Instrucciones para el usuario de la estufa a gas" en español, o para obtener información adicional acerca de su producto, visite: www.amana.com Tenga listo su número de modelo completo. Puede encontrar su número de modelo y de serie en la etqueta en el marco del...
Table of Contents RANGE SAFETY 2 The Anti-Tip Bracket 3 FEATURE GUIDE 4 COOKTOP USE 5 Sealed Surface Burners 5 OVEN USE 6 Electronic Oven Controls 6 Aluminum Foil 7 Positioning Racks and Bakeware 7 Oven Vent 7 Baking and Roasting 7 Broiling 7 Convection Baking and Roasting 7 ... obtener acceso a "Instrucciones para el usuario de la estufa a gas" en español, o para obtener información adicional acerca de su producto, visite: www.amana.com Tenga listo su número de modelo completo. Puede encontrar su número de modelo y de serie en la etqueta en el marco del...
Use and Care
Page 5
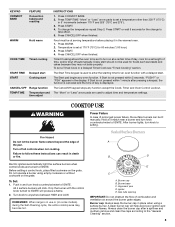
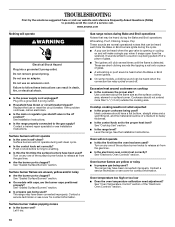
...than 350°F (175°C) in place when using empty cookware or without cookware on some models) during the Self-Cleaning cycle, the entire cooktop area may not bake properly. or "PSH" appears in the warmed oven. 1. After burner lights, turn knob counterclockwise to IGNITE. To Set:.../TIME "More" or "Less" arrow pads to IGNITE. Delay start CANCEL/OFF Range function TEMP/TIME Temperature and time adjust INSTRUCTIONS 1. COOKTOP USE WARNING Fire Hazard Do not let the burner flame extend beyond the edge of combustion and ventilation air around the burner grate edges. Before...
...than 350°F (175°C) in place when using empty cookware or without cookware on some models) during the Self-Cleaning cycle, the entire cooktop area may not bake properly. or "PSH" appears in the warmed oven. 1. After burner lights, turn knob counterclockwise to IGNITE. To Set:.../TIME "More" or "Less" arrow pads to IGNITE. Delay start CANCEL/OFF Range function TEMP/TIME Temperature and time adjust INSTRUCTIONS 1. COOKTOP USE WARNING Fire Hazard Do not let the burner flame extend beyond the edge of combustion and ventilation air around the burner grate edges. Before...
Use and Care
Page 6
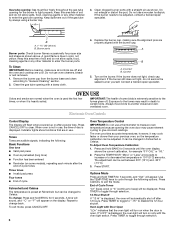
... temperature calibration can be adjusted. OVEN USE Odors and smoke are cool. If the burner needs to the fumes given off and the oven and cooktop are normal when the oven is used the first few times, or when it may result in Fahrenheit or Celsius. A tone will sound, and "°...
... temperature calibration can be adjusted. OVEN USE Odors and smoke are cool. If the burner needs to the fumes given off and the oven and cooktop are normal when the oven is used the first few times, or when it may result in Fahrenheit or Celsius. A tone will sound, and "°...
Use and Care
Page 8
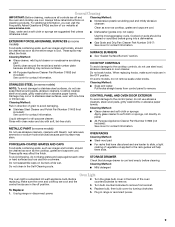
... CANCEL/OFF to clear the display. 4. If the temperature is for heavy soil. Always move or bend the gasket. ■ Remove plastic items from the cooktop because they may result in burns. Do not clean, rub, damage or move freely. The last 30 minutes of day to start time/delay oven...
... CANCEL/OFF to clear the display. 4. If the temperature is for heavy soil. Always move or bend the gasket. ■ Remove plastic items from the cooktop because they may result in burns. Do not clean, rub, damage or move freely. The last 30 minutes of day to start time/delay oven...
Use and Care
Page 9
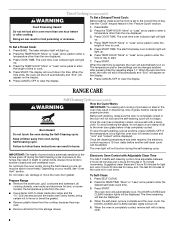
... cover for contact information. To Replace: 1. Cleaning Method: ■ Nonabrasive plastic scrubbing pad and mildly abrasive cleanser: Clean as soon as cooktop, grates and caps are cool. EXTERIOR PORCELAIN ENAMEL SURFACES (on panel. ■ All-Purpose Appliance Cleaner Part Number 31682 (not included): ... should be soaked or scrubbed before cleaning. Damage may affect the finish. Do not clean in the back of our website at www.amana.com. Liquid detergent or all controls are off position. 2. These spills may occur to remove. 3. Unplug range or disconnect power. ...
... cover for contact information. To Replace: 1. Cleaning Method: ■ Nonabrasive plastic scrubbing pad and mildly abrasive cleanser: Clean as soon as cooktop, grates and caps are cool. EXTERIOR PORCELAIN ENAMEL SURFACES (on panel. ■ All-Purpose Appliance Cleaner Part Number 31682 (not included): ... should be soaked or scrubbed before cleaning. Damage may affect the finish. Do not clean in the back of our website at www.amana.com. Liquid detergent or all controls are off position. 2. These spills may occur to remove. 3. Unplug range or disconnect power. ...
Use and Care
Page 10
... converted improperly. Ideal cookware should not extend more than ½" (1.3 cm) outside the cooking area. Turn on and off. www.amana.com Nothing will click several times until the flame is detected. Surface burners will make a single pop when it dry. 10 Contact ...ports clogged? See the Installation Instructions. Do not remove ground prong. Cookware should have been used ? Do not use an adapter. Turn on cooktop ■ Is the cookware the proper size? See "Sealed Surface Burners" section. See "Oven Temperature Control" section of a service call an...
... converted improperly. Ideal cookware should not extend more than ½" (1.3 cm) outside the cooking area. Turn on and off. www.amana.com Nothing will click several times until the flame is detected. Surface burners will make a single pop when it dry. 10 Contact ...ports clogged? See the Installation Instructions. Do not remove ground prong. Cookware should have been used ? Do not use an adapter. Turn on cooktop ■ Is the cookware the proper size? See "Sealed Surface Burners" section. See "Oven Temperature Control" section of a service call an...
Dimension Guide
Page 1
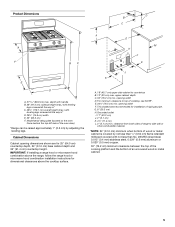
...8" (20.3 cm) H. Because Whirlpool Corporation policy includes a continuous commitment to improve our products, we reserve the right to top of cooktop, see Installation Instructions packed with leveling legs screwed all the way in the system. A time-delay fuse or circuit breaker is recommended. &#...(45.7 cm) upper side cabinet to the range location. 30" (76.2 cm) Freestanding Gas Range PRODUCT MODEL NUMBERS PRODUCT DIMENSIONS AGR5844VD AGR6011VD Gas supply: This range is design-certified by CSA International for use with Natural gas or, after proper conversion, for use with not ...
...8" (20.3 cm) H. Because Whirlpool Corporation policy includes a continuous commitment to improve our products, we reserve the right to top of cooktop, see Installation Instructions packed with leveling legs screwed all the way in the system. A time-delay fuse or circuit breaker is recommended. &#...(45.7 cm) upper side cabinet to the range location. 30" (76.2 cm) Freestanding Gas Range PRODUCT MODEL NUMBERS PRODUCT DIMENSIONS AGR5844VD AGR6011VD Gas supply: This range is design-certified by CSA International for use with Natural gas or, after proper conversion, for use with not ...
Installation Instruction
Page 5
...or metal cabinet. 5 E. 30¹⁄₈" (76.5 cm) min. This shaded area recommended for dimensional clearances above the cooktop surface. depth with handle B. 36" (91.4 cm) cooktop height (max.) with leveling legs screwed all the way in* C. 46⁷⁄₈" (119.1 cm) overall height (max...adjusting the leveling legs. clearance from both sides of range to side wall or other combustible material. *NOTE: 24" (61.0 cm) minimum when bottom of cooktop, see NOTE*. Product Dimensions M A F BC E D A. 27 69.9 cm) max. Model/serial rating plate (located on the oven frame behind ...
...or metal cabinet. 5 E. 30¹⁄₈" (76.5 cm) min. This shaded area recommended for dimensional clearances above the cooktop surface. depth with handle B. 36" (91.4 cm) cooktop height (max.) with leveling legs screwed all the way in* C. 46⁷⁄₈" (119.1 cm) overall height (max...adjusting the leveling legs. clearance from both sides of range to side wall or other combustible material. *NOTE: 24" (61.0 cm) minimum when bottom of cooktop, see NOTE*. Product Dimensions M A F BC E D A. 27 69.9 cm) max. Model/serial rating plate (located on the oven frame behind ...
Installation Instruction
Page 10
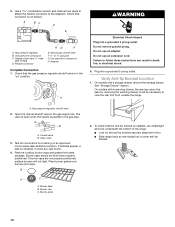
... outlet. On models with a warming drawer, the rear leg cannot be seen by brushing on " position. It will not light. A. A B A. Closed valve B. Open valve 3. Remove cooktop burner caps and grates from outside the range. If burner caps are not properly positioned, surface burners will be level when properly positioned. Burner cap...
... outlet. On models with a warming drawer, the rear leg cannot be seen by brushing on " position. It will not light. A. A B A. Closed valve B. Open valve 3. Remove cooktop burner caps and grates from outside the range. If burner caps are not properly positioned, surface burners will be level when properly positioned. Burner cap...
Installation Instruction
Page 11
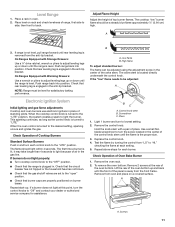
... of air in the center of the valve stem. Push range back into position. Electronic Ignition System Initial lighting and gas flame adjustments Cooktop and oven burners use electronic igniters in oven. 2. The flame should be adjusted using the adjustment screw in the gas line. The ... 1. Test the flame by turning the control from oven and place on burner bases. Repeat above steps for assistance. Place a rack in place of Cooktop Burners Standard Surface Burners Push in and turn the screw located in . Push range back into position. NOTE: Range must be adjusted: A B C...
... of air in the center of the valve stem. Push range back into position. Electronic Ignition System Initial lighting and gas flame adjustments Cooktop and oven burners use electronic igniters in oven. 2. The flame should be adjusted using the adjustment screw in the gas line. The ... 1. Test the flame by turning the control from oven and place on burner bases. Repeat above steps for assistance. Place a rack in place of Cooktop Burners Standard Surface Burners Push in and turn the screw located in . Push range back into position. NOTE: Range must be adjusted: A B C...
Installation Instruction
Page 15
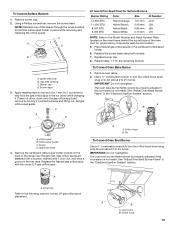
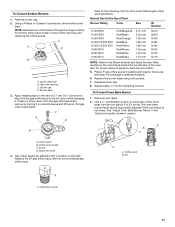
... spud holder located on the oven frame behind the top left side of the oven door for proper sizing of the screws through the range cooktop to the following chart for the remaining burners. To Convert Oven Bake Burner 1. A A. Burner base 3.
... spud holder located on the oven frame behind the top left side of the oven door for proper sizing of the screws through the range cooktop to the following chart for the remaining burners. To Convert Oven Bake Burner 1. A A. Burner base 3.
Installation Instruction
Page 16
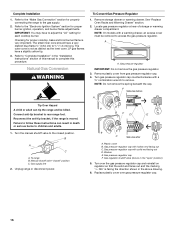
... this procedure. IMPORTANT: You may have a slightly yellow tip. 3. Connect anti-tip bracket to adjust the "LO" setting for proper cooktop, bake and broil burner flame is very important. Checking for each cooktop burner. LP gas flames have to rear range foot. Natural Gas Conversion WARNING To Convert Gas Pressure Regulator 1. Washer E.
... this procedure. IMPORTANT: You may have a slightly yellow tip. 3. Connect anti-tip bracket to adjust the "LO" setting for proper cooktop, bake and broil burner flame is very important. Checking for each cooktop burner. LP gas flames have to rear range foot. Natural Gas Conversion WARNING To Convert Gas Pressure Regulator 1. Washer E.
Installation Instruction
Page 17
..., remove the burner base. Orifice spud B. Remove oven racks. 2. A A. To Convert Surface Burners 1. Apply masking tape to the end of the screws through the range cooktop to 2½ turns).
..., remove the burner base. Orifice spud B. Remove oven racks. 2. A A. To Convert Surface Burners 1. Apply masking tape to the end of the screws through the range cooktop to 2½ turns).
Installation Instruction
Page 18
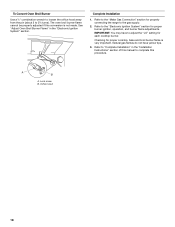
... properly adjusted if this procedure. Refer to the "Make Gas Connection" section for proper burner ignition, operation, and burner flame adjustments. Checking for each cooktop burner. To Convert Oven Broil Burner Use a ½" combination wrench to loosen the orifice hood away from the pin (about 2 to the gas ... to "Complete Installation" in the "Electronic Ignition System" section. Natural gas flames do not have to adjust the "LO" setting for proper cooktop, bake and broil burner flame is not made. Orifice hood 18 Refer to complete this conversion is very important.
... properly adjusted if this procedure. Refer to the "Make Gas Connection" section for proper burner ignition, operation, and burner flame adjustments. Checking for each cooktop burner. To Convert Oven Broil Burner Use a ½" combination wrench to loosen the orifice hood away from the pin (about 2 to the gas ... to "Complete Installation" in the "Electronic Ignition System" section. Natural gas flames do not have to adjust the "LO" setting for proper cooktop, bake and broil burner flame is not made. Orifice hood 18 Refer to complete this conversion is very important.
