

Use and Care
Page 3
... light any appliance. • Do not touch any electrical switch. • Do not use any other flammable vapors and liquids in this manual and on your building. • Immediately call the fire department. - All safety messages will follow instructions. WARNING: Gas leaks cannot always ...don't immediately follow the "What to cause cancer. WARNING: If the information in the vicinity of this or any phone in this manual is detected, follow instructions. Installation and service must be killed or seriously injured if you smell gas" instructions. This symbol alerts ...
... light any appliance. • Do not touch any electrical switch. • Do not use any other flammable vapors and liquids in this manual and on your building. • Immediately call the fire department. - All safety messages will follow instructions. WARNING: Gas leaks cannot always ...don't immediately follow the "What to cause cancer. WARNING: If the information in the vicinity of this or any phone in this manual is detected, follow instructions. Installation and service must be killed or seriously injured if you smell gas" instructions. This symbol alerts ...

Use and Care
Page 5
... E. Door gasket 5 The locations and appearances of the features shown here may have purchased may not match those of broiler door) E. PARTS AND FEATURES This manual covers several different models. Control Panel A B A. Broiler door G. Anti-tip bracket F. Oven temperature control knob D. Model and serial number plate (behind left side of your...
... E. Door gasket 5 The locations and appearances of the features shown here may have purchased may not match those of broiler door) E. PARTS AND FEATURES This manual covers several different models. Control Panel A B A. Broiler door G. Anti-tip bracket F. Oven temperature control knob D. Model and serial number plate (behind left side of your...

Use and Care
Page 7
... on , repeat previous steps for proper size and shape as shown. The oven burner should turn on the oven control knob. Support rods 4. Open the manual shutoff valve. 8. Burner ports To Clean: IMPORTANT: Before cleaning, make sure the pilot will stay lit after releasing the knob, repeat steps 5 and 6. 8. Replace surface... and the oven and cooktop are off after turning off the oven. Burner ports: Check burner flames occasionally for lighting oven pilot light. Close the manual shutoff valve. 2. A A.
... on , repeat previous steps for proper size and shape as shown. The oven burner should turn on the oven control knob. Support rods 4. Open the manual shutoff valve. 8. Burner ports To Clean: IMPORTANT: Before cleaning, make sure the pilot will stay lit after releasing the knob, repeat steps 5 and 6. 8. Replace surface... and the oven and cooktop are off after turning off the oven. Burner ports: Check burner flames occasionally for lighting oven pilot light. Close the manual shutoff valve. 2. A A.

Use and Care
Page 8
Do not enlarge or distort the port. Open the manual shutoff valve. 8. Ideal cookware should have a yellow tip, which affects cooking results. Cookware material is a factor in how quickly and evenly heat is best for ...-to cool. ■ Center the canner on the grate. ■ Do not place canner on low heat settings. Do not use a wooden toothpick. Close the manual shutoff valve. 2. Lift the cooktop by both sides while pressing the support rods back to medium heat settings. A A. Support rods 4. Do not use oven cleaners...
Do not enlarge or distort the port. Open the manual shutoff valve. 8. Ideal cookware should have a yellow tip, which affects cooking results. Cookware material is a factor in how quickly and evenly heat is best for ...-to cool. ■ Center the canner on the grate. ■ Do not place canner on low heat settings. Do not use a wooden toothpick. Close the manual shutoff valve. 2. Lift the cooktop by both sides while pressing the support rods back to medium heat settings. A A. Support rods 4. Do not use oven cleaners...

Dimension Guide
Page 1
... wall or other damage. The rigid pipe must be used in line. Du Pont Nemours and Company. LP gas conversion: Conversion must be equipped with a manual shutoff valve. NOTE: Pipe-joint compounds that resist the action of LP gas must be removed from the gas specified on the types of gas...
... wall or other damage. The rigid pipe must be used in line. Du Pont Nemours and Company. LP gas conversion: Conversion must be equipped with a manual shutoff valve. NOTE: Pipe-joint compounds that resist the action of LP gas must be removed from the gas specified on the types of gas...

Installation Instruction
Page 2
All safety messages will follow instructions. Do not store or use any phone in this manual is detected, follow instructions. Installation and service must be a T-handle type. ■ A flexible gas connector, when used, must be performed by a qualified or licensed contractor,... alerts you to reduce the chance of this or any electrical switch. • Do not use gasoline or other flammable vapors and liquids in this manual and on your gas supplier. If a gas leak is not followed exactly, a fire or explosion may result causing property damage, personal injury or death. - ...
All safety messages will follow instructions. Do not store or use any phone in this manual is detected, follow instructions. Installation and service must be a T-handle type. ■ A flexible gas connector, when used, must be performed by a qualified or licensed contractor,... alerts you to reduce the chance of this or any electrical switch. • Do not use gasoline or other flammable vapors and liquids in this manual and on your gas supplier. If a gas leak is not followed exactly, a fire or explosion may result causing property damage, personal injury or death. - ...

Installation Instruction
Page 5
..." section. LP gas conversion: Conversion must be equipped with Natural gas. Shutoff valve "open" position C. Gas Supply Pressure Testing Gas supply pressure for use with a manual shutoff valve. IMPORTANT: Leak testing of gas available, check with American National Standard, National Fuel Gas Code ANSI Z223.1 - It should be as an adjacent...
..." section. LP gas conversion: Conversion must be equipped with Natural gas. Shutoff valve "open" position C. Gas Supply Pressure Testing Gas supply pressure for use with a manual shutoff valve. IMPORTANT: Leak testing of gas available, check with American National Standard, National Fuel Gas Code ANSI Z223.1 - It should be as an adjacent...

Installation Instruction
Page 6
..., slide range onto shipping base, cardboard or hardboard. 6 Depending on the thickness of floor covering. Place them lengthwise on its individual manual shutoff valve during any pressure testing of the gas supply piping system at test pressures in cabinet opening is not flush with overhang. 1....or more people to engage the anti-tip bracket. Connect anti-tip bracket to adjust the rear legs. 8. Place template on top of this manual. 2. NOTE: If height adjustment is made when range is moved. Remove template from inside the oven cavity) or from the back of another...
..., slide range onto shipping base, cardboard or hardboard. 6 Depending on the thickness of floor covering. Place them lengthwise on its individual manual shutoff valve during any pressure testing of the gas supply piping system at test pressures in cabinet opening is not flush with overhang. 1....or more people to engage the anti-tip bracket. Connect anti-tip bracket to adjust the rear legs. 8. Place template on top of this manual. 2. NOTE: If height adjustment is made when range is moved. Remove template from inside the oven cavity) or from the back of another...
Installation Instruction
Page 8
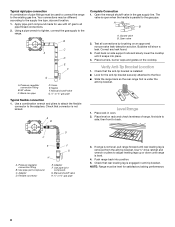
... adapters. B C A D E F G A. Use a combination wrench and pliers to attach the flexible connector to the range. Open the manual shutoff valve in oven. 2. Place burners, burner caps and grates on rack and check levelness of pipe fittings must be level for satisfactory baking ...so the rear range foot is under the anti-tip bracket. Pressure regulator connection fitting B. 90° elbow C. Black iron pipe D. Union E. Manual shutoff valve G. ½" or ¾" gas pipe Typical flexible connection 1. A B Complete Connection 1. The valve is open when the handle is...
... adapters. B C A D E F G A. Use a combination wrench and pliers to attach the flexible connector to the range. Open the manual shutoff valve in oven. 2. Place burners, burner caps and grates on rack and check levelness of pipe fittings must be level for satisfactory baking ...so the rear range foot is under the anti-tip bracket. Pressure regulator connection fitting B. 90° elbow C. Black iron pipe D. Union E. Manual shutoff valve G. ½" or ¾" gas pipe Typical flexible connection 1. A B Complete Connection 1. The valve is open when the handle is...
Installation Instruction
Page 11
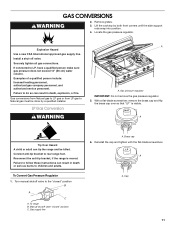
...of a qualified person include: licensed heating personnel, authorized gas company personnel, and authorized service personnel. Failure to children and adults. Turn manual shutoff valve to Natural gas must be killed. Cap 11 Remove grates. 3. Gas conversions from Natural gas to LP gas or from LP...and be done by both front corners until the side support rods snap into position. 4. GAS CONVERSIONS WARNING 2. If connected to rear range foot. Manual shutoff valve "closed " position B A C A. With a flat-blade screwdriver, remove the brass cap and flip the brass cap over so that ...
...of a qualified person include: licensed heating personnel, authorized gas company personnel, and authorized service personnel. Failure to children and adults. Turn manual shutoff valve to Natural gas must be killed. Cap 11 Remove grates. 3. Gas conversions from Natural gas to LP gas or from LP...and be done by both front corners until the side support rods snap into position. 4. GAS CONVERSIONS WARNING 2. If connected to rear range foot. Manual shutoff valve "closed " position B A C A. With a flat-blade screwdriver, remove the brass cap and flip the brass cap over so that ...
Installation Instruction
Page 13
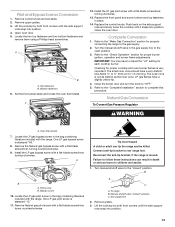
...stamped "15." 11. Bypass screw 10. Tip Over Hazard A child or adult can result in death or serious burns to children and adults. 1. Turn manual shutoff valve to adjust the "LO" setting for properly connecting the range to "OFF." 5. Gas supply line 2. Remove control knobs and set aside. 2....position. 4. Set the front panel aside and locate the oven thermostat. IMPORTANT: You may have a slightly yellow tip. 4. Open oven door. 5. Turn the manual shutoff valve in place. 14. The small inner cone should have a very distinct blue flame ¼" to ½" (0.64 cm to rear range foot. ...
...stamped "15." 11. Bypass screw 10. Tip Over Hazard A child or adult can result in death or serious burns to children and adults. 1. Turn manual shutoff valve to adjust the "LO" setting for properly connecting the range to "OFF." 5. Gas supply line 2. Remove control knobs and set aside. 2....position. 4. Set the front panel aside and locate the oven thermostat. IMPORTANT: You may have a slightly yellow tip. 4. Open oven door. 5. Turn the manual shutoff valve in place. 14. The small inner cone should have a very distinct blue flame ¼" to ½" (0.64 cm to rear range foot. ...

Installation Instruction
Page 15
... position. 3. Push back on the side support rods and slowly lower the cooktop until the side support rods snap into position. Complete Conversion 1. Turn the manual shutoff valve in place. 14.
... position. 3. Push back on the side support rods and slowly lower the cooktop until the side support rods snap into position. Complete Conversion 1. Turn the manual shutoff valve in place. 14.
