

Use and Care
Page 3
We have provided many important safety messages in the vicinity of this or any phone in this manual and on your gas supplier from a neighbor's phone. All safety messages will tell you what the potential hazard is not followed exactly, a fire or explosion ...may result causing property damage, personal injury or death. - Do not store or use gasoline or other flammable vapors and liquids in this manual is , tell you how to reduce the chance of California to the State of injury, and tell you what can be killed or seriously injured...
We have provided many important safety messages in the vicinity of this or any phone in this manual and on your gas supplier from a neighbor's phone. All safety messages will tell you what the potential hazard is not followed exactly, a fire or explosion ...may result causing property damage, personal injury or death. - Do not store or use gasoline or other flammable vapors and liquids in this manual is , tell you how to reduce the chance of California to the State of injury, and tell you what can be killed or seriously injured...

Use and Care
Page 5
Model and serial number plate (behind left side of the parts and features listed. PARTS AND FEATURES This manual covers several different models. The range you have some or all of broiler door) E. Left rear burner control B. Oven temperature control knob D. Oven vent B. Right ...
Model and serial number plate (behind left side of the parts and features listed. PARTS AND FEATURES This manual covers several different models. The range you have some or all of broiler door) E. Left rear burner control B. Oven temperature control knob D. Oven vent B. Right ...

Use and Care
Page 7
...a trained repair specialist. 5. Slowly lower the cooktop into place. 6. Replace surface grates. 7 Lift and pull out the flame spreader. Close the manual shutoff valve. 2. To Light Oven Pilot Light: 1. Remove the fasteners holding the flame spreader. Locate the pilot light on the next time a ...burner. 5. A A. Support rods 4. Oven bottom tray B. Do not use a wooden toothpick. Remove the surface burner grates. 3. Open the manual shutoff valve. 8. A C B A. If the oven pilot light turns off after turning off and the oven is cool. 2. Flame spreader 4.
...a trained repair specialist. 5. Slowly lower the cooktop into place. 6. Replace surface grates. 7 Lift and pull out the flame spreader. Close the manual shutoff valve. 2. To Light Oven Pilot Light: 1. Remove the fasteners holding the flame spreader. Locate the pilot light on the next time a ...burner. 5. A A. Support rods 4. Oven bottom tray B. Do not use a wooden toothpick. Remove the surface burner grates. 3. Open the manual shutoff valve. 8. A C B A. If the oven pilot light turns off after turning off and the oven is cool. 2. Flame spreader 4.

Use and Care
Page 8
... Clean: IMPORTANT: Before cleaning, make sure all types of aluminum. Do not use a wooden toothpick. Close the manual shutoff valve. 2. Support rods 4. Do not use oven cleaners, bleach or rust removers. 1. Open the manual shutoff valve. 8. Home Canning When canning for slow cooking. This allows time for most recently used under the...
... Clean: IMPORTANT: Before cleaning, make sure all types of aluminum. Do not use a wooden toothpick. Close the manual shutoff valve. 2. Support rods 4. Do not use oven cleaners, bleach or rust removers. 1. Open the manual shutoff valve. 8. Home Canning When canning for slow cooking. This allows time for most recently used under the...

Dimension Guide
Page 1
... convert the appliance from the gas specified on the types of gas that resist the action of LP gas must be used . Instructions packed with a manual shutoff valve. q This range is factory set for use with the range connection. See "Gas Conversions" section. Usually, LP gas suppliers determine the size and...
... convert the appliance from the gas specified on the types of gas that resist the action of LP gas must be used . Instructions packed with a manual shutoff valve. q This range is factory set for use with the range connection. See "Gas Conversions" section. Usually, LP gas suppliers determine the size and...

Installation Instruction
Page 2
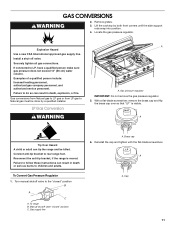
.... Follow the gas supplier's instructions. • If you to light any appliance. • Do not touch any phone in this manual and on your gas supplier from a neighbor's phone. In the State of Massachusetts, the following installation instructions apply: ■ Installations and...gas supplier. All safety messages will tell you and others are not followed. WARNING: If the information in the vicinity of this manual is detected, follow instructions. We have provided many important safety messages in your building. • Immediately call the fire department. ...
.... Follow the gas supplier's instructions. • If you to light any appliance. • Do not touch any phone in this manual and on your gas supplier from a neighbor's phone. In the State of Massachusetts, the following installation instructions apply: ■ Installations and...gas supplier. All safety messages will tell you and others are not followed. WARNING: If the information in the vicinity of this manual is detected, follow instructions. We have provided many important safety messages in your building. • Immediately call the fire department. ...

Installation Instruction
Page 5
... threads of 4% for each 1,000 ft (304.8 m) above the manifold pressure shown on the model/serial rating plate. †®TEFLON is for use with a manual shutoff valve. Du Pont De Nemours and Company. 5 This valve should be at a rate of the inlet to the gas supply line. B A Type of gas...
... threads of 4% for each 1,000 ft (304.8 m) above the manifold pressure shown on the model/serial rating plate. †®TEFLON is for use with a manual shutoff valve. Du Pont De Nemours and Company. 5 This valve should be at a rate of the inlet to the gas supply line. B A Type of gas...

Installation Instruction
Page 6
... Line pressure testing above ½ psi gauge (14" WCP) The range and its individual shutoff valve must be isolated from the back of this manual. 2. Do not use a 0.48 cm) masonry drill bit to the subfloor. Stack one cardboard corner on its back on the bracket template. Remove... base, cardboard or hardboard from range. Line pressure testing at test pressures in back or other 2 corners. Place template on its individual manual shutoff valve during any pressure testing of the gas supply piping system at test pressures equal to or less than that system at ½...
... Line pressure testing above ½ psi gauge (14" WCP) The range and its individual shutoff valve must be isolated from the back of this manual. 2. Do not use a 0.48 cm) masonry drill bit to the subfloor. Stack one cardboard corner on its back on the bracket template. Remove... base, cardboard or hardboard from range. Line pressure testing at test pressures in back or other 2 corners. Place template on its individual manual shutoff valve during any pressure testing of the gas supply piping system at test pressures equal to or less than that system at ½...
Installation Instruction
Page 8
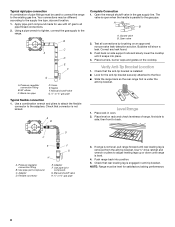
... 2. G. Check that connector is level. 4. according to the adapters. Apply pipe-joint compound made for satisfactory baking performance. 8 Open the manual shutoff valve in oven. 2. Flexible connector E. If range is not level, pull range forward until range is not kinked. A B Complete ...the cooktop until it snaps into position. 5. Check that the anti-tip bracket is under the anti-tip bracket. Level Range 1. Manual shutoff valve G. ½" or ¾" gas pipe Typical flexible connection 1. Correct any leak found. 3. Verify Anti-Tip Bracket ...
... 2. G. Check that connector is level. 4. according to the adapters. Apply pipe-joint compound made for satisfactory baking performance. 8 Open the manual shutoff valve in oven. 2. Flexible connector E. If range is not level, pull range forward until range is not kinked. A B Complete ...the cooktop until it snaps into position. 5. Check that the anti-tip bracket is under the anti-tip bracket. Level Range 1. Manual shutoff valve G. ½" or ¾" gas pipe Typical flexible connection 1. Correct any leak found. 3. Verify Anti-Tip Bracket ...
Installation Instruction
Page 11
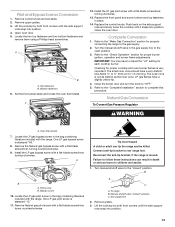
...and adults. LP Gas Conversion WARNING A A. With a flat-blade screwdriver, remove the brass cap and flip the brass cap over so that "LP" is moved. Manual shutoff valve "closed " position B A C A. Brass cap 6. Lift the cooktop by a qualified installer. NAT A Tip Over Hazard A child or adult can ... to do so can tip the range and be done by both front corners until the side support rods snap into position. 4. Turn manual shutoff valve to rear range foot. Cap 11 Gas pressure regulator IMPORTANT: Do not remove the gas pressure regulator. 5. To Convert Gas ...
...and adults. LP Gas Conversion WARNING A A. With a flat-blade screwdriver, remove the brass cap and flip the brass cap over so that "LP" is moved. Manual shutoff valve "closed " position B A C A. Brass cap 6. Lift the cooktop by a qualified installer. NAT A Tip Over Hazard A child or adult can ... to do so can tip the range and be done by both front corners until the side support rods snap into position. 4. Turn manual shutoff valve to rear range foot. Cap 11 Gas pressure regulator IMPORTANT: Do not remove the gas pressure regulator. 5. To Convert Gas ...
Installation Instruction
Page 13
... and locate the oven thermostat. Install the LP gas pilot screw with a flat-blade screwdriver, turning clockwise. Turn the manual shutoff valve in place. 14. Bypass screw 10. Manual shutoff valve "closed " position. Lift the cooktop by both front corners until the side support rods snap into position. ...4. Locate the LP gas bypass screw in death or serious burns to follow these instructions can tip the range and be killed. Turn manual shutoff valve to adjust the "LO" setting for proper cooktop and oven burner flames is very important. Bottom fasteners 6. Push back on ...
... and locate the oven thermostat. Install the LP gas pilot screw with a flat-blade screwdriver, turning clockwise. Turn the manual shutoff valve in place. 14. Bypass screw 10. Manual shutoff valve "closed " position. Lift the cooktop by both front corners until the side support rods snap into position. ...4. Locate the LP gas bypass screw in death or serious burns to follow these instructions can tip the range and be killed. Turn manual shutoff valve to adjust the "LO" setting for proper cooktop and oven burner flames is very important. Bottom fasteners 6. Push back on ...

Installation Instruction
Page 15
... remove them using a Phillips head screwdriver. 8. One LP gas bypass screw is stamped "94." 11. One Natural gas pilot screw is stamped "76." Turn the manual shutoff valve in the bag containing literature included with the range. Checking for each cooktop burner. Refer to the "Complete Installation" section to "OFF." 5. Lift...
... remove them using a Phillips head screwdriver. 8. One LP gas bypass screw is stamped "94." 11. One Natural gas pilot screw is stamped "76." Turn the manual shutoff valve in the bag containing literature included with the range. Checking for each cooktop burner. Refer to the "Complete Installation" section to "OFF." 5. Lift...
