
Use and Care
Page 1
... model and serial number, located on your appliance. If you don't follow instructions. All safety messages will need assistance, call us at www.amana.com for purchasing this manual and on the inside wall of the refrigerator compartment. W10208786A Table of Contents / Índice / Table des matières REFRIGERATOR SAFETY 1 INSTALLATION INSTRUCTIONS 2 REFRIGERATOR USE 11 REFRIGERATOR CARE 13 TROUBLESHOOTING 14 WATER FILTER CERTIFICATIONS 16 PRODUCT DATA SHEETS 17 WARRANTY 18 SEGURIDAD DEL REFRIGERADOR...
... model and serial number, located on your appliance. If you don't follow instructions. All safety messages will need assistance, call us at www.amana.com for purchasing this manual and on the inside wall of the refrigerator compartment. W10208786A Table of Contents / Índice / Table des matières REFRIGERATOR SAFETY 1 INSTALLATION INSTRUCTIONS 2 REFRIGERATOR USE 11 REFRIGERATOR CARE 13 TROUBLESHOOTING 14 WATER FILTER CERTIFICATIONS 16 PRODUCT DATA SHEETS 17 WARRANTY 18 SEGURIDAD DEL REFRIGERADOR...
Use and Care
Page 2
... small, pebble-size pieces. Glass shelves and covers are still dangerous - Important information to cover the floor with warm water and dry. ■ Do not use an extension cord. ■ Disconnect power before servicing. ■ Replace all packaging materials. even if they are cold. Rub a small amount of /recycle all parts and panels before operating. ■ Remove doors from your refrigerator before installing ice maker (on the refrigerator. Tempered glass is designed to...
... small, pebble-size pieces. Glass shelves and covers are still dangerous - Important information to cover the floor with warm water and dry. ■ Do not use an extension cord. ■ Disconnect power before servicing. ■ Replace all packaging materials. even if they are cold. Rub a small amount of /recycle all parts and panels before operating. ■ Remove doors from your refrigerator before installing ice maker (on the refrigerator. Tempered glass is designed to...
Use and Care
Page 3
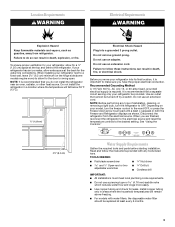
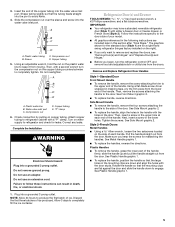
... tools listed here. TOOLS NEEDED: ■ Flat-blade screwdriver Nut driver and ¹⁄₂" Open-end or two adjustable wrenches Drill bit ■ Cordless drill IMPORTANT: ■ All installations must meet local plumbing code requirements. ■ Do not use an adapter. Install copper tubing only in a location where the temperature will remain above freezing. ■ For models with any type of installation, cleaning, or removing a light bulb, turn the freezer control to...
... tools listed here. TOOLS NEEDED: ■ Flat-blade screwdriver Nut driver and ¹⁄₂" Open-end or two adjustable wrenches Drill bit ■ Cordless drill IMPORTANT: ■ All installations must meet local plumbing code requirements. ■ Do not use an adapter. Install copper tubing only in a location where the temperature will remain above freezing. ■ For models with any type of installation, cleaning, or removing a light bulb, turn the freezer control to...
Use and Care
Page 4
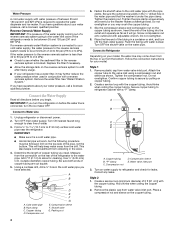
... copper tubing. Connect to operate the water dispenser and ice maker. Remove the water filter. Turn OFF main water supply. Find a ¹⁄₂" to 1¹⁄₄" (12.7 mm to Water Line 1. Remove plastic cap from water valve inlet port. Pipe clamp C. Place a compression nut and sleeve on the copper tubing as it will help keep water away from collecting in a container or sink, and turn ON the main water supply. Water Pressure A cold water supply...
... copper tubing. Connect to operate the water dispenser and ice maker. Remove the water filter. Turn OFF main water supply. Find a ¹⁄₂" to 1¹⁄₄" (12.7 mm to Water Line 1. Remove plastic cap from water valve inlet port. Pipe clamp C. Place a compression nut and sleeve on the copper tubing as it will help keep water away from collecting in a container or sink, and turn ON the main water supply. Water Pressure A cold water supply...
Use and Care
Page 5
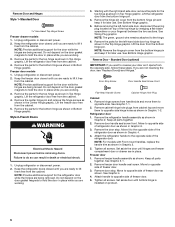
... overtighten. Plastic water line B. Copper tubing E. Do not use an extension cord. NOTE: Allow 24 hours to the upper end of ice. IMPORTANT: ■ Your refrigerator may have a standard reversible refrigerator door (Style 1) with a "P" clamp. Using a flat-blade screw driver wrapped in the door. Plastic Handles ■ To remove the handle, grasp the lower part of your model. ■ All graphics referenced in the following instructions are down...
... overtighten. Plastic water line B. Copper tubing E. Do not use an extension cord. NOTE: Allow 24 hours to the upper end of ice. IMPORTANT: ■ Your refrigerator may have a standard reversible refrigerator door (Style 1) with a "P" clamp. Using a flat-blade screw driver wrapped in the door. Plastic Handles ■ To remove the handle, grasp the lower part of your model. ■ All graphics referenced in the following instructions are down...
Use and Care
Page 6
... not reversing the door, see "Replace Door(s) and Hinges." Attach the refrigerator handle to the hinge. 6. Freezer door 1. Remove door stop . Set aside door until you are ready to do so can result in place. Keep the refrigerator door closed until hinges and freezer compartment door or drawer are working . 3. Unplug refrigerator or disconnect power. 2. NOTE: The green, ground wire remains attached to the opposite side of freezer door. 3. Set aside the door until you are in death or electrical...
... not reversing the door, see "Replace Door(s) and Hinges." Attach the refrigerator handle to the hinge. 6. Freezer door 1. Remove door stop . Set aside door until you are ready to do so can result in place. Keep the refrigerator door closed until hinges and freezer compartment door or drawer are working . 3. Unplug refrigerator or disconnect power. 2. NOTE: The green, ground wire remains attached to the opposite side of freezer door. 3. Set aside the door until you are in death or electrical...
Use and Care
Page 7
... are working . 2. Replace the parts for the refrigerator doors while the hinges are being moved. Tighten screws. NOTE: Provide additional support for the door while the hinges are being moved. NOTE: Provide additional support for the bottom hinge as shown in the drawer front. 3. Reconnect the wiring plug on the side of the refrigerator door is reversed. Remove and Replace Drawer Handle Metal Handles ■ Using a Allen wrench, loosen the two setscrews located on...
... are working . 2. Replace the parts for the refrigerator doors while the hinges are being moved. Tighten screws. NOTE: Provide additional support for the door while the hinges are being moved. NOTE: Provide additional support for the bottom hinge as shown in the drawer front. 3. Reconnect the wiring plug on the side of the refrigerator door is reversed. Remove and Replace Drawer Handle Metal Handles ■ Using a Allen wrench, loosen the two setscrews located on...
Use and Care
Page 8
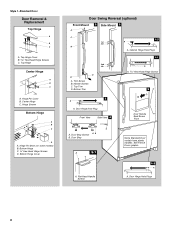
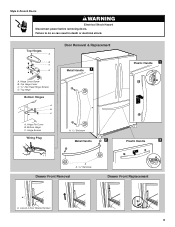
...A. Handle Screws C. Door Stop Screws A B B. Style 1-Standard Door Door Removal & Replacement Top Hinge A B C A. Top Hinge Center Hinge A B C A. Hinge Screws Bottom Hinge A B C D A. Cabinet Hinge Hole Plugs 1-1 2nd 4th D B A. Door Stop A 5-1 A. Trim Screw B. Door Hinge Hole Plugs 8 Top Hinge Cover B Hex-Head Hinge Screws C. Center Hinge C. Bottom Trim A A Hex-Head Hinge Screws 6 1 1 3 A A. Top Trim D. Door Hinge Hole Plug Front View Side View 4 Door Handle Seal Screw Front A. See French Doors graphic. 5-2 A A. Flat-Head Handle Screws Some Standard Door models...
...A. Handle Screws C. Door Stop Screws A B B. Style 1-Standard Door Door Removal & Replacement Top Hinge A B C A. Top Hinge Center Hinge A B C A. Hinge Screws Bottom Hinge A B C D A. Cabinet Hinge Hole Plugs 1-1 2nd 4th D B A. Door Stop A 5-1 A. Trim Screw B. Door Hinge Hole Plugs 8 Top Hinge Cover B Hex-Head Hinge Screws C. Center Hinge C. Bottom Trim A A Hex-Head Hinge Screws 6 1 1 3 A A. Top Trim D. Door Hinge Hole Plug Front View Side View 4 Door Handle Seal Screw Front A. See French Doors graphic. 5-2 A A. Flat-Head Handle Screws Some Standard Door models...
Use and Care
Page 9
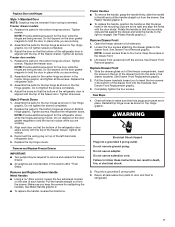
Top Hinges A B C D A. Loosen 4 Door Bracket Screws 9 Top Hinge Cover C. 5/16" Hex Head Hinge Screws D. Hinge Pin Cover B. Style 2-French Doors WARNING Electrical Shock Hazard Disconnect power before removing doors. Top Hinge Bottom Hinges A B C Door Removal & Replacement Metal Handle 1 A A. Failure to do so can result in death or electrical shock. Hinge Cover Screw B. Bottom Hinge C. Hinge Screws Wiring Plug A. 3/32" Setscrew Metal Handle 2 Plastic Handle 1 Plastic Handle 2 A A. 3/32" Setscrew Drawer Front Removal Drawer Front Replacement A A.
Top Hinges A B C D A. Loosen 4 Door Bracket Screws 9 Top Hinge Cover C. 5/16" Hex Head Hinge Screws D. Hinge Pin Cover B. Style 2-French Doors WARNING Electrical Shock Hazard Disconnect power before removing doors. Top Hinge Bottom Hinges A B C Door Removal & Replacement Metal Handle 1 A A. Failure to do so can result in death or electrical shock. Hinge Cover Screw B. Bottom Hinge C. Hinge Screws Wiring Plug A. 3/32" Setscrew Metal Handle 2 Plastic Handle 1 Plastic Handle 2 A A. 3/32" Setscrew Drawer Front Removal Drawer Front Replacement A A.
Use and Care
Page 11
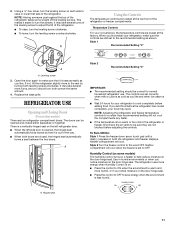
... household refrigerator use. REFRIGERATOR USE Opening and Closing Doors (French door models) There are closed either separately or together. This makes it easier to adjust the tilt of the leveling screw to turn both leveling screws clockwise. A Style 2 Recommended Setting "4" IMPORTANT: ■ The recommended setting should turn the screws. Style 2 Turn the freezer control to a colder than recommended setting will cool. Using the Controls The temperature controls are not blocked before adding food. Temperature Controls For your refrigerator, make sure...
... household refrigerator use. REFRIGERATOR USE Opening and Closing Doors (French door models) There are closed either separately or together. This makes it easier to adjust the tilt of the leveling screw to turn both leveling screws clockwise. A Style 2 Recommended Setting "4" IMPORTANT: ■ The recommended setting should turn the screws. Style 2 Turn the freezer control to a colder than recommended setting will cool. Using the Controls The temperature controls are not blocked before adding food. Temperature Controls For your refrigerator, make sure...
Use and Care
Page 12
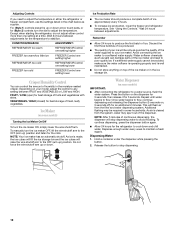
... (Style 2) controls turn the dial to the OFF (arm up or down. To manually turn the ice maker ON, simply lower the wire shutoff arm. Water Dispenser (on some models) Turning the Ice Maker On/Off To turn the ice maker OFF, lift the wire shutoff arm to adjust the temperature. Except when starting the refrigerator, do not adjust either the refrigerator or freezer compartment, use the settings listed in some models) IMPORTANT: ■ After connecting the refrigerator to...
... (Style 2) controls turn the dial to the OFF (arm up or down. To manually turn the ice maker ON, simply lower the wire shutoff arm. Water Dispenser (on some models) Turning the Ice Maker On/Off To turn the ice maker OFF, lift the wire shutoff arm to adjust the temperature. Except when starting the refrigerator, do not adjust either the refrigerator or freezer compartment, use the settings listed in some models) IMPORTANT: ■ After connecting the refrigerator to...
Use and Care
Page 13
... or cover foods tightly. ■ For stainless steel models, stainless steel is no greater than 40 watts). 1. NOTE: You may be replaced at least 2 minutes before 6 months have passed, replace the water filter more often. Unplug the refrigerator or disconnect power. 2. Remove sealing label from the back. Rinse surfaces with clean, warm water and dry immediately to avoid water spots. 4. If you need to remove the upper freezer shelf or...
... or cover foods tightly. ■ For stainless steel models, stainless steel is no greater than 40 watts). 1. NOTE: You may be replaced at least 2 minutes before 6 months have passed, replace the water filter more often. Unplug the refrigerator or disconnect power. 2. Remove sealing label from the back. Rinse surfaces with clean, warm water and dry immediately to avoid water spots. 4. If you need to remove the upper freezer shelf or...
Use and Care
Page 14
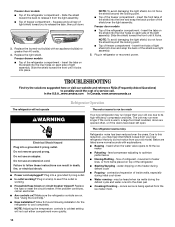
... the defrost cycle and water runs into the liner holes on the shield into the drain pan ■ Creaking/Cracking - Do not use an adapter. fans/compressor adjusting to fill the ice maker ■ Pulsating - Insert the tabs on each side of light assembly. Insert front tabs of light shield into a grounded 3 prong outlet. Failure to cool completely. Plug in death, fire, or electrical shock. ■ Power cord...
... the defrost cycle and water runs into the liner holes on the shield into the drain pan ■ Creaking/Cracking - Do not use an adapter. fans/compressor adjusting to fill the ice maker ■ Pulsating - Insert the tabs on each side of light assembly. Insert front tabs of light shield into a grounded 3 prong outlet. Failure to cool completely. Plug in death, fire, or electrical shock. ■ Power cord...
Use and Care
Page 15
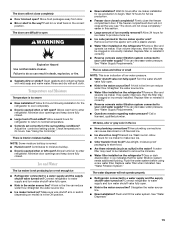
...; Freezer door closed . Remove filter and operate ice maker. Gray or dark discoloration in the ice ■ New plumbing connections? Straighten the water source line. ■ New installation? Clean gaskets and contact surfaces with soft cloth. Allows warm air to water supply and turn water shutoff valve fully open . ■ Kink in the correct position. Minimize door openings and keep doors fully closed. ■ Large load of ice recently removed? Straighten the water source line. ■ Ice maker turned on ? Remove ice from door. ■ Bin or shelf in...
...; Freezer door closed . Remove filter and operate ice maker. Gray or dark discoloration in the ice ■ New plumbing connections? Straighten the water source line. ■ New installation? Clean gaskets and contact surfaces with soft cloth. Allows warm air to water supply and turn water shutoff valve fully open . ■ Kink in the correct position. Minimize door openings and keep doors fully closed. ■ Large load of ice recently removed? Straighten the water source line. ■ Ice maker turned on ? Remove ice from door. ■ Bin or shelf in...
Use and Care
Page 16
... installed. Close the door firmly. Make sure the water dispenser tube connections are fully tightened. Remove filter and operate dispenser. If it correctly. ■ Refrigerator door closed completely? The water pressure to the home determines the flow from the dispenser is only chilled to a cold water pipe. See "Water Supply Requirements." ■ Water filter installed on the floor near the base grille? Make sure the water dispenser wire/tube assembly has been properly reconnected. See "Water Supply Requirements." Water is warm NOTE: Water...
... installed. Close the door firmly. Make sure the water dispenser tube connections are fully tightened. Remove filter and operate dispenser. If it correctly. ■ Refrigerator door closed completely? The water pressure to the home determines the flow from the dispenser is only chilled to a cold water pipe. See "Water Supply Requirements." ■ Water filter installed on the floor near the base grille? Make sure the water dispenser wire/tube assembly has been properly reconnected. See "Water Supply Requirements." Water is warm NOTE: Water...
Use and Care
Page 17
... Standards 42 and 53. For models without notice. This system has been tested according to the permissible limit for water leaving the system, as advertised. ■ Refer to the "Warranty" section for the Manufacturer's limited warranty. ■ The disposable water filter should be used , the yellow (Order) light comes on disinfected waters that operational, maintenance, and filter replacement requirements be carried out for...
... Standards 42 and 53. For models without notice. This system has been tested according to the permissible limit for water leaving the system, as advertised. ■ Refer to the "Warranty" section for the Manufacturer's limited warranty. ■ The disposable water filter should be used , the yellow (Order) light comes on disinfected waters that operational, maintenance, and filter replacement requirements be carried out for...

Use and Care
Page 18
... a remote area where service by Amana. 5. Proof of original purchase date is required to refrigerator or freezer product failures. 7. Damage resulting from accident, alteration, misuse, abuse, fire, flood, acts of God, improper installation, installation not in which it is used in the country in accordance with original model/serial numbers that are excluded from warranty coverage. 4. Replacement parts or repair labor on the duration...
... a remote area where service by Amana. 5. Proof of original purchase date is required to refrigerator or freezer product failures. 7. Damage resulting from accident, alteration, misuse, abuse, fire, flood, acts of God, improper installation, installation not in which it is used in the country in accordance with original model/serial numbers that are excluded from warranty coverage. 4. Replacement parts or repair labor on the duration...
Warranty
Page 1
... Amana's published installation instructions. 11. Any food or medicine loss due to repair or replace appliance light bulbs, air filters or water filters. Any damage or discoloration caused by markers other than dry-erase markers in the recommended colors listed in accordance with electrical or plumbing codes, or use or when it is installed in an inaccessible location or is not installed in accordance with any marker to refrigerator...
... Amana's published installation instructions. 11. Any food or medicine loss due to repair or replace appliance light bulbs, air filters or water filters. Any damage or discoloration caused by markers other than dry-erase markers in the recommended colors listed in accordance with electrical or plumbing codes, or use or when it is installed in an inaccessible location or is not installed in accordance with any marker to refrigerator...
Dimension Guide
Page 1
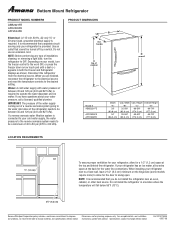
... Dimensions are for the water line connections. Do not use an extension cord. PRODUCT DIMENSIONS B A incl. When installing your refrigerator next to a fixed wall, leave 2-1/2" (6.3 cm) minimum on your cold water supply, the water pressure to the reverse osmosis system needs to be provided. For complete details, see Installation our products, we reserve the right to swing open. Instructions packed with water pressure of installation, cleaning, or removing a light bulb, turn the freezer control to 414 kPa). handle...
... Dimensions are for the water line connections. Do not use an extension cord. PRODUCT DIMENSIONS B A incl. When installing your refrigerator next to a fixed wall, leave 2-1/2" (6.3 cm) minimum on your cold water supply, the water pressure to the reverse osmosis system needs to be provided. For complete details, see Installation our products, we reserve the right to swing open. Instructions packed with water pressure of installation, cleaning, or removing a light bulb, turn the freezer control to 414 kPa). handle...
Specifications Sheet
Page 2
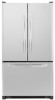
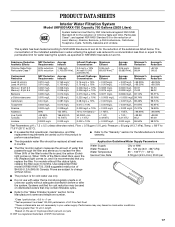
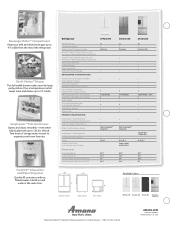
... Drawer Track System Slide-Out Upper Freezer Basket Glide-Out Wire Freezer Basket EasyFreezer™ Food Organizer Factory-Installed Ice Maker Colors Stainless Steel Door with Stainless Steel Handles Dimensions Overall Height (A) Cabinet Width (B) Cabinet Depth with Door Handle (C) Cabinet Depth with ice, filtered water or both ice and water at 90° (D) AFF2534FE 25 . With QuickSplit™ Organizer . of Maytag Corporation or its related companies. ©2008. AARL023. W, Q, B, S Order model AFD2535FES...
... Drawer Track System Slide-Out Upper Freezer Basket Glide-Out Wire Freezer Basket EasyFreezer™ Food Organizer Factory-Installed Ice Maker Colors Stainless Steel Door with Stainless Steel Handles Dimensions Overall Height (A) Cabinet Width (B) Cabinet Depth with Door Handle (C) Cabinet Depth with ice, filtered water or both ice and water at 90° (D) AFF2534FE 25 . With QuickSplit™ Organizer . of Maytag Corporation or its related companies. ©2008. AARL023. W, Q, B, S Order model AFD2535FES...


