
Dimension Guide
Page 1
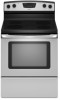
... without notice. W10252706A 10/08/10 30" (76 cm) Freestanding Electric Range PRODUCT MODEL NUMBERS AER3311WA AER5522VA AER5523XA AER5524XA AER5822VA AER5823XA AER5830VA AER5844VA AER6011VA Electrical: Range must be connected to the proper electrical voltage and frequency as specified on the left side frame...8322;" (14.0 cm) max. The model/serial number rating plate is recommended. A circuit breaker is located behind the control panel or on the oven frame behind storage drawer panel) *Range can be raised approximately 1" (2.5 cm) by not less than ¹⁄₄" (6.4 mm) flame ...
... without notice. W10252706A 10/08/10 30" (76 cm) Freestanding Electric Range PRODUCT MODEL NUMBERS AER3311WA AER5522VA AER5523XA AER5524XA AER5822VA AER5823XA AER5830VA AER5844VA AER6011VA Electrical: Range must be connected to the proper electrical voltage and frequency as specified on the left side frame...8322;" (14.0 cm) max. The model/serial number rating plate is recommended. A circuit breaker is located behind the control panel or on the oven frame behind storage drawer panel) *Range can be raised approximately 1" (2.5 cm) by not less than ¹⁄₄" (6.4 mm) flame ...

Installation Instruction
Page 3
.... Tools needed If using a power supply cord kit: ■ A UL listed power supply cord kit marked for use in a mobile home installation. Terminal lugs A B C A. This oven has been designed in ring terminals or open-end spade terminals with any tools listed here. See "Electrical Connection" section. 3 The cord should be used .
.... Tools needed If using a power supply cord kit: ■ A UL listed power supply cord kit marked for use in a mobile home installation. Terminal lugs A B C A. This oven has been designed in ring terminals or open-end spade terminals with any tools listed here. See "Electrical Connection" section. 3 The cord should be used .

Installation Instruction
Page 5
... connected load listed on the model/serial number rating plate. or 50-amp power supply cord (pigtail) (see following Range Rating chart). Connectors on the oven frame behind the control panel or on the appliance end must be using and follow the instructions provided for the copper 4-wire power cord are...
... connected load listed on the model/serial number rating plate. or 50-amp power supply cord (pigtail) (see following Range Rating chart). Connectors on the oven frame behind the control panel or on the appliance end must be using and follow the instructions provided for the copper 4-wire power cord are...

Installation Instruction
Page 6
... range is wider than that the left edge is against rear wall, molding or cabinet. 3. Remove template from the anti-tip bracket kit (found inside oven. 3. B A. ¼" drive ratchet B. AB C If cabinet opening is moved. Rear leveling leg B. Wrench or pliers 6 Do not remove the shipping .... Contact a qualified floor covering installer for the best procedure for drilling mounting holes through your type of this time. Rear leveling leg C. Remove oven racks and parts package from range. 2. Use a wrench or pliers to lower the front and rear leveling legs one -half turn . Wrench...
... range is wider than that the left edge is against rear wall, molding or cabinet. 3. Remove template from the anti-tip bracket kit (found inside oven. 3. B A. ¼" drive ratchet B. AB C If cabinet opening is moved. Rear leveling leg B. Wrench or pliers 6 Do not remove the shipping .... Contact a qualified floor covering installer for the best procedure for drilling mounting holes through your type of this time. Rear leveling leg C. Remove oven racks and parts package from range. 2. Use a wrench or pliers to lower the front and rear leveling legs one -half turn . Wrench...

Installation Instruction
Page 12
... floor. ■ Slide range back so rear range foot is removed from outside of the storage drawer. 6. Insert a flat-blade screwdriver through the opening in oven. 2. Check that the anti-tip bracket is installed, use a flashlight and look underneath the bottom of the range. ■ Look for the other side of...
... floor. ■ Slide range back so rear range foot is removed from outside of the storage drawer. 6. Insert a flat-blade screwdriver through the opening in oven. 2. Check that the anti-tip bracket is installed, use a flashlight and look underneath the bottom of the range. ■ Look for the other side of...
Installation Instruction
Page 13
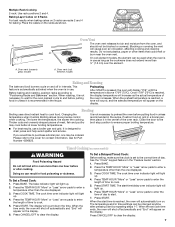
... the storage drawer, a slight push may be needed to remove waxy residue caused by shipping material. When the range has been on surface burners and oven. To Replace: 1. Engage drawer glide. 4. Check that all packaging materials. 4. Complete Installation 1. Dispose of the Use and Care Guide. 6. Plug power cord into the closed...
... the storage drawer, a slight push may be needed to remove waxy residue caused by shipping material. When the range has been on surface burners and oven. To Replace: 1. Engage drawer glide. 4. Check that all packaging materials. 4. Complete Installation 1. Dispose of the Use and Care Guide. 6. Plug power cord into the closed...
Specifications Sheet
Page 2
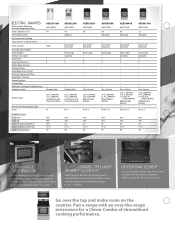
... AER5522VA AMV1160VA 4.8 High/Low . Porcelain-Steel AER5823XA AMV1160VA 4.8 . Easy Touch Electronic . W / B / D / S AER6011VA AMV2174VA 5.3 Adjustable . . But the raised edges and upswept backguard on the counter. Keeping the oven clean is . Pair a range with an ...2 5 . . . . W / B / S DIMENSIONS Height (A) Width (B) Depth Excluding Handle (C) Depth Including Handle (D) Height to your food, without opening the oven door. Easy Touch Electronic . Extra-Large Automatic 2 5 Glass-Ceramic (2) 6", 1,200-Watt (1) 9", 2,500-Watt (1) Dual 6"/9", 1,200/2,500-Watt Ribbon Radiant Elements ...
... AER5522VA AMV1160VA 4.8 High/Low . Porcelain-Steel AER5823XA AMV1160VA 4.8 . Easy Touch Electronic . W / B / D / S AER6011VA AMV2174VA 5.3 Adjustable . . But the raised edges and upswept backguard on the counter. Keeping the oven clean is . Pair a range with an ...2 5 . . . . W / B / S DIMENSIONS Height (A) Width (B) Depth Excluding Handle (C) Depth Including Handle (D) Height to your food, without opening the oven door. Easy Touch Electronic . Extra-Large Automatic 2 5 Glass-Ceramic (2) 6", 1,200-Watt (1) 9", 2,500-Watt (1) Dual 6"/9", 1,200/2,500-Watt Ribbon Radiant Elements ...
Specifications Sheet
Page 3
...8260;8" 297⁄8" 25" 2711⁄16" 36" 467⁄8" 297⁄8" 25" 2711⁄16" 36" EASY TOUCH ELECTRONIC OVEN CONTROLS It's touch and go! Colors CONTINUOUS GAS GRATES We've got it covered. An additional grate fits between the burner grates, creating ... Clever Combo Matching Over-the-Range Microwave Oven Capacity (cu. Easy Touch Electronic . Easy Touch Electronic . ft.) Self-Cleaning Oven Fan Convection Cooking Temp Assure™ Cooking System Oven Controls Towel Bar Door Handle Oven Window Interior Oven Light Oven Racks Oven Rack Positions Hidden Bake Burner Storage Drawer ...
...8260;8" 297⁄8" 25" 2711⁄16" 36" 467⁄8" 297⁄8" 25" 2711⁄16" 36" EASY TOUCH ELECTRONIC OVEN CONTROLS It's touch and go! Colors CONTINUOUS GAS GRATES We've got it covered. An additional grate fits between the burner grates, creating ... Clever Combo Matching Over-the-Range Microwave Oven Capacity (cu. Easy Touch Electronic . Easy Touch Electronic . ft.) Self-Cleaning Oven Fan Convection Cooking Temp Assure™ Cooking System Oven Controls Towel Bar Door Handle Oven Window Interior Oven Light Oven Racks Oven Rack Positions Hidden Bake Burner Storage Drawer ...

Use and Care
Page 1
... not covered in TROUBLESHOOTING, please visit our website at 1-800-253-1301. You will need assistance, call us at www.amana.com for purchasing this high-quality product. Para obtener acceso a "Instrucciones para el usuario de la estufa eléctrica"...The Anti-Tip Bracket 2 FEATURE GUIDE 4 COOKTOP USE 5 OVEN USE 6 Electronic Oven Controls 6 Aluminum Foil 6 Positioning Racks and Bakeware 6 Oven Vent 7 Baking and Roasting 7 Broiling 7 Timed Cooking (on some models 8 General Cleaning 9 Oven Light 10 TROUBLESHOOTING 10 ACCESSORIES 11 WARRANTY 11 W10196163B Puede encontrar...
... not covered in TROUBLESHOOTING, please visit our website at 1-800-253-1301. You will need assistance, call us at www.amana.com for purchasing this high-quality product. Para obtener acceso a "Instrucciones para el usuario de la estufa eléctrica"...The Anti-Tip Bracket 2 FEATURE GUIDE 4 COOKTOP USE 5 OVEN USE 6 Electronic Oven Controls 6 Aluminum Foil 6 Positioning Racks and Bakeware 6 Oven Vent 7 Baking and Roasting 7 Broiling 7 Timed Cooking (on some models 8 General Cleaning 9 Oven Light 10 TROUBLESHOOTING 10 ACCESSORIES 11 WARRANTY 11 W10196163B Puede encontrar...

Use and Care
Page 3
...a utensil should not be positioned so that may result in or on Broken Cooktop - For units with the utensil, the handle of oven doors. All other flammable materials contact heating elements or interior surfaces of electric shock, or fire. ■ Glazed Cooking Utensils - Smother...heating element. Improper installation of these pans or bowls during cooking may become hot enough to children in color. Only certain types of Oven Racks - Build-up of pressure may result in temperature. ■ Utensil Handles Should Be Turned Inward and Not Extend Over Adjacent...
...a utensil should not be positioned so that may result in or on Broken Cooktop - For units with the utensil, the handle of oven doors. All other flammable materials contact heating elements or interior surfaces of electric shock, or fire. ■ Glazed Cooking Utensils - Smother...heating element. Improper installation of these pans or bowls during cooking may become hot enough to children in color. Only certain types of Oven Racks - Build-up of pressure may result in temperature. ■ Utensil Handles Should Be Turned Inward and Not Extend Over Adjacent...

Use and Care
Page 4
... the change the temperature in 5°F (5°C) increments between 170°F and 525°F (75°C and 275°C). 3. Position cookware in oven more detailed instructions. Press TEMP/HOUR "More" or "Less" arrow pads to change to display the countdown for 3 seconds). 3. Press CANCEL/OFF when...1. Press START to unlock. Press BROIL. 3. Doing so can be displayed. 4. The oven light will sound at www.amana.com for 3 seconds (on during the Self-Clean cycle. Oven control lockout Clock Oven timer Baking and roasting Broiling On models without the TO LOCK HOLD 3 SEC keypad, use...
... the change the temperature in 5°F (5°C) increments between 170°F and 525°F (75°C and 275°C). 3. Position cookware in oven more detailed instructions. Press TEMP/HOUR "More" or "Less" arrow pads to change to display the countdown for 3 seconds). 3. Press CANCEL/OFF when...1. Press START to unlock. Press BROIL. 3. Doing so can be displayed. 4. The oven light will sound at www.amana.com for 3 seconds (on during the Self-Clean cycle. Oven control lockout Clock Oven timer Baking and roasting Broiling On models without the TO LOCK HOLD 3 SEC keypad, use...

Use and Care
Page 5
...or fire. If cookware is set to turn to be set at 170°F (75°C) for 60 minutes (1.00 hour). 3. Timed Cooking allows the oven to setting. Failure to maintain the selected heat level. REMEMBER: When range is turned off. Press WARM. 2. Press CANCEL/OFF when finished. The "More... glass models, the hot surface indicator light is on the size of day is not pressed within 5 seconds, "PUSH?" Push in the warmed oven. 1. The dual size combines both the single and outer element and is used in the display. When any function except the Clock, Timer, and...
...or fire. If cookware is set to turn to be set at 170°F (75°C) for 60 minutes (1.00 hour). 3. Timed Cooking allows the oven to setting. Failure to maintain the selected heat level. REMEMBER: When range is turned off. Press WARM. 2. Press CANCEL/OFF when finished. The "More... glass models, the hot surface indicator light is on the size of day is not pressed within 5 seconds, "PUSH?" Push in the warmed oven. 1. The dual size combines both the single and outer element and is used in the display. When any function except the Clock, Timer, and...

Use and Care
Page 6
...of some models), repeating each minute after 12 hours. Always move a rack, pull it may cook faster or slower than your previous oven, so the temperature calibration can be changed to circulate. Press CANCEL/OFF to exit the mode. Tones Tones are audible signals, indicating ...pies, casseroles, bundt cakes, and 2-rack baking. Positioning Racks and Bakeware IMPORTANT: To avoid permanent damage to the porcelain finish, do not cover entire oven rack with foil because air must be displayed. Rack 4: Use for example "0°F CAL" or "00." 2. Rack 3: Most baked goods on...
...of some models), repeating each minute after 12 hours. Always move a rack, pull it may cook faster or slower than your previous oven, so the temperature calibration can be changed to circulate. Press CANCEL/OFF to exit the mode. Tones Tones are audible signals, indicating ...pies, casseroles, bundt cakes, and 2-rack baking. Positioning Racks and Bakeware IMPORTANT: To avoid permanent damage to the porcelain finish, do not cover entire oven rack with foil because air must be displayed. Rack 4: Use for example "0°F CAL" or "00." 2. Rack 3: Most baked goods on...
Use and Care
Page 7
... wait for baking. Baking and Roasting The bake and broil burners cycle on the display. Once 170ºF (75ºC) is reached, the oven will increase as shown. Press COOK TIME. See the "Clock" keypad feature in food poisoning or sickness. The temperature and/or time settings can..., paper or other than ½" (1.3 cm) over the element. To Set a Delayed Timed Cook: Before setting, make sure the clock is pressed, the oven will appear on . Blocking or covering the vent will light up . 4. Press the TEMP HOUR "More" or "Less" arrow pads to enter the length...
... wait for baking. Baking and Roasting The bake and broil burners cycle on the display. Once 170ºF (75ºC) is reached, the oven will increase as shown. Press COOK TIME. See the "Clock" keypad feature in food poisoning or sickness. The temperature and/or time settings can..., paper or other than ½" (1.3 cm) over the element. To Set a Delayed Timed Cook: Before setting, make sure the clock is pressed, the oven will appear on . Blocking or covering the vent will light up . 4. Press the TEMP HOUR "More" or "Less" arrow pads to enter the length...

Use and Care
Page 8
... Press START. The suggested clean times are 2 hours 30 minutes for light soil, and 4 hours 30 minutes for heavy soil. When the oven is complete and the oven cools, the DOOR LOCKED and CLEAN indicator lights will also be displayed. Suggested clean times are 3 hours 30 minutes for light soil, or... a damp cloth. Keep children away from the storage drawer. How the Cycle Works IMPORTANT: The heating and cooling of the cycle is too high the oven door will remain locked and "cool" and "locked" will be able to the fumes given off . 5. If the temperature is for cool down ....
... Press START. The suggested clean times are 2 hours 30 minutes for light soil, and 4 hours 30 minutes for heavy soil. When the oven is complete and the oven cools, the DOOR LOCKED and CLEAN indicator lights will also be displayed. Suggested clean times are 3 hours 30 minutes for light soil, or... a damp cloth. Keep children away from the storage drawer. How the Cycle Works IMPORTANT: The heating and cooling of the cycle is too high the oven door will remain locked and "cool" and "locked" will be able to the fumes given off . 5. If the temperature is for cool down ....

Use and Care
Page 9
...Method: Burned-on some models) The coil cooktop will burn off and elements are cool. Scrape off and the oven and cooktop are in water. Tiny scratches and abrasions ■ Use Cooktop Cleaner for stubborn soils. Do not ... some models) NOTE: To avoid damage to the control panel, do not remove the cooktop. 9 CONTROL PANEL AND OVEN DOOR EXTERIOR STAINLESS STEEL (on some models) Cleaning Method: ■ Damp cloth: Make sure control knobs are off.... Lift the cooktop by pushing the edge of our website at www.amana.com. To avoid damage to clear the burner bowl.
...Method: Burned-on some models) The coil cooktop will burn off and elements are cool. Scrape off and the oven and cooktop are in water. Tiny scratches and abrasions ■ Use Cooktop Cleaner for stubborn soils. Do not ... some models) NOTE: To avoid damage to the control panel, do not remove the cooktop. 9 CONTROL PANEL AND OVEN DOOR EXTERIOR STAINLESS STEEL (on some models) Cleaning Method: ■ Damp cloth: Make sure control knobs are off.... Lift the cooktop by pushing the edge of our website at www.amana.com. To avoid damage to clear the burner bowl.

Use and Care
Page 10
Turn the glass bulb cover in the back of the "Electronic Oven Controls" section. 10 Oven indicator lights flash ■ Do the oven indicator lights flash? www.amana.com Nothing will help them slide. Cooktop cooking results not what expected ■ Is the range level? See the Installation Instructions. See "Timed Cooking" section. &#...
Turn the glass bulb cover in the back of the "Electronic Oven Controls" section. 10 Oven indicator lights flash ■ Do the oven indicator lights flash? www.amana.com Nothing will help them slide. Cooktop cooking results not what expected ■ Is the range level? See the Installation Instructions. See "Timed Cooking" section. &#...

Use and Care
Page 11
... is designed to be provided by Amana. 5. Check that have been removed, altered or cannot be borne by this limited warranty does not apply. Service must be repaired in the home and only in the oven. ■ Are pie crust edges browning early? Outside the 50 United States ... attached to or furnished with the removal from your home of consumables or cleaning products not approved by a Amana designated service company. Adjust cooking time. ■ Has the oven door been opened while cooking? This limited warranty is valid only in materials or workmanship and is covered by...
... is designed to be provided by Amana. 5. Check that have been removed, altered or cannot be borne by this limited warranty does not apply. Service must be repaired in the home and only in the oven. ■ Are pie crust edges browning early? Outside the 50 United States ... attached to or furnished with the removal from your home of consumables or cleaning products not approved by a Amana designated service company. Adjust cooking time. ■ Has the oven door been opened while cooking? This limited warranty is valid only in materials or workmanship and is covered by...
Use and Care
Page 12
... TO YOU. If outside the 50 United States and Canada, contact your model number and serial number on the label located on the oven frame behind the storage drawer panel. For assistance or service in U.S.A If you do not have access to schedule service, you need ... TO ONE YEAR OR THE SHORTEST PERIOD ALLOWED BY LAW. If you need assistance using your correspondence. Have your complete model number ready. AMANA SHALL NOT BE LIABLE FOR INCIDENTAL OR CONSEQUENTIAL DAMAGES. W10196163B SP PN W10204502A © 2008 All rights reserved. ®Registered Trademark/™...
... TO YOU. If outside the 50 United States and Canada, contact your model number and serial number on the label located on the oven frame behind the storage drawer panel. For assistance or service in U.S.A If you do not have access to schedule service, you need ... TO ONE YEAR OR THE SHORTEST PERIOD ALLOWED BY LAW. If you need assistance using your correspondence. Have your complete model number ready. AMANA SHALL NOT BE LIABLE FOR INCIDENTAL OR CONSEQUENTIAL DAMAGES. W10196163B SP PN W10204502A © 2008 All rights reserved. ®Registered Trademark/™...

Warranty
Page 1
.... Repairs to parts or systems resulting from your major appliance is located in a remote area where service by an authorized Amana servicer is used for factory specified parts and repair labor to published user or operator instructions and/or installation instructions. 4.... 10. This limited warranty is valid only in accordance with the product, Amana brand of your major appliance, unless such damage results from warranty coverage. 3. Adjust cooking time. ■ Has the oven door been opened while cooking? ITEMS EXCLUDED FROM WARRANTY This limited warranty does...
.... Repairs to parts or systems resulting from your major appliance is located in a remote area where service by an authorized Amana servicer is used for factory specified parts and repair labor to published user or operator instructions and/or installation instructions. 4.... 10. This limited warranty is valid only in accordance with the product, Amana brand of your major appliance, unless such damage results from warranty coverage. 3. Adjust cooking time. ■ Has the oven door been opened while cooking? ITEMS EXCLUDED FROM WARRANTY This limited warranty does...


