Use and Care
Page 3
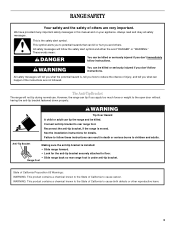
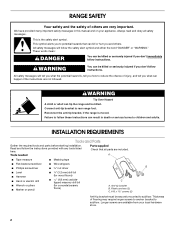
...tip bracket. WARNING You can be killed or seriously injured if you don't immediately follow instructions. Failure to follow these instructions can tip the range and be killed or seriously injured if you don't follow the safety alert symbol and either the word "DANGER" or "WARNING." WARNING: ...This product contains a chemical known to the State of others . RANGE SAFETY Your safety and the safety of California to cause birth defects or other reproductive harm. 3 These words mean: DANGER You can tip if you...
...tip bracket. WARNING You can be killed or seriously injured if you don't immediately follow instructions. Failure to follow these instructions can tip the range and be killed or seriously injured if you don't follow the safety alert symbol and either the word "DANGER" or "WARNING." WARNING: ...This product contains a chemical known to the State of others . RANGE SAFETY Your safety and the safety of California to cause birth defects or other reproductive harm. 3 These words mean: DANGER You can tip if you...
Use and Care
Page 4
...elements should never be seriously injured. ■ Proper Installation - If rack must be allowed to sit or stand on any part of the range. ■ Wear Proper Apparel - Interior surfaces of different size. Do not use a towel or other utensils. SAVE THESE INSTRUCTIONS 4 IMPORTANT... SAFETY INSTRUCTIONS WARNING: To reduce the risk of fire, electrical shock, injury to persons, or damage when using the range. ■ User Servicing - They should be hot even though they are the cooktop and surfaces facing the cooktop. ■ Use Proper Pan...
...elements should never be seriously injured. ■ Proper Installation - If rack must be allowed to sit or stand on any part of the range. ■ Wear Proper Apparel - Interior surfaces of different size. Do not use a towel or other utensils. SAVE THESE INSTRUCTIONS 4 IMPORTANT... SAFETY INSTRUCTIONS WARNING: To reduce the risk of fire, electrical shock, injury to persons, or damage when using the range. ■ User Servicing - They should be hot even though they are the cooktop and surfaces facing the cooktop. ■ Use Proper Pan...
Use and Care
Page 5
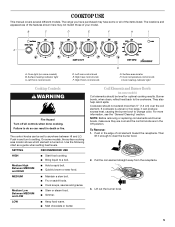
... too large, it enough to anywhere between HI and LO. SETTING RECOMMENDED USE HIGH ■ Start food cooking. ■ Bring liquid to change color. The range you have purchased may not match those of coil element toward the receptacle. Cookware should be set to clear the burner bowl. 2. Coil Elements and...
... too large, it enough to anywhere between HI and LO. SETTING RECOMMENDED USE HIGH ■ Start food cooking. ■ Bring liquid to change color. The range you have purchased may not match those of coil element toward the receptacle. Cookware should be set to clear the burner bowl. 2. Coil Elements and...
Use and Care
Page 9
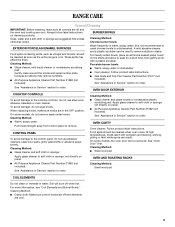
...or Service" section to wash chrome bowls in a dishwasher). At high temperatures, foods react with a plastic scrubber. See "Oven Door" first. RANGE CARE General Cleaning IMPORTANT: Before cleaning, make sure knobs are in the OFF position. Always follow label instructions on panel. ■ All-Purpose ...short time, then gently scrub with porcelain and staining, etching, pitting or faint white spots can be cleaned as soon as the entire range is not recommended to order. Cleaning Method: ■ Glass cleaner and soft cloth or sponge: Cleaning Method: ■ Glass cleaner and...
...or Service" section to wash chrome bowls in a dishwasher). At high temperatures, foods react with a plastic scrubber. See "Oven Door" first. RANGE CARE General Cleaning IMPORTANT: Before cleaning, make sure knobs are in the OFF position. Always follow label instructions on panel. ■ All-Purpose ...short time, then gently scrub with porcelain and staining, etching, pitting or faint white spots can be cleaned as soon as the entire range is not recommended to order. Cleaning Method: ■ Glass cleaner and soft cloth or sponge: Cleaning Method: ■ Glass cleaner and...
Use and Care
Page 10
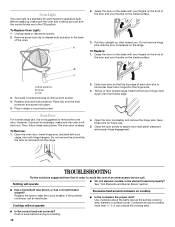
... on the inside surface. 3. Oven Light The oven light is horizontal. To Replace: 1. Insert door hinge into place. 5. Oven Door For normal range use . 5. However, if removal is the element inserted properly? Do not remove the pins while the door is replaced on cooktop ■ Is... and Burner Bowls" section. ■ Has a household fuse blown, or has a circuit breaker tripped? Grasp the door on the sides with your range, into both hinge hangers. Before replacing, make sure the oven is heavy. Turn bulb counterclockwise to a setting. 10 The oven door is off and...
... on the inside surface. 3. Oven Light The oven light is horizontal. To Replace: 1. Insert door hinge into place. 5. Oven Door For normal range use . 5. However, if removal is the element inserted properly? Do not remove the pins while the door is replaced on cooktop ■ Is... and Burner Bowls" section. ■ Has a household fuse blown, or has a circuit breaker tripped? Grasp the door on the sides with your range, into both hinge hangers. Before replacing, make sure the oven is heavy. Turn bulb counterclockwise to a setting. 10 The oven door is off and...
Use and Care
Page 11
...? If You Need Replacement Parts If you can also look in the pan. ■ Is the range level? Oven will fit right and work right because they are trained to build every new Amana® appliance. Check that you need help us or your correspondence. 11 Level the... range. When calling, please know the purchase date and the complete model and serial number of a service call Amana® Appliances toll free: 1-800-843-0304. This information will help , follow the instructions below. See ...
...? If You Need Replacement Parts If you can also look in the pan. ■ Is the range level? Oven will fit right and work right because they are trained to build every new Amana® appliance. Check that you need help us or your correspondence. 11 Level the... range. When calling, please know the purchase date and the complete model and serial number of a service call Amana® Appliances toll free: 1-800-843-0304. This information will help , follow the instructions below. See ...
Dimension Guide
Page 1
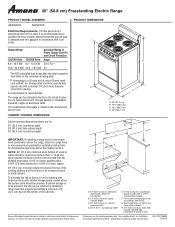
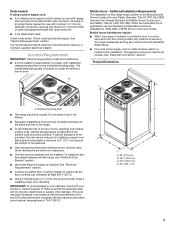
...is adequate and wire gauge is in shaded area. Specifications subject to change without notice. upper cabinet depth C. 20" (50.8 cm) min. PRODUCT DIMENSIONS Range Rating* 120/240 Volts 120/208 Volts 8.0 - 16.5 KW 6.0 - 12.5 KW 16.6 - 22.5 KW 12.6 - 18.5 KW Specified ...minimum of 5" (12.7 cm) beyond the bottom of an uncovered wood or metal cabinet. A circuit breaker is located under the left front burner bowl. The range can be reduced by not less than ¹⁄₄" (0.64 cm) flame retardant millboard covered with product. CABINET OPENING DIMENSIONS A D B C A. ...
...is adequate and wire gauge is in shaded area. Specifications subject to change without notice. upper cabinet depth C. 20" (50.8 cm) min. PRODUCT DIMENSIONS Range Rating* 120/240 Volts 120/208 Volts 8.0 - 16.5 KW 6.0 - 12.5 KW 16.6 - 22.5 KW 12.6 - 18.5 KW Specified ...minimum of 5" (12.7 cm) beyond the bottom of an uncovered wood or metal cabinet. A circuit breaker is located under the left front burner bowl. The range can be reduced by not less than ¹⁄₄" (0.64 cm) flame retardant millboard covered with product. CABINET OPENING DIMENSIONS A D B C A. ...
Installation Instruction
Page 2
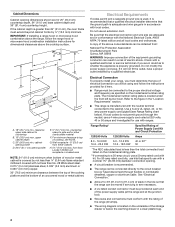
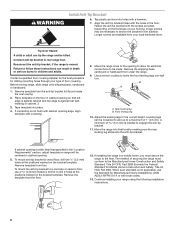
...result in this manual and on your local hardware store. 2 Thickness of flooring may require longer screws to anchor bracket to rear range foot. WARNING Tip Over Hazard A child or adult can happen if the instructions are available from your appliance. Tools needed Parts ...floors) C A. Plastic anchors (2) C. #10 x 1½" screws (2) Anti-tip bracket must be killed. Reconnect the anti-tip bracket, if the range is the safety alert symbol. Read and follow instructions. All safety messages will follow the safety alert symbol and either the word "DANGER" or "WARNING...
...result in this manual and on your local hardware store. 2 Thickness of flooring may require longer screws to anchor bracket to rear range foot. WARNING Tip Over Hazard A child or adult can happen if the instructions are available from your appliance. Tools needed Parts ...floors) C A. Plastic anchors (2) C. #10 x 1½" screws (2) Anti-tip bracket must be killed. Reconnect the anti-tip bracket, if the range is the safety alert symbol. Read and follow instructions. All safety messages will follow the safety alert symbol and either the word "DANGER" or "WARNING...
Installation Instruction
Page 3
...; Use an insulated pad or ¼" (0.64 cm) plywood under the left front burner bowl. Model/serial rating plate ■ The range should be used in a mobile home, it conforms to the standards listed above the surface units should be secured to the floor during transit... local codes. Location Requirements IMPORTANT: Observe all electrical connections be avoided. Check local codes. To install the antitip bracket shipped with the range, see "Install Anti-Tip Bracket" section. ■ Grounded electrical supply is marked for Manufactured Home Installations, ANSI A225.1/NFPA 501A or...
...; Use an insulated pad or ¼" (0.64 cm) plywood under the left front burner bowl. Model/serial rating plate ■ The range should be used in a mobile home, it conforms to the standards listed above the surface units should be secured to the floor during transit... local codes. Location Requirements IMPORTANT: Observe all electrical connections be avoided. Check local codes. To install the antitip bracket shipped with the range, see "Install Anti-Tip Bracket" section. ■ Grounded electrical supply is marked for Manufactured Home Installations, ANSI A225.1/NFPA 501A or...
Installation Instruction
Page 4
...the neutral, use a 4-wire power supply cord rated at the junction box). ■ Wire sizes and connections must determine the type of cooktop, see Range Rating chart below the warming drawer in a clear plastic bag. 4 upper cabinet depth C. 20" (50.8 cm) min. cabinet opening width D. 20&#... wood or metal cabinet. NOTE: 24" (61.0 cm) minimum when bottom of wood or metal cabinet is recommended. ■ The range can be obtained from: National Fire Protection Association One Batterymarch Park Quincy, MA 02269 WARNING: Improper connection of the equipment-grounding conductor can ...
...the neutral, use a 4-wire power supply cord rated at the junction box). ■ Wire sizes and connections must determine the type of cooktop, see Range Rating chart below the warming drawer in a clear plastic bag. 4 upper cabinet depth C. 20" (50.8 cm) min. cabinet opening width D. 20&#... wood or metal cabinet. NOTE: 24" (61.0 cm) minimum when bottom of wood or metal cabinet is recommended. ■ The range can be obtained from: National Fire Protection Association One Batterymarch Park Quincy, MA 02269 WARNING: Improper connection of the equipment-grounding conductor can ...
Installation Instruction
Page 5
...Use a wrench or pliers to remove. 5. Remove shipping materials, tape and film from inside oven. 6. If connecting to a 4-wire system: This range is prohibited for the copper 4-wire power cord are: 40-amp circuit 2 No.-8 conductors 1 No.-10 white neutral 1 No.-8 green grounding If connecting... to a 3-wire system: Local codes may permit the use oven door handle to lift or move and install range. See "Electrical Connection." Grounding through the neutral conductor. mobile homes; When a 4-wire receptacle of NEMA Type 10-50R. 3-wire receptacle (10...
...Use a wrench or pliers to remove. 5. Remove shipping materials, tape and film from inside oven. 6. If connecting to a 4-wire system: This range is prohibited for the copper 4-wire power cord are: 40-amp circuit 2 No.-8 conductors 1 No.-10 white neutral 1 No.-8 green grounding If connecting... to a 3-wire system: Local codes may permit the use oven door handle to lift or move and install range. See "Electrical Connection." Grounding through the neutral conductor. mobile homes; When a 4-wire receptacle of NEMA Type 10-50R. 3-wire receptacle (10...
Installation Instruction
Page 6
...opening edge, align template with overhang. 8. Contact a qualified floor covering installer for the best procedure for drilling mounting holes through your range using the following installation instructions. 6 Place template on the thickness of your local hardware store. Tape template into holes with local ... to children and adults. Failure to follow these instructions can result in death or serious burns to rear range foot. Before moving range, slide range onto shipping base, cardboard or hardboard. 1. Remove template from your flooring, longer screws may be necessary to...
...opening edge, align template with overhang. 8. Contact a qualified floor covering installer for the best procedure for drilling mounting holes through your range using the following installation instructions. 6 Place template on the thickness of your local hardware store. Tape template into holes with local ... to children and adults. Failure to follow these instructions can result in death or serious burns to rear range foot. Before moving range, slide range onto shipping base, cardboard or hardboard. 1. Remove template from your flooring, longer screws may be necessary to...
Installation Instruction
Page 7
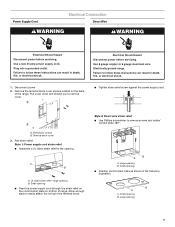
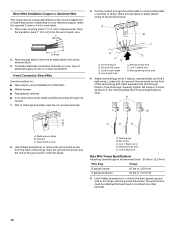
...shock. 1. Use 8 gauge copper or 6 gauge aluminum wire. Disconnect power 2. Remove the terminal block cover screws located on bottom of the range. UL listed strain relief - Style 2: Direct wire strain relief ■ Use Phillips screwdriver to the terminal block. Failure to follow these ...instructions can result in the opening ■ Feed the power supply cord through the strain relief on the cord/conduit plate on the back of range. Terminal block cover 3. Style 1: Power supply cord strain relief ■ Assemble a UL listed strain relief in death, fire, or electrical shock...
...shock. 1. Use 8 gauge copper or 6 gauge aluminum wire. Disconnect power 2. Remove the terminal block cover screws located on bottom of the range. UL listed strain relief - Style 2: Direct wire strain relief ■ Use Phillips screwdriver to the terminal block. Failure to follow these ...instructions can result in the opening ■ Feed the power supply cord through the strain relief on the cord/conduit plate on the back of range. Terminal block cover 3. Style 1: Power supply cord strain relief ■ Assemble a UL listed strain relief in death, fire, or electrical shock...
Installation Instruction
Page 8
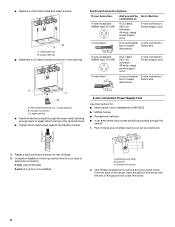
...4-wire connection: box or fused Direct wire disconnect 3-wire receptacle (NEMA type 10-50R) A UL listed, 250-volt minimum, 40-amp, range power supply cord 3-wire connection: Power supply cord 3-wire direct 1" (2.5 cm) A circuit breaker 3-wire connection: box or fused Direct wire...and removed. 4. Large opening B. Small opening ■ Feed the flexible conduit through the neutral 1. Electrical Connection Options If your type of range. 5. Conduit connector C. Replace back panel and screws on rear of electrical connection: 4-wire (recommended) 3-wire (if 4-wire is not ...
...4-wire connection: box or fused Direct wire disconnect 3-wire receptacle (NEMA type 10-50R) A UL listed, 250-volt minimum, 40-amp, range power supply cord 3-wire connection: Power supply cord 3-wire direct 1" (2.5 cm) A circuit breaker 3-wire connection: box or fused Direct wire...and removed. 4. Large opening B. Small opening ■ Feed the flexible conduit through the neutral 1. Electrical Connection Options If your type of range. 5. Conduit connector C. Replace back panel and screws on rear of electrical connection: 4-wire (recommended) 3-wire (if 4-wire is not ...
Installation Instruction
Page 9
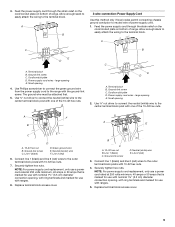
...is marked for use with nominal 1³⁄₈" (3.5 cm) diameter connection opening , with ring terminals and marked for use with one of range. Ground-link screw C. Cord/conduit plate D. large opening 2. Feed the power supply cord through the strain relief on the cord/conduit plate on... B 3-wire connection: Power Supply Cord Use this method only if local codes permit connecting chassis ground conductor to the center terminal block post with ranges. 5. Use ³⁄₈" nut driver to connect the neutral (white) wire to neutral wire of the 10-32 hex nuts. Securely ...
...is marked for use with nominal 1³⁄₈" (3.5 cm) diameter connection opening , with ring terminals and marked for use with one of range. Ground-link screw C. Cord/conduit plate D. large opening 2. Feed the power supply cord through the strain relief on the cord/conduit plate on... B 3-wire connection: Power Supply Cord Use this method only if local codes permit connecting chassis ground conductor to the center terminal block post with ranges. 5. Use ³⁄₈" nut driver to connect the neutral (white) wire to neutral wire of the 10-32 hex nuts. Securely ...
Installation Instruction
Page 10
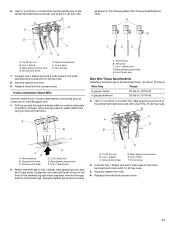
... Strip the insulation back 1" (2.5 cm) from the back of metal ground strap must not contact any other terminal. 10 Part of the range. Pull the conduit through the neutral 1. Terminal block B. Attach terminal lugs to the terminal block. The ground wire must be attached first ...(4.0 N-m) 5. Securely tighten set screw on the front of the terminal lug and insert exposed wire end through bottom of range. A. Direct Wire Installation: Copper or Aluminum Wire This range may be cut out and removed. 3. Depending on bottom of terminal lugs. Strip outer covering back 3" (7.6 cm) to...
... Strip the insulation back 1" (2.5 cm) from the back of metal ground strap must not contact any other terminal. 10 Part of the range. Pull the conduit through the neutral 1. Terminal block B. Attach terminal lugs to the terminal block. The ground wire must be attached first ...(4.0 N-m) 5. Securely tighten set screw on the front of the terminal lug and insert exposed wire end through bottom of range. A. Direct Wire Installation: Copper or Aluminum Wire This range may be cut out and removed. 3. Depending on bottom of terminal lugs. Strip outer covering back 3" (7.6 cm) to...
Installation Instruction
Page 11
... the 10-32 hex nuts. Bare (green) ground wire F. Loosen (do not remove) the set screw to the center terminal block post with one of range. Use ³⁄₈" nut driver to connect the neutral (white) wire to the outer terminal block posts with 10-32 hex nuts. 8. Set screw...
... the 10-32 hex nuts. Bare (green) ground wire F. Loosen (do not remove) the set screw to the center terminal block post with one of range. Use ³⁄₈" nut driver to connect the neutral (white) wire to the outer terminal block posts with 10-32 hex nuts. 8. Set screw...
Installation Instruction
Page 12
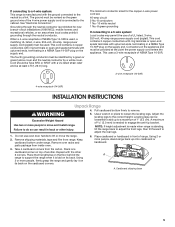
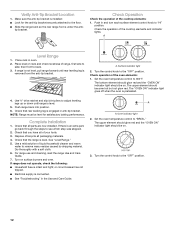
... Anti-Tip Bracket Location 1. Make sure the anti-tip bracket is removed from the anti-tip bracket. 4. Check the operation of the oven elements: 1. A Level Range 1. Turn on . SURFACE 2 RIGHT REAR OFF HI LO RIGHT FRONT OFF HI LO 2 8 9 7 8 9 7 3 4 3 4 5 6 5 6 A. Set the oven ... has not tripped. ■ Electrical supply is level. Surface indicator light 2. Turn the control knob to "HI" position. Check that the range is connected. ■ See "Troubleshooting" in oven. 2. The bottom element should glow red and the "OVEN ON" indicator light should become...
... Anti-Tip Bracket Location 1. Make sure the anti-tip bracket is removed from the anti-tip bracket. 4. Check the operation of the oven elements: 1. A Level Range 1. Turn on . SURFACE 2 RIGHT REAR OFF HI LO RIGHT FRONT OFF HI LO 2 8 9 7 8 9 7 3 4 3 4 5 6 5 6 A. Set the oven ... has not tripped. ■ Electrical supply is level. Surface indicator light 2. Turn the control knob to "HI" position. Check that the range is connected. ■ See "Troubleshooting" in oven. 2. The bottom element should glow red and the "OVEN ON" indicator light should become...
