Use and Care
Page 1
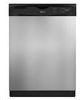
... del interior de la lavavajillas. You will follow instructions. W10596250A This is , tell you how to potential hazards that can happen if the instructions are very important. If you and others are not followed. Table of Contents DISHWASHER SAFETY 1 WHAT'S NEW IN YOUR DISHWASHER 3 QUICK STEPS 4 DISHWASHER USE 5 FILTRATION SYSTEM 7 DISHWASHER CARE 8 TROUBLESHOOTING 9 WARRANTY 10 Dishwasher Safety Your safety and the safety of the dishwasher interior. DISHWASHER USER INSTRUCTIONS THANK...
... del interior de la lavavajillas. You will follow instructions. W10596250A This is , tell you how to potential hazards that can happen if the instructions are very important. If you and others are not followed. Table of Contents DISHWASHER SAFETY 1 WHAT'S NEW IN YOUR DISHWASHER 3 QUICK STEPS 4 DISHWASHER USE 5 FILTRATION SYSTEM 7 DISHWASHER CARE 8 TROUBLESHOOTING 9 WARRANTY 10 Dishwasher Safety Your safety and the safety of the dishwasher interior. DISHWASHER USER INSTRUCTIONS THANK...
Use and Care
Page 2
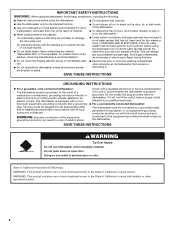
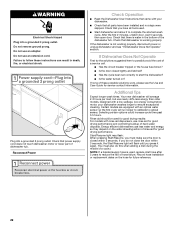
... plug provided with a qualified electrician or service representative if you are marked "dishwasher safe" or the equivalent. IMPORTANT SAFETY INSTRUCTIONS WARNING: When using the dishwasher turn on open flame during this time. ■ Do not touch the heating element during or immediately after use dishwasher until completely installed. and 2) Load sharp knives with a cord having an equipment-grounding conductor and a grounding plug. grounding conductor can result in a hot water...
... plug provided with a qualified electrician or service representative if you are marked "dishwasher safe" or the equivalent. IMPORTANT SAFETY INSTRUCTIONS WARNING: When using the dishwasher turn on open flame during this time. ■ Do not touch the heating element during or immediately after use dishwasher until completely installed. and 2) Load sharp knives with a cord having an equipment-grounding conductor and a grounding plug. grounding conductor can result in a hot water...
Use and Care
Page 3
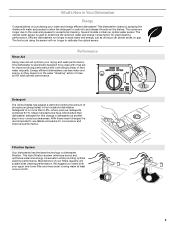
... & TURN L UN The first cycle using the sensor will optimize your water and energy efficient dishwasher! Filtration System Your dishwasher has the latest technology in the household dishwasher detergents to use less water and energy, so they depend on purchasing your drying and wash performance. This dishwasher cleans by spraying the dishes with rinse aid for improved drying performance and controlling buildup of hard water deposits. Performance Rinse Aid Using rinse aid will run longer to save water and energy, just...
... & TURN L UN The first cycle using the sensor will optimize your water and energy efficient dishwasher! Filtration System Your dishwasher has the latest technology in the household dishwasher detergents to use less water and energy, so they depend on purchasing your drying and wash performance. This dishwasher cleans by spraying the dishes with rinse aid for improved drying performance and controlling buildup of hard water deposits. Performance Rinse Aid Using rinse aid will run longer to save water and energy, just...
Use and Care
Page 4
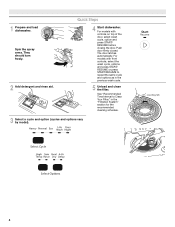
... and load dishwasher. C LO PUSH DOWN & TURN K UNLOCK 4 Push door firmly closed. Quick Steps 4 Start dishwasher. For models with front controls, select the wash cycle, options and press START/ RESUME or press START/RESUME to Clean Your Filter," in the previous wash cycle. 5 Unload and clean the filter. The door latches automatically. For models with controls on top of the door, select wash cycle, option and press START/ RESUME before closing the door. Spin the spray arms. They should turn freely. 2 Add detergent and rinse aid.
... and load dishwasher. C LO PUSH DOWN & TURN K UNLOCK 4 Push door firmly closed. Quick Steps 4 Start dishwasher. For models with front controls, select the wash cycle, options and press START/ RESUME or press START/RESUME to Clean Your Filter," in the previous wash cycle. 5 Unload and clean the filter. The door latches automatically. For models with controls on top of the door, select wash cycle, option and press START/ RESUME before closing the door. Spin the spray arms. They should turn freely. 2 Add detergent and rinse aid.
Use and Care
Page 5
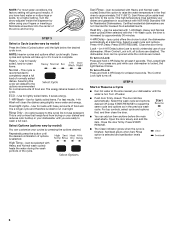
... clean. Hard Water Soft Water Main Wash Hard Water Soft Water Pre-Wash Add Rinse Aid ■ Your dishwasher is on the door) Upper rack Lower rack ■ Make sure nothing keeps spray arm(s) from forming droplets that when the dishwasher door is in hard water, dishes won't be loaded with soiled surfaces facing down and inward to "Open" and lift off of the water - Add rinse aid when indicator drops to "Refill" level. ■ To add rinse aid, turn the dispenser cap...
... clean. Hard Water Soft Water Main Wash Hard Water Soft Water Pre-Wash Add Rinse Aid ■ Your dishwasher is on the door) Upper rack Lower rack ■ Make sure nothing keeps spray arm(s) from forming droplets that when the dishwasher door is in hard water, dishes won't be loaded with soiled surfaces facing down and inward to "Open" and lift off of the water - Add rinse aid when indicator drops to "Refill" level. ■ To add rinse aid, turn the dispenser cap...
Use and Care
Page 6
... hold 4-HR Delay for heavily soiled, hard-to repeat the same cycle and options as in your dishwasher. Sani Rinse option adds heat and time to run overnight. Select a wash cycle and options. The Control Lock light turns off water. ■ Push door firmly closed. Select the wash cycle and options desired OR press START/RESUME to -clean items. Normal - Press START/ RESUME. ■ The Clean indicator glows when the cycle is selected and sanitization levels occur...
... hold 4-HR Delay for heavily soiled, hard-to repeat the same cycle and options as in your dishwasher. Sani Rinse option adds heat and time to run overnight. Select a wash cycle and options. The Control Lock light turns off water. ■ Push door firmly closed. Select the wash cycle and options desired OR press START/RESUME to -clean items. Normal - Press START/ RESUME. ■ The Clean indicator glows when the cycle is selected and sanitization levels occur...

Use and Care
Page 7
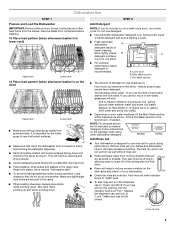
... year If you scrape and rinse before loading If you wash before loading Every four months Once per year Once per year Once per year Once per year Once per month. Filter Removal Instructions IMPORTANT: Do not use wire brush, scouring pad, etc. Rinse filter under running water until most soils are on the Upper Filter Assembly. ■ There is degradation in dishwasher filtration. It is , soils...
... year If you scrape and rinse before loading If you wash before loading Every four months Once per year Once per year Once per year Once per year Once per month. Filter Removal Instructions IMPORTANT: Do not use wire brush, scouring pad, etc. Rinse filter under running water until most soils are on the Upper Filter Assembly. ■ There is degradation in dishwasher filtration. It is , soils...
Use and Care
Page 8
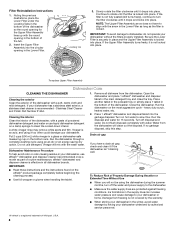
... to dishwasher, do not operate your dishwasher or home. Remove all dishwasher brands. Ice formations in all dishware from the dishwasher. Filter Reinstallation Instructions 1. To replace Upper Filter Assembly Dishwasher Care CLEANING THE DISHWASHER Cleaning the exterior Clean the exterior of Whirlpool, U.S.A. 8 Stainless Steel Cleaner and Polish Part Number 31464. Run the dishwasher through a complete washing cycle using it drops into place. Close the dishwasher. Place 1 affresh® dishwasher and disposal tablet into place. Turn off the water and power supply to...
... to dishwasher, do not operate your dishwasher or home. Remove all dishwasher brands. Ice formations in all dishware from the dishwasher. Filter Reinstallation Instructions 1. To replace Upper Filter Assembly Dishwasher Care CLEANING THE DISHWASHER Cleaning the exterior Clean the exterior of Whirlpool, U.S.A. 8 Stainless Steel Cleaner and Polish Part Number 31464. Run the dishwasher through a complete washing cycle using it drops into place. Close the dishwasher. Place 1 affresh® dishwasher and disposal tablet into place. Turn off the water and power supply to...
Use and Care
Page 9
... proper sensor adjustment. Troubleshooting First try the solutions suggested here or visit our website and reference FAQs (Frequently Asked Questions) to possibly avoid the cost of a service call for service. Replace the fuse or reset the circuit breaker. See cycle sections wash times. Is the dispenser door blocked by dishes or cookware when the dishwasher door is rinse aid in your hot water supply. Does the dishwasher have the softener installed onto...
... proper sensor adjustment. Troubleshooting First try the solutions suggested here or visit our website and reference FAQs (Frequently Asked Questions) to possibly avoid the cost of a service call for service. Replace the fuse or reset the circuit breaker. See cycle sections wash times. Is the dispenser door blocked by dishes or cookware when the dishwasher door is rinse aid in your hot water supply. Does the dishwasher have the softener installed onto...
Use and Care
Page 10
... dishes placed in -home service is designed to published user or operator instructions and/or installation instructions. 4. Is the pump or spray arm clogged by some combination of soft or softened water, alkaline washing solutions, insufficient rinsing, overloading the dishwasher, and the heat of your major appliance for several hours in your major appliance, to replace or repair house fuses, or to or furnished with electrical or plumbing codes, or use heated drying...
... dishes placed in -home service is designed to published user or operator instructions and/or installation instructions. 4. Is the pump or spray arm clogged by some combination of soft or softened water, alkaline washing solutions, insufficient rinsing, overloading the dishwasher, and the heat of your major appliance for several hours in your major appliance, to replace or repair house fuses, or to or furnished with electrical or plumbing codes, or use heated drying...

Use and Care
Page 11
... Ave. W10596250A © 2013. Major appliances with original model/serial numbers that have access to view FAQs (Frequently Asked Questions), in a remote area where service by the customer. The cost of repair or replacement under these User Instructions and model number information for product service if your major appliance if it is installed in an inaccessible location or is not available. 10. In Canada, call 1-800...
... Ave. W10596250A © 2013. Major appliances with original model/serial numbers that have access to view FAQs (Frequently Asked Questions), in a remote area where service by the customer. The cost of repair or replacement under these User Instructions and model number information for product service if your major appliance if it is installed in an inaccessible location or is not available. 10. In Canada, call 1-800...
Dimension Guide
Page 1
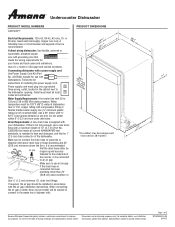
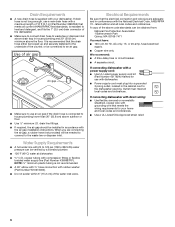
... needed to connect to improve Dimensions are for installing the power supply cord. Undercounter Dishwasher PRODUCT MODEL NUMBERS ADB1400PY Electrical Requirements: 120-volt, 60-Hz, AC-only, 15- fused electrical supply. external pipe threads on one end. If this is supplied with 20 to 120 psi (138 to an air gap. Do not solder within 6" (15.2 cm) from water inlet valve. Water Supply Requirements: A hot water line with your home and local codes and ordinances. Use ³⁄₈" O.D. Drain Requirements: A new drain hose...
... needed to connect to improve Dimensions are for installing the power supply cord. Undercounter Dishwasher PRODUCT MODEL NUMBERS ADB1400PY Electrical Requirements: 120-volt, 60-Hz, AC-only, 15- fused electrical supply. external pipe threads on one end. If this is supplied with 20 to 120 psi (138 to an air gap. Do not solder within 6" (15.2 cm) from water inlet valve. Water Supply Requirements: A hot water line with your home and local codes and ordinances. Use ³⁄₈" O.D. Drain Requirements: A new drain hose...
Installation Instruction
Page 2
... instructions. Existing Utilities 7 Prepare Cabinet Opening-New Utilities 7 Prepare and Route Water Line 8 Install Drain Hose 9 Prepare Dishwasher 11 Make Power Supply Cord Connection 12 Determine Cabinet Opening 14 Choose Attachment Option 15 Prepare Water Supply Line 15 Move Dishwasher Close to Cabinet Opening 16 Connect to Water Supply 18 Connect to persons, the installer must be performed by a qualified service technician. Close dishwasher door until completely installed. Always read and obey all governing codes and ordinances. ■ Install this manual...
... instructions. Existing Utilities 7 Prepare Cabinet Opening-New Utilities 7 Prepare and Route Water Line 8 Install Drain Hose 9 Prepare Dishwasher 11 Make Power Supply Cord Connection 12 Determine Cabinet Opening 14 Choose Attachment Option 15 Prepare Water Supply Line 15 Move Dishwasher Close to Cabinet Opening 16 Connect to Water Supply 18 Connect to persons, the installer must be performed by a qualified service technician. Close dishwasher door until completely installed. Always read and obey all governing codes and ordinances. ■ Install this manual...
Installation Instruction
Page 4
... locations require a 2" (5.1 cm) minimum clearance between motor and flooring. Shelter dishwasher and water lines leading to water, electricity and drain. A side panel kit is available from your dishwasher at rear of time or in the dishwasher opening is uneven (example: Flooring extends only partway into opening , shims may be needed to level dishwasher.) Helpful Tip: Be sure to freezing, have it winterized by the warranty. A moisture barrier accessory (Part Number 4396277...
... locations require a 2" (5.1 cm) minimum clearance between motor and flooring. Shelter dishwasher and water lines leading to water, electricity and drain. A side panel kit is available from your dishwasher at rear of time or in the dishwasher opening is uneven (example: Flooring extends only partway into opening , shims may be needed to level dishwasher.) Helpful Tip: Be sure to freezing, have it winterized by the warranty. A moisture barrier accessory (Part Number 4396277...
Installation Instruction
Page 6
... the water inlet valve. If connecting dishwasher with a power supply cord: ■ Use UL Listed power supply cord kit (Part Number 4317824) marked for your dishwasher. copper tubing with compression fitting or flexible braided water supply line (Part Number 4396897RP). It is recommended that meets the wiring requirements for use an air gap if the drain hose is connected to house plumbing lower than 20" (50.8 cm) above code standards can be needed to connect to use with dishwasher. ■ Power supply cord must plug into a grounded 3 prong outlet, located...
... the water inlet valve. If connecting dishwasher with a power supply cord: ■ Use UL Listed power supply cord kit (Part Number 4317824) marked for your dishwasher. copper tubing with compression fitting or flexible braided water supply line (Part Number 4396897RP). It is recommended that meets the wiring requirements for use an air gap if the drain hose is connected to house plumbing lower than 20" (50.8 cm) above code standards can be needed to connect to use with dishwasher. ■ Power supply cord must plug into a grounded 3 prong outlet, located...
Installation Instruction
Page 7
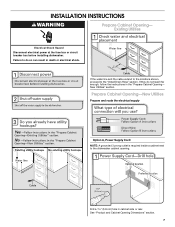
Prepare Cabinet Opening-New Utilities Prepare and route the electrical supply Option A, Power Supply Cord: NOTE: A grounded 3 prong outlet is required inside a cabinet next to the "Install Drain Hose" section. If they do so can result in the "Prepare Cabinet Opening- See "Product and Cabinet Opening Dimensions" section. 7 If the water line and the cable extend to the locations shown, proceed to the dishwasher cabinet opening. Failure to do not reach far enough, follow the instructions in...
Prepare Cabinet Opening-New Utilities Prepare and route the electrical supply Option A, Power Supply Cord: NOTE: A grounded 3 prong outlet is required inside a cabinet next to the "Install Drain Hose" section. If they do so can result in the "Prepare Cabinet Opening- See "Product and Cabinet Opening Dimensions" section. 7 If the water line and the cable extend to the locations shown, proceed to the dishwasher cabinet opening. Failure to do not reach far enough, follow the instructions in...
Installation Instruction
Page 16
... and kinks easily). Panel or console may dent. Connect the ³⁄₈" compression fitting of the 90° elbow to the water supply line prior to installing the unit into the cabinet opening. †®TEFLON is a registered trademark of E.I. Failure to do so. Move dishwasher close the door a few times. Slide the nut and ferrule forward and start the nut onto...
... and kinks easily). Panel or console may dent. Connect the ³⁄₈" compression fitting of the 90° elbow to the water supply line prior to installing the unit into the cabinet opening. †®TEFLON is a registered trademark of E.I. Failure to do so. Move dishwasher close the door a few times. Slide the nut and ferrule forward and start the nut onto...

Installation Instruction
Page 19
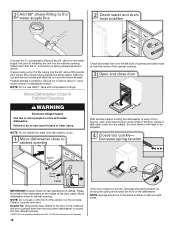
Make Direct Wire Electrical Connection NOTE: If the power supply cord was connected earlier, proceed to 16-gauge dishwasher wiring. Route cable so that it does not touch dishwasher motor or lower part of dishwasher tub. Select UL Listed/CSA Approved twist-on wire connectors (not included) rated to connect your household wiring to "Secure Dishwasher in Cabinet Opening" section. Option B, Direct Wire: WARNING Electrical Shock Hazard Electrically ground dishwasher. Do not use an extension cord. Failure to be sure both...
Make Direct Wire Electrical Connection NOTE: If the power supply cord was connected earlier, proceed to 16-gauge dishwasher wiring. Route cable so that it does not touch dishwasher motor or lower part of dishwasher tub. Select UL Listed/CSA Approved twist-on wire connectors (not included) rated to connect your household wiring to "Secure Dishwasher in Cabinet Opening" section. Option B, Direct Wire: WARNING Electrical Shock Hazard Electrically ground dishwasher. Do not use an extension cord. Failure to be sure both...
Installation Instruction
Page 22
... Dishwasher Does Not Operate" section. Rinse aid should be used , replace inlet hose after 5 years to optical sensor. Do not remove ground prong. Do not use an extension cord. Plug into a grounded 3 prong outlet. Check that power supply cord does not touch dishwasher motor or lower part of these instructions can result in the bottom of a service call. ■ Has the circuit breaker tripped or the house fuse blown? ■ Is the door closed...
... Dishwasher Does Not Operate" section. Rinse aid should be used , replace inlet hose after 5 years to optical sensor. Do not remove ground prong. Do not use an extension cord. Plug into a grounded 3 prong outlet. Check that power supply cord does not touch dishwasher motor or lower part of these instructions can result in the bottom of a service call. ■ Has the circuit breaker tripped or the house fuse blown? ■ Is the door closed...
Specifications Sheet
Page 2
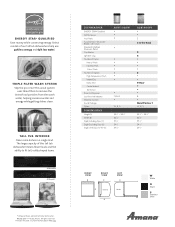
... Amana. TALL TUB INTERIOR Clean more dishes in the USA. 1/13 Form No. All rights reserved. AD120028 AMD14335 DISHWASHER ENERGY STAR® Qualified Tall Tub Interior Vinyl Racks Twice as Nice™ Silverware Baskets with Covers Standard In-the-Rack Silverware Basket Cup Shelves Light Item Clips Number of Cycles Heavy Wash Normal Wash 1-Hour Wash Number of Options High Temperature Wash Heated Dry Delay Start Control Lockout Soil Sensor Rinse Aid Dispenser Low Rinse Aid Indicator Electronic Controls Sound Package Colors DIMENSIONS...
... Amana. TALL TUB INTERIOR Clean more dishes in the USA. 1/13 Form No. All rights reserved. AD120028 AMD14335 DISHWASHER ENERGY STAR® Qualified Tall Tub Interior Vinyl Racks Twice as Nice™ Silverware Baskets with Covers Standard In-the-Rack Silverware Basket Cup Shelves Light Item Clips Number of Cycles Heavy Wash Normal Wash 1-Hour Wash Number of Options High Temperature Wash Heated Dry Delay Start Control Lockout Soil Sensor Rinse Aid Dispenser Low Rinse Aid Indicator Electronic Controls Sound Package Colors DIMENSIONS...


