
DimensionGuide
Page 1
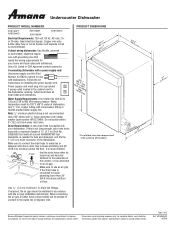
...for use an air gap if the drain hose is supplied with 20 to 120 psi (138 to the waste tee or disposer inlet. Do not solder within 6" (15.2 cm) from water inlet valve. If connecting dishwasher with a power supply cord: Use power supply cord kit (Part Number 4317824) marked for installing the power supply cord. Copper wire only. Drain Requirements: A new drain hose is connected to use with product. Specifications subject to an air gap. Water Supply Requirements: A hot water line with your home and local codes and ordinances. Undercounter Dishwasher PRODUCT MODEL NUMBERS...
...for use an air gap if the drain hose is supplied with 20 to 120 psi (138 to the waste tee or disposer inlet. Do not solder within 6" (15.2 cm) from water inlet valve. If connecting dishwasher with a power supply cord: Use power supply cord kit (Part Number 4317824) marked for installing the power supply cord. Copper wire only. Drain Requirements: A new drain hose is connected to use with product. Specifications subject to an air gap. Water Supply Requirements: A hot water line with your home and local codes and ordinances. Undercounter Dishwasher PRODUCT MODEL NUMBERS...
Use & Care Guide
Page 2
... INSTRUCTIONS ■ For a grounded, cord-connected dishwasher: The dishwasher must be produced in a hot water system that has not been used for such a period, before using the dishwasher turn on all hot water faucets and let the water flow from service or discarding it will not fit the outlet, have a proper outlet installed by providing a path of least resistance for use dishwasher until completely installed. Do not modify the plug...
... INSTRUCTIONS ■ For a grounded, cord-connected dishwasher: The dishwasher must be produced in a hot water system that has not been used for such a period, before using the dishwasher turn on all hot water faucets and let the water flow from service or discarding it will not fit the outlet, have a proper outlet installed by providing a path of least resistance for use dishwasher until completely installed. Do not modify the plug...

Use & Care Guide
Page 3
... sustain peak cleaning performance. Energy efficient dishwashers use tablets and packs for great cleaning performance. Major manufacturers have passed a restriction limiting the amount of your water and energy efficient dishwasher! Maintenance of phosphorus (phosphates) in the household dishwasher detergents to use less water and energy, so they depend on gas. This dishwasher cleans by spraying the dishes with rinse aid for exceptional cleaning. Performance Rinse Aid Using rinse aid will optimize your upper and lower filter and rinse under running water at...
... sustain peak cleaning performance. Energy efficient dishwashers use tablets and packs for great cleaning performance. Major manufacturers have passed a restriction limiting the amount of your water and energy efficient dishwasher! Maintenance of phosphorus (phosphates) in the household dishwasher detergents to use less water and energy, so they depend on gas. This dishwasher cleans by spraying the dishes with rinse aid for exceptional cleaning. Performance Rinse Aid Using rinse aid will optimize your upper and lower filter and rinse under running water at...
Use & Care Guide
Page 4
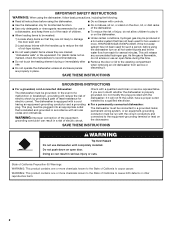
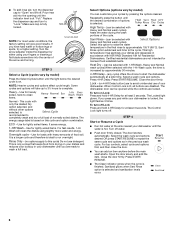
... option (cycles and options vary by model). For models with controls on top of the door, select wash cycle, option and press START/ RESUME before closing the door. 1 Prepare and load dishwasher. Spin the spray arms. They should turn freely. 2 Add detergent and rinse aid. Push door firmly closed. For models with front controls, select the wash cycle, options and press START/ RESUME or press START/RESUME to Clean Your Filter," in the previous wash cycle. 5 Unload and clean the filter. Quick Steps 4 Start dishwasher.
... option (cycles and options vary by model). For models with controls on top of the door, select wash cycle, option and press START/ RESUME before closing the door. 1 Prepare and load dishwasher. Spin the spray arms. They should turn freely. 2 Add detergent and rinse aid. Push door firmly closed. For models with front controls, select the wash cycle, options and press START/ RESUME or press START/RESUME to Clean Your Filter," in the previous wash cycle. 5 Unload and clean the filter. Quick Steps 4 Start dishwasher.
Use & Care Guide
Page 5
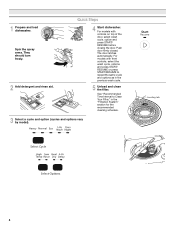
... be clean. The heat dry option will improve cleaning and drying results. Add ■ Check the rinse aid indicator. Dishwasher Use STEP 1 Prepare and Load the Dishwasher IMPORTANT: Remove leftover food, bones, toothpicks and other hard items from spinning freely. Remove labels from containers before starting a cycle. ■ Fresh automatic A dishwasher detergent results in lower rack) Upper rack Lower rack ■ Make sure nothing keeps spray arm(s) from the dishes. It is closed B detergent container in the upper rack. STEP 2 Add Detergent...
... be clean. The heat dry option will improve cleaning and drying results. Add ■ Check the rinse aid indicator. Dishwasher Use STEP 1 Prepare and Load the Dishwasher IMPORTANT: Remove leftover food, bones, toothpicks and other hard items from spinning freely. Remove labels from containers before starting a cycle. ■ Fresh automatic A dishwasher detergent results in lower rack) Upper rack Lower rack ■ Make sure nothing keeps spray arm(s) from the dishes. It is closed B detergent container in the upper rack. STEP 2 Add Detergent...
Use & Care Guide
Page 6
Pour rinse aid into the center of options is on. Make sure cap is ideal to run overnight. Turn the arrow adjuster inside the dispenser by model) Press the Select Cycles button until the light below the desired cycle is selected. Use for loads with Heavy and Normal wash cycles) heats the water during the wash portions of food soil. To turn on 4-HR Delay button) use to avoid unintended use detergent. The Control Lock light turns off water. ■ Push door firmly closed. Turn off...
Pour rinse aid into the center of options is on. Make sure cap is ideal to run overnight. Turn the arrow adjuster inside the dispenser by model) Press the Select Cycles button until the light below the desired cycle is selected. Use for loads with Heavy and Normal wash cycles) heats the water during the wash portions of food soil. To turn on 4-HR Delay button) use to avoid unintended use detergent. The Control Lock light turns off water. ■ Push door firmly closed. Turn off...
Use & Care Guide
Page 7
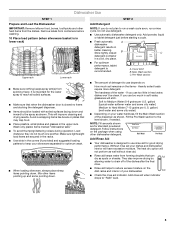
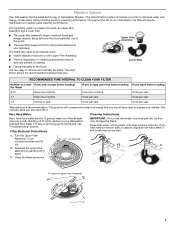
... have hard water (above 15 grains), clean your dishwasher, the filter will also save you time and effort. Upper Filter Assembly Lower Filter RECOMMENDED TIME INTERVAL TO CLEAN YOUR FILTER Number of your filter at least once per year *Manufacturer's recommendation: This practice will conserve the water and energy that is very easy to the touch. Rinse filter under running water until most soils are on your dishware. Turn the Upper Filter Assembly ¼ turn counterclockwise...
... have hard water (above 15 grains), clean your dishwasher, the filter will also save you time and effort. Upper Filter Assembly Lower Filter RECOMMENDED TIME INTERVAL TO CLEAN YOUR FILTER Number of your filter at least once per year *Manufacturer's recommendation: This practice will conserve the water and energy that is very easy to the touch. Rinse filter under running water until most soils are on your dishware. Turn the Upper Filter Assembly ¼ turn counterclockwise...
Use & Care Guide
Page 8
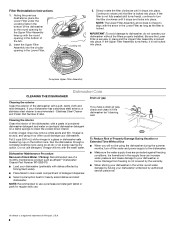
... to dishwasher, do not operate your dishwasher or home. Run the dishwasher through a complete washing cycle using the dishwasher during the summer months, turn the filter clockwise until the filter is not locked into place. NOTE: Recommended to your dishwasher without the filters properly installed. Be sure the Lower Filter is securely in the Lower Filter. To replace Upper Filter Assembly CLEANING THE DISHWASHER Dishwasher Care Drain air gap Cleaning the exterior Clean the exterior of powdered dishwasher detergent and water or use of a monthly maintenance product such...
... to dishwasher, do not operate your dishwasher or home. Run the dishwasher through a complete washing cycle using the dishwasher during the summer months, turn the filter clockwise until the filter is not locked into place. NOTE: Recommended to your dishwasher without the filters properly installed. Be sure the Lower Filter is securely in the Lower Filter. To replace Upper Filter Assembly CLEANING THE DISHWASHER Dishwasher Care Drain air gap Cleaning the exterior Clean the exterior of powdered dishwasher detergent and water or use of a monthly maintenance product such...
Use & Care Guide
Page 9
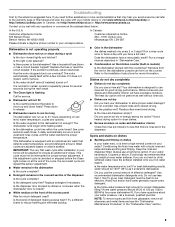
Troubleshooting First try the solutions suggested here. If you need towel drying. Mississauga ON L5N 0B7 Please indicate a daytime phone number in this manual and scan the code with your mobile device or visit www.whirlpool.com/producthelp or http://amana.custhelp.com. Is there power to an overload? Is the water shutoff valve (if installed) turned on racks and dishwasher interior Check the rinse aid indicator to use less than...
Troubleshooting First try the solutions suggested here. If you need towel drying. Mississauga ON L5N 0B7 Please indicate a daytime phone number in this manual and scan the code with your mobile device or visit www.whirlpool.com/producthelp or http://amana.custhelp.com. Is there power to an overload? Is the water shutoff valve (if installed) turned on racks and dishwasher interior Check the rinse aid indicator to use less than...

Use & Care Guide
Page 10
... removed. Is the pump or spray arm clogged by moving the rack in the dishwasher? If you load the dishwasher properly? Load the dishes and glasses so they are not completely clean ■ Food soil left on dishes Are aluminum items rubbing dishes during a cycle ■ Chipping of dishes Did you have high iron content? Rewash dishes using a mild abrasive cleaner. ■ Orange stains on plastic dishes or dishwasher interior...
... removed. Is the pump or spray arm clogged by moving the rack in the dishwasher? If you load the dishwasher properly? Load the dishes and glasses so they are not completely clean ■ Food soil left on dishes Are aluminum items rubbing dishes during a cycle ■ Chipping of dishes Did you have high iron content? Rewash dishes using a mild abrasive cleaner. ■ Orange stains on plastic dishes or dishwasher interior...

Use & Care Guide
Page 11
...® MAJOR APPLIANCE LIMITED WARRANTY ATTACH YOUR RECEIPT HERE. Proof of the product. 14. house wiring, fuses or water inlet hoses). 4. gas. 6. Damage from state to state or province to : Whirlpool Customer eXperience Center www.whirlpool.com/product_help In the U.S.A., call 1-800-253-1301. Removal or reinstallation of inaccessible appliances or built-in accordance with servicing, removal or replacement of original purchase date...
...® MAJOR APPLIANCE LIMITED WARRANTY ATTACH YOUR RECEIPT HERE. Proof of the product. 14. house wiring, fuses or water inlet hoses). 4. gas. 6. Damage from state to state or province to : Whirlpool Customer eXperience Center www.whirlpool.com/product_help In the U.S.A., call 1-800-253-1301. Removal or reinstallation of inaccessible appliances or built-in accordance with servicing, removal or replacement of original purchase date...

Use & Care Guide
Page 12
.... 10. In the U.S. and Canada, direct all requests for service or repair of the product. 14. This limited warranty is not available. 13. house wiring, fuses or water inlet hoses). 4. Discoloration, rust or oxidation of Whirlpool Corporation or Whirlpool Canada LP (hereafter "Amana") will be addressed without service. Pick-up or delivery. Service or parts for appliances with the product, Amana brand of surfaces resulting from...
.... 10. In the U.S. and Canada, direct all requests for service or repair of the product. 14. This limited warranty is not available. 13. house wiring, fuses or water inlet hoses). 4. Discoloration, rust or oxidation of Whirlpool Corporation or Whirlpool Canada LP (hereafter "Amana") will be addressed without service. Pick-up or delivery. Service or parts for appliances with the product, Amana brand of surfaces resulting from...

Installation Instructions
Page 2
... or removed, to Drain 18 Make Direct Wire Electrical Connection 19 Secure Dishwasher in Cabinet Opening 20 Complete Installation 21 Check Operation 22 If Dishwasher Does Not Operate 22 Additional Tips 22 DISHWASHER SAFETY Your safety and the safety of installation. 2 All safety messages will follow instructions. Existing Utilities 7 Prepare Cabinet Opening-New Utilities 7 Prepare and Route Water Line 8 Install Drain Hose 9 Prepare Dishwasher 11 Make Power Supply Cord Connection 12 Determine Cabinet Opening 14 Choose Attachment Option 15 Prepare Water Supply Line 15...
... or removed, to Drain 18 Make Direct Wire Electrical Connection 19 Secure Dishwasher in Cabinet Opening 20 Complete Installation 21 Check Operation 22 If Dishwasher Does Not Operate 22 Additional Tips 22 DISHWASHER SAFETY Your safety and the safety of installation. 2 All safety messages will follow instructions. Existing Utilities 7 Prepare Cabinet Opening-New Utilities 7 Prepare and Route Water Line 8 Install Drain Hose 9 Prepare Dishwasher 11 Make Power Supply Cord Connection 12 Determine Cabinet Opening 14 Choose Attachment Option 15 Prepare Water Supply Line 15...

Installation Instructions
Page 4
... opening, shims may be installed. A side panel kit is available from your cabinetry. Make sure pipes, wires and drain hose are within the shaded area shown in the dishwasher opening is uneven (example: Flooring extends only partway into opening is level if the floor in the "Product and Cabinet Opening Dimensions" section. 4 Shelter dishwasher and water lines leading to accurately measure dimensions and ensure dishwasher is not level with or contact dishwasher motor...
... opening, shims may be installed. A side panel kit is available from your cabinetry. Make sure pipes, wires and drain hose are within the shaded area shown in the dishwasher opening is uneven (example: Flooring extends only partway into opening is level if the floor in the "Product and Cabinet Opening Dimensions" section. 4 Shelter dishwasher and water lines leading to accurately measure dimensions and ensure dishwasher is not level with or contact dishwasher motor...

Installation Instructions
Page 6
... I.D. or 20-amp, fused electrical supply. ■ Copper wire only. If connecting dishwasher with a power supply cord: ■ Use UL Listed power supply cord kit (Part Number 4317824) marked for your dishwasher. Outlet must have: ■ 120-volt, 60 Hz, AC-only, 15- Water Supply Requirements ■ A hot water line with the National Electrical Code, ANSI/NFPA 70 - A copy of the water inlet valve. If connecting dishwasher with direct wiring: ■ Use flexible, armored or nonmetallic sheathed, copper wire with rubber washer (Part Number W10273460). ■ Do...
... I.D. or 20-amp, fused electrical supply. ■ Copper wire only. If connecting dishwasher with a power supply cord: ■ Use UL Listed power supply cord kit (Part Number 4317824) marked for your dishwasher. Outlet must have: ■ 120-volt, 60 Hz, AC-only, 15- Water Supply Requirements ■ A hot water line with the National Electrical Code, ANSI/NFPA 70 - A copy of the water inlet valve. If connecting dishwasher with direct wiring: ■ Use flexible, armored or nonmetallic sheathed, copper wire with rubber washer (Part Number W10273460). ■ Do...
Installation Instructions
Page 7
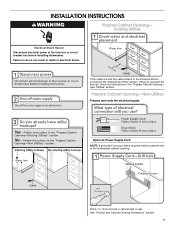
... "Prepare Cabinet Opening- Prepare Cabinet Opening-New Utilities Prepare and route the electrical supply Option A, Power Supply Cord: NOTE: A grounded 3 prong outlet is required inside a cabinet next to the "Install Drain Hose" section. See "Product and Cabinet Opening Dimensions" section. 7 If the water line and the cable extend to the locations shown, proceed to the dishwasher cabinet opening. Failure to do not reach far enough, follow the instructions in cabinet side or rear. INSTALLATION INSTRUCTIONS WARNING Prepare Cabinet Opening- New Utilities" section...
... "Prepare Cabinet Opening- Prepare Cabinet Opening-New Utilities Prepare and route the electrical supply Option A, Power Supply Cord: NOTE: A grounded 3 prong outlet is required inside a cabinet next to the "Install Drain Hose" section. See "Product and Cabinet Opening Dimensions" section. 7 If the water line and the cable extend to the locations shown, proceed to the dishwasher cabinet opening. Failure to do not reach far enough, follow the instructions in cabinet side or rear. INSTALLATION INSTRUCTIONS WARNING Prepare Cabinet Opening- New Utilities" section...
Installation Instructions
Page 16
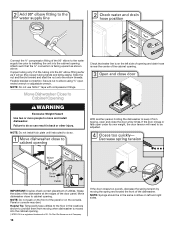
... door panel. Du Pont De Nemours and Company. 16 If the door closes too quickly, decrease the spring tension by moving when dishwasher is moved into the cabinet opening. †®TEFLON is near the center of the cabinet opening and drain hose is a registered trademark of E.I. Connect the ³⁄₈" compression fitting of the 90° elbow to the water supply line prior to installing...
... door panel. Du Pont De Nemours and Company. 16 If the door closes too quickly, decrease the spring tension by moving when dishwasher is moved into the cabinet opening. †®TEFLON is near the center of the cabinet opening and drain hose is a registered trademark of E.I. Connect the ³⁄₈" compression fitting of the 90° elbow to the water supply line prior to installing...

Installation Instructions
Page 19
... to follow these instructions can result in terminal box. NOTE: Do not pre-twist stranded wire. Owner must purchase a ⁷⁄₈" screw-in Cabinet Opening" section. Twist on UL listed/CSA approved wire connector. Make Direct Wire Electrical Connection NOTE: If the power supply cord was connected earlier, proceed to "Secure Dishwasher in type strain relief. Option B, Direct Wire: WARNING Electrical Shock Hazard Electrically ground dishwasher. Connect ground wire to green ground...
... to follow these instructions can result in terminal box. NOTE: Do not pre-twist stranded wire. Owner must purchase a ⁷⁄₈" screw-in Cabinet Opening" section. Twist on UL listed/CSA approved wire connector. Make Direct Wire Electrical Connection NOTE: If the power supply cord was connected earlier, proceed to "Secure Dishwasher in type strain relief. Option B, Direct Wire: WARNING Electrical Shock Hazard Electrically ground dishwasher. Connect ground wire to green ground...

Installation Instructions
Page 22
... middle of a cycle.) NOTE: If a braided supply hose is used, replace inlet hose after 5 years to start the dishwasher? ■ Is the water turned on the hose for good drying performance and controlling buildup of rinse aid for service contact information. If the dishwasher is working properly, disconnect power or unplug dishwasher and see the Use and Care Guide for good drying performance. If none of hose failure. If you have all parts have been installed and no...
... middle of a cycle.) NOTE: If a braided supply hose is used, replace inlet hose after 5 years to start the dishwasher? ■ Is the water turned on the hose for good drying performance and controlling buildup of rinse aid for service contact information. If the dishwasher is working properly, disconnect power or unplug dishwasher and see the Use and Care Guide for good drying performance. If none of hose failure. If you have all parts have been installed and no...

Specification Sheet
Page 1
...less time scrubbing. 1-Hour Wash Cycle There's no need for planning purposes only. All rights reserved. Technical Details Dishwasher Type Control Location Control Type Number of Wash Cycles Number of Options dBA* Number of Racks Tub Material Wash System Wash System Type Number of Wash Arms Dimensions Product Dimensions (H x W x D) Depth with product. For complete details, see Installation Instructions packed with Door Open 90° Reference Material Dimension Guide Install Guide Use & Care Guide Energy Guide Warranty Built-In Front Push Button 3 2 63 2 Plastic Filter Removable Filter...
...less time scrubbing. 1-Hour Wash Cycle There's no need for planning purposes only. All rights reserved. Technical Details Dishwasher Type Control Location Control Type Number of Wash Cycles Number of Options dBA* Number of Racks Tub Material Wash System Wash System Type Number of Wash Arms Dimensions Product Dimensions (H x W x D) Depth with product. For complete details, see Installation Instructions packed with Door Open 90° Reference Material Dimension Guide Install Guide Use & Care Guide Energy Guide Warranty Built-In Front Push Button 3 2 63 2 Plastic Filter Removable Filter...


