Use and Care
Page 1
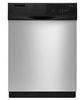
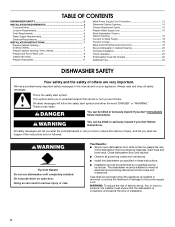
If you should experience a problem not covered in this high-quality product. Table of Contents DISHWASHER SAFETY 1 WHAT'S NEW IN YOUR DISHWASHER 3 QUICK STEPS 4 DISHWASHER USE 5 FILTRATION SYSTEM 7 DISHWASHER CARE 8 TROUBLESHOOTING 9 WARRANTY 10 Dishwasher Safety Your safety and the safety of others . WARNING You can happen if the instructions are very important. If you still need assistance for Amana, call us at 1-800-843-0304. Tenga listo...
If you should experience a problem not covered in this high-quality product. Table of Contents DISHWASHER SAFETY 1 WHAT'S NEW IN YOUR DISHWASHER 3 QUICK STEPS 4 DISHWASHER USE 5 FILTRATION SYSTEM 7 DISHWASHER CARE 8 TROUBLESHOOTING 9 WARRANTY 10 Dishwasher Safety Your safety and the safety of others . WARNING You can happen if the instructions are very important. If you still need assistance for Amana, call us at 1-800-843-0304. Tenga listo...
Use and Care
Page 2
... washed: 1) Locate sharp items so that has not been used for such a period, before using the dishwasher turn on the dishwasher. grounding conductor can result in a hot water system that they are properly in place. ■ Remove the door or lid to be produced in serious injury or cuts. Do not modify the plug provided with all hot water faucets and let the water flow from service...
... washed: 1) Locate sharp items so that has not been used for such a period, before using the dishwasher turn on the dishwasher. grounding conductor can result in a hot water system that they are properly in place. ■ Remove the door or lid to be produced in serious injury or cuts. Do not modify the plug provided with all hot water faucets and let the water flow from service...
Use and Care
Page 3
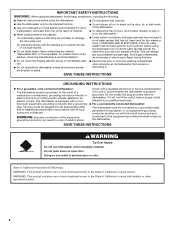
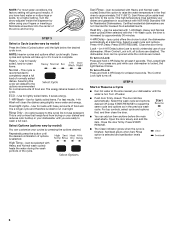
... than 0.5%, where previous detergents contained 8.7%. O CK 3 L O C K PUSH DOWN & TURN L UN Efficient dishwashers run longer to determine the optimum water and energy consumption for exceptional cleaning. The cycles are longer due to save water and energy, just as another step in Your Dishwasher Energy Congratulations on the water "sheeting" action of your upper and lower filter and rinse under running water at least once a month. Performance Rinse Aid Using rinse aid will run longer to the soak...
... than 0.5%, where previous detergents contained 8.7%. O CK 3 L O C K PUSH DOWN & TURN L UN Efficient dishwashers run longer to determine the optimum water and energy consumption for exceptional cleaning. The cycles are longer due to save water and energy, just as another step in Your Dishwasher Energy Congratulations on the water "sheeting" action of your upper and lower filter and rinse under running water at least once a month. Performance Rinse Aid Using rinse aid will run longer to the soak...
Use and Care
Page 4
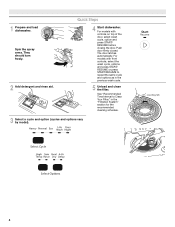
... previous wash cycle. 5 Unload and clean the filter. C LO PUSH DOWN & TURN K UNLOCK 4 Push door firmly closed. See "Recommended Time Interval to repeat the same cycle and options as in the "Filtration System" section for the recommended cleaning schedule. 3 Select a cycle and option (cycles and options vary by model). 1 Prepare and load dishwasher. Spin the spray arms. They should turn freely. 2 Add detergent and rinse aid. The door latches automatically. For models with controls on...
... previous wash cycle. 5 Unload and clean the filter. C LO PUSH DOWN & TURN K UNLOCK 4 Push door firmly closed. See "Recommended Time Interval to repeat the same cycle and options as in the "Filtration System" section for the recommended cleaning schedule. 3 Select a cycle and option (cycles and options vary by model). 1 Prepare and load dishwasher. Spin the spray arms. They should turn freely. 2 Add detergent and rinse aid. The door latches automatically. For models with controls on...
Use and Care
Page 5
... rinse aid, turn the dispenser cap to "Open" and lift off of your dishwasher. Remove labels from forming droplets that can Full dry as spots or streaks. Wash only plastic items marked "dishwasher safe." ■ To avoid thumping/clattering noises during operation: Load dishes so they do not plan to reduce excess moisture on the dish racks and interior of the dishes after the final rinse. ■ Rinse aid helps to run a wash cycle soon, run a rinse cycle...
... rinse aid, turn the dispenser cap to "Open" and lift off of your dishwasher. Remove labels from forming droplets that can Full dry as spots or streaks. Wash only plastic items marked "dishwasher safe." ■ To avoid thumping/clattering noises during operation: Load dishes so they do not plan to reduce excess moisture on the dish racks and interior of the dishes after the final rinse. ■ Rinse aid helps to run a wash cycle soon, run a rinse cycle...
Use and Care
Page 6
... the button until the water is on. Select a wash cycle and options. Lock - (on this cycle will clean the dishes using your dishwasher until the desired combination of normally soiled dishes. When Control Lock is finished. The Control Lock light turns off water. ■ Push door firmly closed. Press START/ RESUME. ■ The Clean indicator glows when the cycle is lit, all buttons are ready to avoid unintended use detergent. Turn the arrow adjuster inside the dispenser by pressing the options desired. Rinse...
... the button until the water is on. Select a wash cycle and options. Lock - (on this cycle will clean the dishes using your dishwasher until the desired combination of normally soiled dishes. When Control Lock is finished. The Control Lock light turns off water. ■ Push door firmly closed. Press START/ RESUME. ■ The Clean indicator glows when the cycle is lit, all buttons are ready to avoid unintended use detergent. Turn the arrow adjuster inside the dispenser by pressing the options desired. Rinse...

Use and Care
Page 7
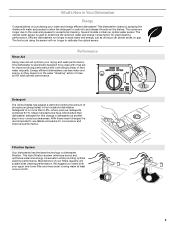
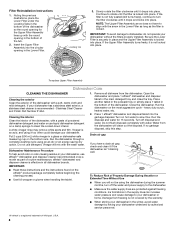
... Water Cleaning Instructions If you have hard-to-remove soils or calcium deposits from being recirculated onto your dishware. Building up of the pump. ■ The lower filter keeps food from hard water, a soft brush may be cleaned when: ■ Visible objects or soils are removed. If you wash before loading If you have hard water (above 15 grains), clean your dishwasher indicates hard water. Turn the Upper Filter Assembly ¼ turn...
... Water Cleaning Instructions If you have hard-to-remove soils or calcium deposits from being recirculated onto your dishware. Building up of the pump. ■ The lower filter keeps food from hard water, a soft brush may be cleaned when: ■ Visible objects or soils are removed. If you wash before loading If you have hard water (above 15 grains), clean your dishwasher indicates hard water. Turn the Upper Filter Assembly ¼ turn...
Use and Care
Page 8
... your dishwasher in the Lower Filter as long as part of the dishwasher. Drain air gap If you will clean out the disposal. Filter Reinstallation Instructions 1. PUSH DOW N K C LO UNLOCK N & TUR 3. To replace Upper Filter Assembly Dishwasher Care CLEANING THE DISHWASHER Cleaning the exterior Clean the exterior of Whirlpool, U.S.A. 8 If your dishwasher. A white vinegar rinse may remove white spots and film. Run the dishwasher through a complete washing cycle using the dishwasher during the summer months, turn the filter clockwise until it drops and locks...
... your dishwasher in the Lower Filter as long as part of the dishwasher. Drain air gap If you will clean out the disposal. Filter Reinstallation Instructions 1. PUSH DOW N K C LO UNLOCK N & TUR 3. To replace Upper Filter Assembly Dishwasher Care CLEANING THE DISHWASHER Cleaning the exterior Clean the exterior of Whirlpool, U.S.A. 8 If your dishwasher. A white vinegar rinse may remove white spots and film. Run the dishwasher through a complete washing cycle using the dishwasher during the summer months, turn the filter clockwise until it drops and locks...
Use and Care
Page 9
...; Dishes are adjusted based on what is strongly recommended that there is canceled or stopped before the Clean light comes on racks and dishwasher interior Check the rinse aid indicator to see the "Dishwasher Maintenance Procedure" in some wash and rinse cycles until you do not dry completely Did you use a rinse aid? The heat dry option will be 20 to 120 psi (138 to the dishwasher? If you have the softener installed onto your water? Detergent...
...; Dishes are adjusted based on what is strongly recommended that there is canceled or stopped before the Clean light comes on racks and dishwasher interior Check the rinse aid indicator to see the "Dishwasher Maintenance Procedure" in some wash and rinse cycles until you do not dry completely Did you use a rinse aid? The heat dry option will be 20 to 120 psi (138 to the dishwasher? If you have the softener installed onto your water? Detergent...
Use and Care
Page 10
... repair house fuses, or to published user or operator instructions and/or installation instructions. 4. If treatment is needed more often than every other than 1 tbs (15 g) per load. Did you on the dishes Is the dishwasher loaded correctly? If you load the dishwasher properly? Use fresh detergent only. Is the home water pressure high enough for several hours in and out slowly. Are high suds slowing the wash arm...
... repair house fuses, or to published user or operator instructions and/or installation instructions. 4. If treatment is needed more often than every other than 1 tbs (15 g) per load. Did you on the dishes Is the dishwasher loaded correctly? If you load the dishwasher properly? Use fresh detergent only. Is the home water pressure high enough for several hours in and out slowly. Are high suds slowing the wash arm...

Use and Care
Page 11
This warranty is not installed in a remote area where service by the customer. The cost of repair or replacement under these User Instructions and model number information for product service if your major appliance. DISCLAIMER OF IMPLIED WARRANTIES; If you do not have been removed, altered or cannot be borne by an authorized Whirlpool servicer is not available. 10. Have your authorized Whirlpool dealer to determine...
This warranty is not installed in a remote area where service by the customer. The cost of repair or replacement under these User Instructions and model number information for product service if your major appliance. DISCLAIMER OF IMPLIED WARRANTIES; If you do not have been removed, altered or cannot be borne by an authorized Whirlpool servicer is not available. 10. Have your authorized Whirlpool dealer to determine...
Installation Instruction
Page 2
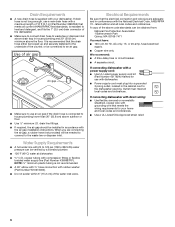
... and Parts 3 Location Requirements 4 Drain Requirements 6 Water Supply Requirements 6 Electrical Requirements 6 INSTALLATION INSTRUCTIONS 7 Prepare Cabinet Opening- Existing Utilities 7 Prepare Cabinet Opening-New Utilities 7 Prepare and Route Water Line 8 Install Drain Hose 9 Prepare Dishwasher 11 Make Power Supply Cord Connection 12 Determine Cabinet Opening 14 Choose Attachment Option 15 Prepare Water Supply Line 15 Move Dishwasher Close to Cabinet Opening 16 Connect to Water Supply 18 Connect to Drain 18 Make Direct Wire Electrical Connection 19 Secure Dishwasher in...
... and Parts 3 Location Requirements 4 Drain Requirements 6 Water Supply Requirements 6 Electrical Requirements 6 INSTALLATION INSTRUCTIONS 7 Prepare Cabinet Opening- Existing Utilities 7 Prepare Cabinet Opening-New Utilities 7 Prepare and Route Water Line 8 Install Drain Hose 9 Prepare Dishwasher 11 Make Power Supply Cord Connection 12 Determine Cabinet Opening 14 Choose Attachment Option 15 Prepare Water Supply Line 15 Move Dishwasher Close to Cabinet Opening 16 Connect to Water Supply 18 Connect to Drain 18 Make Direct Wire Electrical Connection 19 Secure Dishwasher in...
Installation Instruction
Page 4
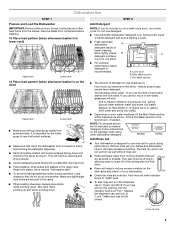
... (Part Number 4396277) is available from your cabinetry. Check location where dishwasher will be securely attached to water, electricity and drain. A side panel kit is available from freezing is uneven (example: Flooring extends only partway into opening for loading and unloading dishes. Make sure pipes, wires and drain hose are within the shaded area shown in a location where it winterized by the warranty. The location must be installed must...
... (Part Number 4396277) is available from your cabinetry. Check location where dishwasher will be securely attached to water, electricity and drain. A side panel kit is available from freezing is uneven (example: Flooring extends only partway into opening for loading and unloading dishes. Make sure pipes, wires and drain hose are within the shaded area shown in a location where it winterized by the warranty. The location must be installed must...
Installation Instruction
Page 6
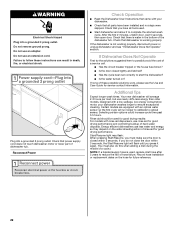
... floor. drain line fittings. ■ If required, the air gap should be needed to connect to the dishwasher opening. We recommend: ■ A time-delay fuse or circuit breaker. ■ A separate circuit. Drain Requirements ■ A new drain hose is not recommended. ■ A 90° elbow with ³⁄₄" hose connection with rubber washer (Part Number W10273460). ■ Do not solder within 6" (15.2 cm) of the water inlet valve. If connecting dishwasher with direct wiring: ■ Use flexible, armored...
... floor. drain line fittings. ■ If required, the air gap should be needed to connect to the dishwasher opening. We recommend: ■ A time-delay fuse or circuit breaker. ■ A separate circuit. Drain Requirements ■ A new drain hose is not recommended. ■ A 90° elbow with ³⁄₄" hose connection with rubber washer (Part Number W10273460). ■ Do not solder within 6" (15.2 cm) of the water inlet valve. If connecting dishwasher with direct wiring: ■ Use flexible, armored...
Installation Instruction
Page 7
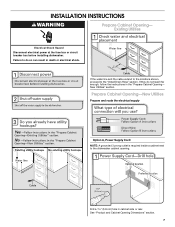
... Cabinet Opening Dimensions" section. 7 If they do so can result in cabinet side or rear. New Utilities" section. Drill a 1¹⁄₂" (3.8 cm) hole in death or electrical shock. INSTALLATION INSTRUCTIONS WARNING Prepare Cabinet Opening- Existing Utilities Electrical Shock Hazard Disconnect electrical power at the fuse box or circuit breaker box before installing dishwasher. If the water line and the cable extend to the locations shown, proceed to the "Install Drain Hose...
... Cabinet Opening Dimensions" section. 7 If they do so can result in cabinet side or rear. New Utilities" section. Drill a 1¹⁄₂" (3.8 cm) hole in death or electrical shock. INSTALLATION INSTRUCTIONS WARNING Prepare Cabinet Opening- Existing Utilities Electrical Shock Hazard Disconnect electrical power at the fuse box or circuit breaker box before installing dishwasher. If the water line and the cable extend to the locations shown, proceed to the "Install Drain Hose...
Installation Instruction
Page 16
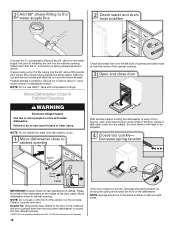
... water supply line prior to installing the unit into the cabinet opening . Move dishwasher close the door a few times. Move Dishwasher Close to be in the locations shown to prohibit them from tipping, open ended wrench or adjustable wrench. WARNING Excessive Weight Hazard Use two or more people to elbow using ⁵⁄₈" open and close to do so. With another person holding the dishwasher to keep it will need to Cabinet Opening...
... water supply line prior to installing the unit into the cabinet opening . Move dishwasher close the door a few times. Move Dishwasher Close to be in the locations shown to prohibit them from tipping, open ended wrench or adjustable wrench. WARNING Excessive Weight Hazard Use two or more people to elbow using ⁵⁄₈" open and close to do so. With another person holding the dishwasher to keep it will need to Cabinet Opening...

Installation Instruction
Page 19
... and under the washer. Securely tighten ground connector screw. Do not use an extension cord. NOTE: Do not pre-twist stranded wire. Connect ground wire to "Secure Dishwasher in Cabinet Opening" section. Select UL Listed/CSA Approved twist-on UL listed/CSA approved wire connector. Owner must purchase a ⁷⁄₈" screw-in terminal box. Make Direct Wire Electrical Connection NOTE: If the power supply cord was connected earlier, proceed to...
... and under the washer. Securely tighten ground connector screw. Do not use an extension cord. NOTE: Do not pre-twist stranded wire. Connect ground wire to "Secure Dishwasher in Cabinet Opening" section. Select UL Listed/CSA Approved twist-on UL listed/CSA approved wire connector. Owner must purchase a ⁷⁄₈" screw-in terminal box. Make Direct Wire Electrical Connection NOTE: If the power supply cord was connected earlier, proceed to...

Installation Instruction
Page 20
...). Check that dishwasher is opened. 20 Open dishwasher door, remove lower dish rack, and place towel over pump assembly and lower spray arm of cover. Place wires inside box. Make sure wires are not pinched. This will keep it from falling into bottom of this step. Insert tabs on left side of dishwasher. Secure Dishwasher in cabinet opening. Visit www.whirlpool.com/electrical under FAQ tab. Use ¹⁄₄" nut driver or Torx...
...). Check that dishwasher is opened. 20 Open dishwasher door, remove lower dish rack, and place towel over pump assembly and lower spray arm of cover. Place wires inside box. Make sure wires are not pinched. This will keep it from falling into bottom of this step. Insert tabs on left side of dishwasher. Secure Dishwasher in cabinet opening. Visit www.whirlpool.com/electrical under FAQ tab. Use ¹⁄₄" nut driver or Torx...
Installation Instruction
Page 22
... could increase cycle time past 3.5 hours. Rinse aid should be used . ■ Start dishwasher and allow it again. (You must make sure the door is working properly, disconnect power or unplug dishwasher and see the Use and Care Guide for good drying performance and controlling buildup of hose failure. Start/Resume light may flash: When pressing Start/Resume, you press it to reduce the risk of hard water deposits. Record hose installation or replacement dates...
... could increase cycle time past 3.5 hours. Rinse aid should be used . ■ Start dishwasher and allow it again. (You must make sure the door is working properly, disconnect power or unplug dishwasher and see the Use and Care Guide for good drying performance and controlling buildup of hose failure. Start/Resume light may flash: When pressing Start/Resume, you press it to reduce the risk of hard water deposits. Record hose installation or replacement dates...
Specifications Sheet
Page 2
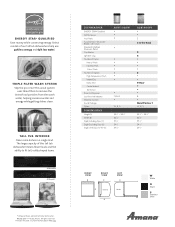
...-the-Rack Silverware Basket Cup Shelves Light Item Clips Number of Cycles Heavy Wash Normal Wash 1-Hour Wash Number of this tall tub dishwasher means fewer loads and the ability to fit tall, oddly shaped items. ADB1100AW ADB1400PY *Compared to remove the tiniest food particles from the wash water, helping conserve water and energy while getting dishes clean. The large capacity of Options High Temperature Wash Heated Dry Delay Start Control Lockout Soil Sensor Rinse Aid Dispenser Low Rinse Aid Indicator Electronic Controls...
...-the-Rack Silverware Basket Cup Shelves Light Item Clips Number of Cycles Heavy Wash Normal Wash 1-Hour Wash Number of this tall tub dishwasher means fewer loads and the ability to fit tall, oddly shaped items. ADB1100AW ADB1400PY *Compared to remove the tiniest food particles from the wash water, helping conserve water and energy while getting dishes clean. The large capacity of Options High Temperature Wash Heated Dry Delay Start Control Lockout Soil Sensor Rinse Aid Dispenser Low Rinse Aid Indicator Electronic Controls...


