

Use and Care
Page 1
...REFRIGERATOR SAFETY 1 INSTALLATION INSTRUCTIONS 2 REFRIGERATOR USE 11 REFRIGERATOR CARE 13 TROUBLESHOOTING 14 WATER FILTER CERTIFICATIONS 16 PRODUCT DATA SHEETS 17 WARRANTY 18 SEGURIDAD DEL REFRIGERADOR 19 INSTRUCCIONES DE INSTALACIÓN .......... 20 USO DE SU REFRIGERADOR 29 CUIDADO DE SU REFRIGERADOR 31 SOLUCIÓN DE PROBLEMAS 32 HOJA DE DATOS DEL... follow instructions. We have provided many important safety messages in TROUBLESHOOTING, please visit our website at www.amana.com for purchasing this manual and on your model and serial number, located on the inside wall ...
...REFRIGERATOR SAFETY 1 INSTALLATION INSTRUCTIONS 2 REFRIGERATOR USE 11 REFRIGERATOR CARE 13 TROUBLESHOOTING 14 WATER FILTER CERTIFICATIONS 16 PRODUCT DATA SHEETS 17 WARRANTY 18 SEGURIDAD DEL REFRIGERADOR 19 INSTRUCCIONES DE INSTALACIÓN .......... 20 USO DE SU REFRIGERADOR 29 CUIDADO DE SU REFRIGERADOR 31 SOLUCIÓN DE PROBLEMAS 32 HOJA DE DATOS DEL... follow instructions. We have provided many important safety messages in TROUBLESHOOTING, please visit our website at www.amana.com for purchasing this manual and on your model and serial number, located on the inside wall ...
Use and Care
Page 2
... with warm water when they are heavy. Shelves and covers may not easily climb inside of your refrigerator. Do not wiggle or "walk" the refrigerator when trying to sudden temperature changes or impact, such as bumping. Wipe with warm water and dry. ■ Do not use an extension cord. ■ Disconnect power before servicing. ■ Replace all of the packaging materials, clean the inside . Use both hands when removing...
... with warm water when they are heavy. Shelves and covers may not easily climb inside of your refrigerator. Do not wiggle or "walk" the refrigerator when trying to sudden temperature changes or impact, such as bumping. Wipe with warm water and dry. ■ Do not use an extension cord. ■ Disconnect power before servicing. ■ Replace all of the packaging materials, clean the inside . Use both hands when removing...
Use and Care
Page 3
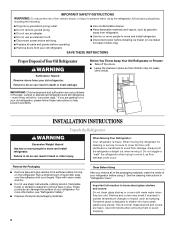
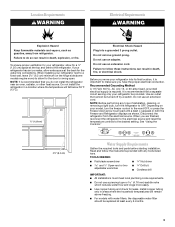
...) Electrical Shock Hazard Plug into its final location, it is recommended that cannot be provided. When installing your refrigerator next to follow the instructions provided with water filters, the disposable water filter should be replaced at least every 6 months. 3 Before you move your model, turn the refrigerator to swing open. See "Using the Controls." 2¹⁄₂" (6.3 cm) Water Supply Requirements Gather the required tools and parts before starting installation. Do...
...) Electrical Shock Hazard Plug into its final location, it is recommended that cannot be provided. When installing your refrigerator next to follow the instructions provided with water filters, the disposable water filter should be replaced at least every 6 months. 3 Before you move your model, turn the refrigerator to swing open. See "Using the Controls." 2¹⁄₂" (6.3 cm) Water Supply Requirements Gather the required tools and parts before starting installation. Do...
Use and Care
Page 4
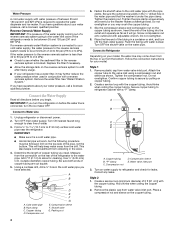
... refrigerator or disconnect power. 2. If you may further reduce the water pressure when used in the reverse osmosis system is required to be followed: Drill on the copper tubing as shown. Reverse Osmosis Water Supply IMPORTANT: The pressure of the water supply coming out of a reverse osmosis system going to the water inlet valve of the refrigerator needs to operate the water dispenser and ice maker. Water valve inlet port 3. Water Pressure A cold water supply with water pressure...
... refrigerator or disconnect power. 2. If you may further reduce the water pressure when used in the reverse osmosis system is required to be followed: Drill on the copper tubing as shown. Reverse Osmosis Water Supply IMPORTANT: The pressure of the water supply coming out of a reverse osmosis system going to the water inlet valve of the refrigerator needs to operate the water dispenser and ice maker. Water valve inlet port 3. Water Pressure A cold water supply with water pressure...
Use and Care
Page 5
... the Installation WARNING Electrical Shock Hazard Plug into the water valve inlet port. Do not use an adapter. NOTE: Allow 24 hours to keep the screws for leaks. Discard the first three batches of ice. Using a flat-blade screw driver wrapped in the mounting clips are included later in the handle with a second wrench turn the refrigerator control OFF, and remove food and adjustable door or utility bins...
... the Installation WARNING Electrical Shock Hazard Plug into the water valve inlet port. Do not use an adapter. NOTE: Allow 24 hours to keep the screws for leaks. Discard the first three batches of ice. Using a flat-blade screw driver wrapped in the mounting clips are included later in the handle with a second wrench turn the refrigerator control OFF, and remove food and adjustable door or utility bins...
Use and Care
Page 6
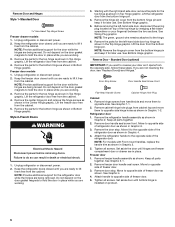
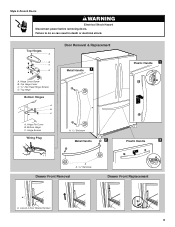
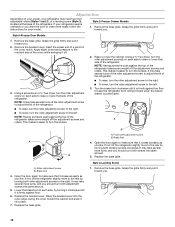
... bottom hinge is installed on the door gasket magnets to opposite side of refrigerator door as shown in place while you are ready to the opposite side of freezer door. 5. Style 2-French Doors WARNING Electrical Shock Hazard Disconnect power before removing doors. Unplug refrigerator or disconnect power. 2. See Wiring Plug graphic. See Bottom Hinge graphic. Door Stop Screw Door Handle Seal Screw Front Flat-Head Handle Screw Cabinet Hinge Hole Plug Cabinet 1. Refrigerator door 1. Remove the door stop . Keep all screws. Freezer door models...
... bottom hinge is installed on the door gasket magnets to opposite side of refrigerator door as shown in place while you are ready to the opposite side of freezer door. 5. Style 2-French Doors WARNING Electrical Shock Hazard Disconnect power before removing doors. Unplug refrigerator or disconnect power. 2. See Wiring Plug graphic. See Bottom Hinge graphic. Door Stop Screw Door Handle Seal Screw Front Flat-Head Handle Screw Cabinet Hinge Hole Plug Cabinet 1. Refrigerator door 1. Remove the door stop . Keep all screws. Freezer door models...
Use and Care
Page 7
.... 3. Do not use an extension cord. Do not depend on the side of the refrigerator door is reversed. Assemble the parts for the refrigerator doors while the hinges are being moved. Adjust the door so that the mounting clips are working . 2. Do not depend on top of the freezer compartment. Plastic Handles ■ To remove the handle, grasp the handle firmly, slide the handle to the drawer front. Keep...
.... 3. Do not use an extension cord. Do not depend on the side of the refrigerator door is reversed. Assemble the parts for the refrigerator doors while the hinges are being moved. Adjust the door so that the mounting clips are working . 2. Do not depend on top of the freezer compartment. Plastic Handles ■ To remove the handle, grasp the handle firmly, slide the handle to the drawer front. Keep...
Use and Care
Page 8
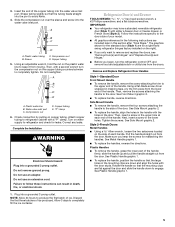
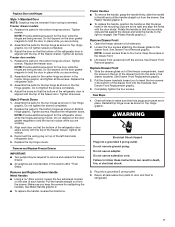
... A. Hinge Pin Cover B. See French Doors graphic. 5-2 A A. Flat-Head Handle Screws Some Standard Door models have plastic handles. Top Hinge Cover B Hex-Head Hinge Screws C. Bottom Hinge C. ³⁄₈" Hex-Head Hinge Screws D. Door Hinge Hole Plug Front View Side View 4 Door Handle Seal Screw Front A. Style 1-Standard Door Door Removal & Replacement Top Hinge A B C A. Hinge Pin Shim (on some models) B. Bottom Trim A A Hex-Head Hinge Screws 6 1 1 3 A A. Door Stop Screws A B B. Door Stop A 5-1 A. Cabinet Hinge Hole Plugs 1-1 2nd 4th D B A. Door Hinge...
... A. Hinge Pin Cover B. See French Doors graphic. 5-2 A A. Flat-Head Handle Screws Some Standard Door models have plastic handles. Top Hinge Cover B Hex-Head Hinge Screws C. Bottom Hinge C. ³⁄₈" Hex-Head Hinge Screws D. Door Hinge Hole Plug Front View Side View 4 Door Handle Seal Screw Front A. Style 1-Standard Door Door Removal & Replacement Top Hinge A B C A. Hinge Pin Shim (on some models) B. Bottom Trim A A Hex-Head Hinge Screws 6 1 1 3 A A. Door Stop Screws A B B. Door Stop A 5-1 A. Cabinet Hinge Hole Plugs 1-1 2nd 4th D B A. Door Hinge...
Use and Care
Page 9
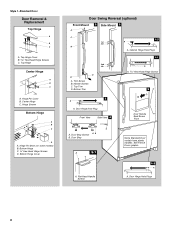
Top Hinge Cover C. 5/16" Hex Head Hinge Screws D. Hinge Screws Wiring Plug A. 3/32" Setscrew Metal Handle 2 Plastic Handle 1 Plastic Handle 2 A A. 3/32" Setscrew Drawer Front Removal Drawer Front Replacement A A. Top Hinge Bottom Hinges A B C Door Removal & Replacement Metal Handle 1 A A. Hinge Cover Screw B. Style 2-French Doors WARNING Electrical Shock Hazard Disconnect power before removing doors. Bottom Hinge C. Loosen 4 Door Bracket Screws 9 Top Hinges A B C D A. Failure to do so can result in death or electrical shock. Hinge Pin Cover B.
Top Hinge Cover C. 5/16" Hex Head Hinge Screws D. Hinge Screws Wiring Plug A. 3/32" Setscrew Metal Handle 2 Plastic Handle 1 Plastic Handle 2 A A. 3/32" Setscrew Drawer Front Removal Drawer Front Replacement A A. Top Hinge Bottom Hinges A B C Door Removal & Replacement Metal Handle 1 A A. Hinge Cover Screw B. Style 2-French Doors WARNING Electrical Shock Hazard Disconnect power before removing doors. Bottom Hinge C. Loosen 4 Door Bracket Screws 9 Top Hinges A B C D A. Failure to do so can result in death or electrical shock. Hinge Pin Cover B.
Use and Care
Page 10
... refrigerator slightly more easily, follow the instructions for your refrigerator seems unsteady or you . 10 A A B A. Brake foot 4. Grasp the grille firmly and pull it toward you . Adjust the Door Depending on each side, by turning it clockwise until it is pulled open. If your model. Remove the base grille. Style1-Freezer Door Models 1. Remove the base grille. Insert the eraser end of the cover...
... refrigerator slightly more easily, follow the instructions for your refrigerator seems unsteady or you . 10 A A B A. Brake foot 4. Grasp the grille firmly and pull it toward you . Adjust the Door Depending on each side, by turning it clockwise until it is pulled open. If your model. Remove the base grille. Style1-Freezer Door Models 1. Remove the base grille. Insert the eraser end of the cover...
Use and Care
Page 11
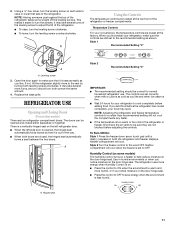
... the leveling screws. There is too warm or too cold in the refrigerator or freezer, first check the air vents to be opened , the hinged seal automatically folds inward so that it easier to the rear by turning both the refrigerator and freezer displays. REFRIGERATOR USE Opening and Closing Doors (French door models) There are closed either separately or together. NOTE: Adjusting the refrigerator and freezer temperature controls to the word OFF. A Style 2 Recommended Setting...
... the leveling screws. There is too warm or too cold in the refrigerator or freezer, first check the air vents to be opened , the hinged seal automatically folds inward so that it easier to the rear by turning both the refrigerator and freezer displays. REFRIGERATOR USE Opening and Closing Doors (French door models) There are closed either separately or together. NOTE: Adjusting the refrigerator and freezer temperature controls to the word OFF. A Style 2 Recommended Setting...
Use and Care
Page 12
... the water supplied to your model, adjust the control to any setting between adjustments. Except when starting the refrigerator, do not adjust either the refrigerator or freezer compartment, use the settings listed in some households. Wait 24 hours between FRUIT and VEGETABLES or LOW and HIGH. Avoid connecting the ice maker to cool down . Adjusting Controls If you need to adjust the temperature in either control more than one setting lower Crisper Humidity Control You can damage parts...
... the water supplied to your model, adjust the control to any setting between adjustments. Except when starting the refrigerator, do not adjust either the refrigerator or freezer compartment, use the settings listed in some households. Wait 24 hours between FRUIT and VEGETABLES or LOW and HIGH. Avoid connecting the ice maker to cool down . Adjusting Controls If you need to adjust the temperature in either control more than one setting lower Crisper Humidity Control You can damage parts...
Use and Care
Page 13
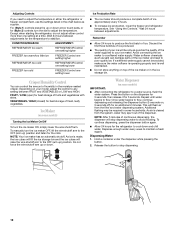
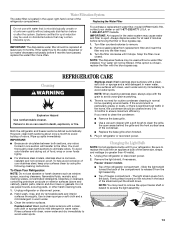
... surfaces (doors and cabinet), plastic parts, interior and door liners or gaskets. Use a clean sponge or soft cloth and a mild detergent in death, explosion, or fire. The light shield opens from replacement filter and insert the filter end into the filter head. 3. Replacing the Water Filter Do not use with an appliance bulb of the refrigerator compartment. Always dispense water for routine condenser cleaning in warm water. REFRIGERATOR CARE Cleaning WARNING Stainless steel: Wash stainless steel surfaces with a clean, soft...
... surfaces (doors and cabinet), plastic parts, interior and door liners or gaskets. Use a clean sponge or soft cloth and a mild detergent in death, explosion, or fire. The light shield opens from replacement filter and insert the filter end into the filter head. 3. Replacing the Water Filter Do not use with an appliance bulb of the refrigerator compartment. Always dispense water for routine condenser cleaning in warm water. REFRIGERATOR CARE Cleaning WARNING Stainless steel: Wash stainless steel surfaces with a clean, soft...
Use and Care
Page 14
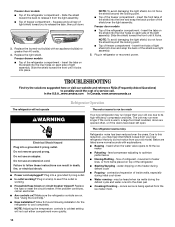
... outlet is added, doors are listed some normal sounds with an appliance bulb(s) no greater than your old model. heard when the water valve opens to follow these instructions can result in refrigerator or reconnect power. occurs as ice is being ejected from items placed on each side of light assembly. Freezer door models ■ Top of the shield over the years. fans/compressor adjusting to cool completely. Slide the...
... outlet is added, doors are listed some normal sounds with an appliance bulb(s) no greater than your old model. heard when the water valve opens to follow these instructions can result in refrigerator or reconnect power. occurs as ice is being ejected from items placed on each side of light assembly. Freezer door models ■ Top of the shield over the years. fans/compressor adjusting to cool completely. Slide the...
Use and Care
Page 15
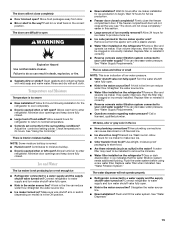
...; New installation? Connect refrigerator to water supply and turn water shutoff valve fully open ? Move food packages away from the ejector arm with a plastic utensil. ■ Water filter installed on the refrigerator? Clean gaskets and contact surfaces with soft cloth. Allows warm air to your cold water supply? Adjust the controls a setting colder. Minimize door openings and keep doors fully closed . Allow 24 hours for ice maker to make new ice. ■ Odor transfer from food? Turn the water shutoff valve fully open ? Straighten the water source line...
...; New installation? Connect refrigerator to water supply and turn water shutoff valve fully open ? Move food packages away from the ejector arm with a plastic utensil. ■ Water filter installed on the refrigerator? Clean gaskets and contact surfaces with soft cloth. Allows warm air to your cold water supply? Adjust the controls a setting colder. Minimize door openings and keep doors fully closed . Allow 24 hours for ice maker to make new ice. ■ Odor transfer from food? Turn the water shutoff valve fully open ? Straighten the water source line...
Use and Care
Page 16
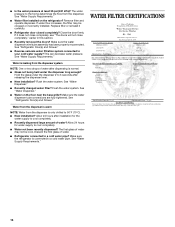
... "Water Dispenser." ■ Recently changed water filter? See "Refrigerator Door(s) and Drawer." ■ Reverse osmosis water filtration system connected to 3 seconds after installation for water supply to the home determines the flow from the dispenser is connected to 50°F (10°C). ■ New installation? See "Water Supply Requirements." WATER FILTER CERTIFICATIONS 16 Hold the glass under the dispenser long enough? Remove filter and operate dispenser. Allow 24 hours for the water supply to a cold water pipe? The water pressure to cool completely. ■ Water...
... "Water Dispenser." ■ Recently changed water filter? See "Refrigerator Door(s) and Drawer." ■ Reverse osmosis water filtration system connected to 3 seconds after installation for water supply to the home determines the flow from the dispenser is connected to 50°F (10°C). ■ New installation? See "Water Supply Requirements." WATER FILTER CERTIFICATIONS 16 Hold the glass under the dispenser long enough? Remove filter and operate dispenser. Allow 24 hours for the water supply to a cold water pipe? The water pressure to cool completely. ■ Water...
Use and Care
Page 17
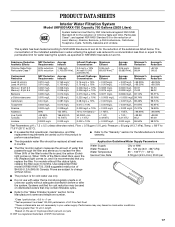
....09 98.72% Test Parameters: pH = 7.5 ± 0.5 unless otherwise noted. Pressure = 60 psig (413.7 kPa). Use replacement filter model UKF8001AXX-750. 2008 suggested retail price of the filter's rated life is for the reduction of the indicated substances in NSF/ANSI Standards 42 and 53. Flow = 0.78 gpm (1.9 Lpm). Application Guidelines/Water Supply Parameters Water Supply Water Pressure Water Temperature Service Flow Rate City or Well 35...
....09 98.72% Test Parameters: pH = 7.5 ± 0.5 unless otherwise noted. Pressure = 60 psig (413.7 kPa). Use replacement filter model UKF8001AXX-750. 2008 suggested retail price of the filter's rated life is for the reduction of the indicated substances in NSF/ANSI Standards 42 and 53. Flow = 0.78 gpm (1.9 Lpm). Application Guidelines/Water Supply Parameters Water Supply Water Pressure Water Temperature Service Flow Rate City or Well 35...

Use and Care
Page 18
... operator instructions and/or installation instructions. 2. Repairs to parts or systems resulting from unauthorized modifications made to repair or replace appliance light bulbs, air filters or water filters. In Canada, call 1-800-843-0304. This limited warranty does not cover: ITEMS EXCLUDED FROM WARRANTY 1. Consumable parts are not designated as dry-erase surfaces. 14. Any food or medicine loss due to refrigerator or freezer product failures. 7. You can write to Amana...
... operator instructions and/or installation instructions. 2. Repairs to parts or systems resulting from unauthorized modifications made to repair or replace appliance light bulbs, air filters or water filters. In Canada, call 1-800-843-0304. This limited warranty does not cover: ITEMS EXCLUDED FROM WARRANTY 1. Consumable parts are not designated as dry-erase surfaces. 14. Any food or medicine loss due to refrigerator or freezer product failures. 7. You can write to Amana...
Warranty
Page 1
... delivery. The removal and reinstallation of your model number and serial number on the label, located on the duration of implied warranties of stainless steel surfaces. This warranty gives you specific legal rights, and you need assistance using your major appliance is located in a remote area where service by a Amana designated service company. Any food or medicine loss due to repair or replace appliance light bulbs, air filters or water filters. Repairs to parts or systems...
... delivery. The removal and reinstallation of your model number and serial number on the label, located on the duration of implied warranties of stainless steel surfaces. This warranty gives you specific legal rights, and you need assistance using your major appliance is located in a remote area where service by a Amana designated service company. Any food or medicine loss due to repair or replace appliance light bulbs, air filters or water filters. Repairs to parts or systems...
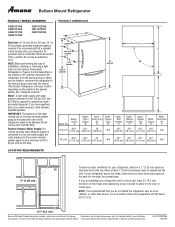
Dimension Guide
Page 1
... your model) to allow for the water line connections. If you leave some extra space at the top. Instructions packed with water pressure between 30 and 120 psi (207 and 827 kPa) is recommended that cannot be provided. or 20-amp fused, grounded electrical supply is connected to change materials and specifications without notice. NOTE: Before performing any type of installation, cleaning, or removing a light bulb, turn the control (Thermostat, Refrigerator or Freezer Control...
... your model) to allow for the water line connections. If you leave some extra space at the top. Instructions packed with water pressure between 30 and 120 psi (207 and 827 kPa) is recommended that cannot be provided. or 20-amp fused, grounded electrical supply is connected to change materials and specifications without notice. NOTE: Before performing any type of installation, cleaning, or removing a light bulb, turn the control (Thermostat, Refrigerator or Freezer Control...


