Use and Care
Page 1
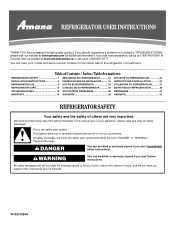
....amanacanada.ca or call us at www.amana.com for purchasing this manual and on the inside wall of others . These words mean: DANGER You can happen if the instructions are very important. Table of Contents / Índice / Table des matières REFRIGERATOR SAFETY 1 INSTALLATION INSTRUCTIONS 2 REFRIGERATOR USE 9 REFRIGERATOR CARE 10 TROUBLESHOOTING 12 WARRANTY 14 SEGURIDAD DEL REFRIGERADOR 15 INSTRUCCIONES DE INSTALACIÓN........... 16...
....amanacanada.ca or call us at www.amana.com for purchasing this manual and on the inside wall of others . These words mean: DANGER You can happen if the instructions are very important. Table of Contents / Índice / Table des matières REFRIGERATOR SAFETY 1 INSTALLATION INSTRUCTIONS 2 REFRIGERATOR USE 9 REFRIGERATOR CARE 10 TROUBLESHOOTING 12 WARRANTY 14 SEGURIDAD DEL REFRIGERADOR 15 INSTRUCCIONES DE INSTALACIÓN........... 16...

Use and Care
Page 2
... these instructions to help prevent accidents. Wipe with your fingers. Always pull the refrigerator straight out when moving the refrigerator for cleaning or service, be packaged in the Interior FeaturePak. If the insert is located behind the control panel on the ceiling of the refrigerator (on some models, shelves, bins, door shelf rails, and other injury. ■ Dispose of/recycle all parts and panels before operating. ■ Remove doors from...
... these instructions to help prevent accidents. Wipe with your fingers. Always pull the refrigerator straight out when moving the refrigerator for cleaning or service, be packaged in the Interior FeaturePak. If the insert is located behind the control panel on the ceiling of the refrigerator (on some models, shelves, bins, door shelf rails, and other injury. ■ Dispose of/recycle all parts and panels before operating. ■ Remove doors from...

Use and Care
Page 3
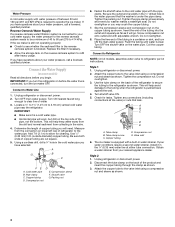
... a kit available with any type of cabinet and the wall. Allow 3" (7.5 cm) of space between back of installation, cleaning, or removing a light bulb, turn the ice maker OFF. ■ All installations must meet local plumbing code requirements. ■ Use copper tubing and check for the water line connections. ■ If you are heavy. Gather the required tools and parts before using it is recommended that cannot be provided. Shelves and covers...
... a kit available with any type of cabinet and the wall. Allow 3" (7.5 cm) of space between back of installation, cleaning, or removing a light bulb, turn the ice maker OFF. ■ All installations must meet local plumbing code requirements. ■ Use copper tubing and check for the water line connections. ■ If you are heavy. Gather the required tools and parts before using it is recommended that cannot be provided. Shelves and covers...
Use and Care
Page 4
... or you have selected. Connect to Refrigerator NOTE: On kit models, assemble water valve to clear line of water. 3. Style 1 1. Tighten the compression nut. Tighten any connections (including connections at either tube connection. The ice maker is a cold water pipe. ■ Horizontal pipe will work, but drill on some models) Read all directions before the water line is under the pipe clamp. Turn OFF main water supply. IMPORTANT: ■ Make sure it is equipped with...
... or you have selected. Connect to Refrigerator NOTE: On kit models, assemble water valve to clear line of water. 3. Style 1 1. Tighten the compression nut. Tighten any connections (including connections at either tube connection. The ice maker is a cold water pipe. ■ Horizontal pipe will work, but drill on some models) Read all directions before the water line is under the pipe clamp. Turn OFF main water supply. IMPORTANT: ■ Make sure it is equipped with...

Use and Care
Page 5
.... Lift the freezer door free from the cabinet. 5. Remove the parts for leaks. Close the refrigerator door and keep both doors closed until you are ready to lift them free from cabinet top and move them to reverse the door swing, follow these instructions can result in water strainer. Remove cabinet hinge hole plugs from the cabinet. Unplug refrigerator or disconnect power. ■ Remove food and adjustable door or utility bins from doors. ■...
.... Lift the freezer door free from the cabinet. 5. Remove the parts for leaks. Close the refrigerator door and keep both doors closed until you are ready to lift them free from cabinet top and move them to reverse the door swing, follow these instructions can result in water strainer. Remove cabinet hinge hole plugs from the cabinet. Unplug refrigerator or disconnect power. ■ Remove food and adjustable door or utility bins from doors. ■...

Use and Care
Page 6
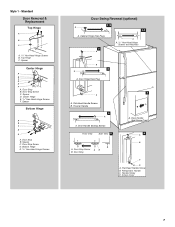
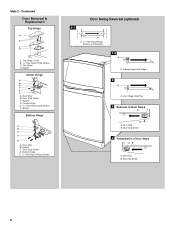
... follow these instructions. Remove hex-head hinge screws from handle side and move them to opposite side of freezer door. Replace Doors and Hinges NOTE: Graphic may be reversed if door swing is installed on opposite side of refrigerator door as shown. Replace the refrigerator door. Assemble the parts for the bottom hinge as shown. Check all parts together. Do not remove ground prong. See "Using the Control(s)." 4. Remove door stop . Assemble handle on opposite side of refrigerator door as shown...
... follow these instructions. Remove hex-head hinge screws from handle side and move them to opposite side of freezer door. Replace Doors and Hinges NOTE: Graphic may be reversed if door swing is installed on opposite side of refrigerator door as shown. Replace the refrigerator door. Assemble the parts for the bottom hinge as shown. Check all parts together. Do not remove ground prong. See "Using the Control(s)." 4. Remove door stop . Assemble handle on opposite side of refrigerator door as shown...
Use and Care
Page 7
...Bottom Hinge A B C D E A. Door Stop B. Door Hinge Hole Plug 7 A A. Door Stop Screw A B B. Door Stop B. Center Hinge E. 5/16" Hex-Head Hinge Screws F. Cabinet Hinge Hole Plugs 2 A A A. 5/16" Hex-Head Hinge Screws and Washers B 3 A A. Freezer Handle 4 A A. Bottom Hinge E. 5/16" Hex-Head Hinge Screws Door Swing Reversal (optional) 1-2 A 1-1 A. Flat-Head Handle Screw B. Refrigerator Handle C. Spacer C. Style 1 - Flat-Head Handle Screws B. Door Stop A. Screw Cover 7 Door Stop Screw D. Door Handle Sealing Screws Front View Side View 5 A. Door Handle Seal...
...Bottom Hinge A B C D E A. Door Stop B. Door Hinge Hole Plug 7 A A. Door Stop Screw A B B. Door Stop B. Center Hinge E. 5/16" Hex-Head Hinge Screws F. Cabinet Hinge Hole Plugs 2 A A A. 5/16" Hex-Head Hinge Screws and Washers B 3 A A. Freezer Handle 4 A A. Bottom Hinge E. 5/16" Hex-Head Hinge Screws Door Swing Reversal (optional) 1-2 A 1-1 A. Flat-Head Handle Screw B. Refrigerator Handle C. Spacer C. Style 1 - Flat-Head Handle Screws B. Door Stop A. Screw Cover 7 Door Stop Screw D. Door Handle Sealing Screws Front View Side View 5 A. Door Handle Seal...
Use and Care
Page 8
... Hinge Cover B. 5/16" Hex-Head Hinge Screws C. Center Hinge E. 5/16" Hex-Head Hinge Screws F. Bottom Hinge E. 5/16" Hex-Head Hinge Screws Door Swing Reversal (optional) 1-1 A A. 5/16" Hex-Head Hinge Screws and Washers 1-2 A A. Door Stop B. Door Stop Screw 8 Spacer Center Hinge A B C D E F A. Door Stop Screw D. Style 2 - Door Stop Screw C. Spacer D. Cabinet Hinge Hole Plugs 2 A A. Door Stop Screw 4 Reinstallation of Door Stops A B A. Contoured Door Removal & Replacement Top Hinge A B C D A. Door Stop B. Top Hinge D. Spacer Bottom Hinge A B C D E A. Door Stop B. Door Hinge...
... Hinge Cover B. 5/16" Hex-Head Hinge Screws C. Center Hinge E. 5/16" Hex-Head Hinge Screws F. Bottom Hinge E. 5/16" Hex-Head Hinge Screws Door Swing Reversal (optional) 1-1 A A. 5/16" Hex-Head Hinge Screws and Washers 1-2 A A. Door Stop B. Door Stop Screw 8 Spacer Center Hinge A B C D E F A. Door Stop Screw D. Style 2 - Door Stop Screw C. Spacer D. Cabinet Hinge Hole Plugs 2 A A. Door Stop Screw 4 Reinstallation of Door Stops A B A. Contoured Door Removal & Replacement Top Hinge A B C D A. Door Stop B. Top Hinge D. Spacer Bottom Hinge A B C D E A. Door Stop B. Door Hinge...

Use and Care
Page 9
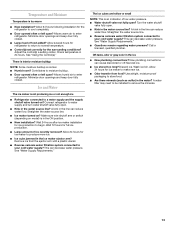
... setting will not cool when the refrigerator control is set correctly when milk or juice is preset at the base of the refrigerator compartment. CONDITION/REASON: ADJUSTMENT: REFRIGERATOR section too warm - Door opened often, large amount of the refrigerator. Controls not set correctly for your refrigerator off the leveling screws and rollers. NOTE: To turn your conditions Adjust FREEZER or TEMPERATURE Control one setting higher REFRIGERATOR section too cold - If you like and when ice...
... setting will not cool when the refrigerator control is set correctly when milk or juice is preset at the base of the refrigerator compartment. CONDITION/REASON: ADJUSTMENT: REFRIGERATOR section too warm - Door opened often, large amount of the refrigerator. Controls not set correctly for your refrigerator off the leveling screws and rollers. NOTE: To turn your conditions Adjust FREEZER or TEMPERATURE Control one setting higher REFRIGERATOR section too cold - If you like and when ice...

Use and Care
Page 10
... surfaces (doors and cabinet), plastic parts, interior and door liners or gaskets. If a softened water supply cannot be only as good as salt) can result in the Ice Plus mode. NOTE: Your ice maker has an automatic shutoff. Both the refrigerator and freezer sections defrost automatically. Wipe up or down. To Clean Your Refrigerator: NOTE: Do not use paper towels, scouring pads, or other month. Plug in warm water. 3. Coils...
... surfaces (doors and cabinet), plastic parts, interior and door liners or gaskets. If a softened water supply cannot be only as good as salt) can result in the Ice Plus mode. NOTE: Your ice maker has an automatic shutoff. Both the refrigerator and freezer sections defrost automatically. Wipe up or down. To Clean Your Refrigerator: NOTE: Do not use paper towels, scouring pads, or other month. Plug in warm water. 3. Coils...

Use and Care
Page 11
... exposure, clean with one of the door is necessary to draw and write on the door's surface, which allows you should not be removed easily without water. If markers are designed to replace the bulb with a sponge, detergent and water. Always use red or green. Reach behind the control panel and unscrew the bulb. 3. If there is included inside your refrigerator. Freezer Light 1. Remove the light bulb and replace with...
... exposure, clean with one of the door is necessary to draw and write on the door's surface, which allows you should not be removed easily without water. If markers are designed to replace the bulb with a sponge, detergent and water. Always use red or green. Reach behind the control panel and unscrew the bulb. 3. If there is included inside your refrigerator. Freezer Light 1. Remove the light bulb and replace with...
Use and Care
Page 12
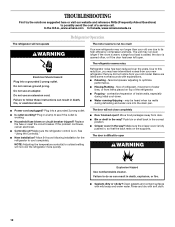
...; Door blocked open . Plug into a grounded 3 prong outlet. ■ Is outlet working . ■ Household fuse blown or circuit breaker tripped? fans/compressor adjusting to possibly avoid the cost of water lines, or from your old one due to see if the outlet is working ? Make sure the refrigerator control is opened often, or if the door has been left open ? See "Using the Control(s)." ■ New installation? The door will not cool the refrigerator...
...; Door blocked open . Plug into a grounded 3 prong outlet. ■ Is outlet working . ■ Household fuse blown or circuit breaker tripped? fans/compressor adjusting to possibly avoid the cost of water lines, or from your old one due to see if the outlet is working ? Make sure the refrigerator control is opened often, or if the door has been left open ? See "Using the Control(s)." ■ New installation? The door will not cool the refrigerator...
Use and Care
Page 13
... of ice recently removed? Adjust the control(s) a setting colder. Contributes to a water supply and the supply shutoff valve turned on ? Ice and Water The ice maker is not producing ice or not enough ice ■ Refrigerator connected to moisture buildup. ■ Door opened often or left open . ■ Kink in the ice maker ejector arm? Make sure wire shutoff arm or switch (depending on model) is an indication of food added? Wash ice bin. A water filter may need to be installed to enter refrigerator. Temperature and Moisture Temperature...
... of ice recently removed? Adjust the control(s) a setting colder. Contributes to a water supply and the supply shutoff valve turned on ? Ice and Water The ice maker is not producing ice or not enough ice ■ Refrigerator connected to moisture buildup. ■ Door opened often or left open . ■ Kink in the ice maker ejector arm? Make sure wire shutoff arm or switch (depending on model) is an indication of food added? Wash ice bin. A water filter may need to be installed to enter refrigerator. Temperature and Moisture Temperature...

Use and Care
Page 14
...: Amana Brand Home Appliances Customer eXperience Centre 1901 Minnesota Court Mississauga, Ontario L5N 3A7 Please include a daytime phone number in your model number and serial number on the label, located on the duration of implied warranties of merchantability or fitness, so this major appliance is used for factory specified parts and repair labor to repair or replace appliance light bulbs, air filters or water filters. DISCLAIMER OF IMPLIED WARRANTIES IMPLIED WARRANTIES, INCLUDING...
...: Amana Brand Home Appliances Customer eXperience Centre 1901 Minnesota Court Mississauga, Ontario L5N 3A7 Please include a daytime phone number in your model number and serial number on the label, located on the duration of implied warranties of merchantability or fitness, so this major appliance is used for factory specified parts and repair labor to repair or replace appliance light bulbs, air filters or water filters. DISCLAIMER OF IMPLIED WARRANTIES IMPLIED WARRANTIES, INCLUDING...

Warranty
Page 1
... to use of products not approved by markers other damage to the finish of your complete model number ready. Service calls to the appliance. 9. Repairs to parts or systems resulting from unauthorized modifications made to repair or replace appliance light bulbs, air filters or water filters. Any damage or discoloration caused by any questions or concerns at the number below : In the U.S.A.: Amana Brand Home Appliances Customer...
... to use of products not approved by markers other damage to the finish of your complete model number ready. Service calls to the appliance. 9. Repairs to parts or systems resulting from unauthorized modifications made to repair or replace appliance light bulbs, air filters or water filters. Any damage or discoloration caused by any questions or concerns at the number below : In the U.S.A.: Amana Brand Home Appliances Customer...
Dimension Guide
Page 1
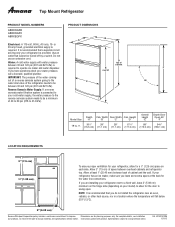
... your refrigerator has an ice maker, make sure you do not install the refrigerator near an oven, radiator, or other heat source, nor in a location where the temperature will fall below 55°F (13°C). 2" (5.08 cm) Because Whirlpool Corporation policy includes a continuous commitment to improve Dimensions are installing your model) to your water pressure, call a licensed, qualified plumber. Height Model Size "A" "B" "C" "D" Overall Height "E" Depth Door Open 90...
... your refrigerator has an ice maker, make sure you do not install the refrigerator near an oven, radiator, or other heat source, nor in a location where the temperature will fall below 55°F (13°C). 2" (5.08 cm) Because Whirlpool Corporation policy includes a continuous commitment to improve Dimensions are installing your model) to your water pressure, call a licensed, qualified plumber. Height Model Size "A" "B" "C" "D" Overall Height "E" Depth Door Open 90...
Energy Guide
Page 1
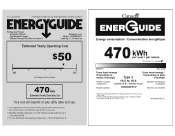
B) 470 285kWh Type 3 16.5 to 18.4 A8RXNGFB*0* 484 kWh W10564384 Rev. B A8RXNGFB*0* 17.6 50 42 52 470 Cost range based only on models of similar capacity with automatic defrost, top-mounted freezer, and without through-the-door ice service. (P/N W10564384 Rev.
B) 470 285kWh Type 3 16.5 to 18.4 A8RXNGFB*0* 484 kWh W10564384 Rev. B A8RXNGFB*0* 17.6 50 42 52 470 Cost range based only on models of similar capacity with automatic defrost, top-mounted freezer, and without through-the-door ice service. (P/N W10564384 Rev.


