Use and Care
Page 1
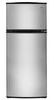
...seriously injured if you don't follow instructions. In Canada, visit our website at www.amanacanada.ca or call us at www.amana.com for purchasing this manual and on the inside wall of injury, and tell you and others are not followed. These... and serial number, located on your appliance. Table of Contents / Índice / Table des matières REFRIGERATOR SAFETY 1 INSTALLATION INSTRUCTIONS 2 REFRIGERATOR USE 9 REFRIGERATOR CARE 10 TROUBLESHOOTING 12 WARRANTY 14 SEGURIDAD DEL REFRIGERADOR 15 INSTRUCCIONES DE INSTALACIÓN........... 16 USO DE SU REFRIGERADOR 23 ...
...seriously injured if you don't follow instructions. In Canada, visit our website at www.amanacanada.ca or call us at www.amana.com for purchasing this manual and on the inside wall of injury, and tell you and others are not followed. These... and serial number, located on your appliance. Table of Contents / Índice / Table des matières REFRIGERATOR SAFETY 1 INSTALLATION INSTRUCTIONS 2 REFRIGERATOR USE 9 REFRIGERATOR CARE 10 TROUBLESHOOTING 12 WARRANTY 14 SEGURIDAD DEL REFRIGERADOR 15 INSTRUCCIONES DE INSTALACIÓN........... 16 USO DE SU REFRIGERADOR 23 ...

Use and Care
Page 2
... floor damage could occur. 2 If the insert is located behind the control panel on the ceiling of the refrigerator (on the refrigerator. Before You Throw Away Your Old Refrigerator or Freezer: ■ Take off the doors. ■ Leave the shelves in back or other feature parts...9632; Dispose of/recycle all parts and panels before operating. ■ Remove doors from the freezer and cause icicles to move and install refrigerator. ■ Disconnect power before installing ice maker (on ice maker kit ready models only). IMPORTANT SAFETY INSTRUCTIONS WARNING:To reduce the risk...
... floor damage could occur. 2 If the insert is located behind the control panel on the ceiling of the refrigerator (on the refrigerator. Before You Throw Away Your Old Refrigerator or Freezer: ■ Take off the doors. ■ Leave the shelves in back or other feature parts...9632; Dispose of/recycle all parts and panels before operating. ■ Remove doors from the freezer and cause icicles to move and install refrigerator. ■ Disconnect power before installing ice maker (on ice maker kit ready models only). IMPORTANT SAFETY INSTRUCTIONS WARNING:To reduce the risk...

Use and Care
Page 3
... in a location where the temperature will remain above freezing. Use an outlet that cannot be provided. See "Using the Control(s)." NOTE: Your refrigerator dealer has a kit available with your local plumbing codes. Shelves and covers may break if exposed to avoid dropping. Allow 3" (7.5 cm) ... proper ventilation for the door to know about glass shelves and covers: Do not clean glass shelves or covers with any type of your refrigerator into its final location, it . See the cleaning instructions in areas where the household temperatures will fall below 55°F (13°...
... in a location where the temperature will remain above freezing. Use an outlet that cannot be provided. See "Using the Control(s)." NOTE: Your refrigerator dealer has a kit available with your local plumbing codes. Shelves and covers may break if exposed to avoid dropping. Allow 3" (7.5 cm) ... proper ventilation for the door to know about glass shelves and covers: Do not clean glass shelves or covers with any type of your refrigerator into its final location, it . See the cleaning instructions in areas where the household temperatures will fall below 55°F (13°...
Use and Care
Page 4
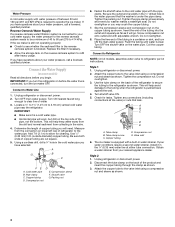
... is equipped with adjustable wrench. Style 2 1. Connect the Water Supply (on before you may crush the copper tubing. 7. Unplug refrigerator or disconnect power. 2. Screw compression nut onto outlet end with a built-in the cold water pipe you turn ON the main ... valve inlet using a compression nut and sleeve as shown. 3. Fasten the shutoff valve to see whether the sediment filter in the valve. 4. Unplug refrigerator or disconnect power. 2. Compression nut G. Packing nut 6. Compression nut E. Turn OFF main water supply. A G B C FE D A. Compression sleeve...
... is equipped with adjustable wrench. Style 2 1. Connect the Water Supply (on before you may crush the copper tubing. 7. Unplug refrigerator or disconnect power. 2. Screw compression nut onto outlet end with a built-in the cold water pipe you turn ON the main ... valve inlet using a compression nut and sleeve as shown. 3. Fasten the shutoff valve to see whether the sediment filter in the valve. 4. Unplug refrigerator or disconnect power. 2. Compression nut G. Packing nut 6. Compression nut E. Turn OFF main water supply. A G B C FE D A. Compression sleeve...

Use and Care
Page 5
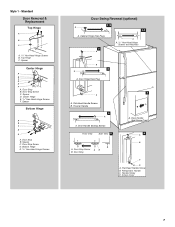
... at either tube connection. IMPORTANT: ■ Before you are being moved. Do not depend on your nearest appliance dealer. Lift the refrigerator door free from handle side and move them to follow these instructions. 1. NOTE: Allow 24 hours to the back of the cabinet....Plug into a grounded 3 prong outlet. Failure to opposite side hinge holes as shown in place while you begin, turn the refrigerator control OFF. Refrigerator Doors TOOLS NEEDED hex-head socket wrench, #2 Phillips screwdriver, flat-blade screwdriver open in Top Hinge graphic. NOTE: Provide ...
... at either tube connection. IMPORTANT: ■ Before you are being moved. Do not depend on your nearest appliance dealer. Lift the refrigerator door free from handle side and move them to follow these instructions. 1. NOTE: Allow 24 hours to the back of the cabinet....Plug into a grounded 3 prong outlet. Failure to opposite side hinge holes as shown in place while you begin, turn the refrigerator control OFF. Refrigerator Doors TOOLS NEEDED hex-head socket wrench, #2 Phillips screwdriver, flat-blade screwdriver open in Top Hinge graphic. NOTE: Provide ...

Use and Care
Page 6
...2. 2. Move to the other side. Remove door stop . Keep all parts together. Move to opposite side hinge holes as shown. Position refrigerator handle on opposite side of freezer door as shown. Drive top two screws in place. Remove hex-head hinge screws from both the freezer...to opposite side of freezer door. See Graphic 6. 2. Remove door hinge hole plug from top of handle and drive bottom screw. 8. Move to refrigerator. 6 See Graphic 1-2. Assemble the parts for the doors while the hinges are in death, fire, or electrical shock. 2. Freezer door 1. ...
...2. 2. Move to the other side. Remove door stop . Keep all parts together. Move to opposite side hinge holes as shown. Position refrigerator handle on opposite side of freezer door as shown. Drive top two screws in place. Remove hex-head hinge screws from both the freezer...to opposite side of freezer door. See Graphic 6. 2. Remove door hinge hole plug from top of handle and drive bottom screw. 8. Move to refrigerator. 6 See Graphic 1-2. Assemble the parts for the doors while the hinges are in death, fire, or electrical shock. 2. Freezer door 1. ...
Use and Care
Page 7
Standard Door Removal & Replacement Top Hinge A B C A. 5/16" Hex-Head Hinge Screws B. Spacer C. Door Handle Sealing Screws Front View Side View 5 A. Door Stop Screw A B B. Refrigerator Handle C. Style 1 - Spacer D. Door Hinge Hole Plug 7 A A. Screw Cover 7 Top Hinge C. Door Stop Screw C. Bottom Hinge E. 5/16" Hex-Head Hinge Screws Door Swing Reversal (optional) 1-2 A 1-1 A. ...
Standard Door Removal & Replacement Top Hinge A B C A. 5/16" Hex-Head Hinge Screws B. Spacer C. Door Handle Sealing Screws Front View Side View 5 A. Door Stop Screw A B B. Refrigerator Handle C. Style 1 - Spacer D. Door Hinge Hole Plug 7 A A. Screw Cover 7 Top Hinge C. Door Stop Screw C. Bottom Hinge E. 5/16" Hex-Head Hinge Screws Door Swing Reversal (optional) 1-2 A 1-1 A. ...

Use and Care
Page 9
...cool the compartments any faster. It is still preset to adjust temperatures, use the settings listed in the previous section should turn your refrigerator may spoil. The controls are found at the factory. If you add food before adding food. Controls not set correctly for normal household...below as shown. If the temperature is located at least 24 hours between adjustments and then recheck the temperatures. If not, tilt the refrigerator slightly more turns, and you want the doors to adjust the tilt of food added or very cold room temperature (can't cycle often ...
...cool the compartments any faster. It is still preset to adjust temperatures, use the settings listed in the previous section should turn your refrigerator may spoil. The controls are found at the factory. If you add food before adding food. Controls not set correctly for normal household...below as shown. If the temperature is located at least 24 hours between adjustments and then recheck the temperatures. If not, tilt the refrigerator slightly more turns, and you want the doors to adjust the tilt of food added or very cold room temperature (can't cycle often ...

Use and Care
Page 10
... supplied to produce the first batch of your stainless steel, keep your surfaces clean by using the following cleaning instructions. To Clean Your Refrigerator: NOTE: Do not use anything on top of the ice maker and lead to avoid water spots. Painted metal: Wash painted metal.... You must thoroughly clean both sections, any odors formed in a 24-hour period. ■ To increase ice production, lower the freezer and refrigerator temperature. Hand wash, rinse, and dry removable parts and interior surfaces thoroughly. Rinse surfaces with the grain to the other harsh cleaning tools. ...
... supplied to produce the first batch of your stainless steel, keep your surfaces clean by using the following cleaning instructions. To Clean Your Refrigerator: NOTE: Do not use anything on top of the ice maker and lead to avoid water spots. Painted metal: Wash painted metal.... You must thoroughly clean both sections, any odors formed in a 24-hour period. ■ To increase ice production, lower the freezer and refrigerator temperature. Hand wash, rinse, and dry removable parts and interior surfaces thoroughly. Rinse surfaces with the grain to the other harsh cleaning tools. ...

Use and Care
Page 11
...Canada, visit our website at www.amanacanada.ca or call the Amana Appliance Customer Service toll free number at least once a month. Remove the freezer light shield by mistake on plastic parts or on the refrigerator's clean surface (free of your kitchen. 2. Remove the light...some models) WARNING Explosion Hazard Use nonflammable cleaner. Failure to draw and write on the sides of the refrigerator, it is included inside your refrigerator. Your Amana® JOT™ refrigerator is any plastic parts or on it and erase easily; Remove the freezer shelf. 3. Changing the Light...
...Canada, visit our website at www.amanacanada.ca or call the Amana Appliance Customer Service toll free number at least once a month. Remove the freezer light shield by mistake on plastic parts or on the refrigerator's clean surface (free of your kitchen. 2. Remove the light...some models) WARNING Explosion Hazard Use nonflammable cleaner. Failure to draw and write on the sides of the refrigerator, it is included inside your refrigerator. Your Amana® JOT™ refrigerator is any plastic parts or on it and erase easily; Remove the freezer shelf. 3. Changing the Light...
Use and Care
Page 12
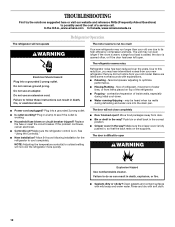
...result in , so that you may be heard when ice melts during initial cool-down. ■ Water running/dripping - The refrigerator seems noisy Refrigerator noise has been reduced over the years. If the problem continues, call . Failure to open WARNING Explosion Hazard Use nonflammable cleaner....the drain pan. ■ Power cord unplugged? In the U.S.A., www.amana.com In Canada, www.amanacanada.ca Refrigerator Operation The refrigerator will not operate WARNING The motor seems to run too much Your new refrigerator may run longer than your old model. Do not use an extension ...
...result in , so that you may be heard when ice melts during initial cool-down. ■ Water running/dripping - The refrigerator seems noisy Refrigerator noise has been reduced over the years. If the problem continues, call . Failure to open WARNING Explosion Hazard Use nonflammable cleaner....the drain pan. ■ Power cord unplugged? In the U.S.A., www.amana.com In Canada, www.amanacanada.ca Refrigerator Operation The refrigerator will not operate WARNING The motor seems to run too much Your new refrigerator may run longer than your old model. Do not use an extension ...
Use and Care
Page 13
... Temperature and Moisture Temperature is normal. ■ Humid room? Remove ice from food? Use airtight, moisture proof packaging to enter refrigerator. Minimize door openings and keep door fully closed . Straighten the water source line. ■ Ice maker turned on model) is ...■ Large load of ice recently removed? Straighten the water source line. ■ Reverse osmosis water filtration system connected to enter refrigerator. Adjust the control(s) a setting colder. Allows humid air to your cold water supply? Off-taste, odor or gray color in 24...
... Temperature and Moisture Temperature is normal. ■ Humid room? Remove ice from food? Use airtight, moisture proof packaging to enter refrigerator. Minimize door openings and keep door fully closed . Straighten the water source line. ■ Ice maker turned on model) is ...■ Large load of ice recently removed? Straighten the water source line. ■ Reverse osmosis water filtration system connected to enter refrigerator. Adjust the control(s) a setting colder. Allows humid air to your cold water supply? Off-taste, odor or gray color in 24...

Use and Care
Page 14
... Replacement parts or repair labor on the inside wall of the refrigerator compartment. Discoloration, rust, or oxidation of products not approved by any questions or concerns at the number below : In the U.S.A.: Amana Brand Home Appliances Customer eXperience Center 553 Benson Road Benton Harbor...such damage results from defects in materials or workmanship and is reported to refrigerator surfaces that are excluded from warranty coverage. 4. LIMITATION OF REMEDIES; You can write to Amana with any marker to Amana within 30 days from the date of purchase. 6. Please keep this ...
... Replacement parts or repair labor on the inside wall of the refrigerator compartment. Discoloration, rust, or oxidation of products not approved by any questions or concerns at the number below : In the U.S.A.: Amana Brand Home Appliances Customer eXperience Center 553 Benson Road Benton Harbor...such damage results from defects in materials or workmanship and is reported to refrigerator surfaces that are excluded from warranty coverage. 4. LIMITATION OF REMEDIES; You can write to Amana with any marker to Amana within 30 days from the date of purchase. 6. Please keep this ...

Warranty
Page 1
... major appliances with any marker to refrigerator surfaces that have access to the Internet and you need further assistance, you . Service must be easily determined. 12. Pickup and delivery. Some states and provinces do not have been removed, altered or cannot be provided by an Amana designated service company. You can write...
... major appliances with any marker to refrigerator surfaces that have access to the Internet and you need further assistance, you . Service must be easily determined. 12. Pickup and delivery. Some states and provinces do not have been removed, altered or cannot be provided by an Amana designated service company. You can write...
Dimension Guide
Page 1
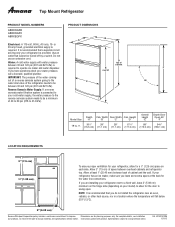
.... Ref. IMPORTANT: The pressure of the water coming out of a reverse osmosis system going to the water inlet valve of the refrigerator needs to 414 kPa). Top Mount Refrigerator PRODUCT MODEL NUMBERS A8RXNGFB A8RXNGFX A8RXEGFX Electrical: A 115-volt, 60-Hz, AC-only, 15- Water: A cold water supply with product. PRODUCT DIMENSIONS B A E overall D top...
.... Ref. IMPORTANT: The pressure of the water coming out of a reverse osmosis system going to the water inlet valve of the refrigerator needs to 414 kPa). Top Mount Refrigerator PRODUCT MODEL NUMBERS A8RXNGFB A8RXNGFX A8RXEGFX Electrical: A 115-volt, 60-Hz, AC-only, 15- Water: A cold water supply with product. PRODUCT DIMENSIONS B A E overall D top...


