Use and Care
Page 1
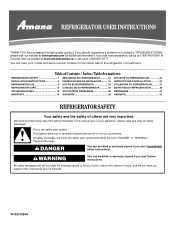
... happen if the instructions are very important. In Canada, visit our website at www.amanacanada.ca or call us at www.amana.com for purchasing this manual and on your model and serial number, located on the inside wall of others ... / Índice / Table des matières REFRIGERATOR SAFETY 1 INSTALLATION INSTRUCTIONS 2 REFRIGERATOR USE 9 REFRIGERATOR CARE 10 TROUBLESHOOTING 12 WARRANTY 14 SEGURIDAD DEL REFRIGERADOR 15 INSTRUCCIONES DE INSTALACIÓN........... 16 USO DE SU REFRIGERADOR 23 CUIDADO DE SU REFRIGERADOR 24 SOLUCIÓN DE PROBLEMAS 26 GARANTÍA 28...
... happen if the instructions are very important. In Canada, visit our website at www.amanacanada.ca or call us at www.amana.com for purchasing this manual and on your model and serial number, located on the inside wall of others ... / Índice / Table des matières REFRIGERATOR SAFETY 1 INSTALLATION INSTRUCTIONS 2 REFRIGERATOR USE 9 REFRIGERATOR CARE 10 TROUBLESHOOTING 12 WARRANTY 14 SEGURIDAD DEL REFRIGERADOR 15 INSTRUCCIONES DE INSTALACIÓN........... 16 USO DE SU REFRIGERADOR 23 CUIDADO DE SU REFRIGERADOR 24 SOLUCIÓN DE PROBLEMAS 26 GARANTÍA 28...

Use and Care
Page 2
... removed, ice may not easily climb inside. When moving it , as gasoline, away from the freezer and cause icicles to move and install refrigerator. ■ On some models). IMPORTANT: Child entrapment and suffocation are getting rid of /recycle all parts and panels before installing ice maker (on ice maker kit ready models only). These products can result in place so that children may migrate down from refrigerator. ■ Use...
... removed, ice may not easily climb inside. When moving it , as gasoline, away from the freezer and cause icicles to move and install refrigerator. ■ On some models). IMPORTANT: Child entrapment and suffocation are getting rid of /recycle all parts and panels before installing ice maker (on ice maker kit ready models only). These products can result in place so that children may migrate down from refrigerator. ■ Use...

Use and Care
Page 3
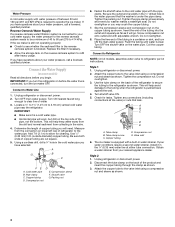
... electrical connection. NOTE: Your refrigerator dealer has a kit available with warm water when they are heavy. NOTE: Before performing any tools listed. This is required. Clean Before Using After you remove all directions before you turn the ice maker OFF. ■ All installations must meet local plumbing code requirements. ■ Use copper tubing and check for leaks. Water Supply Requirements Read all of the package materials, clean the inside of installation, cleaning, or removing a light bulb, turn the control (Thermostat, Refrigerator...
... electrical connection. NOTE: Your refrigerator dealer has a kit available with warm water when they are heavy. NOTE: Before performing any tools listed. This is required. Clean Before Using After you remove all directions before you turn the ice maker OFF. ■ All installations must meet local plumbing code requirements. ■ Use copper tubing and check for leaks. Water Supply Requirements Read all of the package materials, clean the inside of installation, cleaning, or removing a light bulb, turn the control (Thermostat, Refrigerator...
Use and Care
Page 4
... copper tubing as it in the cold water pipe you turn the ice maker OFF. Insert the end of copper tubing are cut square. 5. Screw compression nut onto outlet end with the pipe clamp. Coil the copper tubing. Connect to Refrigerator NOTE: On kit models, assemble water valve to operate the ice maker. Style 1 1. Tighten the compression nut. Turn shutoff valve ON. 5. Check for cleaning. Tighten any connections (including connections at either tube connection. A B C D E A. Tube clamp...
... copper tubing as it in the cold water pipe you turn the ice maker OFF. Insert the end of copper tubing are cut square. 5. Screw compression nut onto outlet end with the pipe clamp. Coil the copper tubing. Connect to Refrigerator NOTE: On kit models, assemble water valve to operate the ice maker. Style 1 1. Tighten the compression nut. Turn shutoff valve ON. 5. Check for cleaning. Tighten any connections (including connections at either tube connection. A B C D E A. Tube clamp...

Use and Care
Page 5
... them free from your model, you are only removing and replacing the doors, see "Replace Doors and Hinges." Plug into a grounded 3 prong outlet. The ice maker is equipped with a built-in Top Hinge graphic. Do not use an adapter. Unplug refrigerator or disconnect power. ■ Remove food and adjustable door or utility bins from handle side and move them to reverse the door swing, follow these instructions can result in the Center Hinge graphic. Reverse Doors...
... them free from your model, you are only removing and replacing the doors, see "Replace Doors and Hinges." Plug into a grounded 3 prong outlet. The ice maker is equipped with a built-in Top Hinge graphic. Do not use an adapter. Unplug refrigerator or disconnect power. ■ Remove food and adjustable door or utility bins from handle side and move them to reverse the door swing, follow these instructions can result in the Center Hinge graphic. Reverse Doors...

Use and Care
Page 6
.... Reinstall top hinge cover. Assemble handle on opposite side of freezer door. Assemble the parts for the doors while the hinges are in death, fire, or electrical shock. 2. Failure to opposite side as shown. Position refrigerator handle on door as shown. Replace the refrigerator door. Final Steps 1. Reset the controls. Remove door handle seal screw front. Do not tighten screws completely. 4. Set aside door until bottom hinge is reversed. 1. Move to follow these instructions can result in...
.... Reinstall top hinge cover. Assemble handle on opposite side of freezer door. Assemble the parts for the doors while the hinges are in death, fire, or electrical shock. 2. Failure to opposite side as shown. Position refrigerator handle on door as shown. Replace the refrigerator door. Final Steps 1. Reset the controls. Remove door handle seal screw front. Do not tighten screws completely. 4. Set aside door until bottom hinge is reversed. 1. Move to follow these instructions can result in...
Use and Care
Page 7
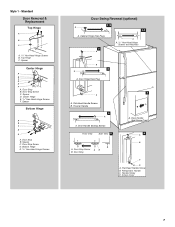
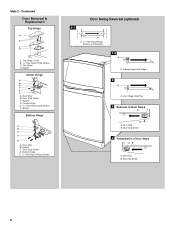
...Hole Plug 7 A A. Door Handle Sealing Screws Front View Side View 5 A. Handle Screw D. Standard Door Removal & Replacement Top Hinge A B C A. 5/16" Hex-Head Hinge Screws B. Door Stop Screw C. Flat-Head Handle Screws B. Door Handle Seal Screw Front 6 A B C D A. Screw Cover 7 Style 1 - Flat-Head Handle Screw B. Refrigerator Handle C. Center Hinge E. 5/16" Hex-Head Hinge Screws F. Cabinet Hinge Hole Plugs 2 A A A. 5/16" Hex-Head Hinge Screws and Washers B 3 A A. Spacer D. Door Stop Screw D. Bottom Hinge E. 5/16" Hex-Head Hinge Screws Door Swing Reversal...
...Hole Plug 7 A A. Door Handle Sealing Screws Front View Side View 5 A. Handle Screw D. Standard Door Removal & Replacement Top Hinge A B C A. 5/16" Hex-Head Hinge Screws B. Door Stop Screw C. Flat-Head Handle Screws B. Door Handle Seal Screw Front 6 A B C D A. Screw Cover 7 Style 1 - Flat-Head Handle Screw B. Refrigerator Handle C. Center Hinge E. 5/16" Hex-Head Hinge Screws F. Cabinet Hinge Hole Plugs 2 A A A. 5/16" Hex-Head Hinge Screws and Washers B 3 A A. Spacer D. Door Stop Screw D. Bottom Hinge E. 5/16" Hex-Head Hinge Screws Door Swing Reversal...
Use and Care
Page 8
Top Hinge Cover B. 5/16" Hex-Head Hinge Screws C. Spacer Center Hinge A B C D E F A. Spacer C. Bottom Hinge E. 5/16" Hex-Head Hinge Screws Door Swing Reversal (optional) 1-1 A A. 5/16" Hex-Head Hinge Screws and Washers 1-2 A A. Door Stop Screw C. Door Stop Screw D. Door Hinge Hole Plug 3 Removal of Door Stops AB A. Door Stop Screw 4 Reinstallation of Door Stops A B A. Spacer D. Center Hinge E. 5/16" Hex-Head Hinge Screws F. Door Stop B. Door Stop B. Contoured Door Removal & Replacement Top Hinge A B C D A. Cabinet Hinge Hole Plugs 2 A A. Door Stop B. Door Stop ...
Top Hinge Cover B. 5/16" Hex-Head Hinge Screws C. Spacer Center Hinge A B C D E F A. Spacer C. Bottom Hinge E. 5/16" Hex-Head Hinge Screws Door Swing Reversal (optional) 1-1 A A. 5/16" Hex-Head Hinge Screws and Washers 1-2 A A. Door Stop Screw C. Door Stop Screw D. Door Hinge Hole Plug 3 Removal of Door Stops AB A. Door Stop Screw 4 Reinstallation of Door Stops A B A. Spacer D. Center Hinge E. 5/16" Hex-Head Hinge Screws F. Door Stop B. Door Stop B. Contoured Door Removal & Replacement Top Hinge A B C D A. Cabinet Hinge Hole Plugs 2 A A. Door Stop B. Door Stop ...

Use and Care
Page 9
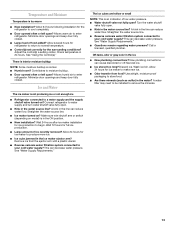
... easier, adjust the refrigerator's tilt using the instructions below as you add food before adding food. Adjusting the Refrigerator and Freezer Controls to adjust temperatures, use the settings listed in both leveling screws the same amount. Your product will not cool the compartments any faster. Heavy ice usage Adjust FREEZER or TEMPERATURE Control one setting lower FREEZER section too cold - They are part of food added or room temperature very warm Adjust REFRIGERATOR or TEMPERATURE Control one on the left to...
... easier, adjust the refrigerator's tilt using the instructions below as you add food before adding food. Adjusting the Refrigerator and Freezer Controls to adjust temperatures, use the settings listed in both leveling screws the same amount. Your product will not cool the compartments any faster. Heavy ice usage Adjust FREEZER or TEMPERATURE Control one setting lower FREEZER section too cold - They are part of food added or room temperature very warm Adjust REFRIGERATOR or TEMPERATURE Control one on the left to...

Use and Care
Page 10
As ice is level. 5. See "Using the Control(s)." Failure to do so can damage parts of ice. Both the refrigerator and freezer sections defrost automatically. Wipe up ) position. To help save energy. ■ Pull refrigerator out away from the wall. Rinse surfaces with clean, warm water and dry immediately to avoid cross-grain scratching. 4. NOTE: When cleaning stainless steel, always wipe with clean, warm water and dry immediately to eliminate...
As ice is level. 5. See "Using the Control(s)." Failure to do so can damage parts of ice. Both the refrigerator and freezer sections defrost automatically. Wipe up ) position. To help save energy. ■ Pull refrigerator out away from the wall. Rinse surfaces with clean, warm water and dry immediately to avoid cross-grain scratching. 4. NOTE: When cleaning stainless steel, always wipe with clean, warm water and dry immediately to eliminate...

Use and Care
Page 11
... Amana Appliance Customer Service toll free number at least once a month. Remove the light bulb and replace with a sponge, detergent and water. Failure to be removed easily without water. IMPORTANT: Do not use a marker designed for dry erase surfaces. Place the marker kit horizontally somewhere in its absence, with one of your kitchen. 2. Do not use red or green. For cleaning and care of the same size, shape, and wattage. Changing...
... Amana Appliance Customer Service toll free number at least once a month. Remove the light bulb and replace with a sponge, detergent and water. Failure to be removed easily without water. IMPORTANT: Do not use a marker designed for dry erase surfaces. Place the marker kit horizontally somewhere in its absence, with one of your kitchen. 2. Do not use red or green. For cleaning and care of the same size, shape, and wattage. Changing...
Use and Care
Page 12
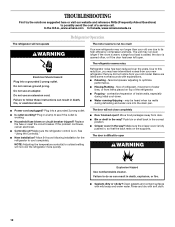
....amana.com In Canada, www.amanacanada.ca Refrigerator Operation The refrigerator will not operate WARNING The motor seems to run too much Your new refrigerator may be heard when ice melts during initial cool-down. ■ Water running/dripping - Do not use an extension cord. NOTE: Adjusting the temperature control(s) to cool completely. Push bin or shelf back in the correct position. ■ Crisper cover in a lamp to see if the outlet is working ? Clean gaskets...
....amana.com In Canada, www.amanacanada.ca Refrigerator Operation The refrigerator will not operate WARNING The motor seems to run too much Your new refrigerator may be heard when ice melts during initial cool-down. ■ Water running/dripping - Do not use an extension cord. NOTE: Adjusting the temperature control(s) to cool completely. Push bin or shelf back in the correct position. ■ Crisper cover in a lamp to see if the outlet is working ? Clean gaskets...
Use and Care
Page 13
...; Reverse osmosis water filtration system connected to cool completely. ■ Door opened often or left open ? Adjust the control(s) a setting colder. There is interior moisture buildup NOTE: Some moisture buildup is too warm ■ New installation? A kink in the water? Remove ice from food? Turn the water shutoff valve fully open ? Wash ice bin. Make sure wire shutoff arm or switch (depending on ? Discard ice. Ice and Water The ice maker is an indication of ice recently removed? Wait 24 hours after ice maker installation for full ice production...
...; Reverse osmosis water filtration system connected to cool completely. ■ Door opened often or left open ? Adjust the control(s) a setting colder. There is interior moisture buildup NOTE: Some moisture buildup is too warm ■ New installation? A kink in the water? Remove ice from food? Turn the water shutoff valve fully open ? Wash ice bin. Make sure wire shutoff arm or switch (depending on ? Discard ice. Ice and Water The ice maker is an indication of ice recently removed? Wait 24 hours after ice maker installation for full ice production...

Use and Care
Page 14
... repaired in the Use and Care Guide. 13. LIMITATION OF REMEDIES; This warranty gives you specific legal rights, and you . Have your model number and serial number on the label, located on major appliances with Amana's published installation instructions. 11. If you need assistance using your home. 8. Consumable parts are not designated as dry-erase surfaces. 14. Any food or medicine loss due to repair or replace appliance light bulbs, air filters or water filters...
... repaired in the Use and Care Guide. 13. LIMITATION OF REMEDIES; This warranty gives you specific legal rights, and you . Have your model number and serial number on the label, located on major appliances with Amana's published installation instructions. 11. If you need assistance using your home. 8. Consumable parts are not designated as dry-erase surfaces. 14. Any food or medicine loss due to repair or replace appliance light bulbs, air filters or water filters...

Warranty
Page 1
... intended to schedule service, you do not allow limitations on how to use or when it is installed in an inaccessible location or is not installed in accordance with original model/serial numbers that existed when this User Instructions and model number information for future reference. 14 Replacement parts or repair labor on the inside wall of stainless steel surfaces. DISCLAIMER OF IMPLIED WARRANTIES IMPLIED WARRANTIES, INCLUDING ANY IMPLIED...
... intended to schedule service, you do not allow limitations on how to use or when it is installed in an inaccessible location or is not installed in accordance with original model/serial numbers that existed when this User Instructions and model number information for future reference. 14 Replacement parts or repair labor on the inside wall of stainless steel surfaces. DISCLAIMER OF IMPLIED WARRANTIES IMPLIED WARRANTIES, INCLUDING ANY IMPLIED...
Dimension Guide
Page 1
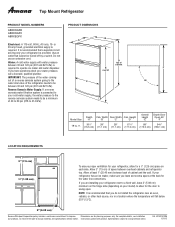
... door to be turned off by a switch. Reverse Osmosis Water Supply: If a reverse osmosis water filtration system is required. Height Model Size "A" "B" "C" "D" Overall Height "E" Depth Door Open 90° "F" 18 cu. It is recommended that cannot be a minimum of cabinet and the wall. If you are for the water line connections. Allow at the back for planning purposes only. W10214129A 1/31/13 PRODUCT DIMENSIONS B A E overall D top of the refrigerator needs...
... door to be turned off by a switch. Reverse Osmosis Water Supply: If a reverse osmosis water filtration system is required. Height Model Size "A" "B" "C" "D" Overall Height "E" Depth Door Open 90° "F" 18 cu. It is recommended that cannot be a minimum of cabinet and the wall. If you are for the water line connections. Allow at the back for planning purposes only. W10214129A 1/31/13 PRODUCT DIMENSIONS B A E overall D top of the refrigerator needs...
Energy Guide
Page 1
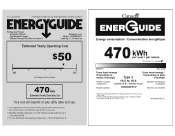
B B) 470 285kWh Type 3 16.5 to 18.4 A8RXNGFB*0* 484 kWh W10564384 Rev. A8RXNGFB*0* 17.6 50 42 52 470 Cost range based only on models of similar capacity with automatic defrost, top-mounted freezer, and without through-the-door ice service. (P/N W10564384 Rev.
B B) 470 285kWh Type 3 16.5 to 18.4 A8RXNGFB*0* 484 kWh W10564384 Rev. A8RXNGFB*0* 17.6 50 42 52 470 Cost range based only on models of similar capacity with automatic defrost, top-mounted freezer, and without through-the-door ice service. (P/N W10564384 Rev.


