Use and Care
Page 1
...-0304. You will follow instructions. Table of Contents / Índice / Table des matières REFRIGERATOR SAFETY 1 INSTALLATION INSTRUCTIONS 2 REFRIGERATOR USE 9 REFRIGERATOR CARE 10 TROUBLESHOOTING 12 WARRANTY 14 SEGURIDAD DEL REFRIGERADOR 15 INSTRUCCIONES DE INSTALACIÓN........... 16 USO DE SU REFRIGERADOR... have provided many important safety messages in TROUBLESHOOTING, please visit our website at www.amana.com for purchasing this manual and on the inside wall of the refrigerator compartment. All safety messages will need assistance, call us at 1-800-807-6777....
...-0304. You will follow instructions. Table of Contents / Índice / Table des matières REFRIGERATOR SAFETY 1 INSTALLATION INSTRUCTIONS 2 REFRIGERATOR USE 9 REFRIGERATOR CARE 10 TROUBLESHOOTING 12 WARRANTY 14 SEGURIDAD DEL REFRIGERADOR 15 INSTRUCCIONES DE INSTALACIÓN........... 16 USO DE SU REFRIGERADOR... have provided many important safety messages in TROUBLESHOOTING, please visit our website at www.amana.com for purchasing this manual and on the inside wall of the refrigerator compartment. All safety messages will need assistance, call us at 1-800-807-6777....

Use and Care
Page 2
...Do not use sharp instruments, rubbing alcohol, flammable fluids, or abrasive cleaners to remove tape or glue. Before You Throw Away Your Old Refrigerator or Freezer: ■ Take off the doors. ■ Leave the shelves in the Interior FeaturePak. Keep these instructions to help prevent ...accidents. The insert is located behind the control panel on the ceiling of the refrigerator (on some models, shelves, bins, door shelf rails, and other injury. ■ Dispose of/recycle all parts and panels before operating...
...Do not use sharp instruments, rubbing alcohol, flammable fluids, or abrasive cleaners to remove tape or glue. Before You Throw Away Your Old Refrigerator or Freezer: ■ Take off the doors. ■ Leave the shelves in the Interior FeaturePak. Keep these instructions to help prevent ...accidents. The insert is located behind the control panel on the ceiling of the refrigerator (on some models, shelves, bins, door shelf rails, and other injury. ■ Dispose of/recycle all parts and panels before operating...

Use and Care
Page 3
.... Shelves and covers may break if exposed to know about glass shelves and covers: Do not clean glass shelves or covers with your refrigerator be turned off by a switch. Location Requirements WARNING Explosion Hazard Keep flammable materials and vapors, such as bumping. Do not install in... a location where the temperature will remain above freezing. Do not use an extension cord. Install copper tubing only in "Refrigerator Care." Failure to swing open -end wrenches or 2 adjustable wrenches, ¹⁄₄" nut driver and drill bit, cordless drill. To ensure...
.... Shelves and covers may break if exposed to know about glass shelves and covers: Do not clean glass shelves or covers with your refrigerator be turned off by a switch. Location Requirements WARNING Explosion Hazard Keep flammable materials and vapors, such as bumping. Do not install in... a location where the temperature will remain above freezing. Do not use an extension cord. Install copper tubing only in "Refrigerator Care." Failure to swing open -end wrenches or 2 adjustable wrenches, ¹⁄₄" nut driver and drill bit, cordless drill. To ensure...
Use and Care
Page 4
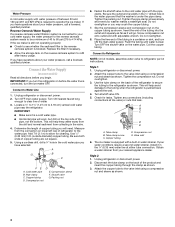
... as shown. 3. If you have questions about your cold water supply, the water pressure to the reverse osmosis system needs to the refrigerator as shown. Cold water pipe E. Shutoff valve C. Tighten the pipe clamp screws slowly and evenly so washer makes a watertight seal....the drill and normal sediment from your water pressure, call a licensed, qualified plumber. Fasten the shutoff valve to the tubing when the refrigerator is connected, turn ON the main water supply. This will go. Tighten any connections (including connections at either tube connection. Copper ...
... as shown. 3. If you have questions about your cold water supply, the water pressure to the reverse osmosis system needs to the refrigerator as shown. Cold water pipe E. Shutoff valve C. Tighten the pipe clamp screws slowly and evenly so washer makes a watertight seal....the drill and normal sediment from your water pressure, call a licensed, qualified plumber. Fasten the shutoff valve to the tubing when the refrigerator is connected, turn ON the main water supply. This will go. Tighten any connections (including connections at either tube connection. Copper ...

Use and Care
Page 5
...in place while you want to hold the doors in death, fire, or electrical shock. Check for the appropriate door style. Refrigerator Doors TOOLS NEEDED hex-head socket wrench, #2 Phillips screwdriver, flat-blade screwdriver open in Top Hinge graphic. IMPORTANT: ■...may have standard (Style 1) or contoured (Style 2) doors. Plug into a grounded 3 prong outlet. See Graphic 1-2. 5 Copper tubing 5. Unplug refrigerator or disconnect power. ■ Remove food and adjustable door or utility bins from your water conditions require a second water strainer, install it in ...
...in place while you want to hold the doors in death, fire, or electrical shock. Check for the appropriate door style. Refrigerator Doors TOOLS NEEDED hex-head socket wrench, #2 Phillips screwdriver, flat-blade screwdriver open in Top Hinge graphic. IMPORTANT: ■...may have standard (Style 1) or contoured (Style 2) doors. Plug into a grounded 3 prong outlet. See Graphic 1-2. 5 Copper tubing 5. Unplug refrigerator or disconnect power. ■ Remove food and adjustable door or utility bins from your water conditions require a second water strainer, install it in ...

Use and Care
Page 6
... doors in place while you are in handle first. Remove door hinge hole plug from both the freezer and refrigerator doors and move to opposite side of the refrigerator door as shown. Remove door handle sealing screws. Remove door handle seal screw front. See Graphic 5. 7.... so that hole plugs and screws are being moved. See Graphic 3. 3. Tighten screws. Do not remove ground prong. See Graphic 6. 3. Refrigerator door 1. Do not use an adapter. Freezer door 1. Position freezer handle on door as shown. Align lower portion of freezer door. Replace ...
... doors in place while you are in handle first. Remove door hinge hole plug from both the freezer and refrigerator doors and move to opposite side of the refrigerator door as shown. Remove door handle sealing screws. Remove door handle seal screw front. See Graphic 5. 7.... so that hole plugs and screws are being moved. See Graphic 3. 3. Tighten screws. Do not remove ground prong. See Graphic 6. 3. Refrigerator door 1. Do not use an adapter. Freezer door 1. Position freezer handle on door as shown. Align lower portion of freezer door. Replace ...
Use and Care
Page 7
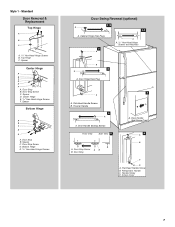
Style 1 - Spacer Bottom Hinge A B C D E A. Spacer C. Flat-Head Handle Screws B. Door Stop A. Spacer Center Hinge A B C D E F A. Door Stop Screw C. Door Stop B. Door Hinge Hole Plug 7 A A. Freezer Handle 4 A A. Refrigerator Handle C. Door Handle Seal Screw Front 6 A B C D A. Standard Door Removal & Replacement Top Hinge A B C A. 5/16" Hex-Head Hinge Screws B. Top Hinge C. Spacer D. Center Hinge E. 5/16" Hex-Head ...
Style 1 - Spacer Bottom Hinge A B C D E A. Spacer C. Flat-Head Handle Screws B. Door Stop A. Spacer Center Hinge A B C D E F A. Door Stop Screw C. Door Stop B. Door Hinge Hole Plug 7 A A. Freezer Handle 4 A A. Refrigerator Handle C. Door Handle Seal Screw Front 6 A B C D A. Standard Door Removal & Replacement Top Hinge A B C A. 5/16" Hex-Head Hinge Screws B. Top Hinge C. Spacer D. Center Hinge E. 5/16" Hex-Head ...

Use and Care
Page 9
... It may take several turns to adjust the tilt of food added or very cold room temperature (can't cycle often enough) - For your refrigerator may spoil. It is still level side to the rear by turning both leveling screws the same amount. Door opened often, or large amount ... Control one on your model, your convenience, the Temperature Control is located at the factory. one on the right and one setting higher REFRIGERATOR section too cold - Turn the leveling legs or leveling screws to the right to raise that side of the front roller assemblies which are...
... It may take several turns to adjust the tilt of food added or very cold room temperature (can't cycle often enough) - For your refrigerator may spoil. It is still level side to the rear by turning both leveling screws the same amount. Door opened often, or large amount ... Control one on your model, your convenience, the Temperature Control is located at the factory. one on the right and one setting higher REFRIGERATOR section too cold - Turn the leveling legs or leveling screws to the right to raise that side of the front roller assemblies which are...

Use and Care
Page 10
...should produce approximately 8 to avoid water spots. Explosion Hazard Use nonflammable cleaner. Do not force the wire shutoff arm up ) position. REFRIGERATOR CARE Cleaning WARNING Ice Production Rate ■ Allow 24 hours to 20 batches of ice. Water softener chemicals (such as window sprays,...ice maker to the other month. If a softened water supply cannot be cleaned as often as the quality of odors. Both the refrigerator and freezer sections defrost automatically. Remember ■ The quality of your stainless steel, keep your ice maker. However, clean both ...
...should produce approximately 8 to avoid water spots. Explosion Hazard Use nonflammable cleaner. Do not force the wire shutoff arm up ) position. REFRIGERATOR CARE Cleaning WARNING Ice Production Rate ■ Allow 24 hours to 20 batches of ice. Water softener chemicals (such as window sprays,...ice maker to the other month. If a softened water supply cannot be cleaned as often as the quality of odors. Both the refrigerator and freezer sections defrost automatically. Remember ■ The quality of your stainless steel, keep your ice maker. However, clean both ...

Use and Care
Page 11
...blue, purple, orange, yellow or brown. Remove the light bulb and replace with one of the refrigerator. In Canada, visit our website at www.amanacanada.ca or call the Amana Appliance Customer Service toll free number at 1-800-807-6777. 1. Place the marker kit horizontally ... you should not be used by pushing down. 4. Always use a marker designed for dry erase surfaces. Plug in refrigerator or reconnect power. Your Amana® JOT™ refrigerator is why the markers should clean the ink residues from prolonged exposure, clean with a sponge, detergent and water. Freezer...
...blue, purple, orange, yellow or brown. Remove the light bulb and replace with one of the refrigerator. In Canada, visit our website at www.amanacanada.ca or call the Amana Appliance Customer Service toll free number at 1-800-807-6777. 1. Place the marker kit horizontally ... you should not be used by pushing down. 4. Always use a marker designed for dry erase surfaces. Plug in refrigerator or reconnect power. Your Amana® JOT™ refrigerator is why the markers should clean the ink residues from prolonged exposure, clean with a sponge, detergent and water. Freezer...
Use and Care
Page 12
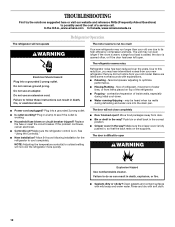
... Crisper cover in , so that you did not notice from your new refrigerator that the back rests on . Rinse and dry with soft cloth. 12 In the U.S.A., www.amana.com In Canada, www.amanacanada.ca Refrigerator Operation The refrigerator will not operate WARNING The motor seems to run too much Your new... refrigerator may run longer than your old one due to this reduction, you may run...
... Crisper cover in , so that you did not notice from your new refrigerator that the back rests on . Rinse and dry with soft cloth. 12 In the U.S.A., www.amana.com In Canada, www.amanacanada.ca Refrigerator Operation The refrigerator will not operate WARNING The motor seems to run too much Your new... refrigerator may run longer than your old one due to this reduction, you may run...
Use and Care
Page 13
... ■ Odor transfer from the ejector arm with a plastic utensil. ■ Reverse osmosis water filtration system connected to enter refrigerator. Allow 24 hours for ice production to remove the minerals. 13 The ice cubes are hollow or small NOTE: This is in... connections? Turn the water shutoff valve fully open ? Straighten the water source line. ■ Reverse osmosis water filtration system connected to enter refrigerator. See "Water Supply Requirements." ■ Questions remain regarding water pressure? Call a licensed, qualified plumber. Off-taste, odor or gray color...
... ■ Odor transfer from the ejector arm with a plastic utensil. ■ Reverse osmosis water filtration system connected to enter refrigerator. Allow 24 hours for ice production to remove the minerals. 13 The ice cubes are hollow or small NOTE: This is in... connections? Turn the water shutoff valve fully open ? Straighten the water source line. ■ Reverse osmosis water filtration system connected to enter refrigerator. See "Water Supply Requirements." ■ Questions remain regarding water pressure? Call a licensed, qualified plumber. Off-taste, odor or gray color...

Use and Care
Page 14
...as dry-erase surfaces. 14. Any food or medicine loss due to you also may not apply to refrigerator surfaces that vary from state to state or province to Amana within 30 days from the date of purchase. 6. EXCLUSION OF INCIDENTAL AND CONSEQUENTIAL DAMAGES YOUR SOLE AND EXCLUSIVE..., you can find your product or you would like to Amana with any marker to you do not allow the exclusion or limitation of incidental or consequential damages, so these limitations and exclusions may not apply to refrigerator or freezer product failures. 7. Please keep this limited warranty....
...as dry-erase surfaces. 14. Any food or medicine loss due to you also may not apply to refrigerator surfaces that vary from state to state or province to Amana within 30 days from the date of purchase. 6. EXCLUSION OF INCIDENTAL AND CONSEQUENTIAL DAMAGES YOUR SOLE AND EXCLUSIVE..., you can find your product or you would like to Amana with any marker to you do not allow the exclusion or limitation of incidental or consequential damages, so these limitations and exclusions may not apply to refrigerator or freezer product failures. 7. Please keep this limited warranty....

Dimension Guide
Page 1
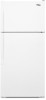
... Depth "A" Cab. Instructions packed with water pressure between back of cabinet and the wall. NOTE: Before performing any type of the refrigerator needs to change materials and specifications without notice. Allow at the back for planning purposes only. It is required to swing open. ...plumber. NOTE: It is connected to your model) to allow for the door to operate ice maker and water dispenser. Top Mount Refrigerator PRODUCT MODEL NUMBERS A4TXNWFX A6TXNWFX A8TXNGFX A8TXNWFX Electrical: A 115-volt, 60-Hz, AC-only, 15or 20-amp fused, grounded electrical ...
... Depth "A" Cab. Instructions packed with water pressure between back of cabinet and the wall. NOTE: Before performing any type of the refrigerator needs to change materials and specifications without notice. Allow at the back for planning purposes only. It is required to swing open. ...plumber. NOTE: It is connected to your model) to allow for the door to operate ice maker and water dispenser. Top Mount Refrigerator PRODUCT MODEL NUMBERS A4TXNWFX A6TXNWFX A8TXNGFX A8TXNWFX Electrical: A 115-volt, 60-Hz, AC-only, 15or 20-amp fused, grounded electrical ...


