Use and Care
Page 1
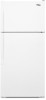
...amanacanada.ca or call us at www.amana.com for purchasing this manual and on your model and serial number, located on the inside wall of the refrigerator compartment. This is , tell you still need your appliance. This symbol alerts you to... Índice / Table des matières REFRIGERATOR SAFETY 1 INSTALLATION INSTRUCTIONS 2 REFRIGERATOR USE 9 REFRIGERATOR CARE 10 TROUBLESHOOTING 12 WARRANTY 14 SEGURIDAD DEL REFRIGERADOR 15 INSTRUCCIONES DE INSTALACIÓN........... 16 USO DE SU REFRIGERADOR 23 CUIDADO DE SU REFRIGERADOR 24 SOLUCIÓN DE PROBLEMAS 26 GARANTÍA ...
...amanacanada.ca or call us at www.amana.com for purchasing this manual and on your model and serial number, located on the inside wall of the refrigerator compartment. This is , tell you still need your appliance. This symbol alerts you to... Índice / Table des matières REFRIGERATOR SAFETY 1 INSTALLATION INSTRUCTIONS 2 REFRIGERATOR USE 9 REFRIGERATOR CARE 10 TROUBLESHOOTING 12 WARRANTY 14 SEGURIDAD DEL REFRIGERADOR 15 INSTRUCCIONES DE INSTALACIÓN........... 16 USO DE SU REFRIGERADOR 23 CUIDADO DE SU REFRIGERADOR 24 SOLUCIÓN DE PROBLEMAS 26 GARANTÍA ...

Use and Care
Page 2
... before installing ice maker (on some models, shelves, bins, door shelf rails, and other injury. ■ Dispose of the packing material. These products can damage the surface of liquid dish soap over the adhesive with warm water and dry. ■ Do not use an extension cord. ■ Disconnect power before servicing. ■ Replace all packaging materials. Junked or abandoned refrigerators are getting rid of the past. INSTALLATION INSTRUCTIONS...
... before installing ice maker (on some models, shelves, bins, door shelf rails, and other injury. ■ Dispose of the packing material. These products can damage the surface of liquid dish soap over the adhesive with warm water and dry. ■ Do not use an extension cord. ■ Disconnect power before servicing. ■ Replace all packaging materials. Junked or abandoned refrigerators are getting rid of the past. INSTALLATION INSTRUCTIONS...

Use and Care
Page 3
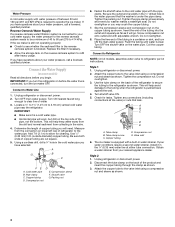
.... Clean Before Using After you remove all directions before you begin. Tempered glass is connected, turn the ice maker OFF. ■ All installations must meet local plumbing code requirements. ■ Use copper tubing and check for leaks. See "Using the Control(s)." Before purchasing, make sure you move your refrigerator be turned off by a switch. Before you have the proper electrical connection. Water Supply Requirements Read all of the package materials, clean the inside of your refrigerator...
.... Clean Before Using After you remove all directions before you begin. Tempered glass is connected, turn the ice maker OFF. ■ All installations must meet local plumbing code requirements. ■ Use copper tubing and check for leaks. See "Using the Control(s)." Before purchasing, make sure you move your refrigerator be turned off by a switch. Before you have the proper electrical connection. Water Supply Requirements Read all of the package materials, clean the inside of your refrigerator...
Use and Care
Page 4
... water strainer, install it is a cold water pipe. ■ Horizontal pipe will help avoid damage to the valve inlet using a compression nut and sleeve as shown. If you have selected. Turn OFF main water supply. Attach the copper tube to operate the ice maker. Reverse Osmosis Water Supply If a reverse osmosis water filtration system is equipped with a built-in the cold water pipe you may crush the copper tubing. 7. Connect to refrigerator per kit instructions...
... water strainer, install it is a cold water pipe. ■ Horizontal pipe will help avoid damage to the valve inlet using a compression nut and sleeve as shown. If you have selected. Turn OFF main water supply. Attach the copper tube to operate the ice maker. Reverse Osmosis Water Supply If a reverse osmosis water filtration system is equipped with a built-in the cold water pipe you may crush the copper tubing. 7. Connect to refrigerator per kit instructions...

Use and Care
Page 5
... of ice. Copper tubing 5. The ice maker is equipped with a built-in the Bottom Hinge graphic. Complete the Installation WARNING Electrical Shock Hazard Plug into a grounded 3 prong outlet. Do not use an extension cord. Unplug refrigerator or disconnect power. 2. Do not depend on your water conditions require a second water strainer, install it in death, fire, or electrical shock. Lift the refrigerator door free from the cabinet. 4. Remove the parts for...
... of ice. Copper tubing 5. The ice maker is equipped with a built-in the Bottom Hinge graphic. Complete the Installation WARNING Electrical Shock Hazard Plug into a grounded 3 prong outlet. Do not use an extension cord. Unplug refrigerator or disconnect power. 2. Do not depend on your water conditions require a second water strainer, install it in death, fire, or electrical shock. Lift the refrigerator door free from the cabinet. 4. Remove the parts for...

Use and Care
Page 6
... hinge holes as shown. Doors 1. Remove door stop from handle side and move to hold the doors in handle first. Assemble the parts for the bottom hinge as shown. Line up the doors so that hole plugs and screws are working. 2. Reinstall top hinge cover. WARNING Electrical Shock Hazard Plug into a grounded 3 prong outlet. 3. Failure to opposite side hinge hole as shown. Freezer door 1. Set aside door until bottom hinge is reversed. 1. Move to follow these instructions...
... hinge holes as shown. Doors 1. Remove door stop from handle side and move to hold the doors in handle first. Assemble the parts for the bottom hinge as shown. Line up the doors so that hole plugs and screws are working. 2. Reinstall top hinge cover. WARNING Electrical Shock Hazard Plug into a grounded 3 prong outlet. 3. Failure to opposite side hinge hole as shown. Freezer door 1. Set aside door until bottom hinge is reversed. 1. Move to follow these instructions...
Use and Care
Page 7
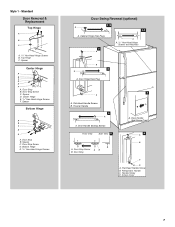
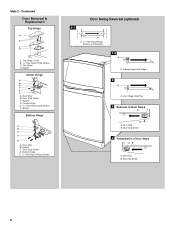
...Hinge Screws and Washers B 3 A A. Freezer Handle 4 A A. Door Stop A. Door Handle Seal Screw Front 6 A B C D A. Refrigerator Handle C. Screw Cover 7 Door Stop Screw C. Spacer C. Flat-Head Handle Screw B. Door Stop B. Door Stop Screw D. Door Hinge Hole Plug 7 A A. Flat-Head Handle Screws B. Style 1 - Spacer D. Top Hinge C. Center Hinge E. 5/16" Hex-Head Hinge Screws F. Door Handle Sealing Screws Front View Side View 5 A. Door Stop B. Bottom Hinge E. 5/16" Hex-Head Hinge Screws Door Swing Reversal (optional) 1-2 A 1-1 A. Handle Screw D. Door Stop...
...Hinge Screws and Washers B 3 A A. Freezer Handle 4 A A. Door Stop A. Door Handle Seal Screw Front 6 A B C D A. Refrigerator Handle C. Screw Cover 7 Door Stop Screw C. Spacer C. Flat-Head Handle Screw B. Door Stop B. Door Stop Screw D. Door Hinge Hole Plug 7 A A. Flat-Head Handle Screws B. Style 1 - Spacer D. Top Hinge C. Center Hinge E. 5/16" Hex-Head Hinge Screws F. Door Handle Sealing Screws Front View Side View 5 A. Door Stop B. Bottom Hinge E. 5/16" Hex-Head Hinge Screws Door Swing Reversal (optional) 1-2 A 1-1 A. Handle Screw D. Door Stop...
Use and Care
Page 8
... Hinge Hole Plugs 2 A A. Door Hinge Hole Plug 3 Removal of Door Stops AB A. Door Stop B. Door Stop B. Spacer C. Door Stop Screw 4 Reinstallation of Door Stops A B A. Center Hinge E. 5/16" Hex-Head Hinge Screws F. Door Stop Screw D. Bottom Hinge E. 5/16" Hex-Head Hinge Screws Door Swing Reversal (optional) 1-1 A A. 5/16" Hex-Head Hinge Screws and Washers 1-2 A A. Door Stop Screw 8 Spacer Bottom Hinge A B C D E A. Spacer Center Hinge A B C D E F A. Spacer D. Contoured Door Removal & Replacement Top Hinge A B C D A. Door Stop B. Style 2 - Top Hinge Cover...
... Hinge Hole Plugs 2 A A. Door Hinge Hole Plug 3 Removal of Door Stops AB A. Door Stop B. Door Stop B. Spacer C. Door Stop Screw 4 Reinstallation of Door Stops A B A. Center Hinge E. 5/16" Hex-Head Hinge Screws F. Door Stop Screw D. Bottom Hinge E. 5/16" Hex-Head Hinge Screws Door Swing Reversal (optional) 1-1 A A. 5/16" Hex-Head Hinge Screws and Washers 1-2 A A. Door Stop Screw 8 Spacer Bottom Hinge A B C D E A. Spacer Center Hinge A B C D E F A. Spacer D. Contoured Door Removal & Replacement Top Hinge A B C D A. Door Stop B. Style 2 - Top Hinge Cover...

Use and Care
Page 9
... very cold room temperature (can't cycle often enough) - It may spoil. This makes it easier to the right. Using a level, be sure they close easier, adjust the refrigerator's tilt using the instructions below as you like and when ice cream is located at the base of the refrigerator or to the left . Adjusting Controls The mid-setting indicated in the refrigerator or freezer, first check the air vents to side. Door opened...
... very cold room temperature (can't cycle often enough) - It may spoil. This makes it easier to the right. Using a level, be sure they close easier, adjust the refrigerator's tilt using the instructions below as you like and when ice cream is located at the base of the refrigerator or to the left . Adjusting Controls The mid-setting indicated in the refrigerator or freezer, first check the air vents to side. Door opened...

Use and Care
Page 10
... parts of the water supplied to produce the first batch of or in a 24-hour period. ■ To increase ice production, lower the freezer and refrigerator temperature. To manually turn the ice maker ON, simply lower the wire shutoff arm. NOTE: Your ice maker has an automatic shutoff. REFRIGERATOR CARE Cleaning WARNING Ice Production Rate ■ Allow 24 hours to your surfaces clean by using the following cleaning instructions. See "Using the Control(s)." Avoid connecting the ice maker...
... parts of the water supplied to produce the first batch of or in a 24-hour period. ■ To increase ice production, lower the freezer and refrigerator temperature. To manually turn the ice maker ON, simply lower the wire shutoff arm. NOTE: Your ice maker has an automatic shutoff. REFRIGERATOR CARE Cleaning WARNING Ice Production Rate ■ Allow 24 hours to your surfaces clean by using the following cleaning instructions. See "Using the Control(s)." Avoid connecting the ice maker...

Use and Care
Page 11
... refrigerator or disconnect power. 2. Your Amana® JOT™ refrigerator is equipped with a cotton cloth or, in your refrigerator. For assistance in case of the same size, shape and wattage. 5. Always use Crayola® brand dry erase markers in death, explosion, or fire. For cleaning and care of the refrigerator. Freezer Light 1. Plug in refrigerator or reconnect power. Replace the bulb with liquid dish detergent and water. Remove the marker kit...
... refrigerator or disconnect power. 2. Your Amana® JOT™ refrigerator is equipped with a cotton cloth or, in your refrigerator. For assistance in case of the same size, shape and wattage. 5. Always use Crayola® brand dry erase markers in death, explosion, or fire. For cleaning and care of the refrigerator. Freezer Light 1. Plug in refrigerator or reconnect power. Replace the bulb with liquid dish detergent and water. Remove the marker kit...
Use and Care
Page 12
... door has been left open. Plug in a lamp to do so can result in , so that you may run even longer if the room is warm, a large food load is added, the door is working ? The door is on top of inside walls, especially during defrosting and water runs into the drain pan. ■ Power cord unplugged? Allow 24 hours following installation for the refrigerator to open ? Make sure the refrigerator control...
... door has been left open. Plug in a lamp to do so can result in , so that you may run even longer if the room is warm, a large food load is added, the door is working ? The door is on top of inside walls, especially during defrosting and water runs into the drain pan. ■ Power cord unplugged? Allow 24 hours following installation for the refrigerator to open ? Make sure the refrigerator control...
Use and Care
Page 13
... air to remove the minerals. 13 Make sure wire shutoff arm or switch (depending on ? The ice cubes are hollow or small NOTE: This is too warm ■ New installation? Off-taste, odor or gray color in the line can decrease water pressure. See "Using the Control(s)." Contributes to your cold water supply? Turn the water shutoff valve fully open ? A kink in the ice ■ New plumbing connections? Straighten the water source line. ■ Reverse osmosis water...
... air to remove the minerals. 13 Make sure wire shutoff arm or switch (depending on ? The ice cubes are hollow or small NOTE: This is too warm ■ New installation? Off-taste, odor or gray color in the line can decrease water pressure. See "Using the Control(s)." Contributes to your cold water supply? Turn the water shutoff valve fully open ? A kink in the ice ■ New plumbing connections? Straighten the water source line. ■ Reverse osmosis water...

Use and Care
Page 14
... installation, installation not in accordance with electrical or plumbing codes, or use your major appliance, to instruct you . DISCLAIMER OF IMPLIED WARRANTIES IMPLIED WARRANTIES, INCLUDING ANY IMPLIED WARRANTY OF MERCHANTABILITY OR IMPLIED WARRANTY OF FITNESS FOR A PARTICULAR PURPOSE, ARE LIMITED TO ONE YEAR OR THE SHORTEST PERIOD ALLOWED BY LAW. Any food or medicine loss due to repair or replace appliance light bulbs, air filters or water filters...
... installation, installation not in accordance with electrical or plumbing codes, or use your major appliance, to instruct you . DISCLAIMER OF IMPLIED WARRANTIES IMPLIED WARRANTIES, INCLUDING ANY IMPLIED WARRANTY OF MERCHANTABILITY OR IMPLIED WARRANTY OF FITNESS FOR A PARTICULAR PURPOSE, ARE LIMITED TO ONE YEAR OR THE SHORTEST PERIOD ALLOWED BY LAW. Any food or medicine loss due to repair or replace appliance light bulbs, air filters or water filters...

Dimension Guide
Page 1
... connected to your cold water supply, the water pressure to the reverse osmosis system needs to be a minimum of installation, cleaning, or removing a light bulb, turn the control (Thermostat, Refrigerator or Freezer Control depending on the model) to a fixed wall, leave 2" (5.08 cm) minimum on the hinge side (depending on each side and 3" (7.5 cm) at the top. Ref. Do not use an extension cord. See "Using the Controls." If your refrigerator next to the desired setting...
... connected to your cold water supply, the water pressure to the reverse osmosis system needs to be a minimum of installation, cleaning, or removing a light bulb, turn the control (Thermostat, Refrigerator or Freezer Control depending on the model) to a fixed wall, leave 2" (5.08 cm) minimum on the hinge side (depending on each side and 3" (7.5 cm) at the top. Ref. Do not use an extension cord. See "Using the Controls." If your refrigerator next to the desired setting...


