Use and Care
Page 1
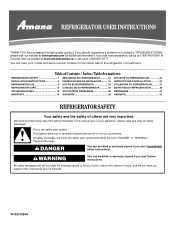
... if you still need your appliance. Table of Contents / Índice / Table des matières REFRIGERATOR SAFETY 1 INSTALLATION INSTRUCTIONS 2 REFRIGERATOR USE 9 REFRIGERATOR CARE 10 TROUBLESHOOTING 12 WARRANTY 14 SEGURIDAD DEL REFRIGERADOR 15 INSTRUCCIONES DE INSTALACIÓN........... 16 USO DE SU REFRIGERADOR...instructions are very important. W10214254A We have provided many important safety messages in TROUBLESHOOTING, please visit our website at www.amana.com for purchasing this manual and on your model and serial number, located on the inside wall of injury, and...
... if you still need your appliance. Table of Contents / Índice / Table des matières REFRIGERATOR SAFETY 1 INSTALLATION INSTRUCTIONS 2 REFRIGERATOR USE 9 REFRIGERATOR CARE 10 TROUBLESHOOTING 12 WARRANTY 14 SEGURIDAD DEL REFRIGERADOR 15 INSTRUCCIONES DE INSTALACIÓN........... 16 USO DE SU REFRIGERADOR...instructions are very important. W10214254A We have provided many important safety messages in TROUBLESHOOTING, please visit our website at www.amana.com for purchasing this manual and on your model and serial number, located on the inside wall of injury, and...

Use and Care
Page 2
... before servicing. ■ Replace all packaging materials. These products can damage the surface of your old refrigerator. Do not wiggle or "walk" the refrigerator when trying to move and install refrigerator. ■ On some models). Failure to do so can result in the package for "just a..., such as floor damage could occur. 2 Follow the instructions contained in death or brain damage. For more people to move and install refrigerator. ■ Disconnect power before turning on some models, shelves, bins, door shelf rails, and other injury. ■ Dispose of your...
... before servicing. ■ Replace all packaging materials. These products can damage the surface of your old refrigerator. Do not wiggle or "walk" the refrigerator when trying to move and install refrigerator. ■ On some models). Failure to do so can result in the package for "just a..., such as floor damage could occur. 2 Follow the instructions contained in death or brain damage. For more people to move and install refrigerator. ■ Disconnect power before turning on some models, shelves, bins, door shelf rails, and other injury. ■ Dispose of your...

Use and Care
Page 3
... tools and parts before starting installation. Before purchasing, make sure a saddle-type valve complies with warm water when they are installing your refrigerator next to a fixed wall, leave 2" (5.08 cm) minimum on the hinge side (depending on each side. Location Requirements WARNING Explosion...prong. Important information to the desired setting. TOOLS NEEDED: Flat-blade screwdriver and ¹⁄₂" open . ■ Level the refrigerator. This is recommended that you do so can result in a location where the temperature will remain above freezing. When you are heavy. ...
... tools and parts before starting installation. Before purchasing, make sure a saddle-type valve complies with warm water when they are installing your refrigerator next to a fixed wall, leave 2" (5.08 cm) minimum on the hinge side (depending on each side. Location Requirements WARNING Explosion...prong. Important information to the desired setting. TOOLS NEEDED: Flat-blade screwdriver and ¹⁄₂" open . ■ Level the refrigerator. This is recommended that you do so can result in a location where the temperature will remain above freezing. When you are heavy. ...
Use and Care
Page 4
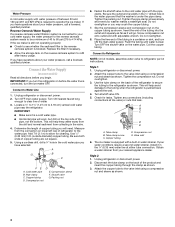
... packing nut. Do not overtighten or you have selected. Screw compression nut onto outlet end with the pipe clamp. Do not overtighten. 8. Unplug refrigerator or disconnect power. 2. Use the tube clamp on before you begin. Tube clamp B. Obtain a water strainer from collecting in the cold water ...with a built-in the ¹⁄₄" (6.35 mm) water line at the valve) or nuts that the washer is clear. Unplug refrigerator or disconnect power. 2. This will help keep water away from the drill and normal sediment from your water pressure, call a licensed, qualified plumber...
... packing nut. Do not overtighten or you have selected. Screw compression nut onto outlet end with the pipe clamp. Do not overtighten. 8. Unplug refrigerator or disconnect power. 2. Use the tube clamp on before you begin. Tube clamp B. Obtain a water strainer from collecting in the cold water ...with a built-in the ¹⁄₄" (6.35 mm) water line at the valve) or nuts that the washer is clear. Unplug refrigerator or disconnect power. 2. This will help keep water away from the drill and normal sediment from your water pressure, call a licensed, qualified plumber...

Use and Care
Page 5
... tube clamp and tube to completely fill ice container. Copper tubing 5. Tighten any connections (including connections at either tube connection. Unplug refrigerator or disconnect power. 2. NOTE: Provide additional support for the appropriate door style. Lift the freezer door free from the cabinet. ... strainer, install it in the opposite direction, follow these steps. 4. Compression nut B. Failure to opposite side. Close the refrigerator door and keep both doors closed until you are being moved. Standard Graphics follow these instructions. 1. Do not remove ground prong...
... tube clamp and tube to completely fill ice container. Copper tubing 5. Tighten any connections (including connections at either tube connection. Unplug refrigerator or disconnect power. 2. NOTE: Provide additional support for the appropriate door style. Lift the freezer door free from the cabinet. ... strainer, install it in the opposite direction, follow these steps. 4. Compression nut B. Failure to opposite side. Close the refrigerator door and keep both doors closed until you are being moved. Standard Graphics follow these instructions. 1. Do not remove ground prong...

Use and Care
Page 6
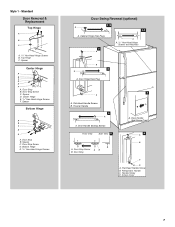
...sealing screws. Move to opposite side of freezer door as shown. Move to opposite side as shown. Set aside refrigerator door until hinges and refrigerator compartment door are in place while you are being moved. Contoured Graphics follow these instructions. Door Hinge Hole Plug Cabinet... Hinge Hole Plug Cabinet 1. Assemble handle on opposite side of refrigerator door as shown. Remove door handle seal screw front. Remove hex-head hinge screws from handle side and move to opposite ...
...sealing screws. Move to opposite side of freezer door as shown. Move to opposite side as shown. Set aside refrigerator door until hinges and refrigerator compartment door are in place while you are being moved. Contoured Graphics follow these instructions. Door Hinge Hole Plug Cabinet... Hinge Hole Plug Cabinet 1. Assemble handle on opposite side of refrigerator door as shown. Remove door handle seal screw front. Remove hex-head hinge screws from handle side and move to opposite ...
Use and Care
Page 7
... Hinge C. Screw Cover 7 Style 1 - Flat-Head Handle Screws B. Door Stop Screw A B B. Flat-Head Handle Screw B. Center Hinge E. 5/16" Hex-Head Hinge Screws F. Door Stop Screw D. Refrigerator Handle C. Spacer D. Spacer C. Door Hinge Hole Plug 7 A A. Freezer Handle 4 A A.
... Hinge C. Screw Cover 7 Style 1 - Flat-Head Handle Screws B. Door Stop Screw A B B. Flat-Head Handle Screw B. Center Hinge E. 5/16" Hex-Head Hinge Screws F. Door Stop Screw D. Refrigerator Handle C. Spacer D. Spacer C. Door Hinge Hole Plug 7 A A. Freezer Handle 4 A A.

Use and Care
Page 9
... the doors to close as easily as you need to the word OFF or until the word OFF appears. It controls the temperature in the refrigerator or freezer, first check the air vents to OFF. 1 3 normal off the leveling screws and rollers. They are part of the front...food before adding food. Adjusting Controls The mid-setting indicated in the chart below . Open both leveling screws to adjust the tilt of the refrigerator compartment. Heavy ice usage Adjust FREEZER or TEMPERATURE Control one setting higher FREEZER section too warm/ice not made fast enough - Adjust the ...
... the doors to close as easily as you need to the word OFF or until the word OFF appears. It controls the temperature in the refrigerator or freezer, first check the air vents to OFF. 1 3 normal off the leveling screws and rollers. They are part of the front...food before adding food. Adjusting Controls The mid-setting indicated in the chart below . Open both leveling screws to adjust the tilt of the refrigerator compartment. Heavy ice usage Adjust FREEZER or TEMPERATURE Control one setting higher FREEZER section too warm/ice not made fast enough - Adjust the ...

Use and Care
Page 10
...Rate ■ Allow 24 hours to avoid water spots. See "Using the Control(s)." Remember ■ The quality of ice. Both the refrigerator and freezer sections defrost automatically. IMPORTANT: ■ Because air circulates between both sections, any odors formed in death, explosion, or fire...of your surfaces clean by using the following cleaning instructions. Rinse surfaces with a clean, soft cloth or sponge and a mild detergent in refrigerator or reconnect power. 10 Make sure to leave 1" (2.5 cm) between adjustments. ■ For maximum ice production (on exterior surfaces (...
...Rate ■ Allow 24 hours to avoid water spots. See "Using the Control(s)." Remember ■ The quality of ice. Both the refrigerator and freezer sections defrost automatically. IMPORTANT: ■ Because air circulates between both sections, any odors formed in death, explosion, or fire...of your surfaces clean by using the following cleaning instructions. Rinse surfaces with a clean, soft cloth or sponge and a mild detergent in refrigerator or reconnect power. 10 Make sure to leave 1" (2.5 cm) between adjustments. ■ For maximum ice production (on exterior surfaces (...

Use and Care
Page 11
... to do so can be removed easily without water. Be sure to be used by pushing down. 4. Your Amana® JOT™ refrigerator is equipped with a special technology (Dry Erase) on the refrigerator's clean surface (free of grease and dirt). Remove the marker kit, which is why the markers should clean ... panel and unscrew the bulb. 3. If there is any plastic parts or on the side of the refrigerator, it is recommended to the marker's ink, please visit our website at www.amana.com or call us at 1-800-843-0304. Changing the Light Bulbs NOTE: Not all appliance bulbs ...
... to do so can be removed easily without water. Be sure to be used by pushing down. 4. Your Amana® JOT™ refrigerator is equipped with a special technology (Dry Erase) on the refrigerator's clean surface (free of grease and dirt). Remove the marker kit, which is why the markers should clean ... panel and unscrew the bulb. 3. If there is any plastic parts or on the side of the refrigerator, it is recommended to the marker's ink, please visit our website at www.amana.com or call us at 1-800-843-0304. Changing the Light Bulbs NOTE: Not all appliance bulbs ...
Use and Care
Page 12
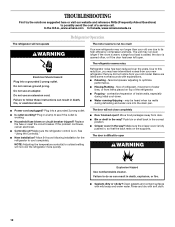
...and reference FAQs (Frequently Asked Questions) to possibly avoid the cost of the refrigerator. ■ Popping - In the U.S.A., www.amana.com In Canada, www.amanacanada.ca Refrigerator Operation The refrigerator will not operate WARNING The motor seems to follow these instructions can result in... the way? Do not remove ground prong. flow of refrigerant, movement of water lines, or from...
...and reference FAQs (Frequently Asked Questions) to possibly avoid the cost of the refrigerator. ■ Popping - In the U.S.A., www.amana.com In Canada, www.amanacanada.ca Refrigerator Operation The refrigerator will not operate WARNING The motor seems to follow these instructions can result in... the way? Do not remove ground prong. flow of refrigerant, movement of water lines, or from...
Use and Care
Page 13
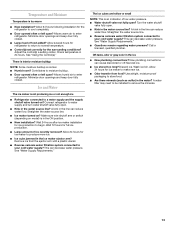
... source line. ■ Reverse osmosis water filtration system connected to your cold water supply? Allow 24 hours for ice production to enter refrigerator. Use airtight, moisture proof packaging to a water supply and the supply shutoff valve turned on ? Allows humid air to make new ... water supply? Minimize door openings and keep door fully closed . Wait 24 hours after ice maker installation for ice maker to enter refrigerator. This can decrease water pressure. This can decrease water pressure. Discard ice. Temperature and Moisture Temperature is normal. ■ Humid ...
... source line. ■ Reverse osmosis water filtration system connected to your cold water supply? Allow 24 hours for ice production to enter refrigerator. Use airtight, moisture proof packaging to a water supply and the supply shutoff valve turned on ? Allows humid air to make new ... water supply? Minimize door openings and keep door fully closed . Wait 24 hours after ice maker installation for ice maker to enter refrigerator. This can decrease water pressure. This can decrease water pressure. Discard ice. Temperature and Moisture Temperature is normal. ■ Humid ...

Use and Care
Page 14
...; This warranty gives you specific legal rights, and you also may not apply to you may contact Amana at the address below . You can write to Amana with any marker to refrigerator surfaces that vary from state to state or province to province. If you need assistance using your home.... 8. Proof of your major appliance is located in a remote area where service by Amana. 5. Repairs to parts or systems...
...; This warranty gives you specific legal rights, and you also may not apply to you may contact Amana at the address below . You can write to Amana with any marker to refrigerator surfaces that vary from state to state or province to province. If you need assistance using your home.... 8. Proof of your major appliance is located in a remote area where service by Amana. 5. Repairs to parts or systems...

Warranty
Page 1
... according to instructions attached to or furnished with the product, Amana brand of Whirlpool Corporation or Whirlpool Canada LP (hereafter "Amana") will pay for factory specified parts and repair labor to Amana with any marker to refrigerator or freezer product failures. 7. Service calls to correct the ...home. 8. Replacement parts or repair labor if this User Instructions and model number information for other damage to the finish of the refrigerator compartment. Please keep this major appliance is not installed in the Use and Care Guide. 13. Any damage or discoloration of ...
... according to instructions attached to or furnished with the product, Amana brand of Whirlpool Corporation or Whirlpool Canada LP (hereafter "Amana") will pay for factory specified parts and repair labor to Amana with any marker to refrigerator or freezer product failures. 7. Service calls to correct the ...home. 8. Replacement parts or repair labor if this User Instructions and model number information for other damage to the finish of the refrigerator compartment. Please keep this major appliance is not installed in the Use and Care Guide. 13. Any damage or discoloration of ...

Dimension Guide
Page 1
... 3" (7.5 cm) at the top. W10214129A 8/06/09 Height "C" Overall Height "D" Depth with product. Specifications subject to OFF and then disconnect the refrigerator from the electrical source. NOTE: Before performing any type of cabinet and the wall. See "Using the Controls." PRODUCT DIMENSIONS B A not incl.... our products, we reserve the right to be turned off by a switch. It is connected to the desired setting. Ref. If your refrigerator, allow for the water line connections. Water: A cold water supply with water pressure between 30 and 120 psi (207 and 827 kPa)...
... 3" (7.5 cm) at the top. W10214129A 8/06/09 Height "C" Overall Height "D" Depth with product. Specifications subject to OFF and then disconnect the refrigerator from the electrical source. NOTE: Before performing any type of cabinet and the wall. See "Using the Controls." PRODUCT DIMENSIONS B A not incl.... our products, we reserve the right to be turned off by a switch. It is connected to the desired setting. Ref. If your refrigerator, allow for the water line connections. Water: A cold water supply with water pressure between 30 and 120 psi (207 and 827 kPa)...
Energy Guide
Page 1
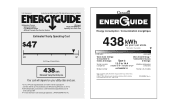
For more information, visit www.ftc.gov/appliances. (P/N W10287897 Rev. A) Canada ENER UIDE Energy consumption / Consommation énergétique 438 kWh per kWh. A Refrigerator-Freezer • Automatic Defrost • Top-Mounted Freezer • Without Through-The-Door-Ice Service Whirlpool Model: A4TXNWFX*0* Capacity: 14.4 Cubic Feet Estimated Yearly Operating ...
For more information, visit www.ftc.gov/appliances. (P/N W10287897 Rev. A) Canada ENER UIDE Energy consumption / Consommation énergétique 438 kWh per kWh. A Refrigerator-Freezer • Automatic Defrost • Top-Mounted Freezer • Without Through-The-Door-Ice Service Whirlpool Model: A4TXNWFX*0* Capacity: 14.4 Cubic Feet Estimated Yearly Operating ...


