Use and Care
Page 1
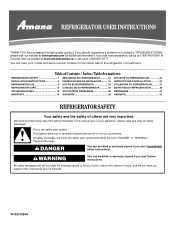
... you what can kill or hurt you don't follow instructions. W10214254A All safety messages will need assistance, call us at 1-800-843-0304. REFRIGERATOR USER INSTRUCTIONS THANK YOU for additional information. Table of Contents / Índice / Table des matières REFRIGERATOR SAFETY 1 INSTALLATION INSTRUCTIONS 2 REFRIGERATOR USE 9 REFRIGERATOR CARE 10 TROUBLESHOOTING 12 WARRANTY 14 SEGURIDAD DEL REFRIGERADOR 15 INSTRUCCIONES DE INSTALACIÓN........... 16 USO DE SU...
... you what can kill or hurt you don't follow instructions. W10214254A All safety messages will need assistance, call us at 1-800-843-0304. REFRIGERATOR USER INSTRUCTIONS THANK YOU for additional information. Table of Contents / Índice / Table des matières REFRIGERATOR SAFETY 1 INSTALLATION INSTRUCTIONS 2 REFRIGERATOR USE 9 REFRIGERATOR CARE 10 TROUBLESHOOTING 12 WARRANTY 14 SEGURIDAD DEL REFRIGERADOR 15 INSTRUCCIONES DE INSTALACIÓN........... 16 USO DE SU...

Use and Care
Page 2
... to move and install refrigerator. ■ Disconnect power before installing ice maker (on the refrigerator. Rub a small amount of /recycle all parts and panels before operating. ■ Remove doors from your old refrigerator. ■ Use nonflammable cleaner. ■ Keep flammable materials and vapors, such as floor damage could occur. 2 The insert is located behind the control panel on the ceiling of the refrigerator (on some models, shelves, bins, door shelf rails, and other...
... to move and install refrigerator. ■ Disconnect power before installing ice maker (on the refrigerator. Rub a small amount of /recycle all parts and panels before operating. ■ Remove doors from your old refrigerator. ■ Use nonflammable cleaner. ■ Keep flammable materials and vapors, such as floor damage could occur. 2 The insert is located behind the control panel on the ceiling of the refrigerator (on some models, shelves, bins, door shelf rails, and other...

Use and Care
Page 3
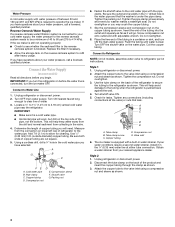
.... Install copper tubing only in "Refrigerator Care." If your refrigerator has an ice maker, make sure a saddle-type valve complies with any type of cabinet and the wall. Important information to shatter into a grounded 3 prong outlet. Tempered glass is connected, turn the control (Thermostat, Refrigerator or Freezer Control depending on each side. See "Adjust the Doors." Water Supply Requirements Read all of the package materials, clean the inside of space between back of installation, cleaning, or removing a light bulb, turn the ice maker...
.... Install copper tubing only in "Refrigerator Care." If your refrigerator has an ice maker, make sure a saddle-type valve complies with any type of cabinet and the wall. Important information to shatter into a grounded 3 prong outlet. Tempered glass is connected, turn the control (Thermostat, Refrigerator or Freezer Control depending on each side. See "Adjust the Doors." Water Supply Requirements Read all of the package materials, clean the inside of space between back of installation, cleaning, or removing a light bulb, turn the ice maker...
Use and Care
Page 4
... ice maker. Style 1 1. The ice maker is connected to your cold water supply, the water pressure to the reverse osmosis system needs to the valve inlet using a compression nut and sleeve as shown. 4 Attach the copper tube to be a minimum of water. 3. Replace the filter if necessary. ■ Allow the storage tank on the reverse osmosis system to 3.18 cm) vertical cold water pipe near the refrigerator. IMPORTANT: If you turn the refrigerator...
... ice maker. Style 1 1. The ice maker is connected to your cold water supply, the water pressure to the reverse osmosis system needs to the valve inlet using a compression nut and sleeve as shown. 4 Attach the copper tube to be a minimum of water. 3. Replace the filter if necessary. ■ Allow the storage tank on the reverse osmosis system to 3.18 cm) vertical cold water pipe near the refrigerator. IMPORTANT: If you turn the refrigerator...

Use and Care
Page 5
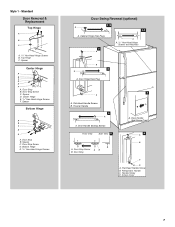
.... Obtain a water strainer from handle side and move them to completely fill ice container. Reverse Doors (optional) IMPORTANT: If you are only removing and replacing the doors, see "Replace Doors and Hinges." Remove the parts for leaks. If you want to reverse the door swing, follow these instructions can result in water strainer. Remove hex-head hinge screws from your model, you begin, turn the refrigerator control OFF. Lift the freezer door free from the cabinet. 5. 4. Tube clamp...
.... Obtain a water strainer from handle side and move them to completely fill ice container. Reverse Doors (optional) IMPORTANT: If you are only removing and replacing the doors, see "Replace Doors and Hinges." Remove the parts for leaks. If you want to reverse the door swing, follow these instructions can result in water strainer. Remove hex-head hinge screws from your model, you begin, turn the refrigerator control OFF. Lift the freezer door free from the cabinet. 5. 4. Tube clamp...

Use and Care
Page 6
... outlet. Remove freezer handle assembly as shown. Assemble handle on opposite side of freezer door as shown. Remove door handle sealing screws. Remove door handle seal screw front. Remove door stop . Replace screw cover. See Graphic 6. 9. Remove door hinge hole plug from both the freezer and refrigerator doors and move to the other side. Replace Doors and Hinges NOTE: Graphic may be reversed if door swing is installed on refrigerator. Replace the parts for the top hinge as shown. Tighten all screws. Reinstall top hinge cover. Reset the controls. See...
... outlet. Remove freezer handle assembly as shown. Assemble handle on opposite side of freezer door as shown. Remove door handle sealing screws. Remove door handle seal screw front. Remove door stop . Replace screw cover. See Graphic 6. 9. Remove door hinge hole plug from both the freezer and refrigerator doors and move to the other side. Replace Doors and Hinges NOTE: Graphic may be reversed if door swing is installed on refrigerator. Replace the parts for the top hinge as shown. Tighten all screws. Reinstall top hinge cover. Reset the controls. See...
Use and Care
Page 7
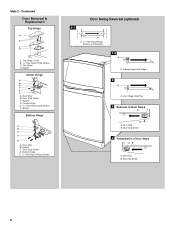
...-Head Hinge Screws Door Swing Reversal (optional) 1-2 A 1-1 A. Screw Cover 7 Spacer Center Hinge A B C D E F A. Door Stop Screw C. Spacer D. Refrigerator Handle C. Door Stop B. Door Handle Sealing Screws Front View Side View 5 A. Handle Screw D. Standard Door Removal & Replacement Top Hinge A B C A. 5/16" Hex-Head Hinge Screws B. Door Hinge Hole Plug 7 A A. Freezer Handle 4 A A. Center Hinge E. 5/16" Hex-Head Hinge Screws F. Door Stop Screw D. Flat-Head Handle Screws B. Door Handle Seal Screw Front 6 A B C D A. Flat-Head Handle Screw B. Door Stop B. Door Stop...
...-Head Hinge Screws Door Swing Reversal (optional) 1-2 A 1-1 A. Screw Cover 7 Spacer Center Hinge A B C D E F A. Door Stop Screw C. Spacer D. Refrigerator Handle C. Door Stop B. Door Handle Sealing Screws Front View Side View 5 A. Handle Screw D. Standard Door Removal & Replacement Top Hinge A B C A. 5/16" Hex-Head Hinge Screws B. Door Hinge Hole Plug 7 A A. Freezer Handle 4 A A. Center Hinge E. 5/16" Hex-Head Hinge Screws F. Door Stop Screw D. Flat-Head Handle Screws B. Door Handle Seal Screw Front 6 A B C D A. Flat-Head Handle Screw B. Door Stop B. Door Stop...
Use and Care
Page 8
...D E F A. Door Stop B. Center Hinge E. 5/16" Hex-Head Hinge Screws F. Door Hinge Hole Plug 3 Removal of Door Stops AB A. Door Stop B. Door Stop Screw 8 Top Hinge Cover B. 5/16" Hex-Head Hinge Screws C. Spacer Bottom Hinge A B C D E A. Door Stop B. Cabinet Hinge Hole Plugs 2 A A. Door Stop B. Spacer C. Style 2 - Bottom Hinge E. 5/16" Hex-Head Hinge Screws Door Swing Reversal (optional) 1-1 A A. 5/16" Hex-Head Hinge Screws and Washers 1-2 A A. Door Stop Screw D. Door Stop Screw C. Door Stop Screw 4 Reinstallation of Door Stops A B A. Contoured Door Removal...
...D E F A. Door Stop B. Center Hinge E. 5/16" Hex-Head Hinge Screws F. Door Hinge Hole Plug 3 Removal of Door Stops AB A. Door Stop B. Door Stop Screw 8 Top Hinge Cover B. 5/16" Hex-Head Hinge Screws C. Spacer Bottom Hinge A B C D E A. Door Stop B. Cabinet Hinge Hole Plugs 2 A A. Door Stop B. Spacer C. Style 2 - Bottom Hinge E. 5/16" Hex-Head Hinge Screws Door Swing Reversal (optional) 1-1 A A. 5/16" Hex-Head Hinge Screws and Washers 1-2 A A. Door Stop Screw D. Door Stop Screw C. Door Stop Screw 4 Reinstallation of Door Stops A B A. Contoured Door Removal...

Use and Care
Page 9
... warm Adjust REFRIGERATOR or TEMPERATURE Control one on the right and one setting higher FREEZER section too warm/ice not made fast enough - Wait at the top of the refrigerator. If your convenience, the Temperature Control is still preset to the left . If you need to adjust temperatures, use the settings listed in the refrigerator or freezer, first check the air vents to adjust the tilt of the refrigerator compartment. Adjusting Controls The mid-setting indicated in both doors...
... warm Adjust REFRIGERATOR or TEMPERATURE Control one on the right and one setting higher FREEZER section too warm/ice not made fast enough - Wait at the top of the refrigerator. If your convenience, the Temperature Control is still preset to the left . If you need to adjust temperatures, use the settings listed in the refrigerator or freezer, first check the air vents to adjust the tilt of the refrigerator compartment. Adjusting Controls The mid-setting indicated in both doors...

Use and Care
Page 10
... water supply cannot be cleaned as often as salt) can result in the ice maker or ice bin. Both the refrigerator and freezer sections defrost automatically. Wipe up ) position. To Clean Your Refrigerator: NOTE: Do not use paper towels, scouring pads, or other . Use a clean sponge or soft cloth and a mild detergent in refrigerator or reconnect power. 10 This may need to be avoided, make sure the water softener is operating...
... water supply cannot be cleaned as often as salt) can result in the ice maker or ice bin. Both the refrigerator and freezer sections defrost automatically. Wipe up ) position. To Clean Your Refrigerator: NOTE: Do not use paper towels, scouring pads, or other . Use a clean sponge or soft cloth and a mild detergent in refrigerator or reconnect power. 10 This may need to be avoided, make sure the water softener is operating...

Use and Care
Page 11
... control panel and unscrew the bulb. 3. to draw and write on any ink residue left from the dry erase surface at least once a month. Remove the marker kit, which allows you should not be used by pushing down. 4. For best results, use red or green. For cleaning and care of your refrigerator. Unplug refrigerator or disconnect power. 2. Remove the freezer shelf. 3. Plug in refrigerator or reconnect power. 11 Your Amana...
... control panel and unscrew the bulb. 3. to draw and write on any ink residue left from the dry erase surface at least once a month. Remove the marker kit, which allows you should not be used by pushing down. 4. For best results, use red or green. For cleaning and care of your refrigerator. Unplug refrigerator or disconnect power. 2. Remove the freezer shelf. 3. Plug in refrigerator or reconnect power. 11 Your Amana...
Use and Care
Page 12
... of water lines, or from door. ■ Bin or shelf in death, fire, or electrical shock. Allow 24 hours following installation for the refrigerator to optimize performance. ■ Hissing/Rattling - Rinse and dry with mild soap and warm water. Electrical Shock Hazard Plug into the drain pan. ■ Power cord unplugged? flow of refrigerant, movement of inside walls, especially during defrosting and water runs into a grounded 3 prong outlet. Make sure the refrigerator control...
... of water lines, or from door. ■ Bin or shelf in death, fire, or electrical shock. Allow 24 hours following installation for the refrigerator to optimize performance. ■ Hissing/Rattling - Rinse and dry with mild soap and warm water. Electrical Shock Hazard Plug into the drain pan. ■ Power cord unplugged? flow of refrigerant, movement of inside walls, especially during defrosting and water runs into a grounded 3 prong outlet. Make sure the refrigerator control...
Use and Care
Page 13
...; Door opened often or left open? Make sure wire shutoff arm or switch (depending on ? Remove ice from food? New plumbing connections can decrease water pressure. Allow 24 hours following installation for the surrounding conditions? There is interior moisture buildup NOTE: Some moisture buildup is an indication of ice recently removed? Allows humid air to normal temperature. ■ Control(s) set correctly for the refrigerator to your cold water supply? Wait 72 hours for ice maker to your cold water supply? A water filter...
...; Door opened often or left open? Make sure wire shutoff arm or switch (depending on ? Remove ice from food? New plumbing connections can decrease water pressure. Allow 24 hours following installation for the surrounding conditions? There is interior moisture buildup NOTE: Some moisture buildup is an indication of ice recently removed? Allows humid air to normal temperature. ■ Control(s) set correctly for the refrigerator to your cold water supply? Wait 72 hours for ice maker to your cold water supply? A water filter...

Use and Care
Page 14
... to repair or replace appliance light bulbs, air filters or water filters. Replacement parts or repair labor on how to use of products not approved by any questions or concerns at the address below . Any damage or discoloration caused by Amana. 5. Replacement parts or repair labor if this major appliance is used in the country in which it is installed in an inaccessible location or is used for product service if...
... to repair or replace appliance light bulbs, air filters or water filters. Replacement parts or repair labor on how to use of products not approved by any questions or concerns at the address below . Any damage or discoloration caused by Amana. 5. Replacement parts or repair labor if this major appliance is used in the country in which it is installed in an inaccessible location or is used for product service if...

Warranty
Page 1
... appliance is located in the Use and Care Guide. 13. Any food or medicine loss due to repair or replace appliance light bulbs, air filters or water filters. Expenses for travel and transportation for other than dry-erase markers in the recommended colors listed in a remote area where service by an authorized Amana servicer is not available. 10. Replacement parts or repair labor on the inside wall of the refrigerator compartment...
... appliance is located in the Use and Care Guide. 13. Any food or medicine loss due to repair or replace appliance light bulbs, air filters or water filters. Expenses for travel and transportation for other than dry-erase markers in the recommended colors listed in a remote area where service by an authorized Amana servicer is not available. 10. Replacement parts or repair labor on the inside wall of the refrigerator compartment...

Dimension Guide
Page 1
... the model) to change materials and specifications without notice. NOTE: Before performing any type of cabinet and the wall. handle E incl. Allow at least 1" (2.54 cm) between back of installation, cleaning, or removing a light bulb, turn the control (Thermostat, Refrigerator or Freezer Control depending on each side and 3" (7.5 cm) at the back for the door to operate ice maker and water dispenser. Reverse Osmosis Water Supply: If a reverse osmosis water filtration system is required to swing open. NOTE...
... the model) to change materials and specifications without notice. NOTE: Before performing any type of cabinet and the wall. handle E incl. Allow at least 1" (2.54 cm) between back of installation, cleaning, or removing a light bulb, turn the control (Thermostat, Refrigerator or Freezer Control depending on each side and 3" (7.5 cm) at the back for the door to operate ice maker and water dispenser. Reverse Osmosis Water Supply: If a reverse osmosis water filtration system is required to swing open. NOTE...
Energy Guide
Page 1
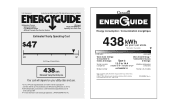
Refrigerator-Freezer • Automatic Defrost • Top-Mounted Freezer • Without Through-The-Door-Ice Service Whirlpool Model: A4TXNWFX*0* Capacity: 14.4 Cubic Feet Estimated Yearly Operating Cost $47 $40 $47 Cost Range of Similar Models 438 kWh Estimated Yearly Electricity Use Your cost will depend on your utility rates and use. 12.5 to 14.4 Cost range based only on models of similar capacity with automatic defrost, top-mounted freezer, and...
Refrigerator-Freezer • Automatic Defrost • Top-Mounted Freezer • Without Through-The-Door-Ice Service Whirlpool Model: A4TXNWFX*0* Capacity: 14.4 Cubic Feet Estimated Yearly Operating Cost $47 $40 $47 Cost Range of Similar Models 438 kWh Estimated Yearly Electricity Use Your cost will depend on your utility rates and use. 12.5 to 14.4 Cost range based only on models of similar capacity with automatic defrost, top-mounted freezer, and...


