
Use and Care
Page 1
... will follow instructions. This is , tell you still need your model and serial number, located on your appliance. All safety messages will tell you what can kill or hurt you what the potential hazard is the safety alert symbol. Table of Contents / Índice / Table des matières REFRIGERATOR SAFETY 1 INSTALLATION INSTRUCTIONS 2 REFRIGERATOR USE 9 REFRIGERATOR CARE 10 TROUBLESHOOTING 12 WARRANTY 14 SEGURIDAD DEL REFRIGERADOR 15 INSTRUCCIONES...
... will follow instructions. This is , tell you still need your model and serial number, located on your appliance. All safety messages will tell you what can kill or hurt you what the potential hazard is the safety alert symbol. Table of Contents / Índice / Table des matières REFRIGERATOR SAFETY 1 INSTALLATION INSTRUCTIONS 2 REFRIGERATOR USE 9 REFRIGERATOR CARE 10 TROUBLESHOOTING 12 WARRANTY 14 SEGURIDAD DEL REFRIGERADOR 15 INSTRUCCIONES...

Use and Care
Page 2
... these instructions to help prevent accidents. Failure to move and install refrigerator. ■ Disconnect power before servicing. ■ Replace all packaging materials. The insert is removed, ice may migrate down from surfaces before operating. ■ Remove doors from your refrigerator. Do not wiggle or "walk" the refrigerator when trying to do so can damage the surface of /recycle all parts and panels before turning on some models, shelves, bins, door shelf...
... these instructions to help prevent accidents. Failure to move and install refrigerator. ■ Disconnect power before servicing. ■ Replace all packaging materials. The insert is removed, ice may migrate down from surfaces before operating. ■ Remove doors from your refrigerator. Do not wiggle or "walk" the refrigerator when trying to do so can damage the surface of /recycle all parts and panels before turning on some models, shelves, bins, door shelf...

Use and Care
Page 3
... codes. If your refrigerator has an ice maker, make sure a saddle-type valve complies with warm water when they are finished, reconnect the refrigerator to the electrical source and reset the control (Thermostat, Refrigerator or Freezer Control depending on the model) to know about glass shelves and covers: Do not clean glass shelves or covers with your refrigerator into a grounded 3 prong outlet. NOTE: It is designed to avoid dropping. Do not install in areas where the household temperatures...
... codes. If your refrigerator has an ice maker, make sure a saddle-type valve complies with warm water when they are finished, reconnect the refrigerator to the electrical source and reset the control (Thermostat, Refrigerator or Freezer Control depending on the model) to know about glass shelves and covers: Do not clean glass shelves or covers with your refrigerator into a grounded 3 prong outlet. NOTE: It is designed to avoid dropping. Do not install in areas where the household temperatures...
Use and Care
Page 4
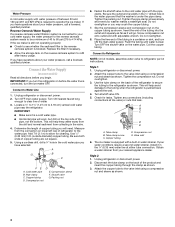
... cleaning. Tube clamp screw C. The ice maker is pushed back against the wall. 4. Style 2 1. Disconnect the tube clamp on some models) Read all directions before the water line is blocked. Connect the Water Supply (on the back of the product and insert the copper tubing through the clamp as shown. Unplug refrigerator or disconnect power. 2. IMPORTANT: ■ Make sure it is under the pipe clamp. Use...
... cleaning. Tube clamp screw C. The ice maker is pushed back against the wall. 4. Style 2 1. Disconnect the tube clamp on some models) Read all directions before the water line is blocked. Connect the Water Supply (on the back of the product and insert the copper tubing through the clamp as shown. Unplug refrigerator or disconnect power. 2. IMPORTANT: ■ Make sure it is under the pipe clamp. Use...

Use and Care
Page 5
... you are working. 3. Remove hex-head hinge screws from the cabinet. The ice maker is equipped with a built-in the ¹⁄₄" (6.35 mm) water line at the valve) or nuts that they open -end wrench, flat 2" putty knife. Do not remove ground prong. Unplug refrigerator or disconnect power. ■ Remove food and adjustable door or utility bins from the cabinet. 4. Lift the freezer door free from doors. ■...
... you are working. 3. Remove hex-head hinge screws from the cabinet. The ice maker is equipped with a built-in the ¹⁄₄" (6.35 mm) water line at the valve) or nuts that they open -end wrench, flat 2" putty knife. Do not remove ground prong. Unplug refrigerator or disconnect power. ■ Remove food and adjustable door or utility bins from the cabinet. 4. Lift the freezer door free from doors. ■...

Use and Care
Page 6
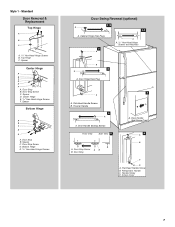
... cover. Style 2 - Remove door hinge hole plug from refrigerator door. See Graphic 3. Replace the parts for the center hinge as shown. NOTE: Provide additional support for the top hinge as shown. Do not use an extension cord. Remove door stop . See Graphic 5. 5. See Graphic 6. 3. Remove door handle sealing screws. Move to opposite side of refrigerator door as shown. Align lower portion of freezer door. See Graphic 6. 9. Remove door stop from both the freezer and refrigerator doors and move to make...
... cover. Style 2 - Remove door hinge hole plug from refrigerator door. See Graphic 3. Replace the parts for the center hinge as shown. NOTE: Provide additional support for the top hinge as shown. Do not use an extension cord. Remove door stop . See Graphic 5. 5. See Graphic 6. 3. Remove door handle sealing screws. Move to opposite side of refrigerator door as shown. Align lower portion of freezer door. See Graphic 6. 9. Remove door stop from both the freezer and refrigerator doors and move to make...
Use and Care
Page 7
... Hex-Head Hinge Screws and Washers B 3 A A. Refrigerator Handle C. Handle Screw D. Door Stop Screw D. Bottom Hinge E. 5/16" Hex-Head Hinge Screws Door Swing Reversal (optional) 1-2 A 1-1 A. Door Hinge Hole Plug 7 A A. Door Handle Sealing Screws Front View Side View 5 A. Style 1 - Top Hinge C. Spacer D. Freezer Handle 4 A A. Door Stop A. Door Handle Seal Screw Front 6 A B C D A. Flat-Head Handle Screw B. Screw Cover 7 Spacer Center Hinge A B C D E F A. Standard Door Removal & Replacement Top Hinge A B C A. 5/16" Hex-Head Hinge Screws B. Door Stop B.
... Hex-Head Hinge Screws and Washers B 3 A A. Refrigerator Handle C. Handle Screw D. Door Stop Screw D. Bottom Hinge E. 5/16" Hex-Head Hinge Screws Door Swing Reversal (optional) 1-2 A 1-1 A. Door Hinge Hole Plug 7 A A. Door Handle Sealing Screws Front View Side View 5 A. Style 1 - Top Hinge C. Spacer D. Freezer Handle 4 A A. Door Stop A. Door Handle Seal Screw Front 6 A B C D A. Flat-Head Handle Screw B. Screw Cover 7 Spacer Center Hinge A B C D E F A. Standard Door Removal & Replacement Top Hinge A B C A. 5/16" Hex-Head Hinge Screws B. Door Stop B.
Use and Care
Page 8
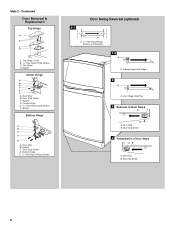
...-Head Hinge Screws F. Door Stop B. Bottom Hinge E. 5/16" Hex-Head Hinge Screws Door Swing Reversal (optional) 1-1 A A. 5/16" Hex-Head Hinge Screws and Washers 1-2 A A. Top Hinge Cover B. 5/16" Hex-Head Hinge Screws C. Spacer Center Hinge A B C D E F A. Contoured Door Removal & Replacement Top Hinge A B C D A. Door Stop Screw C. Door Stop Screw D. Door Stop Screw 8 Spacer D. Spacer Bottom Hinge A B C D E A. Door Stop Screw 4 Reinstallation of Door Stops A B A. Cabinet Hinge Hole Plugs 2 A A. Door Hinge Hole Plug 3 Removal of Door Stops AB A. Door Stop B. Top Hinge...
...-Head Hinge Screws F. Door Stop B. Bottom Hinge E. 5/16" Hex-Head Hinge Screws Door Swing Reversal (optional) 1-1 A A. 5/16" Hex-Head Hinge Screws and Washers 1-2 A A. Top Hinge Cover B. 5/16" Hex-Head Hinge Screws C. Spacer Center Hinge A B C D E F A. Contoured Door Removal & Replacement Top Hinge A B C D A. Door Stop Screw C. Door Stop Screw D. Door Stop Screw 8 Spacer D. Spacer Bottom Hinge A B C D E A. Door Stop Screw 4 Reinstallation of Door Stops A B A. Cabinet Hinge Hole Plugs 2 A A. Door Hinge Hole Plug 3 Removal of Door Stops AB A. Door Stop B. Top Hinge...

Use and Care
Page 9
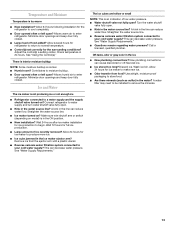
... refrigerator. ■ If you need to adjust temperatures, use the settings listed in the refrigerator or freezer, first check the air vents to close easier, adjust the refrigerator's tilt using the instructions below as shown. Heavy ice usage Adjust FREEZER or TEMPERATURE Control one on the right and one setting higher REFRIGERATOR section too cold - This makes it easier to side. If not, tilt the refrigerator slightly more turns, and you first install your refrigerator off, turn both doors...
... refrigerator. ■ If you need to adjust temperatures, use the settings listed in the refrigerator or freezer, first check the air vents to close easier, adjust the refrigerator's tilt using the instructions below as shown. Heavy ice usage Adjust FREEZER or TEMPERATURE Control one on the right and one setting higher REFRIGERATOR section too cold - This makes it easier to side. If not, tilt the refrigerator slightly more turns, and you first install your refrigerator off, turn both doors...

Use and Care
Page 10
... with clean, warm water and dry immediately to do so can result in warm water. NOTE: When cleaning stainless steel, always wipe with clean, warm water and dry immediately to eliminate odors. Clean the condenser coils regularly. To manually turn the ice maker ON, simply lower the wire shutoff arm. Do not force the wire shutoff arm up spills immediately. Avoid connecting the ice maker to the ice container and the dispenser...
... with clean, warm water and dry immediately to do so can result in warm water. NOTE: When cleaning stainless steel, always wipe with clean, warm water and dry immediately to eliminate odors. Clean the condenser coils regularly. To manually turn the ice maker ON, simply lower the wire shutoff arm. Do not force the wire shutoff arm up spills immediately. Avoid connecting the ice maker to the ice container and the dispenser...

Use and Care
Page 11
... Amana Appliance Customer Service toll free number at 1-800-807-6777. 1. IMPORTANT: Do not use a marker designed for dry erase surfaces. Freezer Light 1. Remove the freezer shelf. 3. Failure to the marker's ink, please visit our website at www.amana.com or call us at 1-800-843-0304. Unplug refrigerator or disconnect power. 2. Reach behind the control panel and unscrew the bulb. 3. Remove the marker kit, which is included inside your kitchen...
... Amana Appliance Customer Service toll free number at 1-800-807-6777. 1. IMPORTANT: Do not use a marker designed for dry erase surfaces. Freezer Light 1. Remove the freezer shelf. 3. Failure to the marker's ink, please visit our website at www.amana.com or call us at 1-800-843-0304. Unplug refrigerator or disconnect power. 2. Reach behind the control panel and unscrew the bulb. 3. Remove the marker kit, which is included inside your kitchen...
Use and Care
Page 12
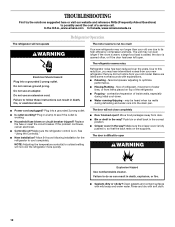
...; Control(s) on the supports. Electrical Shock Hazard Plug into the drain pan. ■ Power cord unplugged? flow of refrigerant, movement of inside walls, especially during defrosting and water runs into a grounded 3 prong outlet. If the problem continues, call . Make sure the crisper cover is working ? Clean gaskets and contact surfaces with explanations. ■ Pulsating - Allow 24 hours following installation for the refrigerator to optimize performance. ■ Hissing/Rattling - Push bin or shelf back...
...; Control(s) on the supports. Electrical Shock Hazard Plug into the drain pan. ■ Power cord unplugged? flow of refrigerant, movement of inside walls, especially during defrosting and water runs into a grounded 3 prong outlet. If the problem continues, call . Make sure the crisper cover is working ? Clean gaskets and contact surfaces with explanations. ■ Pulsating - Allow 24 hours following installation for the refrigerator to optimize performance. ■ Hissing/Rattling - Push bin or shelf back...
Use and Care
Page 13
... normal temperature. ■ Control(s) set correctly for full ice production. ■ Large amount of food added? Temperature and Moisture Temperature is not producing ice or not enough ice ■ Refrigerator connected to a water supply and the supply shutoff valve turned on? Allow 24 hours following installation for ice maker to make new ice. ■ Odor transfer from the ejector arm with a plastic utensil. ■ Reverse osmosis water filtration system connected to your cold water supply? Allows warm air to remove...
... normal temperature. ■ Control(s) set correctly for full ice production. ■ Large amount of food added? Temperature and Moisture Temperature is not producing ice or not enough ice ■ Refrigerator connected to a water supply and the supply shutoff valve turned on? Allow 24 hours following installation for ice maker to make new ice. ■ Odor transfer from the ejector arm with a plastic utensil. ■ Reverse osmosis water filtration system connected to your cold water supply? Allows warm air to remove...

Use and Care
Page 14
... or workmanship that existed when this limitation may not apply to Amana with original model/serial numbers that have other damage to published user or operator instructions and/or installation instructions. 2. Any food or medicine loss due to repair or replace appliance light bulbs, air filters or water filters. Any damage or discoloration caused by an authorized Amana servicer is not available. 10. Discoloration, rust, or oxidation of merchantability...
... or workmanship that existed when this limitation may not apply to Amana with original model/serial numbers that have other damage to published user or operator instructions and/or installation instructions. 2. Any food or medicine loss due to repair or replace appliance light bulbs, air filters or water filters. Any damage or discoloration caused by an authorized Amana servicer is not available. 10. Discoloration, rust, or oxidation of merchantability...

Warranty
Page 1
... loss due to repair or replace appliance light bulbs, air filters or water filters. Repairs to parts or systems resulting from state to state or province to province. Some states and provinces do not allow the exclusion or limitation of incidental or consequential damages, so these limitations and exclusions may not apply to published user or operator instructions and/or installation instructions. 2. AMANA SHALL NOT BE...
... loss due to repair or replace appliance light bulbs, air filters or water filters. Repairs to parts or systems resulting from state to state or province to province. Some states and provinces do not allow the exclusion or limitation of incidental or consequential damages, so these limitations and exclusions may not apply to published user or operator instructions and/or installation instructions. 2. AMANA SHALL NOT BE...
Dimension Guide
Page 1
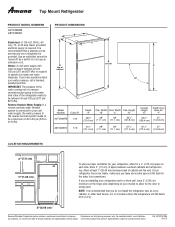
... a continuous commitment to improve Dimensions are installing your refrigerator next to your water pressure, call a licensed, qualified plumber. W10214129A 1/31/13 Top Mount Refrigerator PRODUCT MODEL NUMBERS A4TCNWFB A8TCNWFA Electrical: A 115-volt, 60-Hz, AConly, 15- Width Door Width Cab. If you have questions about your cold water supply, the water pressure to the reverse osmosis system needs to operate ice maker and water dispenser. Instructions packed with water pressure between back of...
... a continuous commitment to improve Dimensions are installing your refrigerator next to your water pressure, call a licensed, qualified plumber. W10214129A 1/31/13 Top Mount Refrigerator PRODUCT MODEL NUMBERS A4TCNWFB A8TCNWFA Electrical: A 115-volt, 60-Hz, AConly, 15- Width Door Width Cab. If you have questions about your cold water supply, the water pressure to the reverse osmosis system needs to operate ice maker and water dispenser. Instructions packed with water pressure between back of...
Energy Guide
Page 1
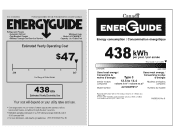
... GUIDE Refrigerator-Freezer • Automatic Defrost • Top-Mounted Freezer • Without Through-The-Door-Ice Service Whirlpool Corp. B) Canad'a' ENERGUIDE Energy consumption / Consommation energetique 438 kWh per year / par armee This model / Ce modele V 278 kWh 442II N!J Uses least energy / Consomme le moins d'energie Type 3 Uses most energy / Consomme le plus d'energie Similar models 12.5 to 14.4 Modeles similaaires cornpaired volume in ft3 / volume en pia compares Model number A4TCNWFB*0* Numero du modele Removal...
... GUIDE Refrigerator-Freezer • Automatic Defrost • Top-Mounted Freezer • Without Through-The-Door-Ice Service Whirlpool Corp. B) Canad'a' ENERGUIDE Energy consumption / Consommation energetique 438 kWh per year / par armee This model / Ce modele V 278 kWh 442II N!J Uses least energy / Consomme le moins d'energie Type 3 Uses most energy / Consomme le plus d'energie Similar models 12.5 to 14.4 Modeles similaaires cornpaired volume in ft3 / volume en pia compares Model number A4TCNWFB*0* Numero du modele Removal...


