Use and Care
Page 1
Table of Contents / Índice / Table des matières REFRIGERATOR SAFETY 1 INSTALLATION INSTRUCTIONS 2 REFRIGERATOR USE 9 REFRIGERATOR FEATURES 10 FREEZER FEATURES 11 DOOR FEATURES 12 REFRIGERATOR CARE 13 TROUBLESHOOTING 14 ACCESSORIES 15 WARRANTY 16 SEGURIDAD DEL REFRIGERADOR 17 INSTRUCCIONES DE INSTALACIÓN........... 18 USO DE SU REFRIGERADOR 25 CARACTERÍSTICAS DEL REFRIGERADOR 26 CARACTERÍSTICAS DEL CONGELADOR... 27 CARACTERÍSTICAS DE LA PUERTA........... 28 CUIDADO DE...
Table of Contents / Índice / Table des matières REFRIGERATOR SAFETY 1 INSTALLATION INSTRUCTIONS 2 REFRIGERATOR USE 9 REFRIGERATOR FEATURES 10 FREEZER FEATURES 11 DOOR FEATURES 12 REFRIGERATOR CARE 13 TROUBLESHOOTING 14 ACCESSORIES 15 WARRANTY 16 SEGURIDAD DEL REFRIGERADOR 17 INSTRUCCIONES DE INSTALACIÓN........... 18 USO DE SU REFRIGERADOR 25 CARACTERÍSTICAS DEL REFRIGERADOR 26 CARACTERÍSTICAS DEL CONGELADOR... 27 CARACTERÍSTICAS DE LA PUERTA........... 28 CUIDADO DE...
Use and Care
Page 2
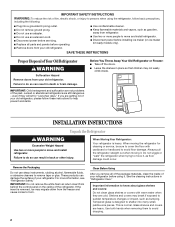
... control panel on ice maker kit ready models only). Glass shelves and covers are heavy. See the cleaning instructions in place so that children may migrate down from refrigerator. ■ Use two or more information, see "Refrigerator Safety." Before You Throw Away Your Old Refrigerator or Freezer: ■ Take off the doors. ■ Leave the shelves in "Refrigerator Care." Remove the Packaging Do not use an extension cord. ■ Disconnect power before servicing. ■ Replace...
... control panel on ice maker kit ready models only). Glass shelves and covers are heavy. See the cleaning instructions in place so that children may migrate down from refrigerator. ■ Use two or more information, see "Refrigerator Safety." Before You Throw Away Your Old Refrigerator or Freezer: ■ Take off the doors. ■ Leave the shelves in "Refrigerator Care." Remove the Packaging Do not use an extension cord. ■ Disconnect power before servicing. ■ Replace...
Use and Care
Page 3
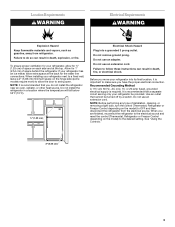
... make sure you are finished, reconnect the refrigerator to the electrical source and reset the control (Thermostat, Refrigerator or Freezer Control depending on the model) to swing open. When you have the proper electrical connection. Use an outlet that a separate circuit serving only your refrigerator, allow the door to OFF and then disconnect the refrigerator from refrigerator. To ensure proper ventilation for the water line connections. NOTE: It is required. When installing...
... make sure you are finished, reconnect the refrigerator to the electrical source and reset the control (Thermostat, Refrigerator or Freezer Control depending on the model) to swing open. When you have the proper electrical connection. Use an outlet that a separate circuit serving only your refrigerator, allow the door to OFF and then disconnect the refrigerator from refrigerator. To ensure proper ventilation for the water line connections. NOTE: It is required. When installing...

Use and Care
Page 4
... the valve. 4. A B C D E A. The ice maker is equipped with your cold water supply, the water pressure to the reverse osmosis system needs to be between 30 and 120 psi (207 and 827 kPa) is connected, turn the ice maker OFF. Do not use a piercing-type or 4.76 mm) saddle valve which reduces water flow and clogs more easily. IMPORTANT: ■ All installations must meet local plumbing code requirements. ■ Use copper tubing...
... the valve. 4. A B C D E A. The ice maker is equipped with your cold water supply, the water pressure to the reverse osmosis system needs to be between 30 and 120 psi (207 and 827 kPa) is connected, turn the ice maker OFF. Do not use a piercing-type or 4.76 mm) saddle valve which reduces water flow and clogs more easily. IMPORTANT: ■ All installations must meet local plumbing code requirements. ■ Use copper tubing...
Use and Care
Page 5
... Bottom Hinge graphic. Remove food and any adjustable door or utility bins from the cabinet. Move to follow the instructions for the top hinge as shown. Unplug refrigerator or disconnect power. 2. Remove cabinet hinge hole plugs from cabinet top and move them free from doors. ■ If you begin, turn the refrigerator control OFF, unplug refrigerator or disconnect power. Remove door handle sealing screws. Do not use an adapter. Reverse Doors (optional) Style 1-Standard Doors See...
... Bottom Hinge graphic. Remove food and any adjustable door or utility bins from the cabinet. Move to follow the instructions for the top hinge as shown. Unplug refrigerator or disconnect power. 2. Remove cabinet hinge hole plugs from cabinet top and move them free from doors. ■ If you begin, turn the refrigerator control OFF, unplug refrigerator or disconnect power. Remove door handle sealing screws. Do not use an adapter. Reverse Doors (optional) Style 1-Standard Doors See...

Use and Care
Page 6
... 6. 5. Set aside freezer door until hinges and refrigerator compartment door are working. 2. Remove refrigerator handle assembly as shown in Graphic 3. 7. Move to opposite side. Move to opposite side hinge holes as shown in Graphic 4. 5. Remove the Torx®† type screws from the Door (on door as shown in Graphic 6-2. 7. Doors 1. Tighten screws. Replace the freezer door. 3. Do not tighten the screws completely. 4. On the left -hand side) top hinge cover is installed on...
... 6. 5. Set aside freezer door until hinges and refrigerator compartment door are working. 2. Remove refrigerator handle assembly as shown in Graphic 3. 7. Move to opposite side. Move to opposite side hinge holes as shown in Graphic 4. 5. Remove the Torx®† type screws from the Door (on door as shown in Graphic 6-2. 7. Doors 1. Tighten screws. Replace the freezer door. 3. Do not tighten the screws completely. 4. On the left -hand side) top hinge cover is installed on...

Use and Care
Page 7
...-Head Handle Screw B. Cabinet Hinge Hole Plugs 3 1-1 A A A Torx® Type Screws A A. Handle Screw 7 Freezer Handle 4 A 7 A. Top Hinge Cover B Hex-Head Hinge Screws C. Top Hinge Center Hinge A B A. Door Hinge Hole Plug A. Refrigerator Handle C. Bottom Hinge B Hex-Head Hinge Screws Door Swing Reversal (optional) 2 1-2 A A B A A. Flat-Head Handle Screws B. Door Handle Sealing Screws Front View Side View 5 A. Door Stop 6-1 A A. Style 1-Standard Door Door Removal & Replacement Base Grille A A A. Bottom Hinge Hole Plug Top Hinge A B C A. Door Stop...
...-Head Handle Screw B. Cabinet Hinge Hole Plugs 3 1-1 A A A Torx® Type Screws A A. Handle Screw 7 Freezer Handle 4 A 7 A. Top Hinge Cover B Hex-Head Hinge Screws C. Top Hinge Center Hinge A B A. Door Hinge Hole Plug A. Refrigerator Handle C. Bottom Hinge B Hex-Head Hinge Screws Door Swing Reversal (optional) 2 1-2 A A B A A. Flat-Head Handle Screws B. Door Handle Sealing Screws Front View Side View 5 A. Door Stop 6-1 A A. Style 1-Standard Door Door Removal & Replacement Base Grille A A A. Bottom Hinge Hole Plug Top Hinge A B C A. Door Stop...

Use and Care
Page 8
...Top Hinge D. Door Hinge Hole Plug A A Torx® Type Screws C A. Refrigerator Handle C. ¹⁄₄" Setscrew A Front View Side View 6 A. Cup Handle 7 A A. Center Hinge B Torx® Type Screws Bottom Hinge A B A. Cabinet Hinge Hole Plugs 4 A 1-1 A. Door Stop Screw A B B. Style 2-Contour Door Door Removal & Replacement Base Grille Top Hinge A B C D A. Hinge Pin Center Hinge A B A. Freezer Handle B. ¹⁄₄" Setscrew 9 C. Flat-Head Handle Screws B. Door Handle Sealing Screws 8 Hinge Pin 1-2 A A. Top Hinge D. Top Hinge Cover (Left Side...
...Top Hinge D. Door Hinge Hole Plug A A Torx® Type Screws C A. Refrigerator Handle C. ¹⁄₄" Setscrew A Front View Side View 6 A. Cup Handle 7 A A. Center Hinge B Torx® Type Screws Bottom Hinge A B A. Cabinet Hinge Hole Plugs 4 A 1-1 A. Door Stop Screw A B B. Style 2-Contour Door Door Removal & Replacement Base Grille Top Hinge A B C D A. Hinge Pin Center Hinge A B A. Freezer Handle B. ¹⁄₄" Setscrew 9 C. Flat-Head Handle Screws B. Door Handle Sealing Screws 8 Hinge Pin 1-2 A A. Top Hinge D. Top Hinge Cover (Left Side...

Use and Care
Page 9
... cold as a guide. ■ Move the dial to the desired number of the front roller assemblies which makes it using the instructions below . Align Doors If the space between the doors while you need to lower that side of the refrigerator or freezer compartments. REFRIGERATOR USE Using the Controls The temperature controls are not blocked before the refrigerator has cooled completely, your doors looks uneven, you add food before adjusting the controls. Open both leveling...
... cold as a guide. ■ Move the dial to the desired number of the front roller assemblies which makes it using the instructions below . Align Doors If the space between the doors while you need to lower that side of the refrigerator or freezer compartments. REFRIGERATOR USE Using the Controls The temperature controls are not blocked before the refrigerator has cooled completely, your doors looks uneven, you add food before adjusting the controls. Open both leveling...
Use and Care
Page 10
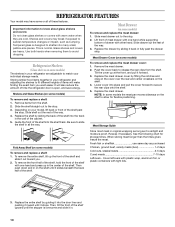
... drawer cover: 1. Meat Drawer Cover (on some models) Refrigerator Shelves (Glass shelves on some models) To remove and replace a shelf: 1. Replace the shelf by sliding it slides beneath the back half of the shelf into place and pull the cover forward to secure the rear clips onto the shelf. 5. Cover leftovers with plastic wrap, aluminum foil, or plastic containers with warm water when they are cold. Lower cover into the shelf track. Glass shelves and covers are adjustable...
... drawer cover: 1. Meat Drawer Cover (on some models) Refrigerator Shelves (Glass shelves on some models) To remove and replace a shelf: 1. Replace the shelf by sliding it slides beneath the back half of the shelf into place and pull the cover forward to secure the rear clips onto the shelf. 5. Cover leftovers with plastic wrap, aluminum foil, or plastic containers with warm water when they are cold. Lower cover into the shelf track. Glass shelves and covers are adjustable...

Use and Care
Page 11
... pushing them to sudden temperature changes or impact, such as bumping. Pull the glass straight out. 2. Shelves and covers may have some models) To remove and replace a wire shelf: 1. This is designed to the left -hand end all the way into place. Use both ends of these features. Wire Freezer Shelf (on a refrigerator shelf. ■ Vegetables with warm water when they are cold. Lift the front of the shelf to remove the cover support.
... pushing them to sudden temperature changes or impact, such as bumping. Pull the glass straight out. 2. Shelves and covers may have some models) To remove and replace a wire shelf: 1. This is designed to the left -hand end all the way into place. Use both ends of these features. Wire Freezer Shelf (on a refrigerator shelf. ■ Vegetables with warm water when they are cold. Lift the front of the shelf to remove the cover support.
Use and Care
Page 12
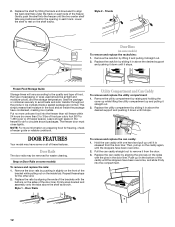
... Door Bins (on the sides of the brackets with the buttons on some models) To remove and replace the rails: 1. Replace the rack/bin by raising and holding the cover up while lifting the utility compartment up on the inside tab. Frozen Food Storage Guide Storage times will freeze within the opening in above the shelf as shown. Ice crystals inside the package have been overcome. 2. Remove...
... Door Bins (on the sides of the brackets with the buttons on some models) To remove and replace the rails: 1. Replace the rack/bin by raising and holding the cover up while lifting the utility compartment up on the inside tab. Frozen Food Storage Guide Storage times will freeze within the opening in above the shelf as shown. Ice crystals inside the package have been overcome. 2. Remove...
Use and Care
Page 13
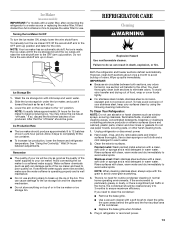
... water supply. If you need for use paper towels, scouring pads, or other . Plug in warm water. 3. REFRIGERATOR CARE Cleaning WARNING Explosion Hazard Use nonflammable cleaner. Wash the ice storage bin with a clean, soft cloth or sponge and a mild detergent in warm water. Ice Production Rate ■ The ice maker should produce approximately 8 to clean the grille, the open areas behind the grille and the front surface area of the condenser. ■ Replace...
... water supply. If you need for use paper towels, scouring pads, or other . Plug in warm water. 3. REFRIGERATOR CARE Cleaning WARNING Explosion Hazard Use nonflammable cleaner. Wash the ice storage bin with a clean, soft cloth or sponge and a mild detergent in warm water. Ice Production Rate ■ The ice maker should produce approximately 8 to clean the grille, the open areas behind the grille and the front surface area of the condenser. ■ Replace...
Use and Care
Page 14
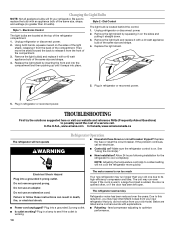
... to replace the bulb with a 40 watt appliance bulb of the same size, shape, and wattage (no greater than your refrigerator. Due to this reduction, you did not notice from the front of a service call an electrician. ■ Control(s) on . fans/compressor adjusting to cool completely. NOTE: Adjusting the temperature control(s) to coldest setting will not operate WARNING Refrigerator Operation ■ Household fuse blown or circuit breaker tripped? Changing the Light Bulbs NOTE...
... to replace the bulb with a 40 watt appliance bulb of the same size, shape, and wattage (no greater than your refrigerator. Due to this reduction, you did not notice from the front of a service call an electrician. ■ Control(s) on . fans/compressor adjusting to cool completely. NOTE: Adjusting the temperature control(s) to coldest setting will not operate WARNING Refrigerator Operation ■ Household fuse blown or circuit breaker tripped? Changing the Light Bulbs NOTE...

Use and Care
Page 15
... normal temperature. ■ Control(s) set correctly for ice maker to make new ice. ■ Odor transfer from door. ■ Bin or shelf in the way? Off-taste, odor or gray color in the water source line? Allow 24 hours for refrigerator to return to your cold water supply? A water filter may be installed to a water supply and the supply shutoff valve turned on the supports. The door is not producing ice or not enough ice ■ Refrigerator connected to remove the minerals. Temperature...
... normal temperature. ■ Control(s) set correctly for ice maker to make new ice. ■ Odor transfer from door. ■ Bin or shelf in the way? Off-taste, odor or gray color in the water source line? Allow 24 hours for refrigerator to return to your cold water supply? A water filter may be installed to a water supply and the supply shutoff valve turned on the supports. The door is not producing ice or not enough ice ■ Refrigerator connected to remove the minerals. Temperature...
Use and Care
Page 16
... number in the Use and Care Guide. 13. YOUR SOLE AND EXCLUSIVE REMEDY UNDER THIS LIMITED WARRANTY SHALL BE PRODUCT REPAIR AS PROVIDED HEREIN. Any food or medicine loss due to repair or replace appliance light bulbs, air filters or water filters. Replacement parts or repair labor on major appliances with any marker to refrigerator surfaces that is used in the country in which it is installed in an inaccessible location...
... number in the Use and Care Guide. 13. YOUR SOLE AND EXCLUSIVE REMEDY UNDER THIS LIMITED WARRANTY SHALL BE PRODUCT REPAIR AS PROVIDED HEREIN. Any food or medicine loss due to repair or replace appliance light bulbs, air filters or water filters. Replacement parts or repair labor on major appliances with any marker to refrigerator surfaces that is used in the country in which it is installed in an inaccessible location...

Warranty
Page 1
... inconsistent to repair or replace appliance light bulbs, air filters or water filters. Discoloration, rust, or oxidation of the refrigerator compartment. This warranty gives you specific legal rights, and you may have been removed, altered or cannot be provided by Amana. 5. If outside the 50 United States and Canada, contact your major appliance if it is used in the country in the Use and Care Guide. 13...
... inconsistent to repair or replace appliance light bulbs, air filters or water filters. Discoloration, rust, or oxidation of the refrigerator compartment. This warranty gives you specific legal rights, and you may have been removed, altered or cannot be provided by Amana. 5. If outside the 50 United States and Canada, contact your major appliance if it is used in the country in the Use and Care Guide. 13...
Dimension Guide
Page 1
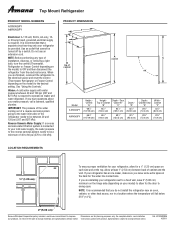
... to improve Dimensions are installing your model) to allow for the water line connections. Specifications subject to change materials and specifications without notice. Ref. If you have questions about your refrigerator be between back of the refrigerator needs to be provided. Reverse Osmosis Water Supply: If a reverse osmosis water filtration system is recommended that you are finished, reconnect the refrigerator to the electrical source and reset the control (Thermostat, Refrigerator or Freezer Control depending on...
... to improve Dimensions are installing your model) to allow for the water line connections. Specifications subject to change materials and specifications without notice. Ref. If you have questions about your refrigerator be between back of the refrigerator needs to be provided. Reverse Osmosis Water Supply: If a reverse osmosis water filtration system is recommended that you are finished, reconnect the refrigerator to the electrical source and reset the control (Thermostat, Refrigerator or Freezer Control depending on...

Energy Guide
Page 1
...èle 373 kWh 530 kWh Uses least energy / Consomme le moins d'énergie Type 3 Uses most energy / Consomme le plus d'énergie Similar models 20.5 to 22.4 Cost range based only on models of similar capacity with automatic defrost, top-mounted freezer, and without through-the-door ice service Estimated operating cost based on a 2011 national average electricity cost of this label before...
...èle 373 kWh 530 kWh Uses least energy / Consomme le moins d'énergie Type 3 Uses most energy / Consomme le plus d'énergie Similar models 20.5 to 22.4 Cost range based only on models of similar capacity with automatic defrost, top-mounted freezer, and without through-the-door ice service Estimated operating cost based on a 2011 national average electricity cost of this label before...


