Operating Instructions
Page 2
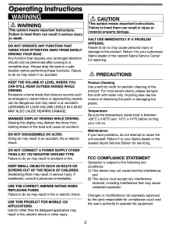
... device may not cause harmful interference, and (2) This device must accept any interference received, including interference that requires your Alpine dealer or the nearest Alpine Service Station for periodic cleaning of the product. Product Cleaning Use a soft dry cloth for servicing. KEEP SMALL OBJECTS SUCH...If you have problems. do so may distract the driver from looking ahead of dissolving the paint or damaging the plastic. DO NOT CONNECT A POWER SUPPLY OTHER THAN A DC 12V NEGATIVE GROUND TYPE. USE THE CORRECT AMPERE RATING WHEN REPLACING FUSES. FCC COMPLIANCE STATEMENT ...
... device may not cause harmful interference, and (2) This device must accept any interference received, including interference that requires your Alpine dealer or the nearest Alpine Service Station for periodic cleaning of the product. Product Cleaning Use a soft dry cloth for servicing. KEEP SMALL OBJECTS SUCH...If you have problems. do so may distract the driver from looking ahead of dissolving the paint or damaging the plastic. DO NOT CONNECT A POWER SUPPLY OTHER THAN A DC 12V NEGATIVE GROUND TYPE. USE THE CORRECT AMPERE RATING WHEN REPLACING FUSES. FCC COMPLIANCE STATEMENT ...
Operating Instructions
Page 3
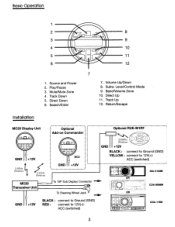
... 8. Optional ! ·· Add-on Commander MC2 : ~€~~ 333MHz ()C7D, Wireless ~u GND +12V BLACK: connect to Ground (GND) YELLOW: connect to 12V(+): ACC (switched) CDA-9886M CDA-118M 3 Play/Pause 3. Track Down 5. BandNolume Zone 10. Return/Escape Installation' MC20 Display Unit t_ 2.4GHz Wireless v~ ~, Wireless opti;;;;~i·RUE~M·1·RF··...
... 8. Optional ! ·· Add-on Commander MC2 : ~€~~ 333MHz ()C7D, Wireless ~u GND +12V BLACK: connect to Ground (GND) YELLOW: connect to 12V(+): ACC (switched) CDA-9886M CDA-118M 3 Play/Pause 3. Track Down 5. BandNolume Zone 10. Return/Escape Installation' MC20 Display Unit t_ 2.4GHz Wireless v~ ~, Wireless opti;;;;~i·RUE~M·1·RF··...
Operating Instructions
Page 4
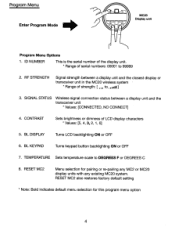
RESET MC2 Menu selection for this program menu option 4 Program Menu Enter Program Mode • MC20 Display unit Program Menu Options 1. 10 NUMBER This is the serial number of the display unit. * Range of LCD display characters * Values: [5, 4,... menu selection for pairing or re-pairing any MC2 or MC20 display units with any existing MC20 system. RF STRENGTH Signal strength between a display unit and the transceiver unit * Values: [CONNECTED, NO CONNECT] 4. SIGNAL STATUS Wireless signal connection status between a display unit and the closest display or transceiver...
RESET MC2 Menu selection for this program menu option 4 Program Menu Enter Program Mode • MC20 Display unit Program Menu Options 1. 10 NUMBER This is the serial number of the display unit. * Range of LCD display characters * Values: [5, 4,... menu selection for pairing or re-pairing any MC2 or MC20 display units with any existing MC20 system. RF STRENGTH Signal strength between a display unit and the transceiver unit * Values: [CONNECTED, NO CONNECT] 4. SIGNAL STATUS Wireless signal connection status between a display unit and the closest display or transceiver...
Operating Instructions
Page 6
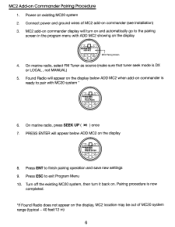
Connect power and ground wires of MC20 system range (typical - 40 feet/12 m) 6 Press ENT to exit Program Menu 10. PRESS ENTER will appear below ADD MC2 when add-on . Press ESC ... ADD MC2 on commander (see Installation) 3. On marine radio, press SEEK UP ( ~ ) once 7. Turn off the existing MC20 system, then turn on and automatically go to pair with ADD MC2 showing on existing MC20 system 2. On marine radio, select FM Tuner as source (make sure that tuner seek mode is ready to...
Connect power and ground wires of MC20 system range (typical - 40 feet/12 m) 6 Press ENT to exit Program Menu 10. PRESS ENTER will appear below ADD MC2 when add-on . Press ESC ... ADD MC2 on commander (see Installation) 3. On marine radio, press SEEK UP ( ~ ) once 7. Turn off the existing MC20 system, then turn on and automatically go to pair with ADD MC2 showing on existing MC20 system 2. On marine radio, select FM Tuner as source (make sure that tuner seek mode is ready to...
Operating Instructions
Page 8
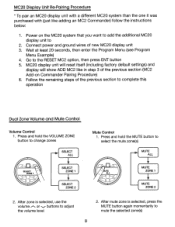
...ALL MUTE ZONE 1 MUTE ZONE 2 2. Go to adjust the volume level 2. Press and hold the MUTE button to mute the selected zone(s) 8 MC20 display unit will reset itself (including factory default settings) and display will show ADD MC2 like adding an MC2 Commander) follow the instructions below: 1. ...or.......", buttons to the RESET MC2 option, then press ENT button 5. After mute zone is selected, use the volume /'.. Connect power and ground wires of the previous section to 2. Wait at least 20 seconds, then enter the Program Menu (see Program Menu Example...
...ALL MUTE ZONE 1 MUTE ZONE 2 2. Go to adjust the volume level 2. Press and hold the MUTE button to mute the selected zone(s) 8 MC20 display unit will reset itself (including factory default settings) and display will show ADD MC2 like adding an MC2 Commander) follow the instructions below: 1. ...or.......", buttons to the RESET MC2 option, then press ENT button 5. After mute zone is selected, use the volume /'.. Connect power and ground wires of the previous section to 2. Wait at least 20 seconds, then enter the Program Menu (see Program Menu Example...


