Operating Instructions
Page 1
... Nord II, B.P. 50016, 95945 Roissy Charles de Gaulle Cedex, France Phone 01-48638989 ALPINE ITALIA S.p.A. Viale C. Marine Remote Commander System MC20 • Operating Instructions Please read before using this equipment. Colombo 8, 20090 Trezzano Sui Naviglio (MI), Italy Phone 02-484781 ALPINE ELECTRONICS DE ESPANA, S.A. Phone 1-800-ALPINE-1 (1-800-257-4631) ALPINE ELECTRONICS OF CANADA, INC. 777 Supertest Road Toronto Ontario M3J 2M9...
... Nord II, B.P. 50016, 95945 Roissy Charles de Gaulle Cedex, France Phone 01-48638989 ALPINE ITALIA S.p.A. Viale C. Marine Remote Commander System MC20 • Operating Instructions Please read before using this equipment. Colombo 8, 20090 Trezzano Sui Naviglio (MI), Italy Phone 02-484781 ALPINE ELECTRONICS DE ESPANA, S.A. Phone 1-800-ALPINE-1 (1-800-257-4631) ALPINE ELECTRONICS OF CANADA, INC. 777 Supertest Road Toronto Ontario M3J 2M9...
Operating Instructions
Page 2
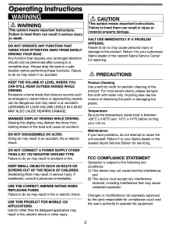
... important instructions. Viewing the display may result in fire, electric shock or other than its designed application may distract the driver from looking ahead of the boat and cause an accident. Use for replacing. DO NOT OPERATE ANY FUNCTION THAT TAKES YOUR ATTENTION AWAY FROM SAFELY DRIVING YOUR BOAT. Always stop . Failure to your Alpine dealer or the nearest Alpine Service Station for...
... important instructions. Viewing the display may result in fire, electric shock or other than its designed application may distract the driver from looking ahead of the boat and cause an accident. Use for replacing. DO NOT OPERATE ANY FUNCTION THAT TAKES YOUR ATTENTION AWAY FROM SAFELY DRIVING YOUR BOAT. Always stop . Failure to your Alpine dealer or the nearest Alpine Service Station for...
Operating Instructions
Page 3
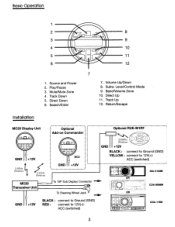
Mute/Mute Zone 4. BandNolume Zone 10. Direct Up 11. Play/Pause 3. Track Down 5. Volume Up/Down 8. Return/Escape Installation' MC20 Display Unit t_ 2.4GHz Wireless v~ ~, Wireless opti;;;;~i·RUE~M·1·RF····· . Transceiver Unit To Steering Wheel Jack -... Level/Control Mode 9. GND +12V BLACK: connect to Ground (GND) RED: connect to 12V(+): ··· ............ Subw. Track Up 12. Search/Enter...
Mute/Mute Zone 4. BandNolume Zone 10. Direct Up 11. Play/Pause 3. Track Down 5. Volume Up/Down 8. Return/Escape Installation' MC20 Display Unit t_ 2.4GHz Wireless v~ ~, Wireless opti;;;;~i·RUE~M·1·RF····· . Transceiver Unit To Steering Wheel Jack -... Level/Control Mode 9. GND +12V BLACK: connect to Ground (GND) RED: connect to 12V(+): ··· ............ Subw. Track Up 12. Search/Enter...
Operating Instructions
Page 4
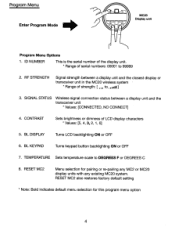
... ••• 111] 3. BL DISPLAY Turns LCD backlighting ON or OFF 6. RESET MC2 also restores factory default setting * Note: Bold indicates default menu selection for pairing or re-pairing any MC2 or MC20 display units with any existing MC20 system. Program Menu Enter Program Mode • MC20 Display unit Program Menu Options 1. 10 NUMBER This is the serial number of the display unit. * Range of LCD display characters * Values: [5, 4, 3, 2, 1, 0] 5. BL KEYPAD Turns keypad button backlighting ON or OFF 7.
... ••• 111] 3. BL DISPLAY Turns LCD backlighting ON or OFF 6. RESET MC2 also restores factory default setting * Note: Bold indicates default menu selection for pairing or re-pairing any MC2 or MC20 display units with any existing MC20 system. Program Menu Enter Program Mode • MC20 Display unit Program Menu Options 1. 10 NUMBER This is the serial number of the display unit. * Range of LCD display characters * Values: [5, 4, 3, 2, 1, 0] 5. BL KEYPAD Turns keypad button backlighting ON or OFF 7.
Operating Instructions
Page 5
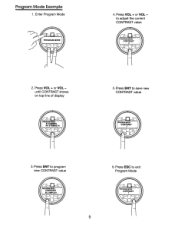
Press VOL + or VOL until CONTRAST shows on top line of display 5. Enter Program Mode 4. Press ENT to exit Program Mode 5 Press ESC to save new CONTRAST value 3. Press ENT to adjust the current CONTRAST value 2. Program Mode Example 1. Press VOL + or VOL to program new CONTRAST value 6.
Press VOL + or VOL until CONTRAST shows on top line of display 5. Enter Program Mode 4. Press ENT to exit Program Mode 5 Press ESC to save new CONTRAST value 3. Press ENT to adjust the current CONTRAST value 2. Program Mode Example 1. Press VOL + or VOL to program new CONTRAST value 6.
Operating Instructions
Page 6
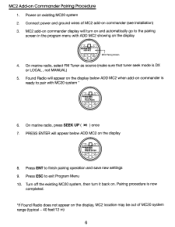
... to the pairing screen in the program menu with MC20 system * 6. MC2 Add-on existing MC20 system 2. Power on Commander Pairing Procedure 1. MC2 add-on commander display will turn it back on the dispray 8. Connect power and ground wires of MC20 system range (typical - 40 feet/12 m) 6 On marine radio, select FM Tuner as source (make sure that tuner seek mode is ready to finish pairing operation and save new settings 9. Pairing procedure is now...
... to the pairing screen in the program menu with MC20 system * 6. MC2 Add-on existing MC20 system 2. Power on Commander Pairing Procedure 1. MC2 add-on commander display will turn it back on the dispray 8. Connect power and ground wires of MC20 system range (typical - 40 feet/12 m) 6 On marine radio, select FM Tuner as source (make sure that tuner seek mode is ready to finish pairing operation and save new settings 9. Pairing procedure is now...
Operating Instructions
Page 7
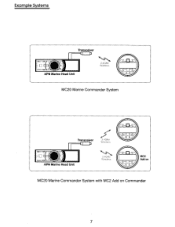
MC20 Marine Commander System Transceiver 2AGHz Wireie~s ~ 2AGHz ·i MC2 Wireless Add on : · APN Marine Head Unit MC20 Marine Commander System with MC2 Add on Commander 7 Example Systems ...: Transceiver ~ 2.4GHz Wireless APN Marine Head Unit .
MC20 Marine Commander System Transceiver 2AGHz Wireie~s ~ 2AGHz ·i MC2 Wireless Add on : · APN Marine Head Unit MC20 Marine Commander System with MC2 Add on Commander 7 Example Systems ...: Transceiver ~ 2.4GHz Wireless APN Marine Head Unit .
Operating Instructions
Page 8
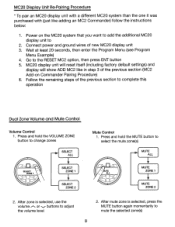
... Add-on the MC20 system that you want to add the additional MC20 display unit to adjust the volume level 2. Press and hold the VOLUME ZONE button to select the mute zone(s) MUTE ALL MUTE ZONE 1 MUTE ZONE 2 2. Power on Commander Pairing Procedure) 6. MC20 display unit will reset itself (including factory default settings) and display will show ADD MC2 like adding an MC2 Commander) follow the instructions below: 1. Connect power and ground wires of new MC20 display unit 3. or.......", buttons to 2.
... Add-on the MC20 system that you want to add the additional MC20 display unit to adjust the volume level 2. Press and hold the VOLUME ZONE button to select the mute zone(s) MUTE ALL MUTE ZONE 1 MUTE ZONE 2 2. Power on Commander Pairing Procedure) 6. MC20 display unit will reset itself (including factory default settings) and display will show ADD MC2 like adding an MC2 Commander) follow the instructions below: 1. Connect power and ground wires of new MC20 display unit 3. or.......", buttons to 2.


