Operating Instructions
Page 2
... USE THIS PRODUCT FOR MOBILE 12V APPLICATIONS. Failure to operate the equipment. 2 Excessive volume levels that requires your authorized Alpine dealer or the nearest Alpine Service Center for compliance could void the user's authority to heed them can result in injury or material property damage. Product... responsible for replacing. DO NOT OPERATE ANY FUNCTION THAT TAKES YOUR ATTENTION AWAY FROM SAFELY DRIVING YOUR BOAT. DO NOT CONNECT A POWER SUPPLY OTHER THAN A DC 12V NEGATIVE GROUND TYPE. Failure to do so may distract the driver from looking ahead of dissolving the...
... USE THIS PRODUCT FOR MOBILE 12V APPLICATIONS. Failure to operate the equipment. 2 Excessive volume levels that requires your authorized Alpine dealer or the nearest Alpine Service Center for compliance could void the user's authority to heed them can result in injury or material property damage. Product... responsible for replacing. DO NOT OPERATE ANY FUNCTION THAT TAKES YOUR ATTENTION AWAY FROM SAFELY DRIVING YOUR BOAT. DO NOT CONNECT A POWER SUPPLY OTHER THAN A DC 12V NEGATIVE GROUND TYPE. Failure to do so may distract the driver from looking ahead of dissolving the...
Operating Instructions
Page 3
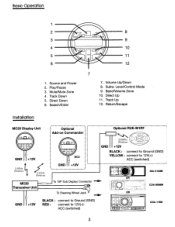
... Search/Enter 7 7. Subw. Direct Up 11. Basic Operation 1 2 8 3 9 4 10 5 11 6 12 1. Source and Power 2. Return/Escape Installation' MC20 Display Unit t_ 2.4GHz Wireless v~ ~, Wireless opti;;;;~i·RUE~M·1·RF····· . Play/Pause 3. Mute/Mute... Zone 4. Direct Down 6. Track Up 12. Volume Up/Down 8. BandNolume Zone 10. ACC (switched) GND +12V 1 I MC20 ~C:::l ce=,.J To 10P Sub Display Connector - . . . Optional ! ·· Add-on Commander MC2 : ~€~~ 333MHz ()C7D, Wireless ...
... Search/Enter 7 7. Subw. Direct Up 11. Basic Operation 1 2 8 3 9 4 10 5 11 6 12 1. Source and Power 2. Return/Escape Installation' MC20 Display Unit t_ 2.4GHz Wireless v~ ~, Wireless opti;;;;~i·RUE~M·1·RF····· . Play/Pause 3. Mute/Mute... Zone 4. Direct Down 6. Track Up 12. Volume Up/Down 8. BandNolume Zone 10. ACC (switched) GND +12V 1 I MC20 ~C:::l ce=,.J To 10P Sub Display Connector - . . . Optional ! ·· Add-on Commander MC2 : ~€~~ 333MHz ()C7D, Wireless ...
Operating Instructions
Page 6
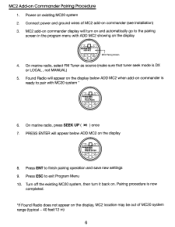
... ( ~ ) once 7. Press ESC to finish pairing operation and save new settings 9. Pairing procedure is now completed. *If Found Radio does not appear on existing MC20 system 2. Power on the display, MC2 location may be out of MC2 add-on the display 4. Press ENT to exit Program Menu 10. Turn off the existing...
... ( ~ ) once 7. Press ESC to finish pairing operation and save new settings 9. Pairing procedure is now completed. *If Found Radio does not appear on existing MC20 system 2. Power on the display, MC2 location may be out of MC2 add-on the display 4. Press ENT to exit Program Menu 10. Turn off the existing...
Operating Instructions
Page 8
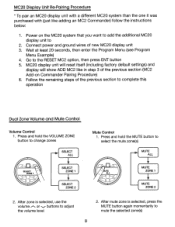
Press and hold the VOLUME ZONE button to change zones SELECT ALL SELECT ZONE 1 SELECT . Connect power and ground wires of new MC20 display unit 3. Wait at least 20 seconds, then enter the Program Menu (see Program Menu Example) 4. Follow the remaining steps of the ...to select the mute zone(s) MUTE ALL MUTE ZONE 1 MUTE ZONE 2 2. Power on Commander Pairing Procedure) 6. After mute zone is selected, use the volume /'.. MC20 Display Unit Re-Pairing Procedure * To pair an MC20 display unit with a different MC20 system than the one it was purchased with Gust like in step 3 of...
Press and hold the VOLUME ZONE button to change zones SELECT ALL SELECT ZONE 1 SELECT . Connect power and ground wires of new MC20 display unit 3. Wait at least 20 seconds, then enter the Program Menu (see Program Menu Example) 4. Follow the remaining steps of the ...to select the mute zone(s) MUTE ALL MUTE ZONE 1 MUTE ZONE 2 2. Power on Commander Pairing Procedure) 6. After mute zone is selected, use the volume /'.. MC20 Display Unit Re-Pairing Procedure * To pair an MC20 display unit with a different MC20 system than the one it was purchased with Gust like in step 3 of...

