Installation Manual
Page 1
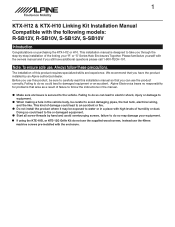
... lead to the vehicle. 1 KTX-H12 & KTX-H10 Linking Kit Installation Manual Compatible with the owners manual and if you still have the product installed by -step installation of the linking your equipment. ˜ If using the KTE-10G, or KTE-12G Grille Kit do not use the supplied wood screws, instead use , Always follow the instructions in the manual. ˜ Make sure enclosure is designed...
... lead to the vehicle. 1 KTX-H12 & KTX-H10 Linking Kit Installation Manual Compatible with the owners manual and if you still have the product installed by -step installation of the linking your equipment. ˜ If using the KTE-10G, or KTE-12G Grille Kit do not use the supplied wood screws, instead use , Always follow the instructions in the manual. ˜ Make sure enclosure is designed...
Installation Manual
Page 2
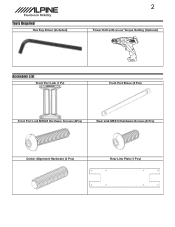
Tools Required Hex Key Driver (Included) 2 Power Drill with a Low Torque Setting (Optional) Accessory List Front Port Link (1 Pc) Front Port Brace (2 Pcs) Front Port Link M5X25 Hardware Screws (4Pcs) Rear Link M5X14 Hardware Screws (8 Pcs) Center Alignment Hardware (4 Pcs) Rear Link Plate (1 Pcs)
Tools Required Hex Key Driver (Included) 2 Power Drill with a Low Torque Setting (Optional) Accessory List Front Port Link (1 Pc) Front Port Brace (2 Pcs) Front Port Link M5X25 Hardware Screws (4Pcs) Rear Link M5X14 Hardware Screws (8 Pcs) Center Alignment Hardware (4 Pcs) Rear Link Plate (1 Pcs)
Installation Manual
Page 3
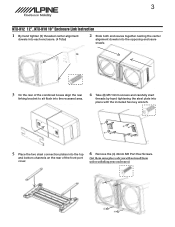
3 KTX-H12 12", KTX-H10 10" Enclosure Link Instruction 1 By hand tighten (2) threaded center alignment dowels into each enclosure. (4 Total) 2 Slide both enclosures together nesting the center alignment dowels into the opposing enclosure snugly. 3 On the rear of the combined boxes align the rear linking bracket to sit flush ... with the included hex key wrench. 5 Place the two steel connection plates into the top and bottom channels on the rear of the front port cover. 6 Remove the (4) 20mm M5 Port Hex Screws. (Set them some place safe you will not need them unless unlinking your enclosures)
3 KTX-H12 12", KTX-H10 10" Enclosure Link Instruction 1 By hand tighten (2) threaded center alignment dowels into each enclosure. (4 Total) 2 Slide both enclosures together nesting the center alignment dowels into the opposing enclosure snugly. 3 On the rear of the combined boxes align the rear linking bracket to sit flush ... with the included hex key wrench. 5 Place the two steel connection plates into the top and bottom channels on the rear of the front port cover. 6 Remove the (4) 20mm M5 Port Hex Screws. (Set them some place safe you will not need them unless unlinking your enclosures)
Installation Manual
Page 4
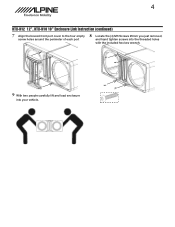
4 KTX-H12 12", KTX-H10 10" Enclosure Link Instruction (continued) 7 Align the braced front port cover to the four empty screw holes around the perimeter of each port 8 Locate the (4) M5 Screws 25mm you just removed, and hand tighten screws into the threaded holes with the included hex key wrench. 9 With two people carefully lift and load enclosure into your vehicle.
4 KTX-H12 12", KTX-H10 10" Enclosure Link Instruction (continued) 7 Align the braced front port cover to the four empty screw holes around the perimeter of each port 8 Locate the (4) M5 Screws 25mm you just removed, and hand tighten screws into the threaded holes with the included hex key wrench. 9 With two people carefully lift and load enclosure into your vehicle.


