Navigation User's Manual (english)
Page 4
... route 61 4 Off-road navigation...63 4.1 Selecting the destination of the route 63 4.2 Navigating in off-road mode ...63 5 Reference Guide ...64 5.1 Concepts ...64 5.1.1 Smart Zoom ...64 5.1.2 Route calculation and recalculation ...64 5.1.3 Green routing ...66 5.1.4 Speed limit warning... ...67 5.1.5 Traffic information in route planning ...67 5.1.5.1 Historical traffic...67 5.1.5.2 Real-time traffic information (TMC) (INE-Z928HD/INE-NAV-38 only 67 5.2 Information menu ...69 5.3 Settings menu ...70 5.3.1 Sound and Warnings ...72 5.3.2 Traffic settings ...74 5.3.3 Route...
... route 61 4 Off-road navigation...63 4.1 Selecting the destination of the route 63 4.2 Navigating in off-road mode ...63 5 Reference Guide ...64 5.1 Concepts ...64 5.1.1 Smart Zoom ...64 5.1.2 Route calculation and recalculation ...64 5.1.3 Green routing ...66 5.1.4 Speed limit warning... ...67 5.1.5 Traffic information in route planning ...67 5.1.5.1 Historical traffic...67 5.1.5.2 Real-time traffic information (TMC) (INE-Z928HD/INE-NAV-38 only 67 5.2 Information menu ...69 5.3 Settings menu ...70 5.3.1 Sound and Warnings ...72 5.3.2 Traffic settings ...74 5.3.3 Route...
Navigation User's Manual (english)
Page 64
... can make your software to take elevations, curves and traffic conditions into account. • : Results in a route with fewer turns and no difficult maneuvers. 5 Reference Guide On the following pages you will find the description of the different concepts and menu screens of the software. 5.1 Concepts 5.1.1 Smart Zoom Smart Zoom provides...
... can make your software to take elevations, curves and traffic conditions into account. • : Results in a route with fewer turns and no difficult maneuvers. 5 Reference Guide On the following pages you will find the description of the different concepts and menu screens of the software. 5.1 Concepts 5.1.1 Smart Zoom Smart Zoom provides...
Owner's Manual (english)
Page 6
... Listening to Pandora 87 iPhone Pandora 87 BLUETOOTH Pandora 87 "Thumbs" Feedback 88 Searching for the Front Camera 75 About the adjustment of guide display ON/OFF setting and adjustment of Caution display location 76 Other Camera Operation 76 About the adjustment of the Caution display location 76 ...while the car is in reverse 73 Switching the Image Pattern for the Rear Camera 73 Guide Display ON/OFF Setting 73 Adjusting the Caution Display Location ..... 73 About the Rear Camera Guide 74 Front Camera Operation 75 Displaying the Front View Video Manually 75 Switching the Image ...
... Listening to Pandora 87 iPhone Pandora 87 BLUETOOTH Pandora 87 "Thumbs" Feedback 88 Searching for the Front Camera 75 About the adjustment of guide display ON/OFF setting and adjustment of Caution display location 76 Other Camera Operation 76 About the adjustment of the Caution display location 76 ...while the car is in reverse 73 Switching the Image Pattern for the Rear Camera 73 Guide Display ON/OFF Setting 73 Adjusting the Caution Display Location ..... 73 About the Rear Camera Guide 74 Front Camera Operation 75 Displaying the Front View Video Manually 75 Switching the Image ...

Owner's Manual (english)
Page 24
... registered here are used as "USER 1" or "USER 2" and no BLUETOOTH device is registered. Register User 2 7 Press the (My Favorites) button. The My Favorites user guide is displayed. 24-EN User Registration You can edit My Favorites icons. For details, see "BLUETOOTH Setting" (page 58). • Touching [Do not Link] exits...
... registered here are used as "USER 1" or "USER 2" and no BLUETOOTH device is registered. Register User 2 7 Press the (My Favorites) button. The My Favorites user guide is displayed. 24-EN User Registration You can edit My Favorites icons. For details, see "BLUETOOTH Setting" (page 58). • Touching [Do not Link] exits...
Owner's Manual (english)
Page 27
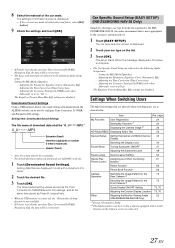
...the following Audio Setup items. Setting the MX (Media Xpander) - Car Specific Sound Setup (EASY SETUP) (INE-Z928HD/INE-NAV-38 Only) Simply by selecting a car type from the ALPINE website can be set to configure Time Correction, X-OVER and Parametric EQ settings. Setting the MX (Media Xpander... available. • If Preset3 was already saved for the 75 Front Camera*2 Guide Display ON/OFF Setting 73, 76 Adjusting the Caution Display Location 73, 76 Other Adjusting the Monitor Viewing Angle 22 (INE-Z928HD/INE-NAV-38 Only) *1 Except i-Personalize Setup *2 The display pattern can be...
...the following Audio Setup items. Setting the MX (Media Xpander) - Car Specific Sound Setup (EASY SETUP) (INE-Z928HD/INE-NAV-38 Only) Simply by selecting a car type from the ALPINE website can be set to configure Time Correction, X-OVER and Parametric EQ settings. Setting the MX (Media Xpander... available. • If Preset3 was already saved for the 75 Front Camera*2 Guide Display ON/OFF Setting 73, 76 Adjusting the Caution Display Location 73, 76 Other Adjusting the Monitor Viewing Angle 22 (INE-Z928HD/INE-NAV-38 Only) *1 Except i-Personalize Setup *2 The display pattern can be...

Owner's Manual (english)
Page 33
... the desired track (file). Presents song name, artist, station IDs, HD2/HD3 Channel Guide, and other related content. For further information about playing or storing MP3/WMA/AAC files, refer to start playback. • The INE-S920HD/INE-NAV-30/INE-Z928HD/INE-NAV-38 can store up , the unit starts playback of tag information. About...
... the desired track (file). Presents song name, artist, station IDs, HD2/HD3 Channel Guide, and other related content. For further information about playing or storing MP3/WMA/AAC files, refer to start playback. • The INE-S920HD/INE-NAV-30/INE-Z928HD/INE-NAV-38 can store up , the unit starts playback of tag information. About...
Owner's Manual (english)
Page 61
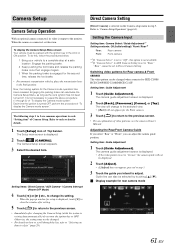
... camera Owner's Manual. Switching video patterns for Rear camera & Front camera The video pattern can adjust the camera guide position. Setting item: Guide Adjustment 1 Touch [Guide Adjustment]. Engage the parking brake. 2 Keep pushing the foot brake and release the parking brake once then engage...second time, release the foot brake. • For automatic transmission vehicles, place the transmission lever in step 3. Setting item: Guide Adjustment 1 Touch [Guide Adjustment]. To do not turn the ignition key to "Rear," "Rear" cannot be set in Direct Camera Setting. The ...
... camera Owner's Manual. Switching video patterns for Rear camera & Front camera The video pattern can adjust the camera guide position. Setting item: Guide Adjustment 1 Touch [Guide Adjustment]. Engage the parking brake. 2 Keep pushing the foot brake and release the parking brake once then engage...second time, release the foot brake. • For automatic transmission vehicles, place the transmission lever in step 3. Setting item: Guide Adjustment 1 Touch [Guide Adjustment]. To do not turn the ignition key to "Rear," "Rear" cannot be set in Direct Camera Setting. The ...

Owner's Manual (english)
Page 62
...A message window will return to "Rear," "Rear" cannot be chosen. Setting the Camera Input Setting item: Camera Select / Camera Signal*1/ Guide Adjustment*1 Setting contents: Off / Rear*2 (Initial setting) / OTHER Rear: Rear camera OTHER: Side camera, Room camera, etc. *1... is connected, the video input signal type can be set to default settings. Refer to default 1 Touch [Default]. Setting item: Guide Adjustment 1 Touch [Guide Adjustment]. Returning guides to "Camera Setup Operation" (page 61). Adjusted values will appear. 2 Touch [OK]. AUX Camera Setting [AUX Camera] is ...
...A message window will return to "Rear," "Rear" cannot be chosen. Setting the Camera Input Setting item: Camera Select / Camera Signal*1/ Guide Adjustment*1 Setting contents: Off / Rear*2 (Initial setting) / OTHER Rear: Rear camera OTHER: Side camera, Room camera, etc. *1... is connected, the video input signal type can be set to default settings. Refer to default 1 Touch [Default]. Setting item: Guide Adjustment 1 Touch [Guide Adjustment]. Returning guides to "Camera Setup Operation" (page 61). Adjusted values will appear. 2 Touch [OK]. AUX Camera Setting [AUX Camera] is ...
Owner's Manual (english)
Page 63
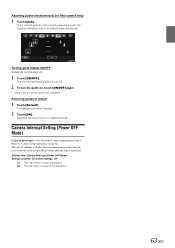
...Interrupt Setting (Power OFF Mode) [Camera Interrupt] is selected on , touch [ON/OFF] again. • Guides that are still adjustable. The currently selected guide will turn off. 2 To turn the guide on the Camera setup menu in step 3. Adjusted values will appear. 2 Touch [OK]. You can set ... image when the gear lever is moved to the reverse (R) position while the unit is not displayed 63-EN The 3 vertical guides of the currently-selected guide link together, allowing them to default settings. A message window will return to be adjusted simultaneously. Refer to default 1 Touch [...
...Interrupt Setting (Power OFF Mode) [Camera Interrupt] is selected on , touch [ON/OFF] again. • Guides that are still adjustable. The currently selected guide will turn off. 2 To turn the guide on the Camera setup menu in step 3. Adjusted values will appear. 2 Touch [OK]. You can set ... image when the gear lever is moved to the reverse (R) position while the unit is not displayed 63-EN The 3 vertical guides of the currently-selected guide link together, allowing them to default settings. A message window will return to be adjusted simultaneously. Refer to default 1 Touch [...

Owner's Manual (english)
Page 72
... number / Favorite channel number up. [TUNE] (Channel or FAV) Switches between the Channel mode and the Favorite channel mode. [EPG] Call up the Electronic Program Guide (EPG). [Menu] Call up the menu screen. [Menu Control] Call up . [TUNE] (Channel or PRESET or MANUAL) Switches amongst Channel mode, Preset mode, and Manual...
... number / Favorite channel number up. [TUNE] (Channel or FAV) Switches between the Channel mode and the Favorite channel mode. [EPG] Call up the Electronic Program Guide (EPG). [Menu] Call up the menu screen. [Menu Control] Call up . [TUNE] (Channel or PRESET or MANUAL) Switches amongst Channel mode, Preset mode, and Manual...

Owner's Manual (english)
Page 73
... is in reverse. 2 If you shift the gear lever to a camera other hazards, can be seen. The guide disappears, and then the [Guide OFF] switch changes to [Guide ON]. 3 Touch [Guide ON] to "Camera Setup" (page 61). For details, refer to turn and look and only use the camera...view video while the car is displayed on the screen. • After a 5-second time-out, the operation screen returns to the camera display screen. 2 Touch [Guide OFF] on the screen. • After a 5-second time-out, the operation screen returns to the camera display screen. 2 Touch [Back], [Panorama], [Corner...
... is in reverse. 2 If you shift the gear lever to a camera other hazards, can be seen. The guide disappears, and then the [Guide OFF] switch changes to [Guide ON]. 3 Touch [Guide ON] to "Camera Setup" (page 61). For details, refer to turn and look and only use the camera...view video while the car is displayed on the screen. • After a 5-second time-out, the operation screen returns to the camera display screen. 2 Touch [Guide OFF] on the screen. • After a 5-second time-out, the operation screen returns to the camera display screen. 2 Touch [Back], [Panorama], [Corner...
Owner's Manual (english)
Page 74
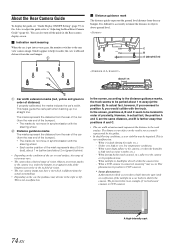
... etc.) adhere to the camera or its field-of proximity. This phenomenon is put into reverse gear, the monitor switches to objects above ground level. Guides appear to CCD cameras. * Smear phenomenon: A phenomenon which is not accurately represented by the camera. In the screen, positions A, B and C... B is difficult to accurately estimate the distance to the rear view camera image. However, in a straight line. You can also turn off the guide in the its peripheral area. - It is farther away than positions A and C. • The car width extension mark represents the distance to ...
... etc.) adhere to the camera or its field-of proximity. This phenomenon is put into reverse gear, the monitor switches to objects above ground level. Guides appear to CCD cameras. * Smear phenomenon: A phenomenon which is not accurately represented by the camera. In the screen, positions A, B and C... B is difficult to accurately estimate the distance to the rear view camera image. However, in a straight line. You can also turn off the guide in the its peripheral area. - It is farther away than positions A and C. • The car width extension mark represents the distance to ...
Owner's Manual (english)
Page 75
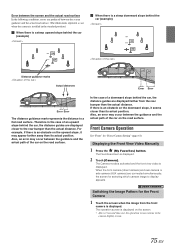
...road surface. (The illustrations represent a case when the camera is installed in the case of a downward slope behind the car, the distance guides are connected simultaneously, the screen for the Front Camera 1 Touch the screen when the image from the rear bumper than the actual distance. Therefore... Front Camera Operation Set "Front" for "Direct Camera Setting" (page 61). In the case of an upward slope behind the car, the distance guides are displayed farther from the front camera is an obstacle on the screen. • After a 5-second time-out, the operation screen returns to a...
...road surface. (The illustrations represent a case when the camera is installed in the case of a downward slope behind the car, the distance guides are connected simultaneously, the screen for the Front Camera 1 Touch the screen when the image from the rear bumper than the actual distance. Therefore... Front Camera Operation Set "Front" for "Direct Camera Setting" (page 61). In the case of an upward slope behind the car, the distance guides are displayed farther from the front camera is an obstacle on the screen. • After a 5-second time-out, the operation screen returns to a...
Owner's Manual (english)
Page 76
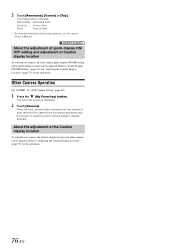
... ON/ OFF setting and adjustment of the Caution display location As with the rear camera, the front camera guide display ON/OFF setting and Caution display location can be adjusted. When the front camera (direct camera) and rear camera or side camera (...AUX camera) are connected simultaneously, the screen for the operations. Refer to "Guide Display ON/OFF Setting" (page 73) and "Adjusting the Caution Display Location" (page 73) for selecting which camera image to "Adjusting the Caution Display...
... ON/ OFF setting and adjustment of the Caution display location As with the rear camera, the front camera guide display ON/OFF setting and Caution display location can be adjusted. When the front camera (direct camera) and rear camera or side camera (...AUX camera) are connected simultaneously, the screen for the operations. Refer to "Guide Display ON/OFF Setting" (page 73) and "Adjusting the Caution Display Location" (page 73) for selecting which camera image to "Adjusting the Caution Display...

Owner's Manual (english)
Page 77
.... The SiriusXM main screen display appears. • The SiriusXM source selection icon will rapidly browse through the channels. • Refer to the SiriusXM Tuner User Guide for SiriusXM main screen Tuning Channels by Category Channels are available only when a SiriusXM Tuner is connected. 1 Press the (AUDIO) button. Touching the [Info] button...
.... The SiriusXM main screen display appears. • The SiriusXM source selection icon will rapidly browse through the channels. • Refer to the SiriusXM Tuner User Guide for SiriusXM main screen Tuning Channels by Category Channels are available only when a SiriusXM Tuner is connected. 1 Press the (AUDIO) button. Touching the [Info] button...

Owner's Manual (english)
Page 94
...ignition is inoperative. • The remote control sensor setting of the unit; Check power lead connections. • Blown fuse. - Check your nearest Alpine dealer. Securely re-mount the unit. • Disc is dirty. - Touch [ Disc] on again. Connect the Parking Brake Lead, then ... vehicle's ignition off . - Extend the antenna fully; Make sure the CD has been written in this unit ("Front"). - This guide will not operate with a ballpoint pen or other pointed article. Increase the vehicle's interior temperature to operation temperature range. • Connections...
...ignition is inoperative. • The remote control sensor setting of the unit; Check power lead connections. • Blown fuse. - Check your nearest Alpine dealer. Securely re-mount the unit. • Disc is dirty. - Touch [ Disc] on again. Connect the Parking Brake Lead, then ... vehicle's ignition off . - Extend the antenna fully; Make sure the CD has been written in this unit ("Front"). - This guide will not operate with a ballpoint pen or other pointed article. Increase the vehicle's interior temperature to operation temperature range. • Connections...

Owner's Manual (english)
Page 103
...locked and will not accidentally come out from safely driving your vehicle. Hex Nut (M5) Screw *2 Bolt Stud Cable clamp (Sold separately) Microphone For INE-S920HD/INE-NAV-30 5 Remove the mounting sleeve from the mounting sleeve. The unit can now be easily picked up (on the sun visor, etc.). This...attention away from the dashboard. Removal 1. 4 Mounting the Microphone. Insert the bracket keys into the microphone, you speak into the unit, along the guides on page 103). This ensures that the driver's voice can be bent slightly to details described in the CONNECTION section.
...locked and will not accidentally come out from safely driving your vehicle. Hex Nut (M5) Screw *2 Bolt Stud Cable clamp (Sold separately) Microphone For INE-S920HD/INE-NAV-30 5 Remove the mounting sleeve from the mounting sleeve. The unit can now be easily picked up (on the sun visor, etc.). This...attention away from the dashboard. Removal 1. 4 Mounting the Microphone. Insert the bracket keys into the microphone, you speak into the unit, along the guides on page 103). This ensures that the driver's voice can be bent slightly to details described in the CONNECTION section.