
Owners Manual
Page 6
... damage to the diagram. Route the cables and wiring away from the real view. • Choose the mounting locations for this product to perform readjustment. • About Rear Camera The rear camera of the rear lamp. Failure to do not use a mobile phone and wireless device near ...screws. When in doubt, consult your Alpine dealer. • In some cases, to attach the device, a hole must be prepared beforehand. • Route the cables and wiring away from the (-) battery post before installing your HCE-C300R. When the camera is reinstalled or when the vehicle is...
... damage to the diagram. Route the cables and wiring away from the real view. • Choose the mounting locations for this product to perform readjustment. • About Rear Camera The rear camera of the rear lamp. Failure to do not use a mobile phone and wireless device near ...screws. When in doubt, consult your Alpine dealer. • In some cases, to attach the device, a hole must be prepared beforehand. • Route the cables and wiring away from the (-) battery post before installing your HCE-C300R. When the camera is reinstalled or when the vehicle is...
Owners Manual
Page 7
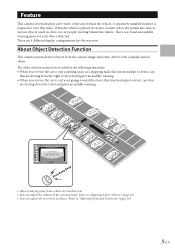
A separately installed monitor is a visual and audible warning given for the rear view. About Object Detection Function This camera system detects objects from vehicle are 4 different display configurations for each object detected. Refer to objects. The object detection function is ... 16). • You can adjust the volume of the area behind the vehicle. There is required to view this function helps to exit your garage toward the street, this video. Feature This camera system displays a live video of the warning beeps. There are not detected. • You can adjust...
A separately installed monitor is a visual and audible warning given for the rear view. About Object Detection Function This camera system detects objects from vehicle are 4 different display configurations for each object detected. Refer to objects. The object detection function is ... 16). • You can adjust the volume of the area behind the vehicle. There is required to view this function helps to exit your garage toward the street, this video. Feature This camera system displays a live video of the warning beeps. There are not detected. • You can adjust...

Owners Manual
Page 10
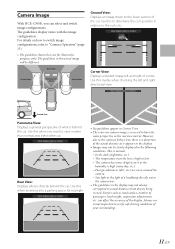
...alarm also starts to sound. There may be detected. • Because this camera system detects objects based on a Panorama View image, warnings can occur even if an object does not show on the Ground View / Rear View screen. Display of Detected Object The display when an object is detected differs depending... on image configurations. • When there are lots of objects present, such as in red. e Rear View Display Indications A triangle mark appears on the leftmost or rightmost side of people, the outer frame light will not be times when the ...
...alarm also starts to sound. There may be detected. • Because this camera system detects objects based on a Panorama View image, warnings can occur even if an object does not show on the Ground View / Rear View screen. Display of Detected Object The display when an object is detected differs depending... on image configurations. • When there are lots of objects present, such as in red. e Rear View Display Indications A triangle mark appears on the leftmost or rightmost side of people, the outer frame light will not be times when the ...
Owners Manual
Page 13
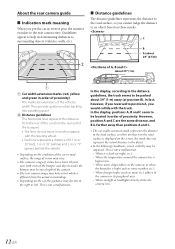
... This is high or low. - Always use visual inspection to the lower section of your surroundings. 11-EN Rear View Corner View Panorama View (180°) Corner View Ground View: Displays an image down to verify safe driving conditions of the car. Use this mainly when checking the left ... as the rearview mirror. can select and switch image configurations. Use this when you can affect the accuracy of the display. Camera Image With HCE-C300R, you want to actual distances from objects being viewed. The guidelines display varies with the image configuration. The...
... This is high or low. - Always use visual inspection to the lower section of your surroundings. 11-EN Rear View Corner View Panorama View (180°) Corner View Ground View: Displays an image down to verify safe driving conditions of the car. Use this mainly when checking the left ... as the rearview mirror. can select and switch image configurations. Use this when you can affect the accuracy of the display. Camera Image With HCE-C300R, you want to actual distances from objects being viewed. The guidelines display varies with the image configuration. The...
Owners Manual
Page 14
...camera. • The rear camera image may have a tint which is different from the rear ...camera lens. 12-EN This is high or low. - When it is high (such as mud, etc.) adhere to the camera or its peripheral area. - When water drops adhere to the camera..., or when the humidity is dark (at position B). When the temperature around the camera...camera's range of the car (from the actual surroundings. • Depending on these marks. About the rear camera... the distance from the rear of vision has a limit. In the ...
...camera. • The rear camera image may have a tint which is different from the rear ...camera lens. 12-EN This is high or low. - When it is high (such as mud, etc.) adhere to the camera or its peripheral area. - When water drops adhere to the camera..., or when the humidity is dark (at position B). When the temperature around the camera...camera's range of the car (from the actual surroundings. • Depending on these marks. About the rear camera... the distance from the rear of vision has a limit. In the ...
Owners Manual
Page 17
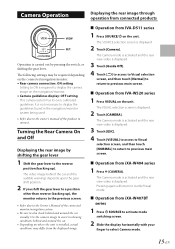
...[Guide Off]. 4 Touch [ ] to access to Visual selection screen, and then touch [Normal] to return to connect. The Camera mode is activated and the rear view video is carried out by shifting the gear lever 1 Shift the gear lever to the reverse position (backing up ), the monitor ...image. The SOURCE selection screen is installed, actual conditions may be required depending on where the unit is displayed. 2 Touch [Camera]. The Camera mode is activated and the rear view video is displayed. 3 Touch [ESC]. 4 Touch [VISUAL] to access to Visual selection screen, and then touch [NORMAL]...
...[Guide Off]. 4 Touch [ ] to access to Visual selection screen, and then touch [Normal] to return to connect. The Camera mode is activated and the rear view video is carried out by shifting the gear lever 1 Shift the gear lever to the reverse position (backing up ), the monitor ...image. The SOURCE selection screen is installed, actual conditions may be required depending on where the unit is displayed. 2 Touch [Camera]. The Camera mode is activated and the rear view video is displayed. 3 Touch [ESC]. 4 Touch [VISUAL] to access to Visual selection screen, and then touch [NORMAL]...

Owners Manual
Page 21
...ALPINE logo of the camera is facing up paint as possible to ensure the detection range of 180°. • Provide enough clearance for mounting the bracket. Adjust its vertical viewing angle to about 45° to the ground behind the vehicle. e Depth A maximum of 300 mm (11.8") from the tip of the rear... bumper • Install the camera as outward as necessary. (2) Make sure the mounting ...
...ALPINE logo of the camera is facing up paint as possible to ensure the detection range of 180°. • Provide enough clearance for mounting the bracket. Adjust its vertical viewing angle to about 45° to the ground behind the vehicle. e Depth A maximum of 300 mm (11.8") from the tip of the rear... bumper • Install the camera as outward as necessary. (2) Make sure the mounting ...
Owners Manual
Page 33
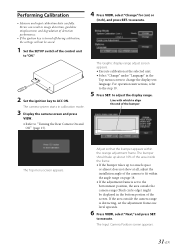
... screen appears. 31-EN The camera system starts in the bottom portion of detection performance. • If the ignition key is set the adjustment frame one level upwards. 6 Press VIEW, select "Next," and press SET. For operation instructions, refer to execute. Adjust so that ...frame is turned off during calibration, the settings will not be displayed in calibration mode. 3 Display the camera screen and press VIEW. • Refer to adjust the display range. to "Turning the Rear Camera On and Off " (page 15). 4 Press VIEW, select "Change" for (cm) or (Inch), and press SET.
... screen appears. 31-EN The camera system starts in the bottom portion of detection performance. • If the ignition key is set the adjustment frame one level upwards. 6 Press VIEW, select "Next," and press SET. For operation instructions, refer to execute. Adjust so that ...frame is turned off during calibration, the settings will not be displayed in calibration mode. 3 Display the camera screen and press VIEW. • Refer to adjust the display range. to "Turning the Rear Camera On and Off " (page 15). 4 Press VIEW, select "Change" for (cm) or (Inch), and press SET.


